Designer CUD Stored Procedures
This step-by-step walkthrough show how to map the create\insert, update, and delete (CUD) operations of an entity type to stored procedures using the Entity Framework Designer (EF Designer). By default, the Entity Framework automatically generates the SQL statements for the CUD operations, but you can also map stored procedures to these operations.
Note, that Code First does not support mapping to stored procedures or functions. However, you can call stored procedures or functions by using the System.Data.Entity.DbSet.SqlQuery method. For example:
var query = context.Products.SqlQuery("EXECUTE [dbo].[GetAllProducts]");
Considerations when Mapping the CUD Operations to Stored Procedures
When mapping the CUD operations to stored procedures, the following considerations apply:
- If you are mapping one of the CUD operations to a stored procedure, map all of them. If you do not map all three, the unmapped operations will fail if executed and an UpdateException will be thrown.
- You must map every parameter of the stored procedure to entity properties.
- If the server generates the primary key value for the inserted row, you must map this value back to the entity's key property. In the example that follows, the InsertPerson stored procedure returns the newly created primary key as part of the stored procedure's result set. The primary key is mapped to the entity key (PersonID) using the <Add Result Bindings> feature of the EF Designer.
- The stored procedure calls are mapped 1:1 with the entities in the conceptual model. For example, if you implement an inheritance hierarchy in your conceptual model and then map the CUD stored procedures for the Parent (base) and the Child (derived) entities, saving the Child changes will only call the Child’s stored procedures, it will not trigger the Parent’s stored procedures calls.
Prerequisites
To complete this walkthrough, you will need:
- A recent version of Visual Studio.
- The School sample database.
Set up the Project
- Open Visual Studio 2012.
- Select File-> New -> Project
- In the left pane, click Visual C#, and then select the Console template.
- Enter CUDSProcsSample as the name.
- Select OK.
Create a Model
Right-click the project name in Solution Explorer, and select Add -> New Item.
Select Data from the left menu and then select ADO.NET Entity Data Model in the Templates pane.
Enter CUDSProcs.edmx for the file name, and then click Add.
In the Choose Model Contents dialog box, select Generate from database, and then click Next.
Click New Connection. In the Connection Properties dialog box, enter the server name (for example, (localdb)\mssqllocaldb), select the authentication method, type School for the database name, and then click OK. The Choose Your Data Connection dialog box is updated with your database connection setting.
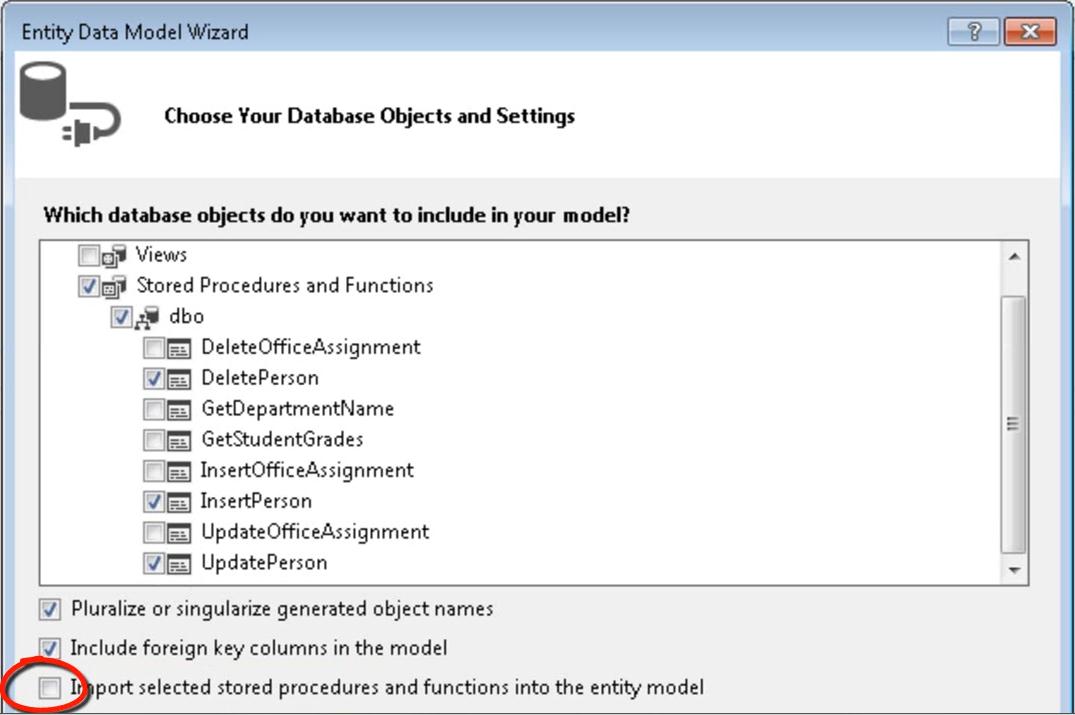
In the Choose Your Database Objects dialog box, under the Tables node, select the Person table.
Also, select the following stored procedures under the Stored Procedures and Functions node: DeletePerson, InsertPerson, and UpdatePerson.
Starting with Visual Studio 2012 the EF Designer supports bulk import of stored procedures. The Import selected stored procedures and functions into the entity model is checked by default. Since in this example we have stored procedures that insert, update, and delete entity types, we do not want to import them and will uncheck this checkbox.

Click Finish. The EF Designer, which provides a design surface for editing your model, is displayed.
Map the Person Entity to Stored Procedures
Right-click the Person entity type and select Stored Procedure Mapping.
The stored procedure mappings appear in the Mapping Details window.
Click <Select Insert Function>. The field becomes a drop-down list of the stored procedures in the storage model that can be mapped to entity types in the conceptual model. Select InsertPerson from the drop-down list.
Default mappings between stored procedure parameters and entity properties appear. Note that arrows indicate the mapping direction: Property values are supplied to stored procedure parameters.
Click <Add Result Binding>.
Type NewPersonID, the name of the parameter returned by the InsertPerson stored procedure. Make sure not to type leading or trailing spaces.
Press Enter.
By default, NewPersonID is mapped to the entity key PersonID. Note that an arrow indicates the direction of the mapping: The value of the result column is supplied to the property.

Click <Select Update Function> and select UpdatePerson from the resulting drop-down list.
Default mappings between stored procedure parameters and entity properties appear.
Click <Select Delete Function> and select DeletePerson from the resulting drop-down list.
Default mappings between stored procedure parameters and entity properties appear.
The insert, update, and delete operations of the Person entity type are now mapped to stored procedures.
If you want to enable concurrency checking when updating or deleting an entity with stored procedures, use one of the following options:
- Use an OUTPUT parameter to return the number of affected rows from the stored procedure and check the Rows Affected Parameter checkbox next to the parameter name. If the value returned is zero when the operation is called, an OptimisticConcurrencyException will be thrown.
- Check the Use Original Value checkbox next to a property that you want to use for concurrency checking. When an update is attempted, the value of the property that was originally read from the database will be used when writing data back to the database. If the value does not match the value in the database, an OptimisticConcurrencyException will be thrown.
Use the Model
Open the Program.cs file where the Main method is defined. Add the following code into the Main function.
The code creates a new Person object, then updates the object, and finally deletes the object.
    using (var context = new SchoolEntities())
    {
        var newInstructor = new Person
        {
            FirstName = "Robyn",
            LastName = "Martin",
            HireDate = DateTime.Now,
            Discriminator = "Instructor"
        }

        // Add the new object to the context.
        context.People.Add(newInstructor);

        Console.WriteLine("Added {0} {1} to the context.",
            newInstructor.FirstName, newInstructor.LastName);

        Console.WriteLine("Before SaveChanges, the PersonID is: {0}",
            newInstructor.PersonID);

        // SaveChanges will call the InsertPerson sproc.
        // The PersonID property will be assigned the value
        // returned by the sproc.
        context.SaveChanges();

        Console.WriteLine("After SaveChanges, the PersonID is: {0}",
            newInstructor.PersonID);

        // Modify the object and call SaveChanges.
        // This time, the UpdatePerson will be called.
        newInstructor.FirstName = "Rachel";
        context.SaveChanges();

        // Remove the object from the context and call SaveChanges.
        // The DeletePerson sproc will be called.
        context.People.Remove(newInstructor);
        context.SaveChanges();

        Person deletedInstructor = context.People.
            Where(p => p.PersonID == newInstructor.PersonID).
            FirstOrDefault();

        if (deletedInstructor == null)
            Console.WriteLine("A person with PersonID {0} was deleted.",
                newInstructor.PersonID);
    }
- Compile and run the application. The program produces the following output *
Note
PersonID is auto-generated by the server, so you will most likely see a different number*
Added Robyn Martin to the context.
Before SaveChanges, the PersonID is: 0
After SaveChanges, the PersonID is: 51
A person with PersonID 51 was deleted.
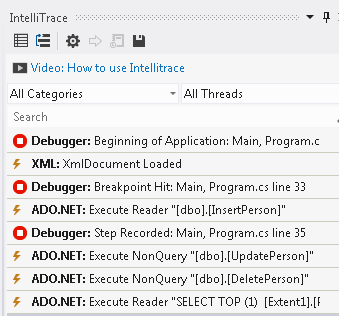
If you are working with the Ultimate version of Visual Studio, you can use Intellitrace with the debugger to see the SQL statements that get executed.

