Een Android-app voor Google Play-distributie publiceren
De meest voorkomende benadering voor het distribueren van Android-apps aan gebruikers is via Google Play. De eerste keer dat een app wordt verzonden naar Google Play, moet deze worden verzonden via de Google Play Console. Volgende versies van de app kunnen worden verzonden via Visual Studio. In beide gevallen is een Google Play Developer-account vereist. Apps die naar Google Play worden verzonden, vereisen goedkeuring van Google.
Als je een .NET Multi-platform App UI (.NET MAUI) Android-app wilt distribueren, moet je deze ondertekenen met een sleutel uit je sleutelarchief voordat je deze uploadt naar Google Play. Sleutelarchieven zijn binaire bestanden die fungeren als opslagplaatsen van certificaten en persoonlijke sleutels.
Google Play vereist dat u uw app indient als een Android App Bundle (AAB). Google Play gebruikt uw app-bundel om geoptimaliseerde Android-pakketten (APK) te genereren en te leveren voor elke apparaatconfiguratie, zodat alleen de code en resources die nodig zijn voor een specifiek apparaat, worden gedownload om uw app uit te voeren. Zie Over Android-app-bundels op developer.android.com voor meer informatie over Android-appbundels.
Het proces voor het distribueren van een .NET MAUI Android-app via Google Play is als volgt:
- Maak een Google Play Developer-account. Zie Een Google Play Developer-account makenvoor meer informatie.
- Maak uw app in Google Play Console. Zie Uw app maken in Google Play Consolevoor meer informatie.
- Stel uw app in op de Google Play Console. Zie Uw app instellen in Google Play Consolevoor meer informatie.
- Zorg ervoor dat uw app de juiste pakketindeling gebruikt. Zie Zorg voor de juiste pakketindelingvoor meer informatie.
- Bouw en onderteken uw app in Visual Studio en distribueer deze vervolgens via Google Play Console. Zie Uw app distribueren via Google Play Consolevoor meer informatie.
Vervolgens kunnen volgende versies van uw app worden gepubliceerd via Visual Studio. Zie Uw app distribueren via Visual Studiovoor meer informatie.
Een Google Play Developer-account maken
Als u Android-apps wilt publiceren in Google Play, moet u een Google Play Developer-account maken:
- Meld u met uw Google-account aan voor een Google Play Developer-account.
- Voer informatie in over uw ontwikkelaarsidentiteit.
- Tijdens het registratieproces moet u de Google Play Developer Distribution Agreementbekijken en accepteren.
- Betaal de eenmalige registratiekosten van $ 25.
- Controleer uw identiteit door de instructies in uw verificatie-e-mail te volgen.
Belangrijk
Identiteitsverificatie moet zijn voltooid voordat u apps kunt publiceren via Google Play. Bovendien moeten nieuwe persoonlijke accounthouders controleren of ze toegang hebben tot een echt Android-apparaat. Zie Apparaatverificatievereisten voor nieuwe ontwikkelaarsaccounts op support.google.com voor meer informatie.
Zodra uw Google Play Developer-account is gemaakt, kunt u beginnen met het proces voor het publiceren van een app naar Google Play.
Zie Registreren voor een Google Play Developer-account op support.google.com voor meer informatie.
Uw app maken in Google Play Console
Nadat u uw Google Play Developer-account hebt gemaakt, moet u een app maken in Google Play Console:
Meld u aan bij uw Google Play Developer-account.
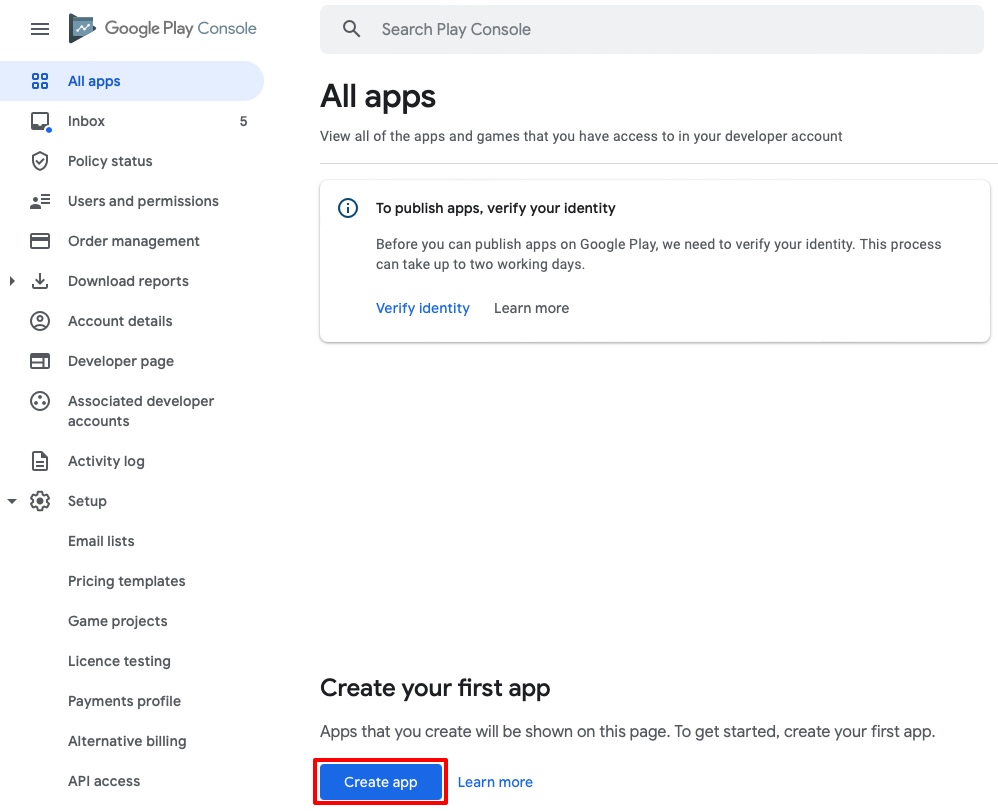
Selecteer in Google Play Consoleop het tabblad Alle apps de knop App maken:
Voer op de pagina App maken de app-gegevens in en selecteer de knop App maken:
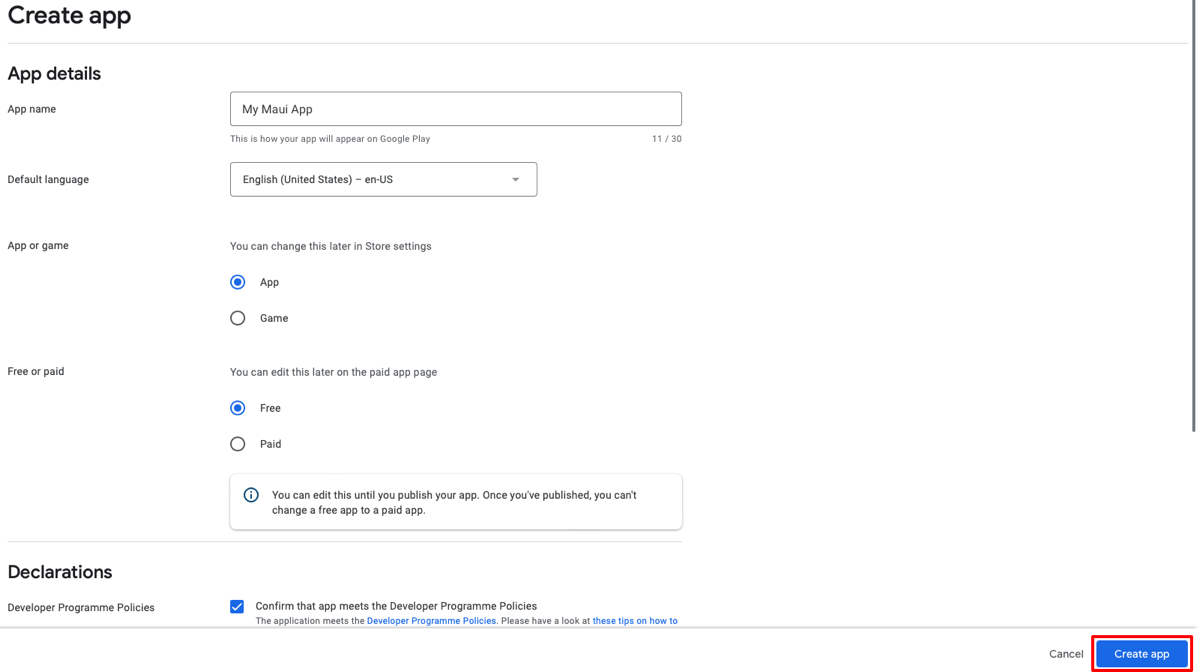
Zie Uw app maken en instellen op support.google.com voor meer informatie over het maken van een app in google Play Console.
Uw app instellen in Google Play Console
Nadat u uw app hebt gemaakt, moet u deze instellen. Het dashboard van uw app leidt u door alle belangrijkste stappen.
Als u de app wilt instellen, selecteert u Dashboard in het linkermenu. Onder de details van uw app boven aan de pagina vindt u verschillende categorieën en taken met betrekking tot het instellen en vrijgeven van apps. U moet de verplichte taken voltooien voordat u uw app op Google Play kunt starten. Wanneer u een taak voltooit, ziet u een groen vinkje en doorstreepte tekst. De voortgangsbalk boven aan de sectie wordt ook bijgewerkt. Zie Uw app instellen op het app-dashboard op support.google.com voor meer informatie.
Zorg ervoor dat het juiste pakketformaat wordt gebruikt
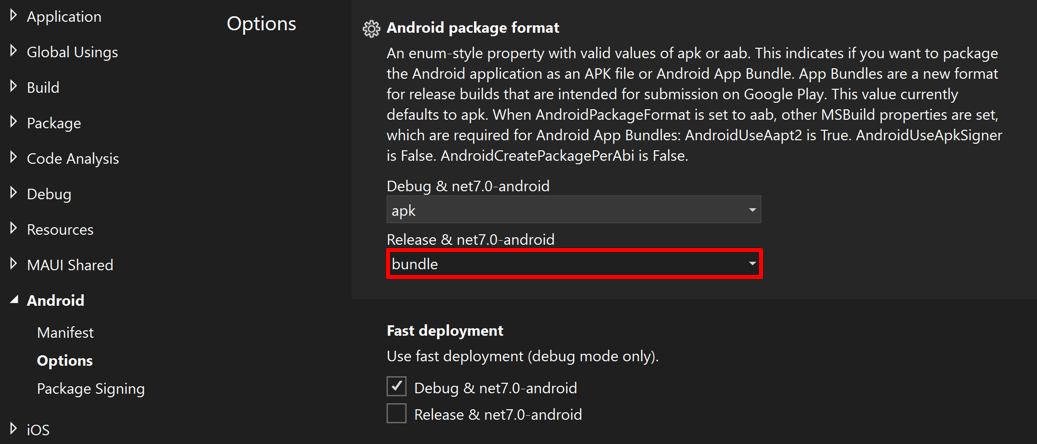
Als u een .NET MAUI Android-app voor Google Play-distributie wilt publiceren, moet de indeling van uw app-pakket AAB zijn. Dit is de standaardpakketindeling voor release-builds. Ga als volgt te werk om te controleren of de pakketindeling van uw app juist is ingesteld:
Klik in de Solution Explorer van Visual Studio met de rechtermuisknop op uw .NET MAUI-app-project en selecteer Eigenschappen. Navigeer vervolgens naar het tabblad Android->-opties en zorg ervoor dat de waarde van het veld Release is ingesteld op bundel:
 publiceren
Uw app distribueren via Google Play Console
De eerste keer dat een AAB naar Google Play wordt verzonden, moet deze handmatig worden geüpload via de Google Play Console. Hierdoor kan Google Play de handtekening van de sleutel op alle toekomstige bundels aanpassen aan de oorspronkelijke sleutel die wordt gebruikt voor de eerste versie van de app. Als u de app wilt uploaden via de Google Play Console, moet deze eerst worden gemaakt en aangemeld bij Visual Studio.
Uw app bouwen en ondertekenen in Visual Studio:
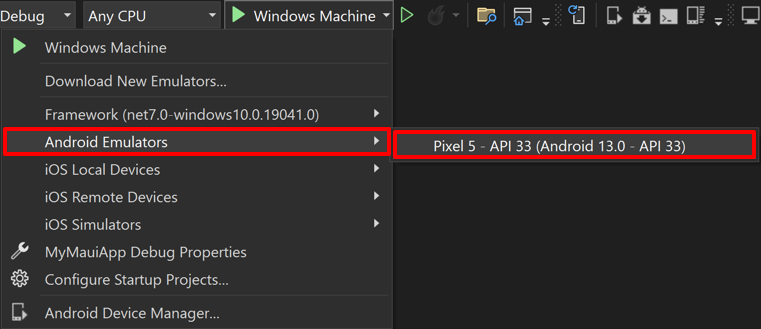
Gebruik op de werkbalk van Visual Studio de vervolgkeuzelijst Foutopsporingsdoel om Android Emulators te selecteren en vervolgens de gekozen emulator:
Gebruik op de werkbalk van Visual Studio de vervolgkeuzelijst Solutions Configuration om van de foutopsporingsconfiguratie naar de releaseconfiguratie te wijzigen:

Klik in Solution Explorer-met de rechtermuisknop op uw .NET MAUI-app-project en selecteer Publiceren...:
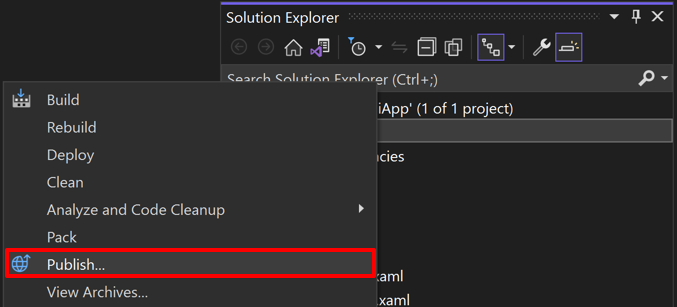
De Archive Manager- wordt geopend en Visual Studio begint met het archiveren van uw app-bundel:

Controleer in de Archive Manager-, zodra archivering is voltooid, of uw archief is geselecteerd en selecteer vervolgens de knop Distribueren ... om het proces van het distribueren van uw app te starten:
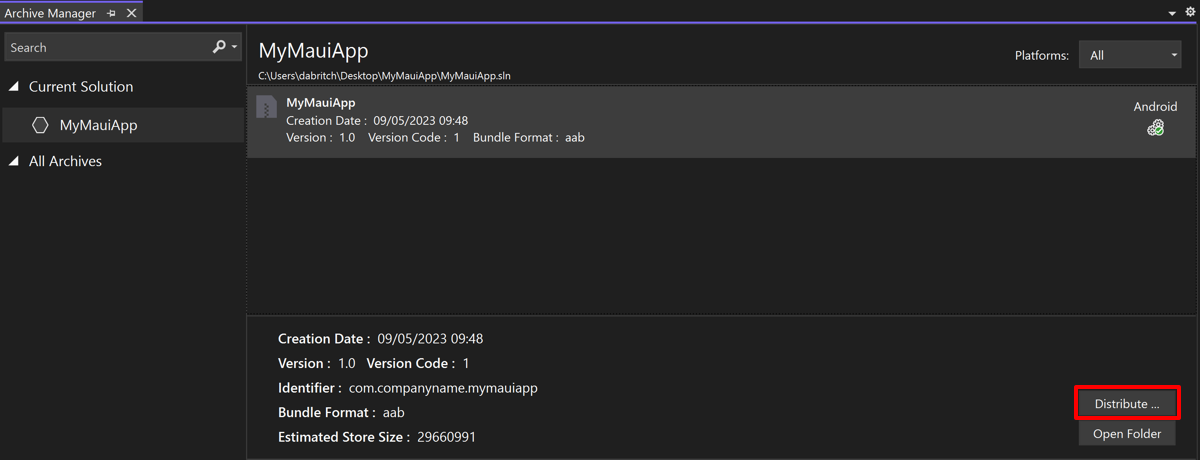
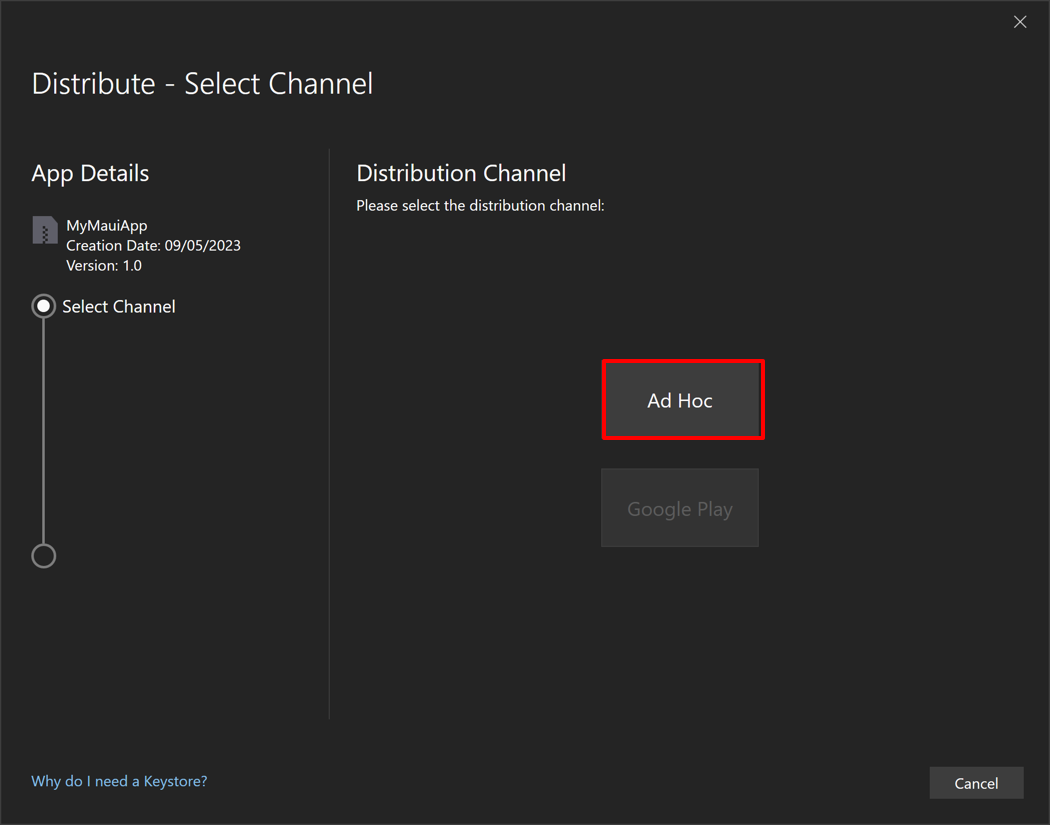
Het dialoogvenster Distribueren - Kanaal selecteren wordt weergegeven.
Selecteer in het dialoogvenster Distribueren - Kanaal selecteren de knop Ad Hoc:
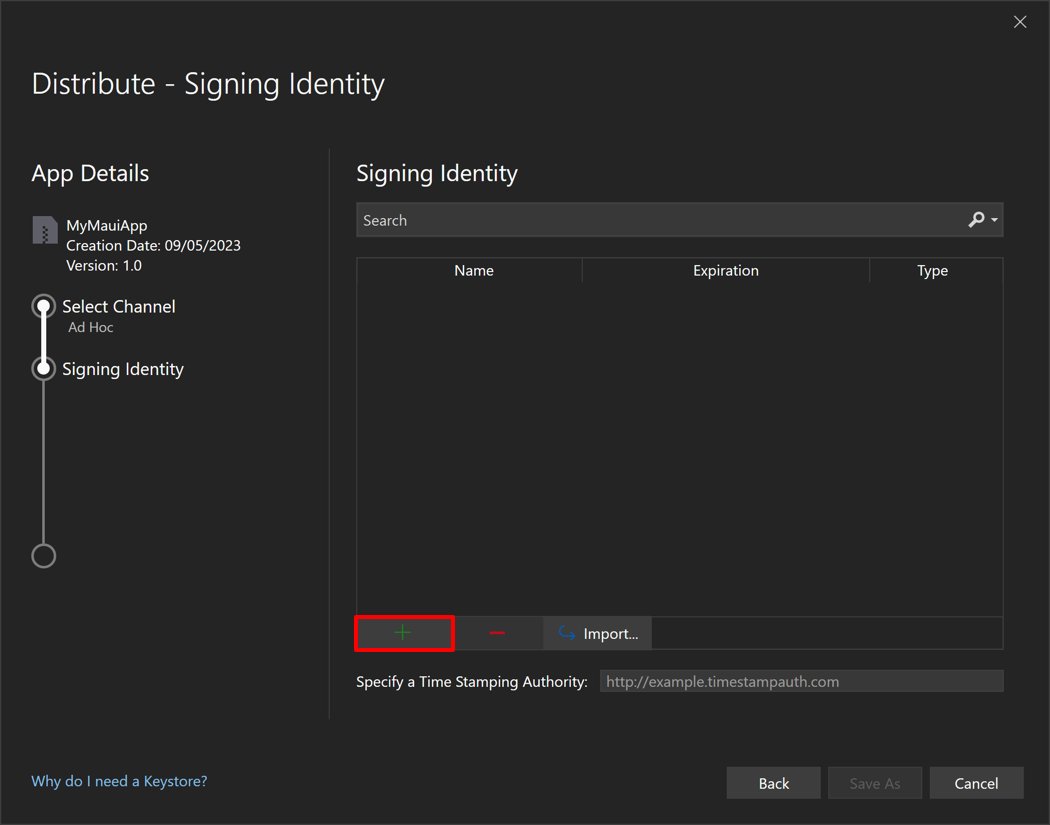
Selecteer in het dialoogvenster Distribueren - Ondertekeningsidentiteit de knop + om een nieuwe ondertekeningsidentiteit te maken:
Het dialoogvenster Android Keystore maken wordt weergegeven.
Notitie
U kunt ook een bestaande handtekeningidentiteit gebruiken door de knop Importeren te selecteren.
Voer in het dialoogvenster Android-sleutelarchief maken de vereiste gegevens in om een nieuwe ondertekeningsidentiteit te maken, ook wel een sleutelarchiefgenoemd, en selecteer vervolgens de knop Maken:
- Alias. Voer een identificatienaam in voor uw sleutel.
- Wachtwoord. Maak en bevestig een beveiligd wachtwoord voor uw sleutel.
- Geldigheid. Stel de tijdsduur in, in jaren, dat uw sleutel geldig is.
- Volledige naam, organisatie-eenheid, organisatie, plaats of lokaliteit, staat of provincie en landcode. Deze informatie wordt niet weergegeven in uw app, maar is opgenomen in uw certificaat.
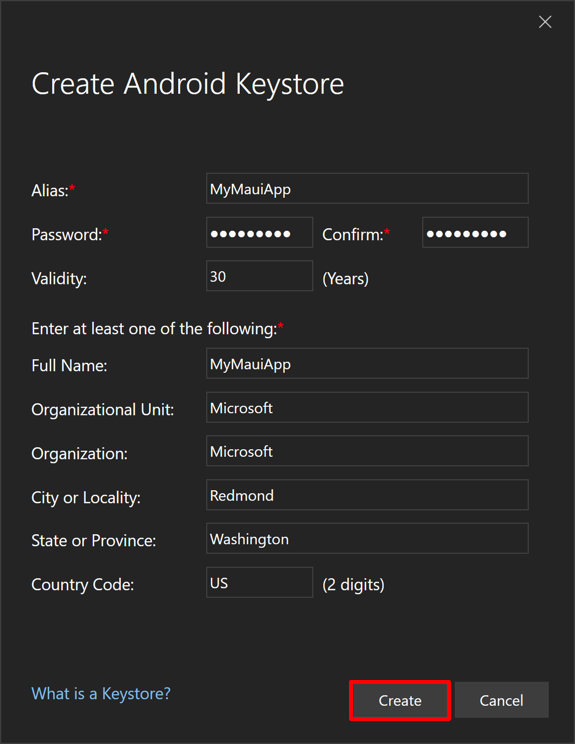
Een nieuw sleutelarchief, dat een nieuw certificaat bevat, wordt opgeslagen in C:\Users{Username}\AppData\Local\Xamarin\Mono voor Android\Keystore{Alias}{Alias}.keystore.
Belangrijk
Het sleutelarchief en wachtwoord worden niet opgeslagen in uw Visual Studio-oplossing. Zorg er daarom voor dat u een back-up maakt van deze gegevens. Als u deze kwijtraakt, kunt u uw app niet ondertekenen met dezelfde ondertekeningsidentiteit.
Selecteer in het dialoogvenster Distribueren - Ondertekeningsidentiteit uw zojuist gemaakte ondertekeningsidentiteit en selecteer de knop Opslaan als:
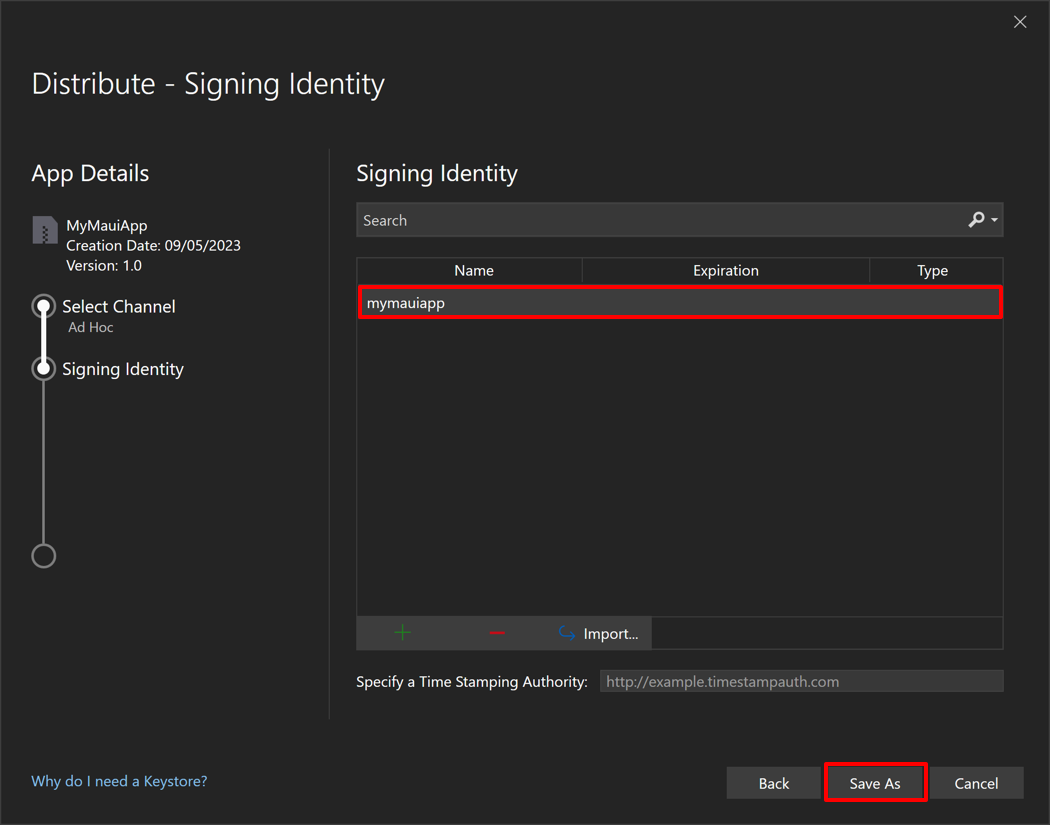
In de Archive Manager wordt het publicatieproces weergegeven.
Controleer in het dialoogvenster Opslaan als of de locatie en bestandsnaam voor uw pakket juist zijn en selecteer de knop Opslaan.
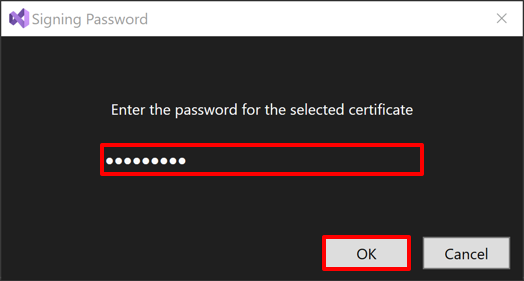
Voer in het dialoogvenster Handtekeningwachtwoord uw wachtwoord voor ondertekeningsidentiteit in en selecteer de knop OK:

Selecteer in de Archive Manager-de knop Distributie openen zodra het publicatieproces is voltooid:
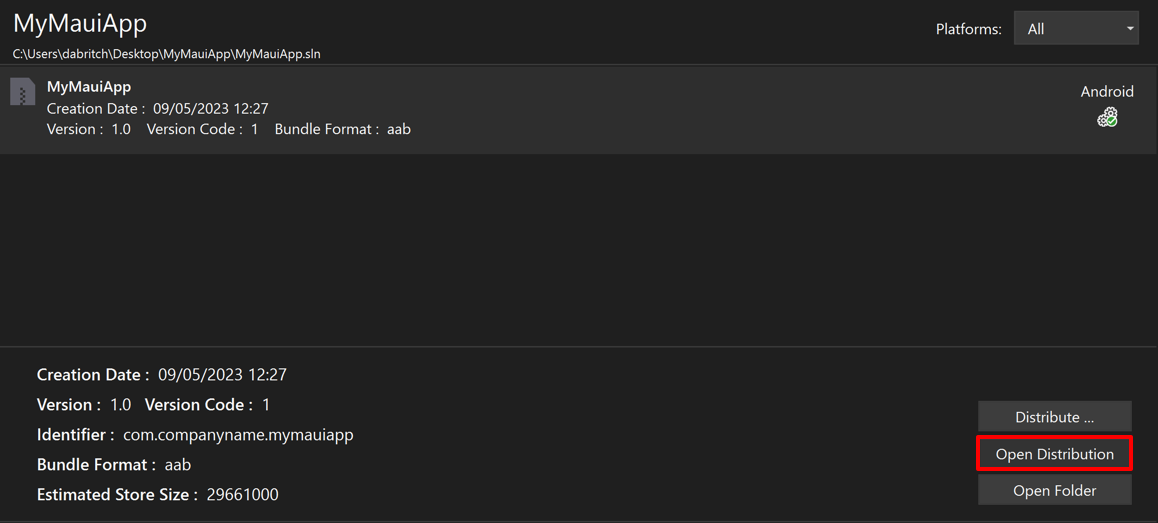
Visual Studio opent de map met de gepubliceerde app.
De gepubliceerde app kan vervolgens via de Google Play-console worden vrijgegeven aan Google Play. Hiervoor moet u eerst een release maken in Google Play Console. Een release is een combinatie van een of meer app-versies die u voorbereidt om een app te starten of een update uit te rollen. U kunt een release maken op de volgende kanalen:
- Interne testen. Interne testreleases zijn beschikbaar voor maximaal 100 testers die u kunt kiezen.
- Gesloten testfase. Gesloten testversies zijn beschikbaar voor een beperkt aantal testers die u kiest, die een voorlopige versie van uw app kunnen testen en feedback kunnen verzenden.
- Open testen. Open testversies zijn beschikbaar voor testers op Google Play. Gebruikers kunnen deelnemen aan tests vanuit uw Store-vermelding.
- Productie. Productieversies zijn beschikbaar voor alle Google Play-gebruikers in uw gekozen landen.
Zie Een release voorbereiden en implementeren op support.google.com voor meer informatie over het maken van een release in Google Play Console.
Belangrijk
De app die naar Google Play wordt verzonden, ondergaat doorgaans een beoordelingsproces. Zie Uw app voorbereiden voor beoordeling en Uw app publiceren op support.google.com voor meer informatie.
Uw app distribueren via Visual Studio
Een AAB moet reeds bij Google Play zijn ingediend en de beoordeling succesvol hebben doorstaan voordat u deze vanuit Visual Studio kunt distribueren. Als u probeert een AAB te distribueren vanuit Visual Studio die nog niet is geüpload vanuit de Play Console, krijgt u de volgende foutmelding:
Google Play vereist dat u uw eerste pakket (APK/AAB) handmatig uploadt voor deze app. Hiervoor kunt u een ad-hocpakket gebruiken.
Wanneer deze fout optreedt, uploadt u handmatig een AAB via de Google Play Console. Volgende releases van de app kunnen vervolgens worden gepubliceerd via Visual Studio. U moet echter de versiecode van de app voor elke upload wijzigen, anders treedt de volgende fout op:
Er is al een AAB met versiecode (1) geüpload.
U kunt deze fout oplossen door de app opnieuw te bouwen met een ander versienummer en deze vervolgens opnieuw in te dienen bij Google Play via Visual Studio.
Notitie
Het versienummer van de app kan worden bijgewerkt door de waarde van de eigenschap ApplicationVersion geheel getal in het projectbestand van de app te verhogen.
Als u uw app uploadt van Visual Studio naar Google Play, moet u eerst API-toegang instellen in de Google Play-console.
Google API-toegang inschakelen
Met de Google Play Developer Publishing-API kan Visual Studio nieuwe versies van een app uploaden naar Google Play. Voordat Visual Studio API-aanroepen kan maken, moet u API-toegang instellen in uw Google Play Developer-account. Dit omvat het koppelen van uw Google Play Developer-account aan een Google Cloud-project en het configureren van toegang tot de Google Play Developer Publishing-API met een OAuth-client.
Google API-toegang inschakelen:
Meld u aan bij uw Google Play Developer-account.
Vouw in Google Play Consolehet item Setup uit en selecteer API-toegang. Selecteer vervolgens op de pagina API-toegang de knop Kies een project om te koppelen.
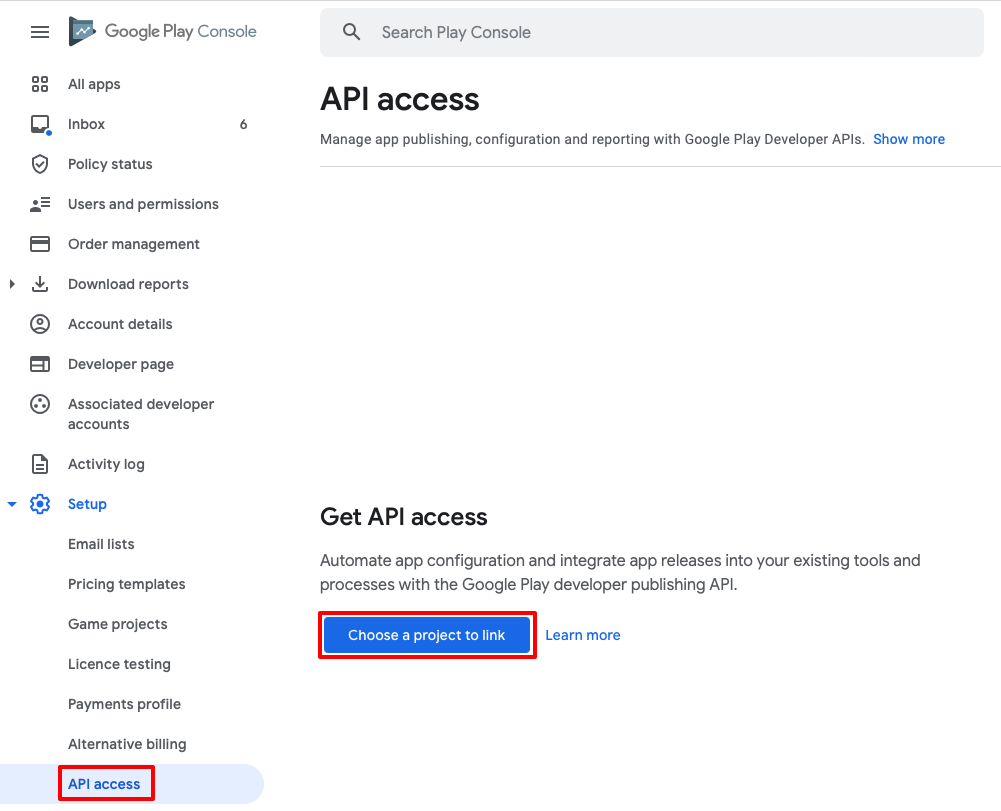
Als u Google Play Developer API's wilt gebruiken, hebt u een Google Cloud-project nodig dat moet worden gekoppeld aan uw Google Play Developer-account.
Notitie
Een Google Play Developer-account kan slechts worden gekoppeld aan één Google Cloud-project. Als u dus meerdere apps publiceert vanuit één Google Play Developer-account, moeten ze allemaal hetzelfde Google Cloud-project delen.
In de API-toegang pagina selecteer je het keuzerondje Een nieuw Google Cloud-project maken, gevolgd door de knop Opslaan.
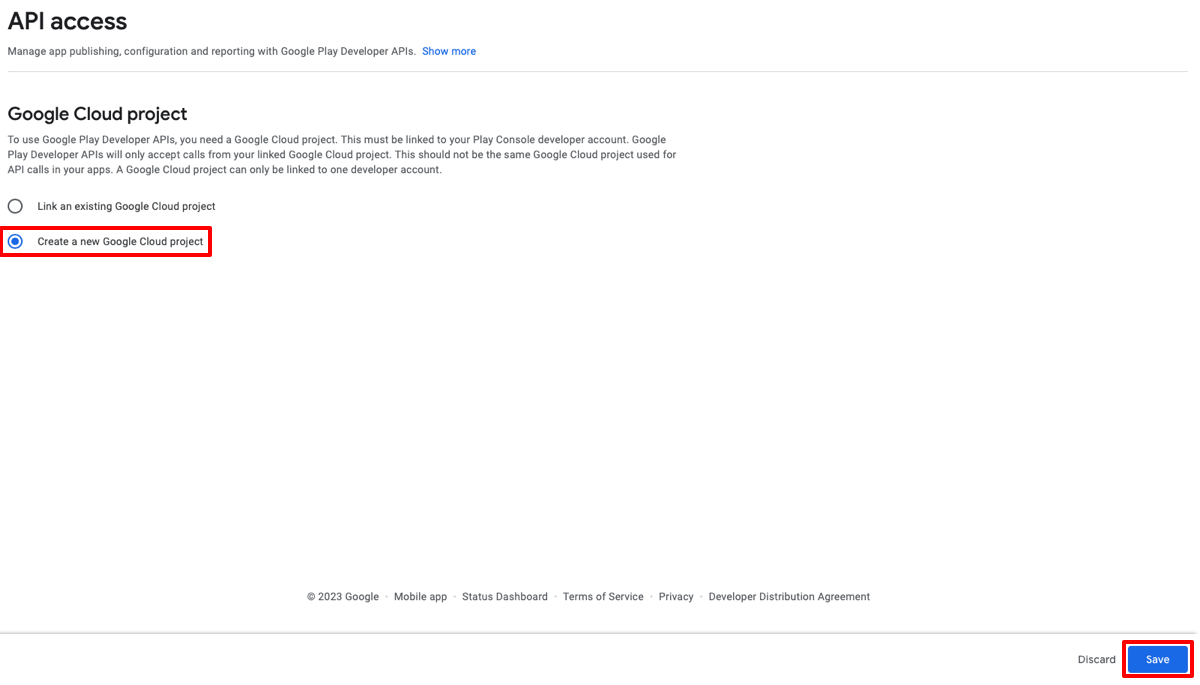
Er wordt een nieuw Google Cloud-project gemaakt en gekoppeld aan uw Google Play Developer-account.
Selecteer op de pagina API-toegang in de sectie OAuth-clientsOAuth-toestemmingsscherm configureren:
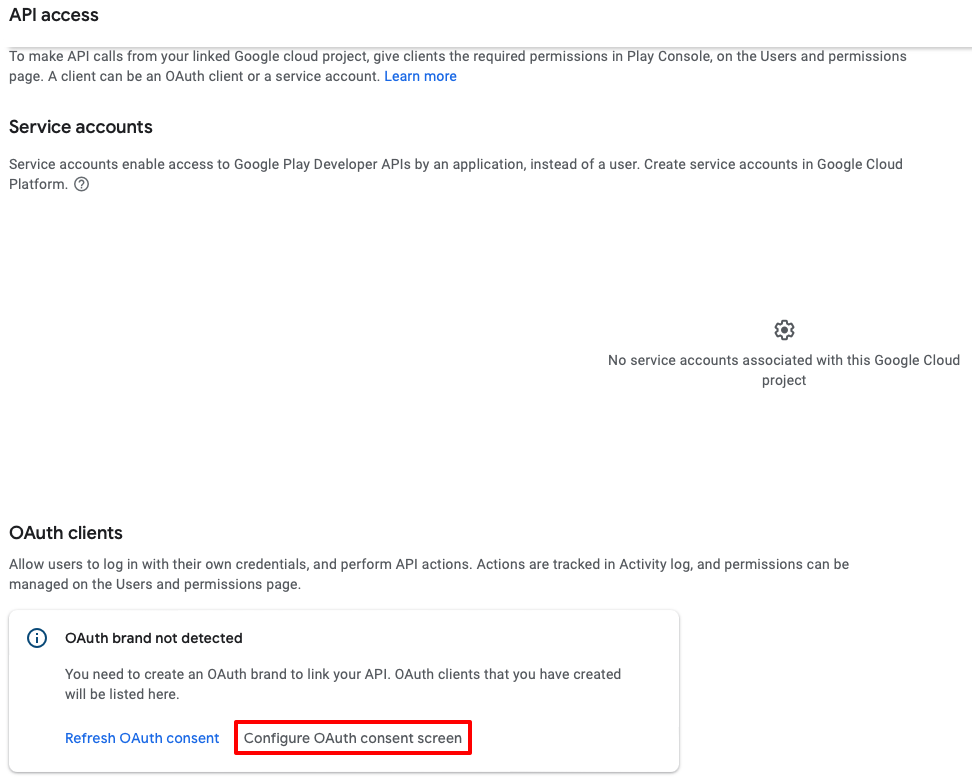
Selecteer op de pagina van het OAuth-toestemmingsscherm het gewenste keuzerondje voor het gebruikerstype en selecteer vervolgens de knop MAKEN.

Zie gebruikerstype op support.google.com voor meer informatie over de gebruikerstypen.
Vul op de pagina Bewerken van de app-registratie de velden in die zijn gemarkeerd als vereist en klik vervolgens op de knop OPSLAAN EN DOORGAAN:
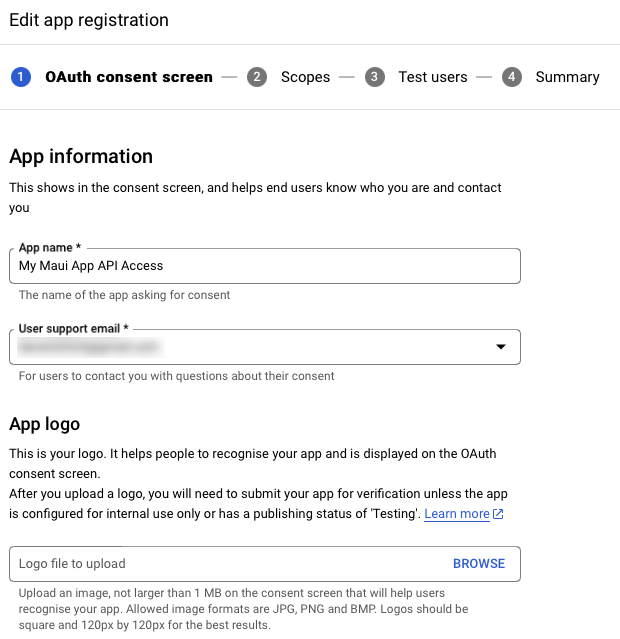
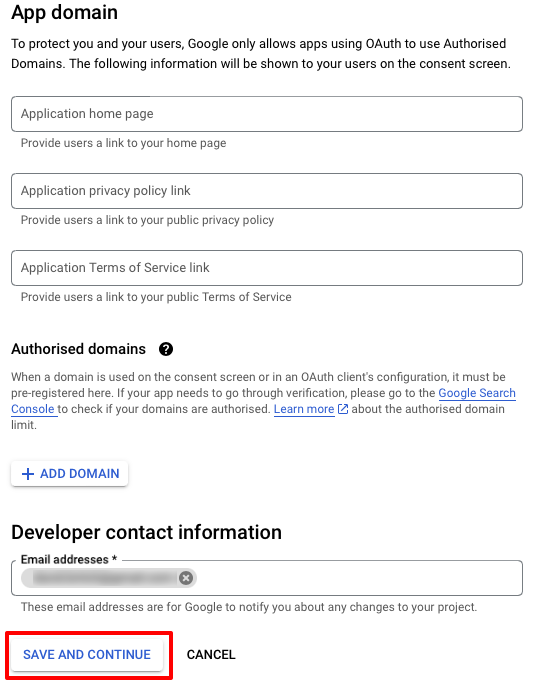
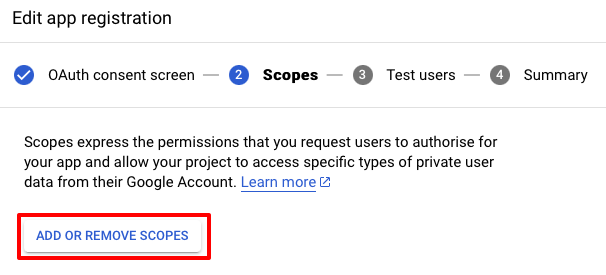
Op de pagina App-registratie bewerken selecteert u de knop BEREIK TOEVOEGEN OF VERWIJDEREN:
Selecteer in de Geselecteerde bereiken bijwerken flyout het
./auth/androidpublisherbereik in de tabel en selecteer vervolgens de knop bijwerken: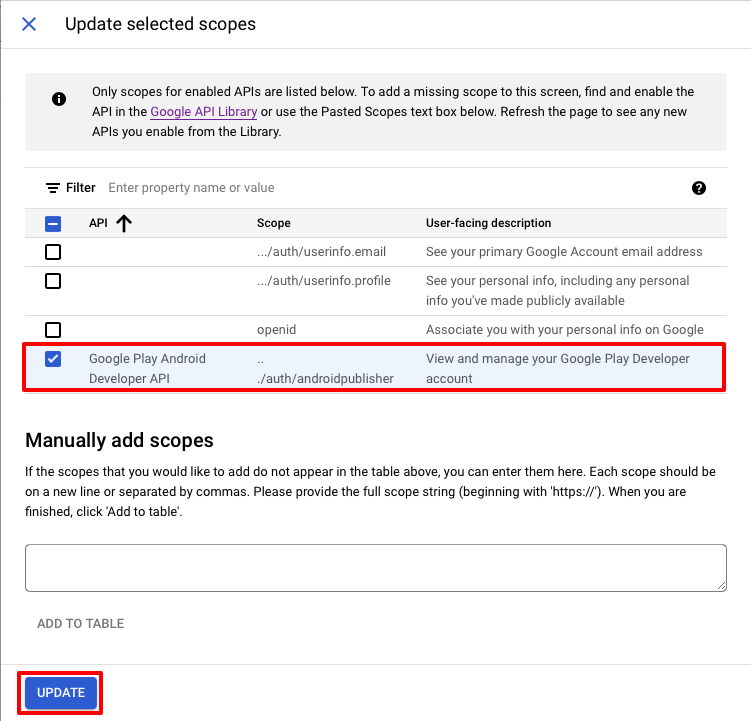
Notitie
De andere scoops in de tabel kunnen optioneel worden geselecteerd omdat het standaardscoops zijn.
Selecteer op de pagina App-registratie bewerken het tabblad Referenties:

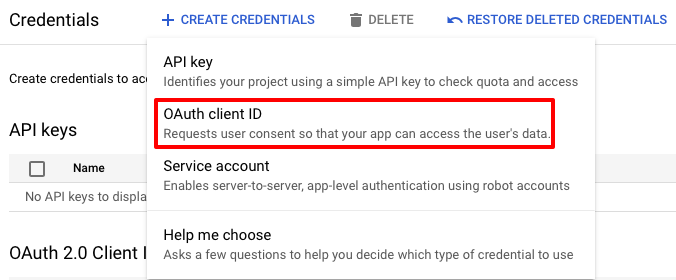
Selecteer op de pagina Referenties de knop + CREATE CREDENTIALS en vervolgens het OAuth-client-ID item:
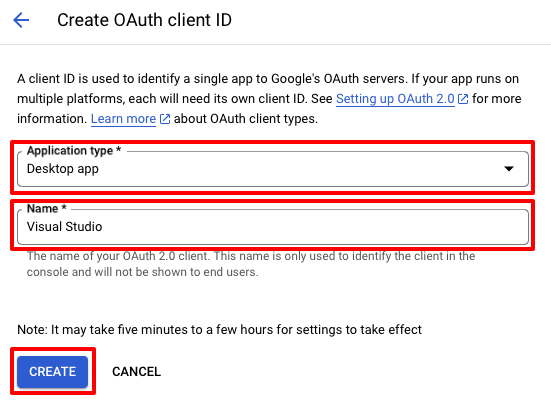
Kies op de pagina OAuth-client-id makenDesktop-app in de vervolgkeuzelijst Toepassingstype, voer Visual Studio- in het veld Naam in en selecteer vervolgens de knop MAKEN:
In het dialoogvenster OAuth-client die is gemaakt, selecteer de knop JSON downloaden om uw client-id en clientsleutel te downloaden. Dit is later vereist. Klik vervolgens op de knop OK om het dialoogvenster te sluiten.
Zie Aan de slag op developers.google.com voor meer informatie over het inschakelen van Google API-toegang tot uw Google Play Developer-account. Zie Uw OAuth-toestemmingsscherm instellen op support.google.com voor meer informatie over het instellen van uw OAuth-toestemmingsscherm.
Uw app uploaden via Visual Studio
Uw app bouwen en ondertekenen in Visual Studio:
Gebruik op de werkbalk van Visual Studio de vervolgkeuzelijst Foutopsporingsdoel om Android Emulators te selecteren en vervolgens de gekozen emulator:

Gebruik op de werkbalk van Visual Studio de vervolgkeuzelijst Solutions Configuration om van de foutopsporingsconfiguratie naar de releaseconfiguratie te wijzigen:

Klik in Solution Explorer-met de rechtermuisknop op uw .NET MAUI-app-project en selecteer Publiceren...:

De Archive Manager- wordt geopend en Visual Studio begint met het archiveren van uw app-bundel:

Controleer in de Archive Manager-, zodra archivering is voltooid, of uw archief is geselecteerd en selecteer vervolgens de knop Distribueren ... om het proces van het distribueren van uw app te starten:

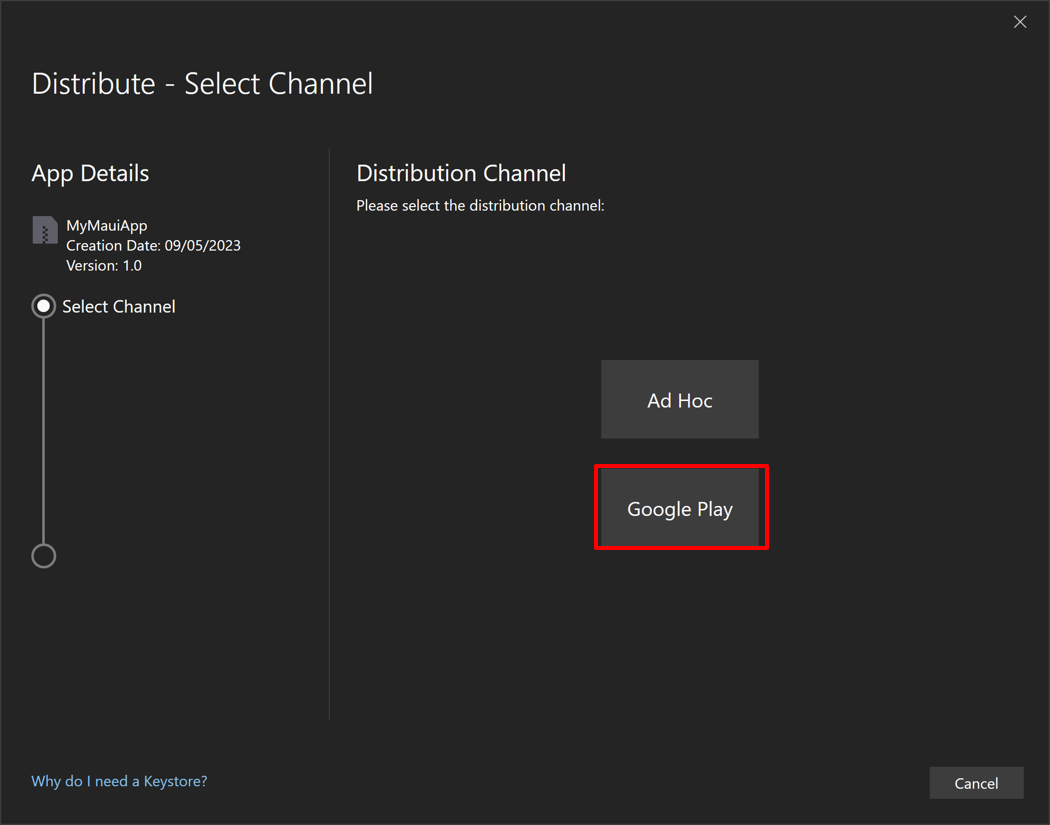
Het dialoogvenster Distribueren - Kanaal selecteren wordt weergegeven.
Selecteer in het dialoogvenster Distribueren - Kanaal selecteren de knop Google Play:
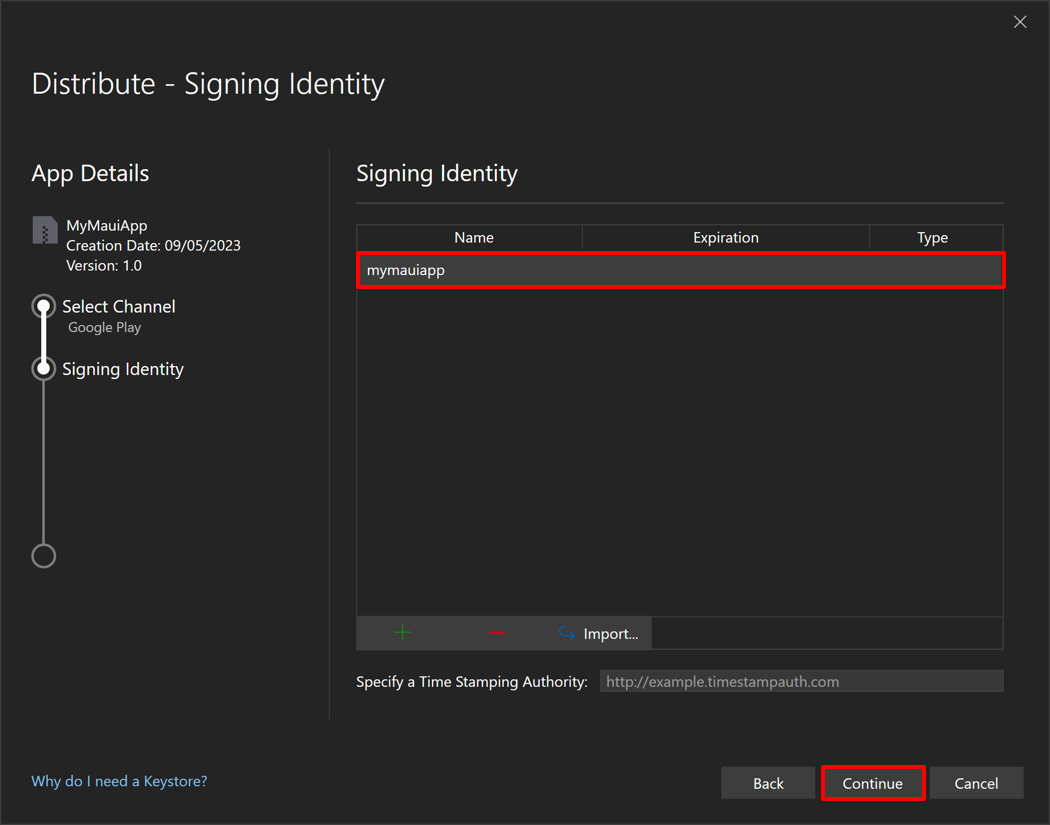
Selecteer in het dialoogvenster Distribueren - Ondertekeningsidentiteit de ondertekeningsidentiteit die u hebt gemaakt bij het bouwen van de app voor distributie via de Google Play Console en selecteer vervolgens de knop Doorgaan:
Details van uw Google Play Developer-account toevoegen
Uw Google Play Developer-account toevoegen aan Visual Studio:
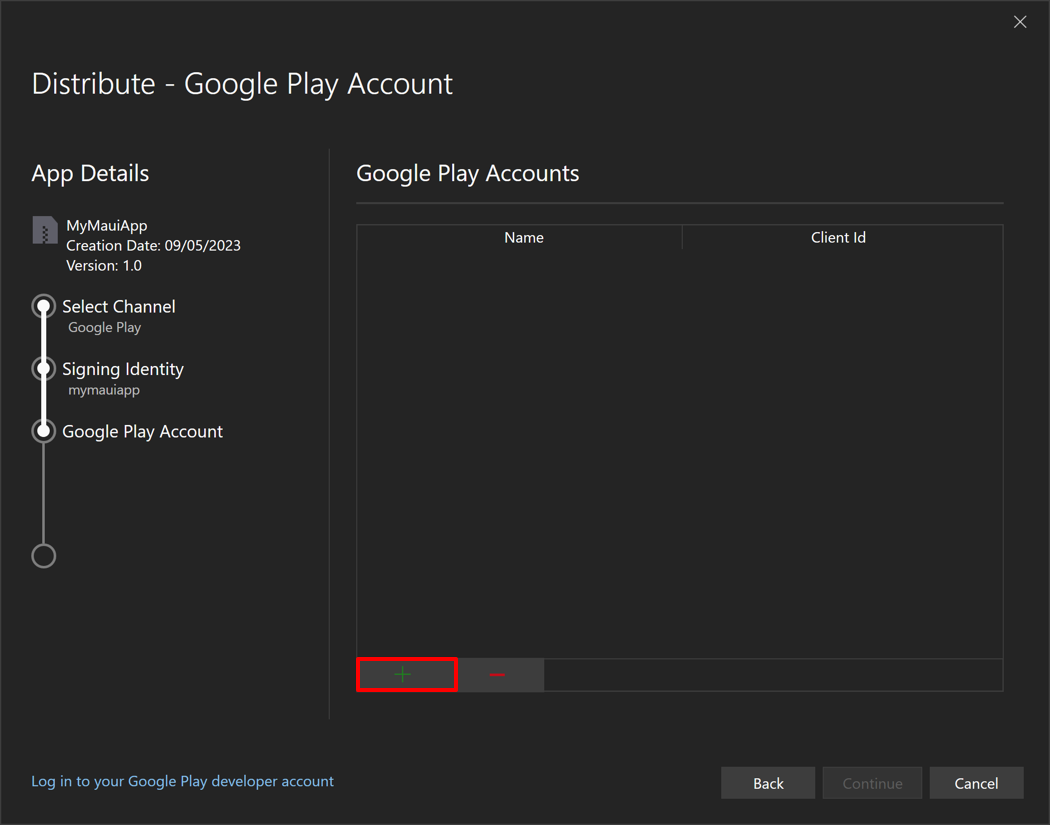
Selecteer in het dialoogvenster Distribueren - Google Play-account de knop + om uw Google Play Developer-accountgegevens toe te voegen:
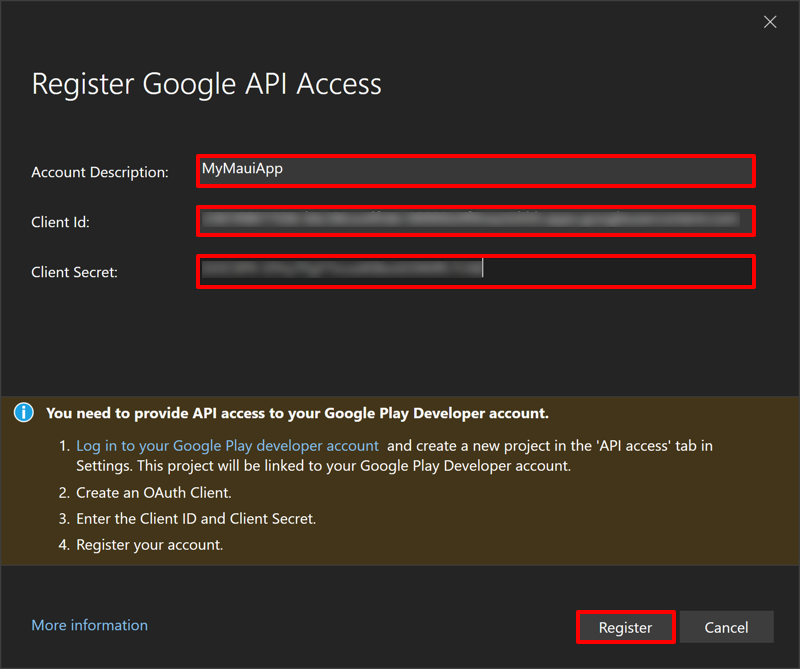
Voer in het dialoogvenster Google API Access registreren een beschrijving en uw OAuth-client-id en clientgeheim in en klik vervolgens op de knop Registreren:
Notitie
Met de accountbeschrijving kunt u meer dan één Google Play Developer-account registreren en apps uploaden naar verschillende Google Play Developer-accounts.
Er wordt een webbrowser geopend.
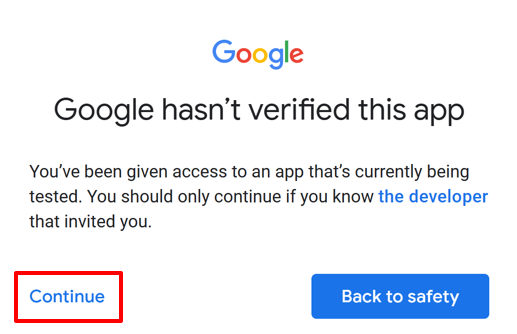
Meld u in de webbrowser aan bij uw Google Play Developer-account. Nadat u zich hebt aangemeld, wordt mogelijk een bericht weergegeven waarin staat dat Google de app niet heeft geverifieerd. Als dit gebeurt, selecteert u de knop Doorgaan:
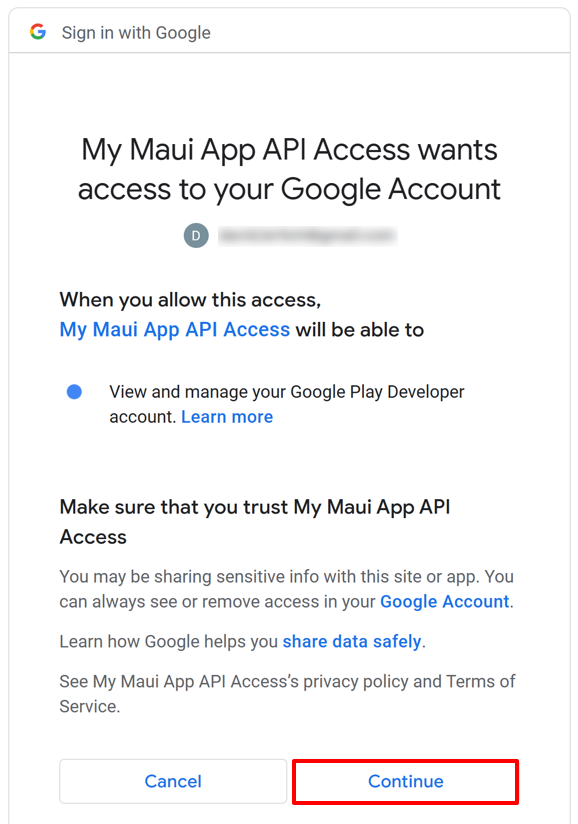
Selecteer in de webbrowser de knop Doorgaan om de app te autoriseren:
De webbrowser ontvangt een verificatiecode.
Belangrijk
Sluit de webbrowser niet.
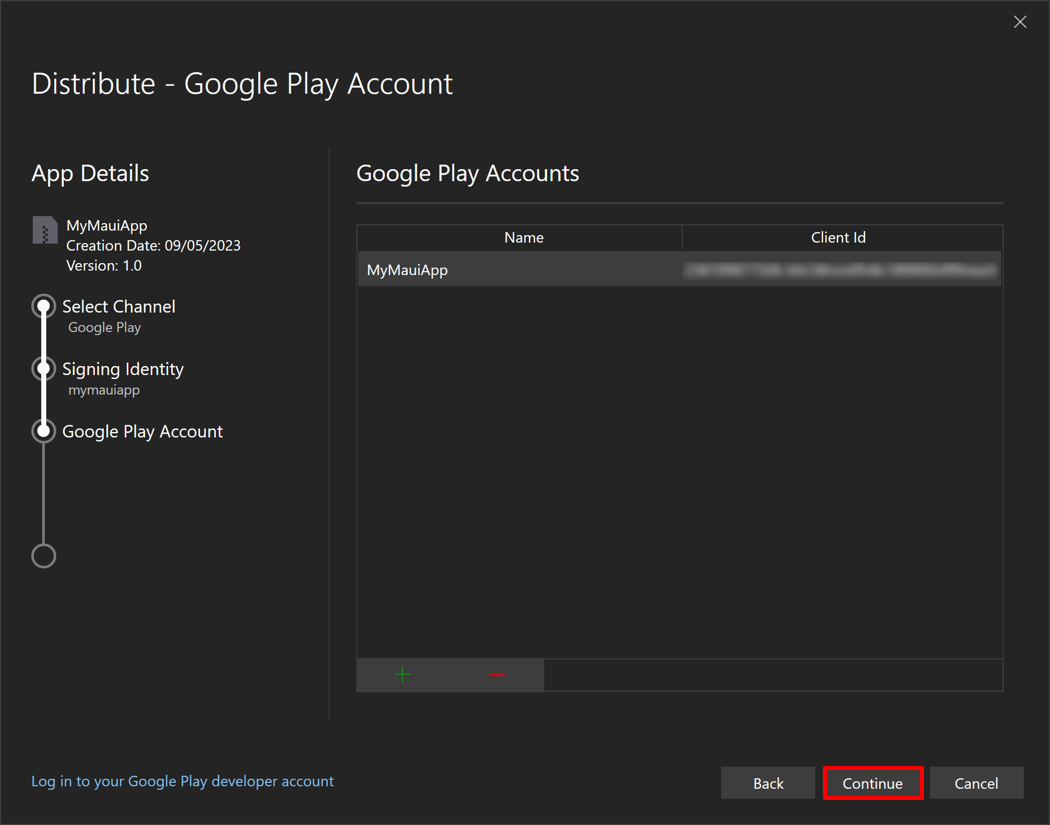
Selecteer in Visual Studio in het dialoogvenster Distribueren - Google Play-accountDoorgaan:
Selecteer een track om uw app te uploaden naar
De Google Play-track selecteren om uw app te uploaden naar:
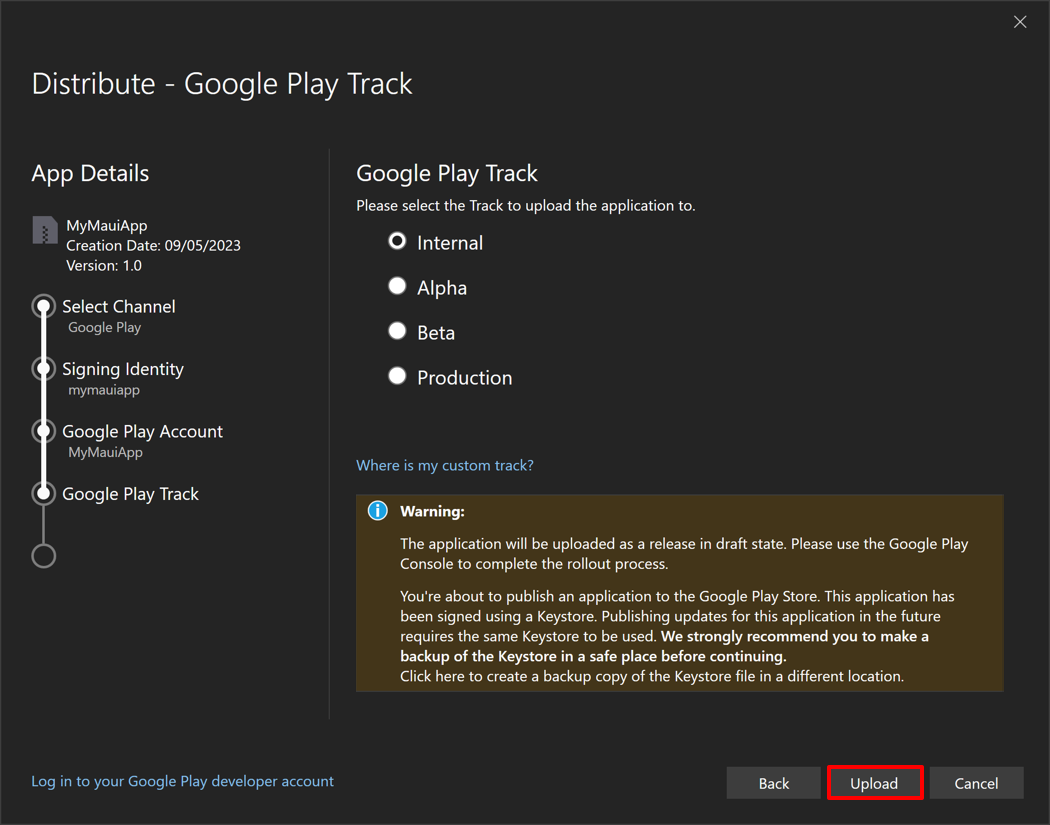
Selecteer in het dialoogvenster Distribueren - Google Play Track het nummer waarin u uw app wilt uploaden. Google Play biedt vijf nummers voor het uploaden van uw app:
- Intern moet worden gebruikt voor het snel distribueren van uw app voor interne tests en kwaliteitscontroles.
- Alfa moet worden gebruikt voor het uploaden van een vroege versie van uw app naar een kleine groep testers.
- Bèta moet worden gebruikt voor het uploaden van een vroege versie van uw app naar een grotere groep testers.
- Productie moet worden gebruikt voor volledige distributie naar de Google Play Store.
- Aangepast moet worden gebruikt voor het testen van voorlopige versies van uw app met specifieke gebruikers door een lijst met testers per e-mailadres te maken.
Belangrijk
Als u het aangepaste nummer niet ziet, controleert u of u een release voor dat nummer hebt gemaakt in de Google Play Console. Zie Een release- voorbereiden en implementeren op support.google.com voor meer informatie.
Selecteer het spoor om uw app naartoe te uploaden en selecteer vervolgens de knop Upload:
Zie Een open, gesloten of interne test instellen op support.google.com voor meer informatie over Google Play-tests.
Visual Studio begint met het publiceren van uw app naar Google Play. Voer in het dialoogvenster Wachtwoord voor ondertekening uw wachtwoord in dat u hebt gemaakt voor de ondertekeningsidentiteit en selecteer de knop OK:
Visual Studio ondertekent uw app-bundel en uploadt deze naar Google Play.
Belangrijk
De app die naar Google Play wordt verzonden, ondergaat doorgaans een beoordelingsproces. Zie Uw app voorbereiden voor beoordeling en Uw app publiceren op support.google.com voor meer informatie.
