Working with Microsoft Project Server 2010 Integration in the Dynamics AX 2012 Feature Pack Demo VM: Part One
Overview:
In this guide we will walk through the functionality available out of the box with Project Server 2010 integration utilizing the latest Microsoft Dynamics AX 2012 Feature Pack Demo Virtual Machine available on PartnerSource. For more detailed information regarding the overall setup of the Project Server 2010 integration with Dynamics AX 2012, please see the following White Paper.
Part One of this guide will focus on setting up the general integration components. Part Two will walkthrough using the integration to synchronize projects and resources between Dynamics AX 2012 and Project Server 2010.
Getting Started:
This guide assumes you have access to an instance of the Dynamics AX 2012 Feature Pack image. The installation and configuration of the base demo image is beyond the scope of this guide.
The Dynamics AX 2012 Feature pack image requires the installation of the following components to enable integration with Project Server 2010:
- Synchronization proxy for Microsoft Project Server
- Synchronization service for Microsoft Project server
To install these components we will need to download a copy of the Microsoft Dynamics AX 2012 Feature Pack media in ISO format. The media may be downloaded from PartnerSource.
With the AX 2012 Feature Pack ISO mounted to DVD drive under the Dynamics AX 2012 FP Hyper-V server settings, we’re ready to get started.
Installation and Configuration:
Step 1. Log into the Dynamics AX 2012 FP environment as Contoso\Administrator
Step 2. Copy the contents of the D: drive to a new folder on the C: drive named “axinstall”
Note: If you attempt to perform the installation directly from the DVD the setup will halt with a dialog prompting for the disk to be inserted.
Step 3. Launch the Dynamics AX 2012 Setup from “C:\axinstall\Dynamics AX\Setup.exe” and select Microsoft Dynamics AX components under Install
Step 4. Proceed through the setup dialogs until you reach the Add or Modify components screen. Select the Microsoft Project Server integration components.
Step 5. Click the Next button, you should pass the Prerequisite Validation and will then be required to enter the service account information
Step 6. After entering the service account information the next screen will allow you to connect to a message queue. Select “Connect to an existing queue” and leave the default address value.
Step 7. Click next accepting the default values for the AOS service account
Step 8. On the Connect to Microsoft Project Server screen enter the following Project web access URL: https://project.contoso.com/PWA/
Step 9. After clicking the Next button and completing the installation the following screen will confirm that the setup was successful
Step 10. Open Internet Explorer from the taskbar and launch the Project Web App from the Favorites pane
The URL for PWA on the FP image is: https://project.contoso.com/PWA/default.aspx
If PWA is functioning properly you should see the following page in Internet Explorer:
Step 11. Open the Dynamics AX 2012 client and select the SUSB company which is the default company for the Services Industry
Step 12. Navigate to System Administration -> Setup -> Microsoft Project Server integration -> Integration settings
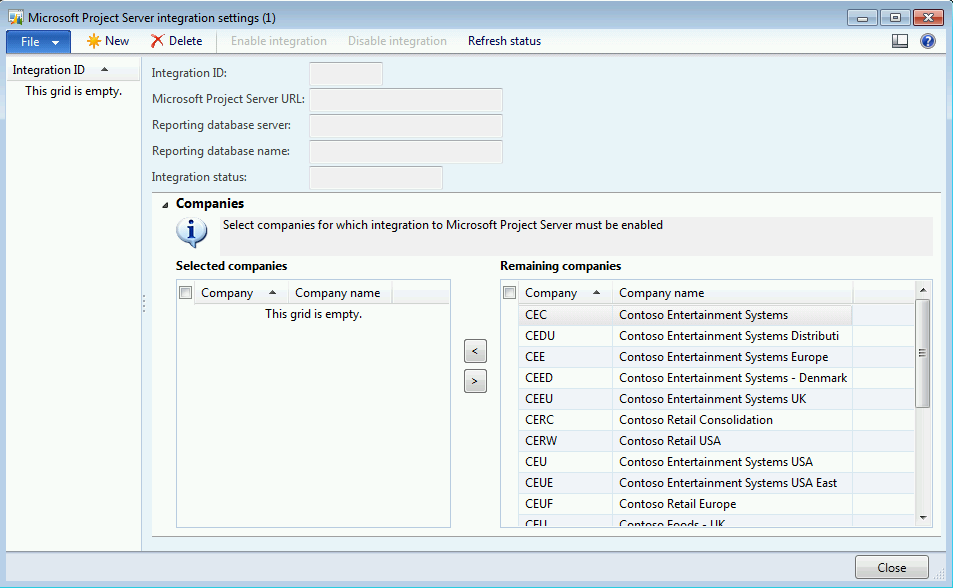
Step 13. Open the Integration settings form to view the current configuration. The integration id grid is empty, so we will create a new integration configuration record.
This is where we run into a data issue in the FP image because there is actually data linking the SUSB company to an integration ID in the supporting database tables.
Before creating the integration, we must first clear out the sync tables that have invalid data.
Step 14. Open SQL Server Management Studio from Windows Start Menu-> All Programs -> Microsoft SQL Server 2008 R2 -> SQL Server Management Studio and connect to localhost.
Step 15. From SQL Server Management Studio click on New Query and enter the following:
To run the script click on the Execute button in the toolbar:
You may now close SQL Server Management Studio without saving any files.
Step 16. Close and re-open the Microsoft Project Server integration settings form in the Dynamics AX 2012 client. The selected companies list box should now display the “This grid is empty.” message.
Step 17. Click on the New button in the Microsoft Project Server integration settings form and enter the following:
Integration ID: App1
Microsoft Project Server URL: https://project.contoso.com/PWA/default.aspx
Reporting database server: localhost
Reporting database name: ProjectServer_Reporting
Under the Companies fast tab select the SUSB company using the left arrow button.
Step 18. With the settings entered into the Microsoft Project Server integration settings form, click on the Enable integration button
The Integration status should change to “In progress”, clicking the Refresh status button will update the form so that you may check for completion.
Step 19. Once the integration has completed you should now see “Completed” in the status field.
Note: If the status stays in progress for more than five minutes I recommend clicking “Disable integration”, deleting the integration record and recreating it.
Conclusion:
In Part One of this guide we have walked through the steps required to install the Project Server 2010 integration components on the Microsoft Dynamics AX 2012 Feature Pack release demo virtual machine image. In Part Two of this guide we will walk through the process of enabling resources and projects for synchronization. We will also take a look at ways to troubleshoot the integration from the perspective of both Dynamics AX and Project Server.
Comments
- Anonymous
December 09, 2012
Dear, the Status is not changing to Completed. the error in the Event Log is for 'Dynamics AX Synchronization Service'. any know reason ?


