VSTS loves Github, Docker, Azure Container Service, Azure Container Registry and Linux.
In this blogpost I show one way how to set up full CI/CD for Docker containers which will finally run in Azure Container Service. In some of my recent posts I already talked about Azure Container Service (ACS) and how I set up an automated Deployment to ACS from VSTS. Now let’s take this to another level.
Goal
Here’s what I want to see:
- As a developer I want to be able to work on a container based application which is automatically installed in a scalable cluster whenever I check in something into “master”.
- As a developer I want to have the chance to manually interact before my application is marked as stable in a private container registry.
Hint: In the meantime there are several great posts and tutorials which do something similar in different ways – all focusing on slightly different aspects. I don’t say my way is better – I’m just showing another option.
Basic Workflow
1. Use Github as source control system.
2. On Check-In to master branch trigger a build definition in VSTS.
3. During build …
- first build a .NET Core application (in a separate container used as a build host)
- next build images containing the application files based on a docker-compose.yml file
- then push all images to our private Azure Container Registry
4. Trigger a release to a Docker Swarm Cluster hosted on Azure Container Service
5. During relase …
- pull the images from or private Azure Container Registry
- start the application using a docker-compose.yml file
6. Allow a manual intervention to “sign off” the quality of the release
7. Tag the images on “stable” in my private Azure Container Registry
As a demo application I’m using an app consisting of 3 services in total where service-a calls service-b. Service-a also is the web frontend. The demoapplication can be found here. To use it just clone the github repo from me so you have all the additional files in it. However all the credits for the application go to the author of the orginal sample.
Things to point out
- I did not always use predefined build/deployment tasks even though there might habe been the chance to use them. Sometimes working with scripts is more comfortable to me. I’m repeating myself (again) but I really love the option to have ssh/commandline available during build/deployment tasks. It’s like basically the equivalent to Gaffertape in your toolbox!
- I did not set up a private agent. Because I like it if I don’t have to care about them. However you could do this if you needed. The Linux based agent is currently still in preview.
- I’m using docker-compose with several additional override files. This might be a little “too much” for this super-small scenario here. Consider this as a proof of concept.
- I’m tagging the final image as “stable” in my private registry. For my scenario this makes sense, please check if it does for yours.
- I did not add a way to automatically stop & remove running containers. If you need this, you have to do it yourself.
- It’s probably pretty easy to rebuild this on your own, but you have to replace some values (mostly dnsnames)
- A big Thank you! to the writers of this great tutorial. I’m reusing your demo code with small adjustments. The original can be found here.
Requirements:
- You should have a Docker Swarm Cluster set up with Azure Container Service. If you don’t have it, here’s how you do it. It isn’t hard to get started. If you’re having trouble with certificates, read this.
- You should have a private Azure Container Registry set up. If not, check this.
- I don’t go into all details, because then this post would just be too long. It would be good if you knew how to set up a connection to external endpoints in VSTS (it’s not hard) and you should have a good understanding of VSTS (which is awesome) in gerneral. If not this post might help as well as I’m doing some stuff in here already.
Details
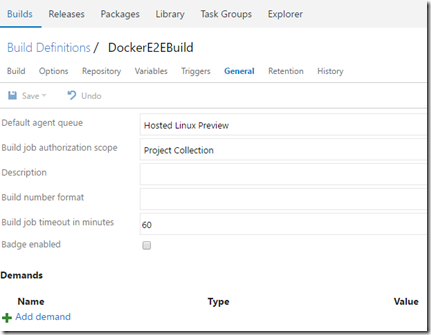
- Create a new Build Definition in VSTS. Mine is called DocerE2EBuild. I’m using a Hosted Linux Preview build as agent. This is preview but it makes life easier when working with Docker.
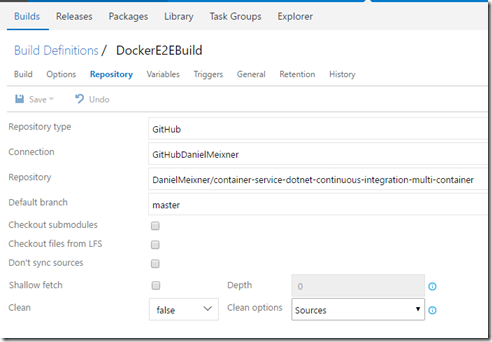
As repository type choose GitHub. You have to setup a service connection to do this as described here.
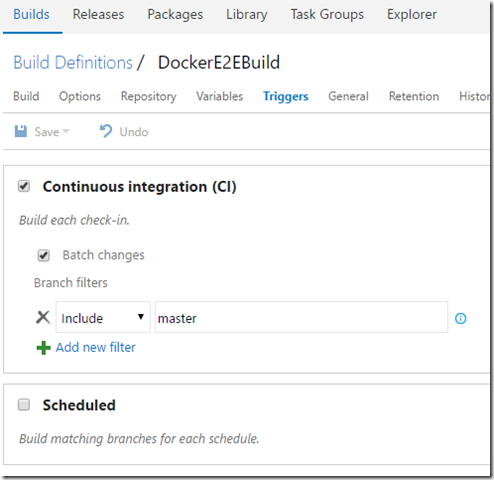
2. Set up continuous integration by setting the triggers correctly
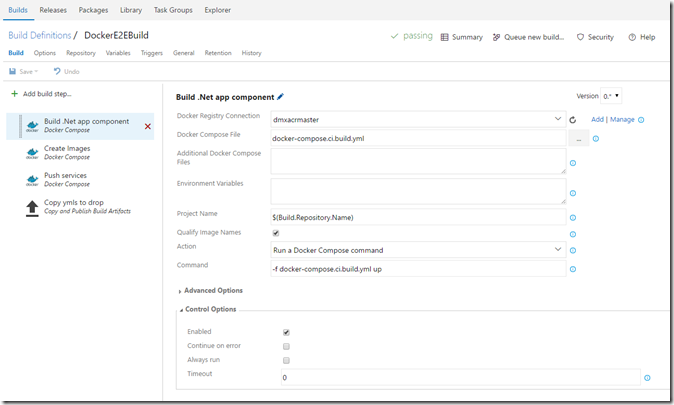
3. Add a build step to Build the .Net Core app. If you take a close look at the source code you will find that there is already a docker-compose.ci.build.yml file. This file spins up a container and then builds the dotnet application which is later distributed in an image.
I’m using the predefined Docker-Compose build task here. The command I’m running is docker-compose –f docker-compose.ci.build.yml up . This fires up the container, the container starts to build the .net core application and the containers is being stopped again.
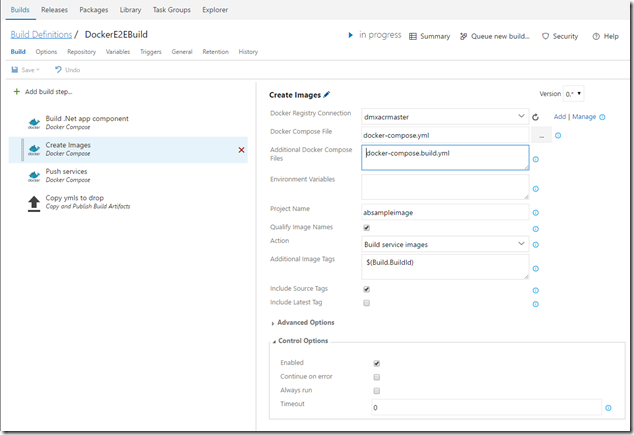
4. Based on the newly generated app images are created. I’m using the predefined Docker-Compose build task again.
Let’s take a closer look: The docker-compose.yml file doesn’t contain information about images or builds to be used during build of service-a and service-b images. I commented them out to show where they could be.
The reason is, that I want to be able to reuse this compose file during build and during release and I want to be able to specify different base images. That’s why I’m referencing a second docker-compose file called docker-compose.build.yml. Docker-compose combines both of them before they are executed. In docker-compose.build.yml. I “hard wired” for service a and b a path to a folder that contains a dockerfile which is used to build the image. This makes sure that at this point we are always creating a new image – and that’s what I want.
I’m also specifying a project name “absampleimage” for later reference. And I’m tagging the created image with the ID of the Build run. I already know that I want to push this image to a registry later, so I qualify the image name based on my docker registry connection.
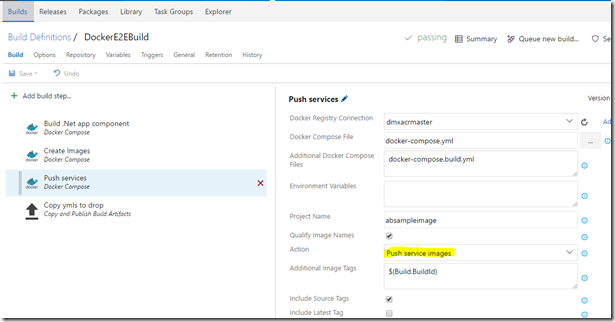
5. After successful build I push the newly generated images to my private container registry. I’m using the predefined docker-compose step here again.
6. Let’s check if the images found their way to my Azure Container Registry using Azure CLI.
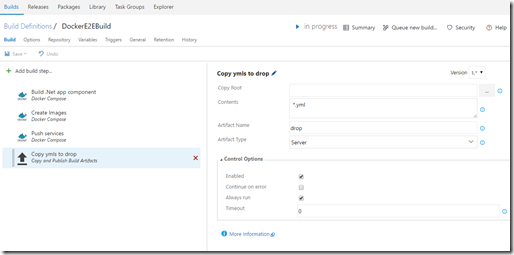
7. Now as we know that the images arrived at the registry, lets deploy them into an ACS Cluster. I want to use the docker-compose.yml file again to spin up the container infrastructure. So I add another step to publish the yml file as a build artifact. I’m takeing all ‘*.yml files I can find here.
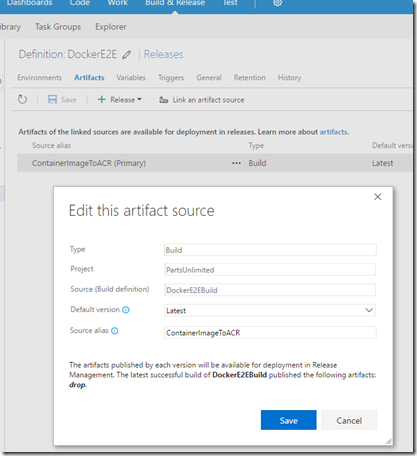
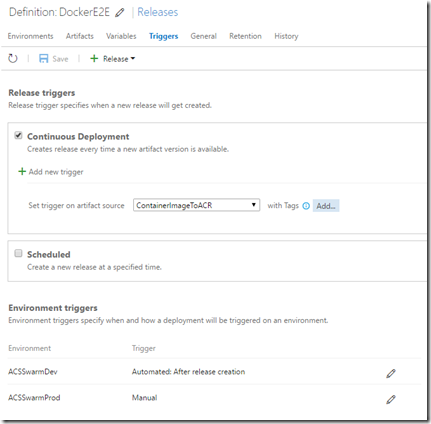
8. To deploy create a release definition. In my scenario I linked the release definition to the build artifacts. This means whenever the build definition drops something a new release is triggered.
Here’s where I created the artifact for the build drop.
Here’s where I set the trigger.
9. I created 2 environments. One is meant to be the development environment. One for production. The idea is that I can test the outputs of the build before I send them to productive use.
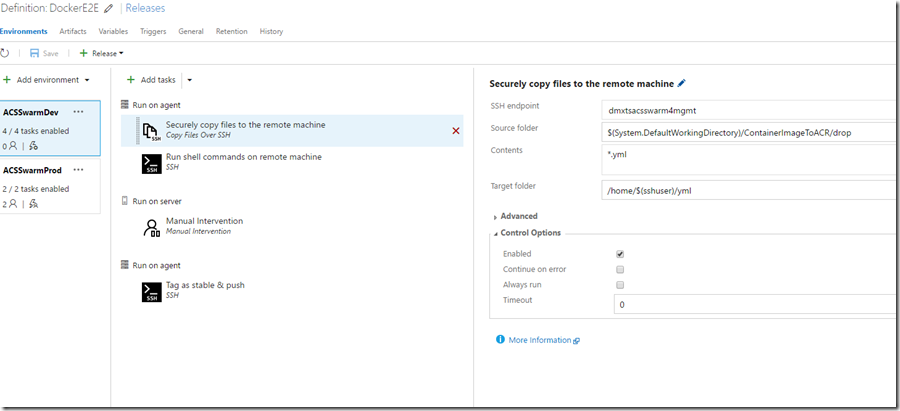
10. I added the first agent phase and added a task to copy the files from the build artifacts folder to the master of my Docker Swarm cluster via ssh. These files are the docker-compose files which I need to spin up my cluster. I’m using an SSH endpoint here into my cluster.
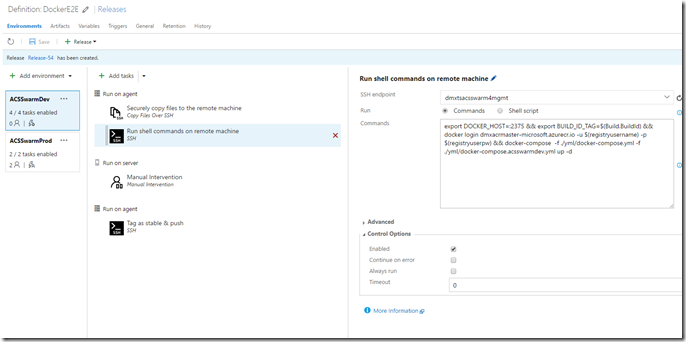
11. In the next task I run a shell command on the cluster manager. I want to run a docker command however I want to run it against the docker-swarm manager, not the docker deamon. (If in doubt read this post).
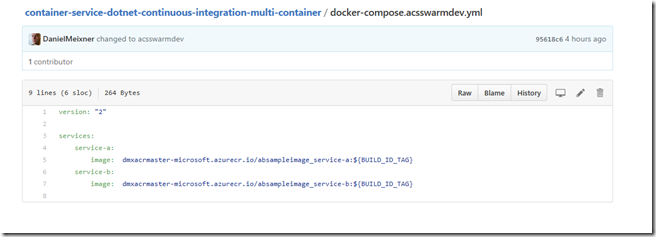
So I export an environment variable (DOCKER_HOST) which redirects all calls to docker to port 2375 where the swarm manager is listening. Afterwards I create an environment variable containing the BuildId. I can reference this variable within docker-compose files now. Then I login to my private container registry to be able to pull images and afterwards I run docker compose again. This time I’m using another override file called docker-compose.acsswarmdev.yml.
In this file I specify that the Build ID will serve as tag for the images to be used. This way I make sure that I’m using the freshly generated images from the previous build run.
Here’s the command I’m using above:
export DOCKER_HOST=:2375 && export BUILD_ID_TAG=$(Build.BuildId) && docker login dmxacrmaster-microsoft.azurecr.io -u $(registryusername) -p $(registryuserpw) && docker-compose -f ./yml/docker-compose.yml -f ./yml/docker-compose.acsswarmdev.yml up –d
Just a little hint:
- Mind the && between the commands. If you leave them out it might happen that the environment variables can’t be found.
- Be careful: Line breaks will break your command.
- Mind the –d at the end. It makes sure your container cluster runs detached and the command prompt won’t be stuck.
12. After this there should be an application running on my Docker Swarm Cluster. I can check this here. Your cluster will – of course – have a different URL. I don’t hide the URL so you can find out how it is composed if you don’t find yours. Basically you are connecting to the DNS of your Public Interface on Port 8080 if you set up a standard ACS Docker Swarm Cluster.
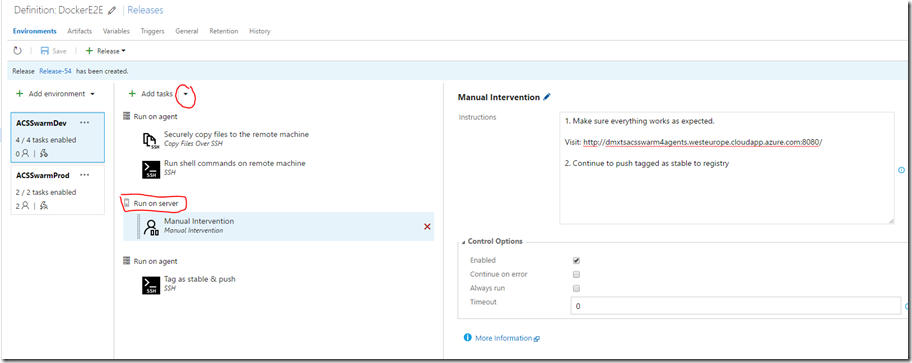
13. Now I can test the application manually. To make this testing “official” I added another “phase” to my deployment. The “server phase”. During this the deployment is paused, the deployment agent is released and the deployment won’t finish until I manually push the trigger again. In my case I also added some instructions for the person doing the manual step.
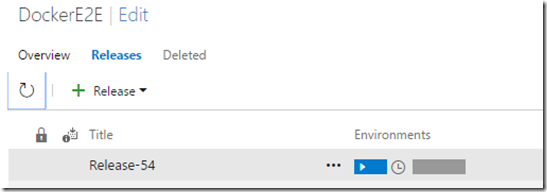
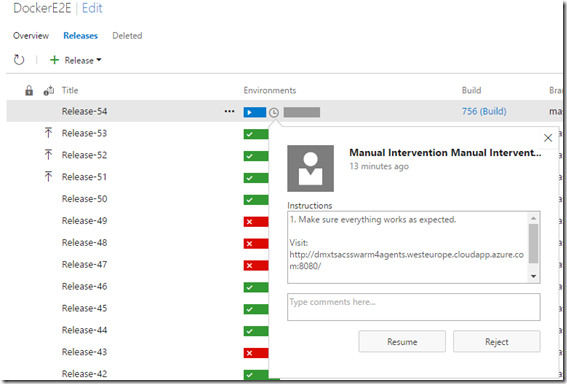
During Deployment it will look like this, when this point is reached.
If you click the clock, here’s what you get:
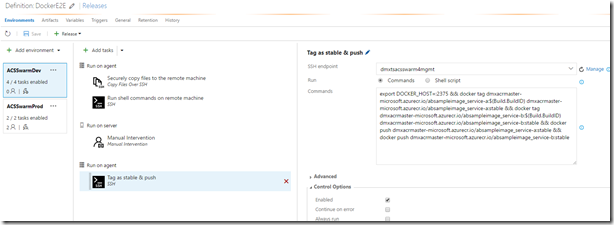
13. After successful sing off I want to tag the images as “stable” in my registry. Therefore I run the following command on my swarm master where all the images are available already:
Here’s the full command:
export DOCKER_HOST=:2375 && docker tag dmxacrmaster-microsoft.azurecr.io/absampleimage_service-a:$(Build.BuildID) dmxacrmaster-microsoft.azurecr.io/absampleimage_service-a:stable && docker tag dmxacrmaster-microsoft.azurecr.io/absampleimage_service-b:$(Build.BuildID) dmxacrmaster-microsoft.azurecr.io/absampleimage_service-b:stable && docker push dmxacrmaster-microsoft.azurecr.io/absampleimage_service-a:stable && docker push dmxacrmaster-microsoft.azurecr.io/absampleimage_service-b:stable
What it does is quite simple. Again, we’re setting up environment variable. Then we tag both service images which currently have the build ID as tag with “stable”. Afterwards we push both of them to the registry.
14. We’re done with our dev environment. I created another environment, which is set up pretty equal, however it uses the images with the “stable” tag which is specified in the docker-compose.acsswarmprod.yml file and it deploys into a differnt cluster.
Here’s the command again:
export DOCKER_HOST=:2375 && docker login dmxacrmaster-microsoft.azurecr.io -u $(registryusername) -p $(registryuserpw) && docker-compose -f ./yml/docker-compose.yml -f ./yml/docker-compose.acsswarmprod.yml up –d
It works. It’s pretty much and it took a while to figure things out. You could now scale up and down the number of containers using docker commands and you could scale up and down the number of underlying machines using Azure CLI to adjust the performance of your system. Pretty cool I hope this can work as basis for your own deployments. Have fun with Docker, Azure Container Services, Azure Container Registry, Docker-Compose, Docker Swarm, GitHub and VSTS ![]()
