Step-By-Step: Installing a fresh Configuration Manager 1606 Site hosted on SQL Server AlwaysOn
Introduction
With the release of Configuration Manager 1606 full media, you can install a fresh ConfigMgr database on SQL AlwaysON configuration. Here's a Step By Step procedure to go about installing one.
Environment
A snapshot of the environment I am using to demonstrate this feature.
Role |
Server Name |
Operating System |
| Domain Controller | DC1 | Windows Server 2016 Data Center |
| SQL Server | SQL1 | Windows Server 2016 Data Center |
| SQL Server | SQL2 | Windows Server 2016 Data Center |
| Primary Site | PRIMARY1 | Windows Server 2016 Data Center |
SQL Configuration
Both the SQL Servers are running identical configuration.
| Edition | SQL Server 2016 |
| Features | Database EngineManagement Tools (Only on SQL1) |
| Instance | MSSQLSERVER (Default) |
| Port | 1433 (Default) |
| Service Account | Domain Account |
| Mode | Windows Authentication |
SCCM Configuration
Will install a Standalone Primary Site using the 1606 full install media.
| Type | Standalone Primary |
| Roles | MP & DP Local on Site Server |
| SQL | <Will use AlwaysON Listener Name> |
| Site Code | PS1 |
| Mode | HTTP |
Windows Cluster
Assuming you have already installed the SQL Standalone version on both the SQL Servers [SQL1 & SQL2], you will start by preparing a Windows Cluster before you can start the SQL AlwaysON configuration.
- On both the SQL servers participating in AlwaysOn group, install the Failover Clustering feature.

- Launch Failover Cluster Manager and start the Create Cluster Wizard
- Add both the SQL nodes which will form the Cluster. Click Next
- You can skip the validation and click Next

- Enter a Cluster Name (This name will not be used by ConfigMgr)
- Click Next to proceed.
- Uncheck the box to Add all eligible storage to the cluster .

- Before clicking Next, make sure the account running this wizard has create and delete computer object access in AD.
Tip: If you are using DHCP on both the SQL Servers, you should set the Windows Cluster Name IP as Static IP Address which is unique. 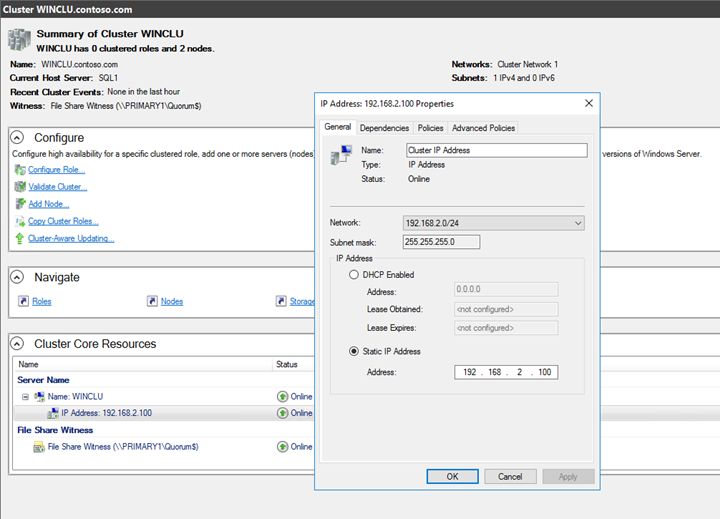
- Based on the number of nodes, configure the Cluster Witness as appropriate.
- Perform a test failover to validate the successful setup.
The above steps will form Windows Cluster for you and prepares the infrastructure ready to use the AlwaysOn feature.
Enable SQL Server AlwaysOn Availability Groups Feature
On both the SQL servers participating in AlwaysOn group, perform the following steps.
- Open SQL Server Configuration Manager.
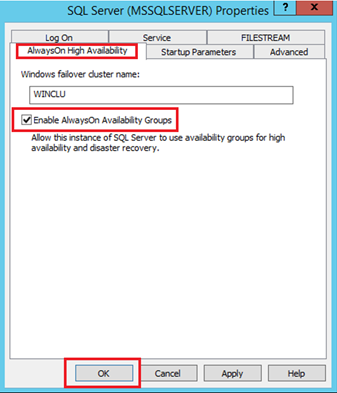
- Double-click the SQLServer (MSSQLSERVER) service to open the Properties dialog box.

- In the Properties dialog box, select the AlwaysOn High Availability tab.
- Check the Enable AlwaysOn Availability Groups check box.
- Click OK and this will prompt you to restart the SQL Server service.
- Manually restart the SQL Server Service
Create and Configure SQL Server AlwaysOn Availability Groups
The next steps are to create an Availability Group which requires a user database. Since we are doing a fresh install and don't have the ConfigMgr database, we will create a Test database which will be used to create the Availability Group. It can be safely removed later.
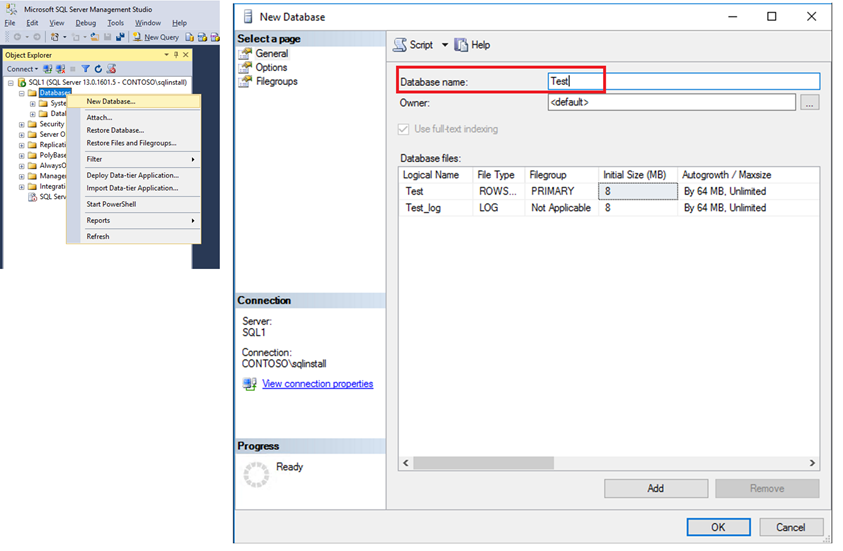
- Open SQL Server Management Studio to create a New Database
- Give a Database name and click OK to proceed with defaults.
Any database which will be part of AlwaysOn requires a backup copy which will be sent to the Secondary SQL servers.
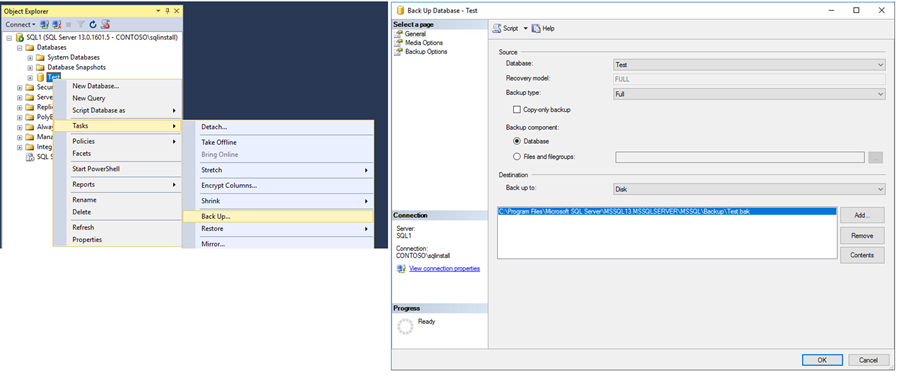
- Right click the Test database and click Tasks > Backup
- Continue with defaults and click OK to complete the backup
Now we are ready to create the Availability Group
In SQL Server Management Studio, right click AlwaysOn High Availability node and click New Availability Group Wizard..
Click Next in the Availability Group Wizard
Specify an Availability Group Name and click Next

Select the Test database. Its status should show Meets prerequisites to allow you click Next.

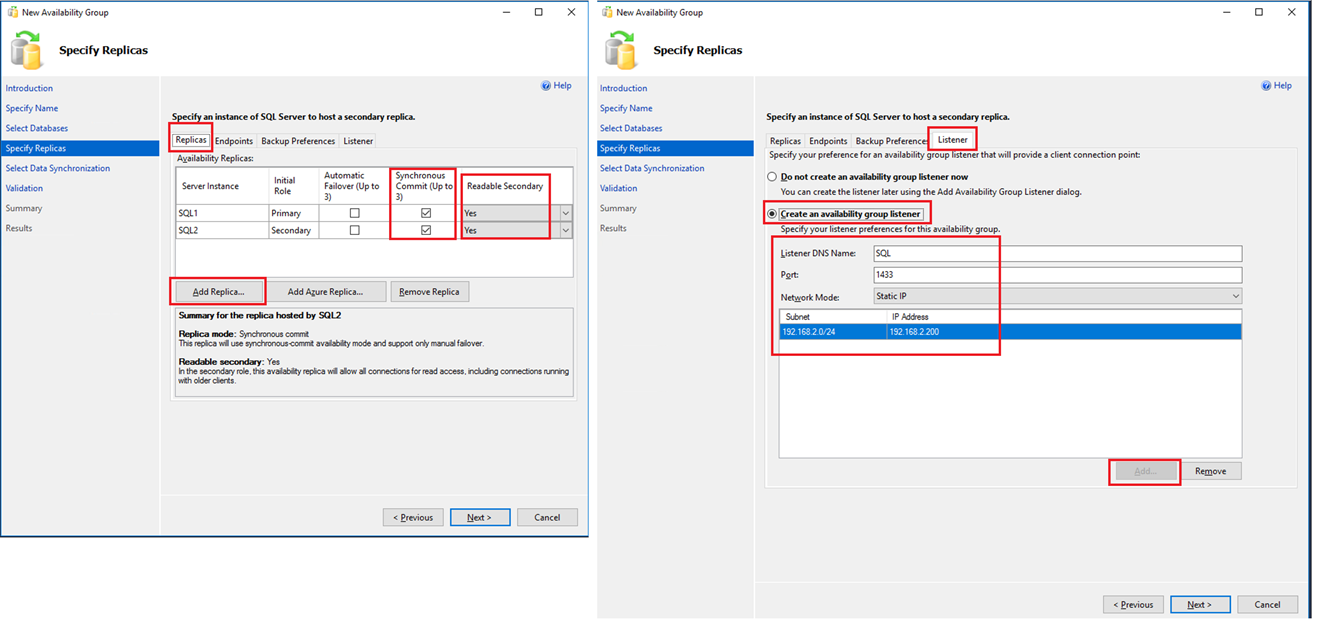
Click Next to Specify Replicas. Click Add Replica to add both SQL nodes.
Check the boxes for Synchronous Commit
Set Readable Secondary = Yes
Uncheck Automatic Failover
Click on Listener Tab
Select the option Create an availability group listener
Specify Listener DNS Name [This name will be used by ConfigMgr setup as the SQL connection string]
Specify the Port No. and set Network Mode to Static IP
Click Add to reserve an IP address for the Listener DNS Name.
Click Next to proceed
Select Data Synchronization. Keep Full and specify a shared path accessible by all replicas.
This share will be used to save the backup of the ConfigMgr database and for restoring to the replicas.
Click Next to confirm a successful validation

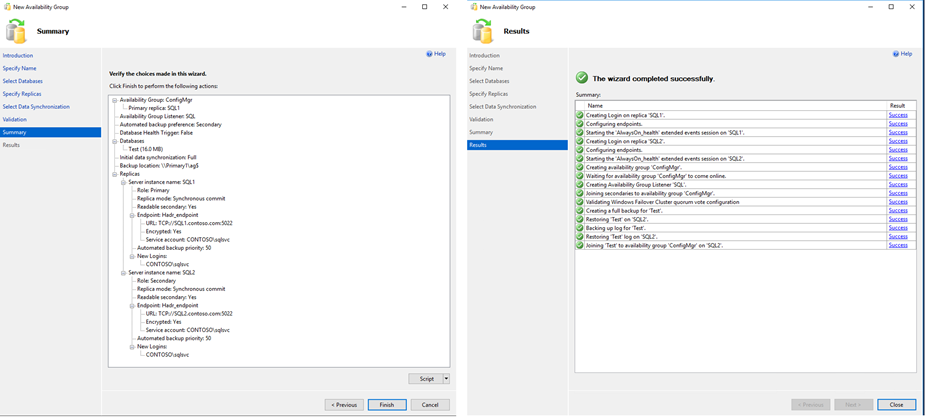
Verify the choices and click Finish
Validate a successful creation of the Availability Group.
Click Close
Verify the health of AlwaysOn availability group via Dashboard
Right click on the recently created Availability Group and click Show Dashboard
Below is a sample snapshot where you can see the health state and the Primary and Secondary Instances along with the DB.

Before proceeding with the ConfigMgr setup, it will be a good idea to perform a manual failover to validate the health on both nodes.
Right click on the Availability Group and click Failover
Confirm a successful failover in the summary results and once again open the Dashboard to validate the health of AlwaysOn availability group. For a detailed dashboard information, you will have to launch it from the Primary SQL node.

Now we are ready to host the ConfigMgr database on this AlwaysOn Availability Group.
Prepare ConfigMgr for SQL AlwaysOn
Before proceeding with ConfigMgr setup, you need to add permissions to the ConfigMgr installation account and its Computer Account.
- Add the computer account of the Primary Site server to the Administrators group on each SQL server participating in SQL AlwaysOn availability group.
- Add the Installation account to the Administrators group on each SQL server participating in SQL AlwaysOn availability group.
- Add the Installation account to sysadmin role on each SQL server participating in SQL AlwaysOn availability group.
ConfigMgr Setup
Now you are all set to launch the ConfigMgr setup. Proceed with the configuration type you are planning to install.
At the Database Information screen, enter the Listener name of the SQL AlwaysOn availability group. If you don't remember, go to SQL Management Studio and expand Availability Groups to view the name under Availability Group Listeners
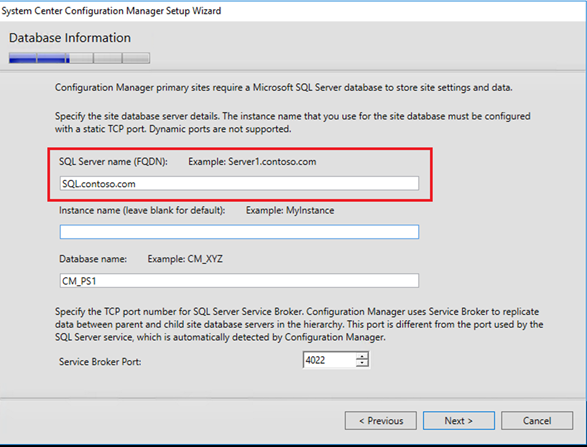
Click Next
If you open the ConfigMgrSetup.log file located at the root of the System Drive. You will notice a validation of the Listener name
INFO: Registered type SQL.CONTOSO.COM MASTER for SQL.contoso.com master
INFO: Registered type SMS Master for SQL.contoso.com master
INFO: Registered type SQL.CONTOSO.COM CM_PS1 for SQL.contoso.com CM_PS1
INFO: Registered type SMS ACCESS for SQL.contoso.com CM_PS1
INFO: SQL Server version detected is 13.0, 13.0.1601.5.
INFO: Return code:0, Major:13, Minor:0, BuildNum:1601
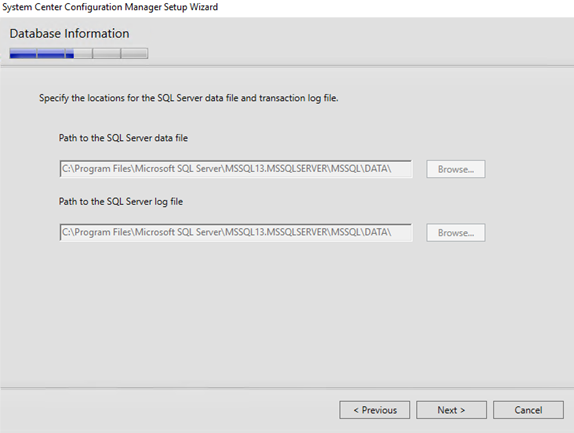
You cannot change the path of the Database files, click Next to Proceed
You will see a new screen for Availability Groups
Provide a Server Share which will be used to keep the DB backup and restore operations of the ConfigMgr database for the Secondary Replicas of SQL AlwaysOn nodes.
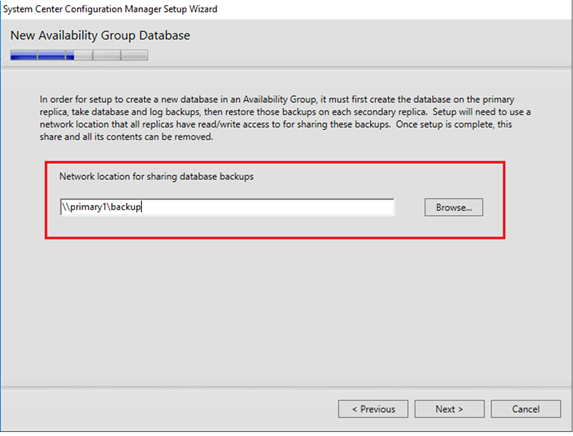
Click Next to proceed with desired configuration and Begin Installation.
A high-level overview of the successful completion of SQL Steps in the ConfigMgrSetup.log file.
Generating public key and SQL Server Certificate
INFO: Creating SQL Server machine certificate for Server [SQL.contoso.com]…
..
Machine certificate has been created successfully on server SQL1.
..
Machine certificate has been created successfully on server SQL2.
Setting up the SQL Server database
INFO: SQLINSTALL Returning with success
INFO: Registered type SMS_ACCESS for SQL.contoso.com CM_PS1
Validate a successful install and click Close.

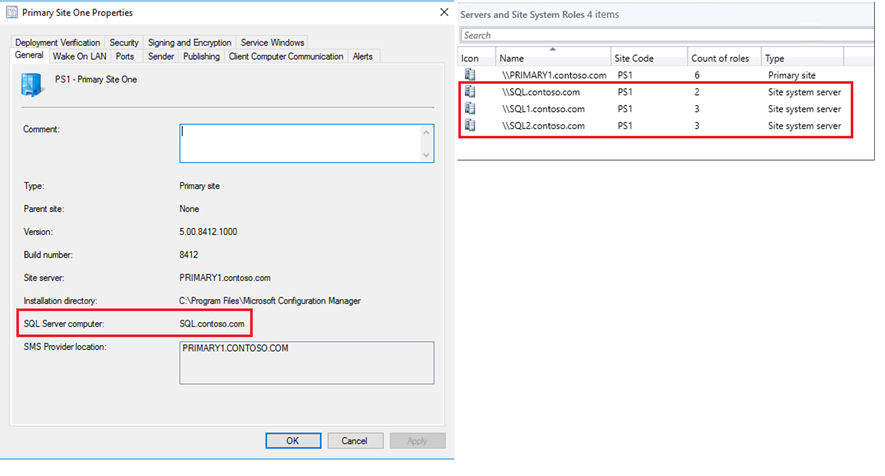
Open the ConfigMgr console and validate the SQL Server name which should be the AlwaysOn Listener name. You will also notice the site system roles
Launch SQL Server Management Studio and go the Properties of ConfigMgr database.
Click Options page and you will notice that you no longer have to do any manual configurations for SQL AlwaysOn. Unlike the existing Database move method, ConfigMgr fresh install automatically configures the Database for SQL AlwaysOn.
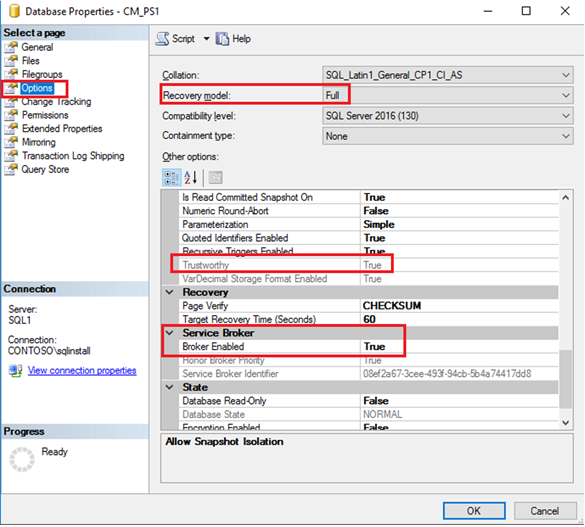
Here's a snapshot of the ConfigMgrSetup.log file configuring DB for SQL AlwaysOn
INFO: Successfully set TRUSTWORTHY ON
INFO: Successfully configured [clr enabled].
INFO: Successfully set Recursive triggers to CM_PS1.
INFO: Successfully set checkpoint truncation.
INFO: Configuring SQL Server service broker...
INFO: Successfully set HONOR_BROKER_PRIORITY.
INFO: Successfully set CHANGE_TRACKING=ON.
INFO: Successfully set ALLOW_SNAPSHOT_ISOLATION ON.
INFO: Successfully set READ_COMMITTED_SNAPSHOT ON.
INFO: Successfully configured Max text replication size.
Validate the health of SQL AlwaysOn by launching the Dashboard. You will notice the ConfigMgr database is now part of the availability group.
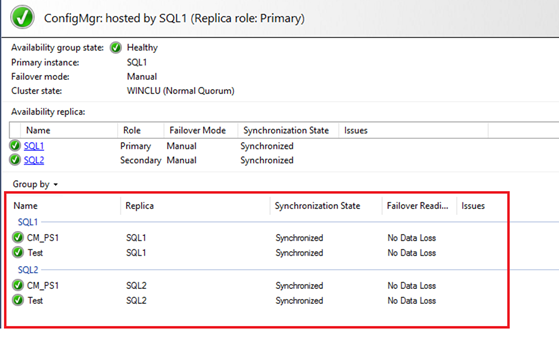
It will be a good idea to run the Failover wizard and move the DB to the Secondary SQL node.
Close and reopen the ConfigMgr console to validate a successful connection.
Automatic Failover (Optional)
Post a successful setup, you may want to configure AlwaysOn for Automatic Failover and not wait for a manual action in an event of failure.
The Current Branch model uses console based updates and each time you plan to install one for example 1606 to 1610, you will have to change the failover mode to Manual before installing.
Follow the steps below to configure Automatic Failover.
Go to the properties of the Availability group.
Change the Failover Mode from Manual to Automatic for both the nodes and click OK to complete the task.
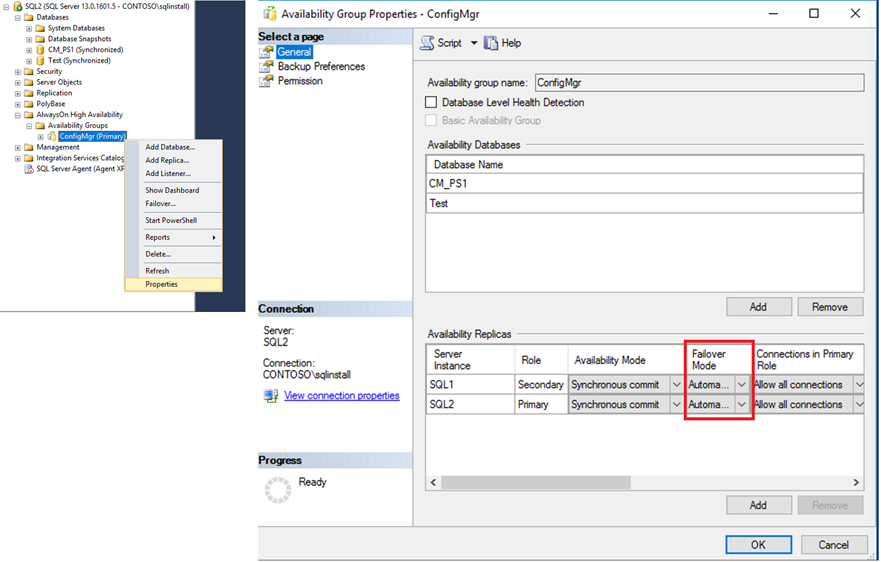
You are now all set for an automatic failover for an uninterrupted access to the ConfigMgr Database.
Restart the SQL server which hosts Primary copy of the DB and launch the AlwaysOn dashboard. You will notice an automatic failover to the other node which now takes the ownership and becomes Primary.
Launch the ConfigMgr console to validate a successful connection to the DB.
Post restart, both the nodes should appear as healthy and ready for Production use.
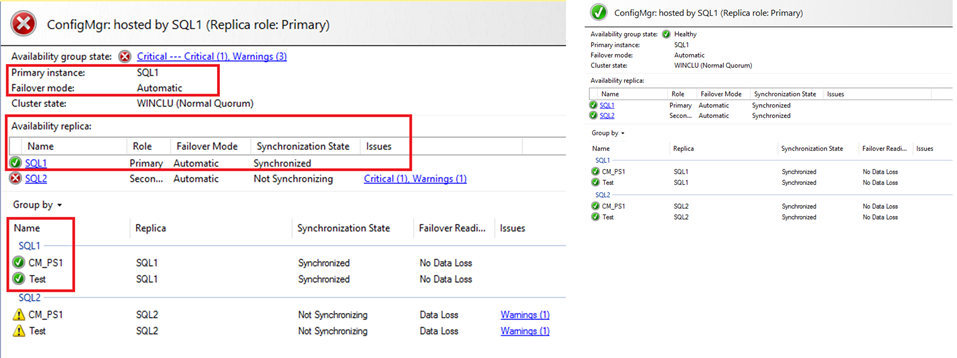
Attached is the ConfigMgrSetup.log file from my environment if you are interested to view details of setup.
Thanks,
Arnab Mitra
Comments
- Anonymous
March 07, 2017
Thanks - Anonymous
May 25, 2017
This was great. Thanks!! - Anonymous
September 19, 2017
Hi AmabIs the above supported ?When I read following documentation : https://docs.microsoft.com/en-us/sccm/core/servers/deploy/configure/configure-aoagI states: "It is not supported to install a new site with its database in an availability group. For example, if you use the baseline 1702 media, you must install the site using a single instance of SQL Server. After the site installs, you can then move the site database to the availability group."RegardsJohan- Anonymous
September 25, 2017
Hi Johan, its being discussed internally & I will keep this thread updated.- Anonymous
September 28, 2017
Hi, This looks like to work ONLY if you want to use Default instance Name during your install and NOT for Named ones.The installations repeat the Instance name 2 times when its Named at the time it tries to create the DB at one node.Like below ---> INFO: SQL Connection succeeded. Connection: ALDSQ1SV1.DEV.NET SITE_001\MASTER, Type: Secure Configuration Manager Setup 9/28/2017 12:07:45 PM 9192 (0x23E8)INFO: Getting SQL's server name from sys.servers on VMDCMSQ01\SITE_001\SITE_001. Configuration Manager Setup 9/28/2017 12:07:45 PM 9192 (0x23E8)Where SITE_001 was our named Instance...And when you use the default one it doesn't happen.The best approach for that is what Johan said, install to one node and then move it AG.https://docs.microsoft.com/en-us/sccm/core/servers/deploy/configure/configure-aoagRegards - Anonymous
March 16, 2018
Hi Arnab Any update on this , supported or not Thx in advanceRegardsJohan- Anonymous
March 21, 2018
Yes, its supported.
- Anonymous
- Anonymous
- Anonymous