Secure endpoints with Zero Trust
![]()
Background
The modern enterprise has an incredible diversity of endpoints accessing data. Not all endpoints are managed or even owned by the organization, leading to different device configurations and software patch levels. This creates a massive attack surface and, if left unresolved, accessing work data from untrusted endpoints can easily become the weakest link in your Zero Trust security strategy.
Zero Trust adheres to the principle, "Never trust, always verify." In terms of endpoints, that means always verify all endpoints. That includes not only contractor, partner, and guest devices, but also apps and devices used by employees to access work data, regardless of device ownership.
In a Zero Trust approach, the same security policies are applied regardless of whether the device is corporate-owned or personally-owned through bring your own device (BYOD); whether the device is fully managed by IT, or only the apps and data are secured. The policies apply to all endpoints, whether PC, Mac, smartphone, tablet, wearable, or IoT device wherever they are connected, be it the secure corporate network, home broadband, or public internet.
Most importantly, the health and trustworthiness of apps that run on those endpoints impacts your security posture. You need to prevent corporate data from leaking to untrusted or unknown apps or services, either accidentally or through malicious intent.
There are a few key rules for securing devices and endpoints in a Zero Trust model:
Zero Trust security policies are centrally enforced through the cloud and cover endpoint security, device configuration, app protection, device compliance, and risk posture.
The platform as well as the apps that run on the devices are securely provisioned, properly configured, and kept up to date.
There is automated and prompt response to contain access to corporate data within the apps in case of a security compromise.
The access control system ensures that all policy controls are in effect before the data is accessed.
Endpoint Zero Trust deployment objectives
Before most organizations start the Zero Trust journey, their endpoint security is set up as follows:
-
Endpoints are domain-joined and managed with solutions like Group Policy Objects or Configuration Manager. These are great options, but they don't leverage modern Windows 10 CSPs or require a separate cloud management gateway appliance to service cloud-based devices.
-
Endpoints are required to be on a corporate network to access data. This could mean that the devices are required to physically be on-site to access the corporate network, or that they require VPN access, which increases the risk that a compromised device could access sensitive corporate resources.
|
When implementing an end-to-end Zero Trust framework for securing endpoints, we recommend you focus first on these initial deployment objectives: |
|
|
|
I. Endpoints are registered with cloud identity providers. In order to monitor security and risk across multiple endpoints used by any one person, you need visibility in all devices and access points that may be accessing your resources. II. Access is only granted to cloud-managed and compliant endpoints and apps. Set compliance rules to ensure that devices meet minimum security requirements before access is granted. Also, set remediation rules for noncompliant devices so that people know how to resolve the issue. III. Data loss prevention (DLP) policies are enforced for corporate devices and BYOD. Control what the user can do with the data after they have access. For instance, restrict file saving to untrusted locations (such as local disk), or restrict copy-and-paste sharing with a consumer communication app or chat app to protect data. |
|
After these are completed, focus on these additional deployment objectives: |
|
|
|
IV. Endpoint threat detection is used to monitor device risk. Use a single pane of glass to manage all endpoints in a consistent way, and use a SIEM to route endpoint logs and transactions such that you get fewer, but actionable, alerts. V. Access control is gated on endpoint risk for both corporate devices and BYOD. Integrate data from Microsoft Defender for Endpoint, or other Mobile Threat Defense (MTD) vendors, as an information source for device compliance policies and device Conditional Access rules. The device risk will then directly influence what resources will be accessible by the user of that device. |
Endpoint Zero Trust deployment guide
This guide will walk you through the steps required to secure your devices following the principles of a Zero Trust security framework.
|
|
Initial deployment objectives |
I. Endpoints are registered with a cloud identity providers
To help limit risk exposure, you need to monitor every endpoint to ensure each one has a trusted identity, security policies are applied, and the risk level for things like malware or data exfiltration has been measured, remediated, or deemed acceptable.
After a device is registered, users can access your organization's restricted resources using their corporate username and password to sign in (or Windows Hello for Business).

Register corporate devices with Microsoft Entra ID
Follow these steps:
New Windows 10 devices
Start up your new device and begin the OOBE (out-of-box-experience) process.
On the Sign in with Microsoft screen, type your work or school email address.
On the Enter your password screen, type your password.
On your mobile device, approve your device so it can access your account.
Complete the OOBE process, including setting your privacy settings and setting up Windows Hello (if necessary).
Your device is now joined to your organization's network.
Existing Windows 10 devices
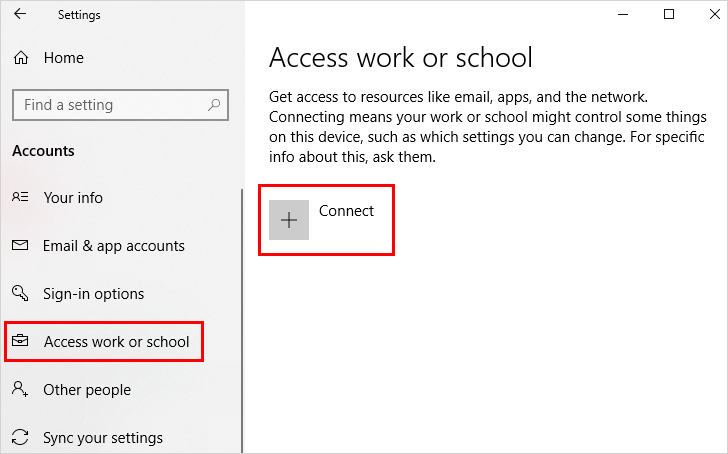
Open Settings, and then select Accounts.
Select Access work or school, and then select Connect.
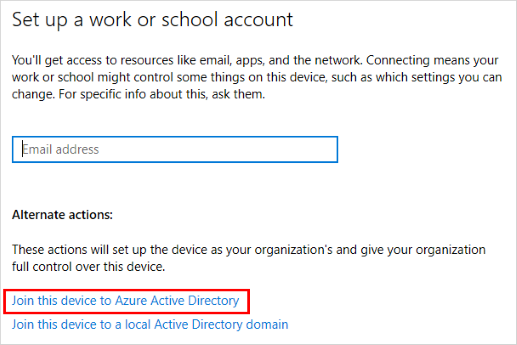
On the Set up a work or school account screen, select Join this device to Microsoft Entra ID.
On the Let's get you signed in screen, type your email address (for example, alain@contoso.com), and then select Next.
On the Enter password screen, type your password, and then select Sign in.
On your mobile device, approve your device so it can access your account.
On the Make sure this is your organization screen, review the information to make sure it's right, and then select Join.
On the You're all set screen, click Done.
Register personal Windows devices with Microsoft Entra ID
Follow these steps:
Open Settings, and then select Accounts.
Select Access work or school, and then select Connect from the Access work or school screen.

On the Add a work or school account screen, type in your email address for your work or school account, and then select Next. For example, alain@contoso.com.
Sign in to your work or school account, and then select Sign in.
Complete the rest of the registration process, including approving your identity verification request (if you use two-step verification) and setting up Windows Hello (if necessary).
Enable and configure Windows Hello for Business
To allow users an alternative sign-in method that replaces a password, such as PIN, biometric authentication, or fingerprint reader, enable Windows Hello for Business on users' Windows 10 devices.
The following Microsoft Intune and Microsoft Entra actions are completed in the Microsoft Intune admin center:
Start by creating a Windows Hello for Business enrollment policy in Microsoft Intune.
Go to Devices > Enrollment > Enroll devices > Windows enrollment > Windows Hello for Business.
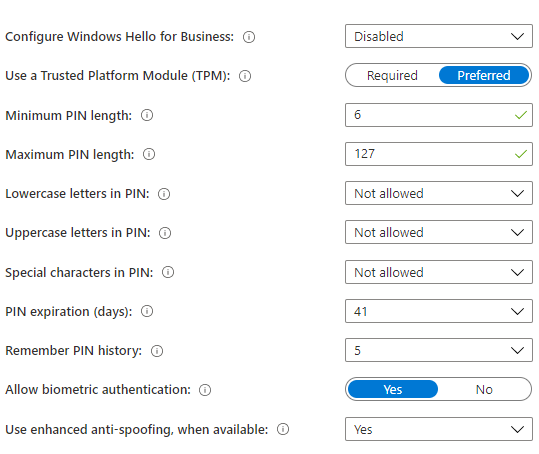
Select from the following options for Configure Windows Hello for Business:
Disabled. If you don't want to use Windows Hello for Business, select this setting. If disabled, users can't provision Windows Hello for Business except on Microsoft Entra joined mobile phones where provisioning may be required.
Enabled. Select this setting if you want to configure Windows Hello for Business settings. When you select Enabled, additional settings for Windows Hello become visible.
Not configured. Select this setting if you don't want to use Intune to control Windows Hello for Business settings. Any existing Windows Hello for Business settings on Windows 10 devices isn't changed. All other settings on the pane are unavailable.
If you selected Enabled, configure the required settings that are applied to all enrolled Windows 10 devices and Windows 10 mobile devices.
Use a Trusted Platform Module (TPM). A TPM chip provides an additional layer of data security. Choose one of the following values:
Required. Only devices with an accessible TPM can provision Windows Hello for Business.
Preferred. Devices first attempt to use a TPM. If this option isn't available, they can use software encryption.
Set a minimum PIN length and Maximum PIN length. This configures devices to use the minimum and maximum PIN lengths that you specify to help ensure secure sign-in. The default PIN length is six characters, but you can enforce a minimum length of four characters. The maximum PIN length is 127 characters.
Set a PIN expiration (days). It's good practice to specify an expiration period for a PIN, after which users must change it. The default is 41 days.
Remember PIN history. Restricts the reuse of previously used PINs. By default, the last 5 PINs can't be reused.
Use enhanced anti-spoofing, when available. This configures when the anti-spoofing features of Windows Hello are used on devices that support it. For example, detecting a photograph of a face instead of a real face.
Allow phone sign-in. If this option is set to Yes, users can use a remote passport to serve as a portable companion device for desktop computer authentication. The desktop computer must be Microsoft Entra joined, and the companion device must be configured with a Windows Hello for Business PIN.
After you configure these settings, select Save.
After configuring the settings that apply to all enrolled Windows 10 devices and Windows 10 mobile devices, set up Windows Hello for Business Identity Protection profiles to customize Windows Hello for Business security settings for specific end user devices.
Select Devices > Configuration profiles > Create profile > Windows 10 and Later > Identity Protection.
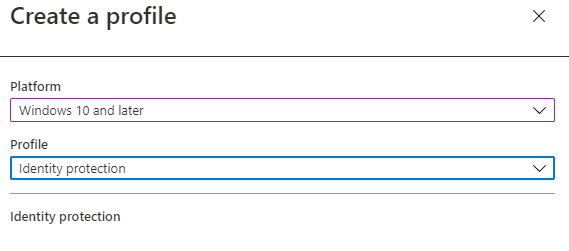
Configure Windows Hello for Business. Choose how you want to configure Windows Hello for Business.
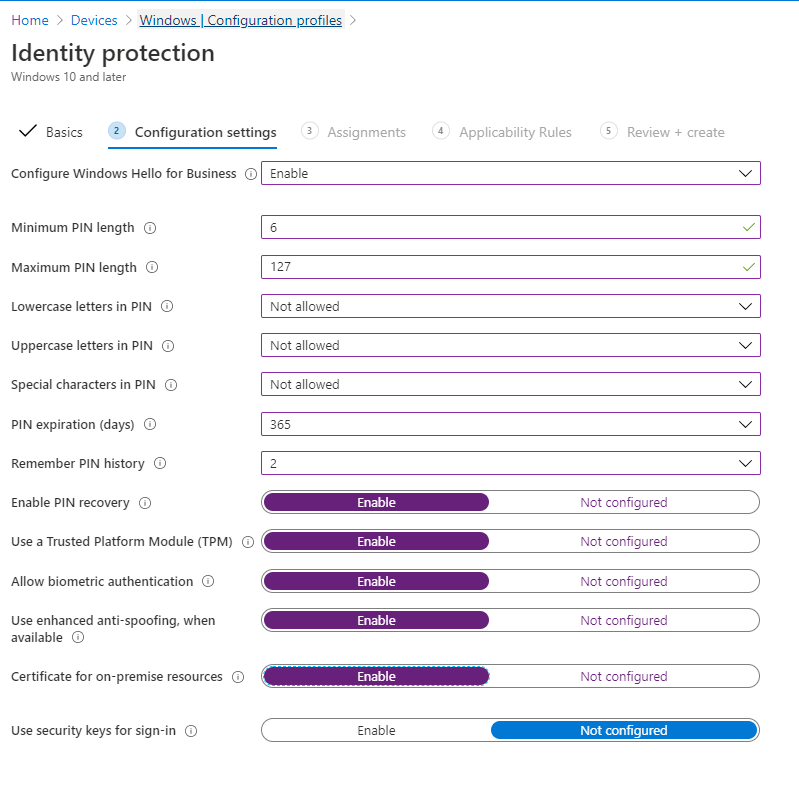
Minimum PIN length.
Lowercase letters in PIN.
Uppercase letters in PIN.
Special characters in PIN.
PIN Expiration (days).
Remember PIN history.
Enable PIN recovery. Allows user to use the Windows Hello for Business PIN recovery service.
Use a Trusted Platform Module (TPM). A TPM chip provides an additional layer of data security.
Allow biometric authentication. Enables biometric authentication, such as facial recognition or fingerprint, as an alternative to a PIN for Windows Hello for Business. Users must still configure a PIN in case biometric authentication fails.
Use enhanced anti-spoofing, when available. Configures when the anti-spoofing features of Windows Hello are used on devices that support it (for example, detecting a photograph of a face instead of a real face).
Use security keys for sign-in. This setting is available for devices that run Windows 10 version 1903 or later. Use it to manage support for using Windows Hello security keys for sign-in.
Finally, you can create additional device restriction policies to further lock down corporate-owned devices.
II. Access is only granted to cloud-managed and compliant endpoints and apps
Once you have identities for all the endpoints accessing corporate resources and before access is granted, you want to ensure that they meet the minimum security requirements set by your organization.
After establishing compliance policies to gate access of corporate resources to trusted endpoints and mobile and desktop applications, all users can access organizational data on mobile devices and a minimum or maximum operating system version is installed on all devices. Devices are not jail-broken or rooted.
Also, set remediation rules for noncompliant devices, such as blocking a noncompliant device or offering the user a grace period to get compliant.

Create a compliance policy with Microsoft Intune (all platforms)
Follow these steps to create a compliance policy:
Select Devices > Compliance policies > Policies > Create Policy.
Select a Platform for this policy (Windows 10 used for example below).
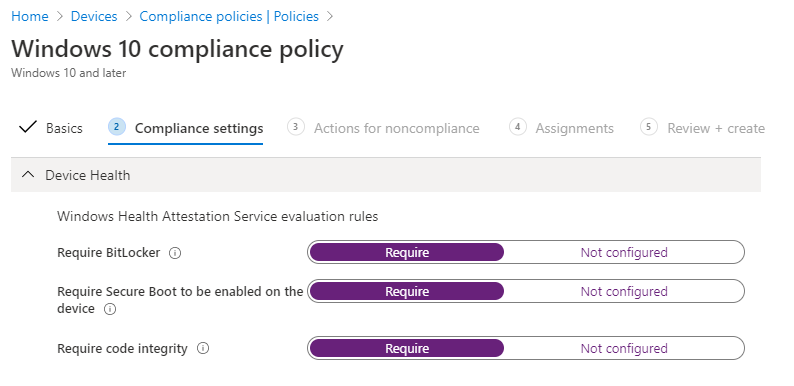
Select the desired Device Health configuration.
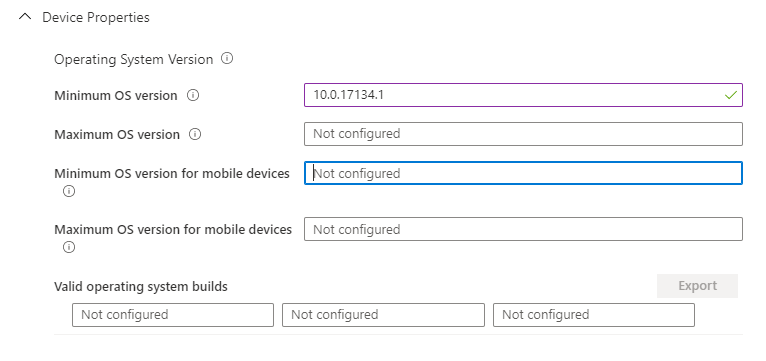
Configure minimum or maximum Device Properties.
Configure Configuration Manager Compliance. This requires all compliance evaluations in Configuration Manager to be compliant and is only applicable for comanaged Windows 10 devices. All Intune-only devices will return N/A.
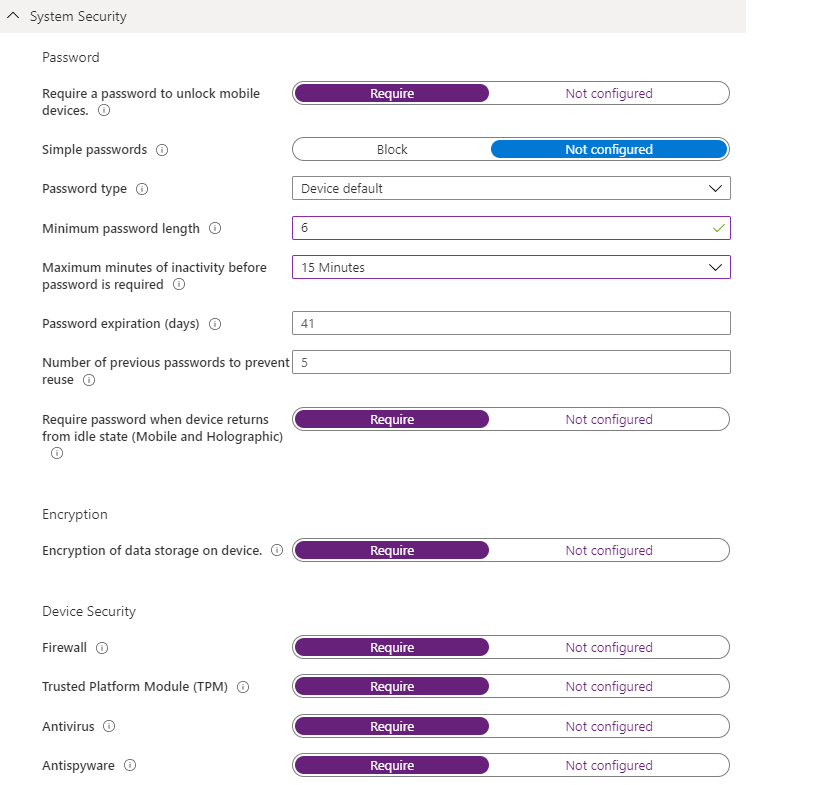
Configure System Security Settings.
Configure Microsoft Defender Antimalware.

Configure the required Microsoft Defender for Endpoint machine risk score.

On the Actions for noncompliance tab, specify a sequence of actions to apply automatically to devices that do not meet this compliance policy.

Automate notification email and add additional remediation actions for noncompliant devices in Intune (all platforms)
When their endpoints or apps become non-compliant, users are guided through self-remediation. Alerts are automatically generated with additional alarms and automated actions set for certain thresholds. You can set non-compliance remediation actions.
Take these steps:
Select Devices > Compliance policies > Notifications > Create notification.
Create a notification message template.
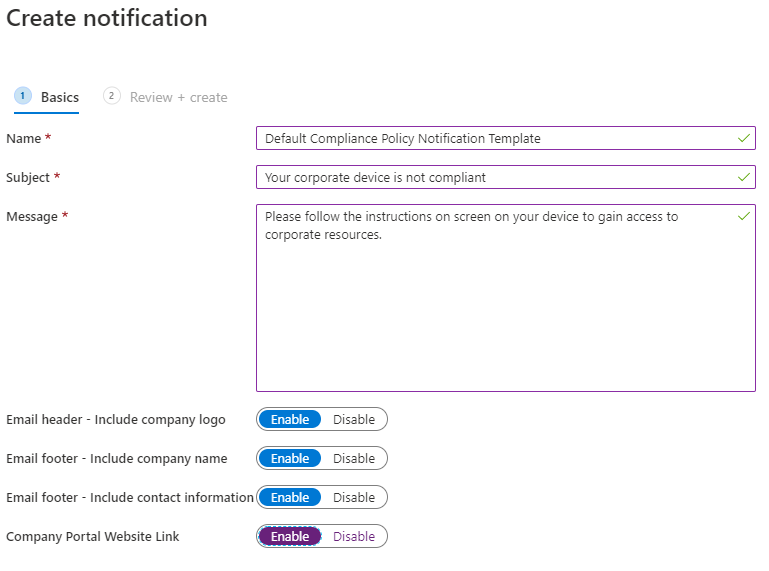
Select Devices > Compliance policies > Policies, select one of your policies, and then select Properties.
Select Actions for noncompliance > Add.
Add actions for noncompliance:

Set up an automated email to users with noncompliant devices.
Set up an action to remotely lock noncompliant devices.
Set up an action to automatically retire a noncompliant device after a set number of days.
III. Data loss prevention (DLP) policies are enforced for corporate devices and BYOD
Once data access is granted, you want to control what the user can do with the data. For example, if a user accesses a document with a corporate identity, you want to prevent that document from being saved in an unprotected consumer storage location, or from being shared with a consumer communication or chat app.

Apply recommended security settings
First, apply security settings recommended by Microsoft to Windows 10 devices to protect corporate data (Requires Windows 10 1809 and later):
Use Intune security baselines to help you secure and protect your users and devices. Security baselines are preconfigured groups of Windows settings that help you apply a known group of settings and default values that are recommended by the relevant security teams.
Follow these steps:
Select Endpoint security > Security baselines to view the list of available baselines.
Select the baseline you'd like to use, and then select Create profile.
On the Configuration settings tab, view the groups of Settings that are available in the baseline you selected. You can expand a group to view the settings in that group and the default values for those settings in the baseline. To find specific settings:
Select a group to expand and review the available settings.
Use the Search bar and specify keywords that filter the view to display only those groups that contain your search criteria.
Reconfigure the default settings to meet your business needs.
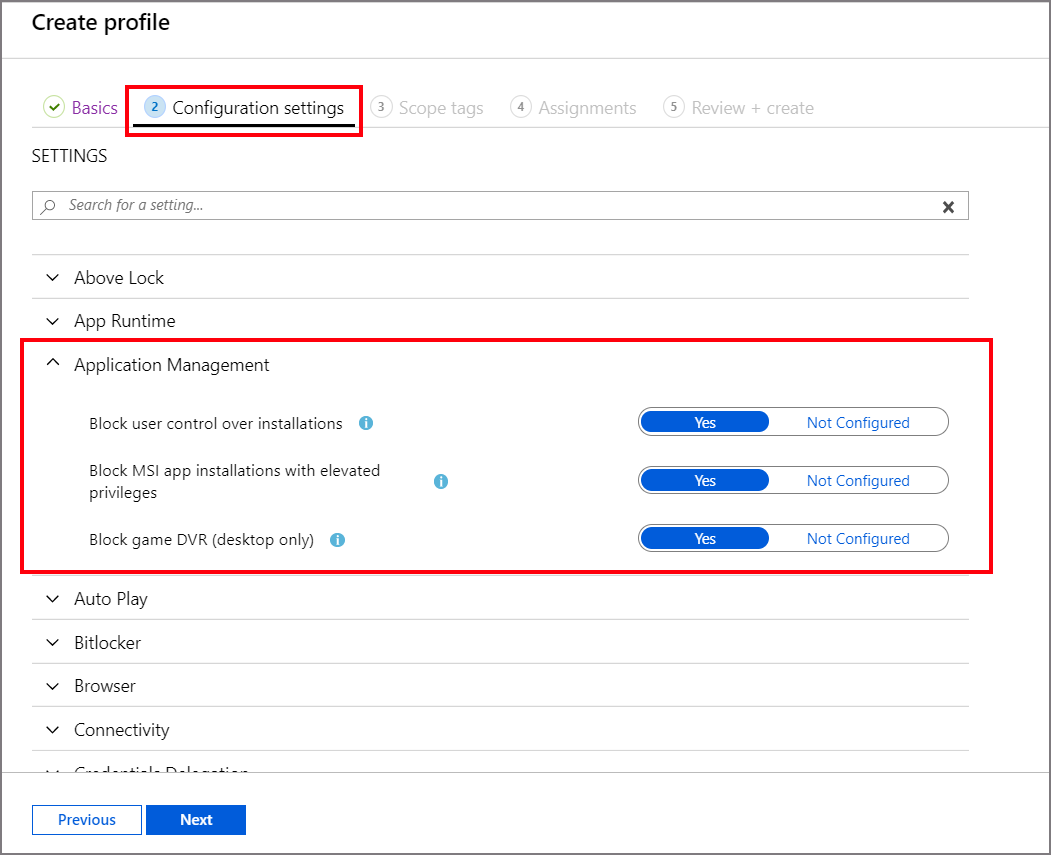
On the Assignments tab, select groups to include and then assign the baseline to one or more groups. To fine-tune the assignment, use Select groups to exclude.
Ensure updates are deployed automatically to endpoints
Configure Windows Updates for Business to simplify the update management experience for users and ensure that devices are automatically updated to meet the required compliance level.
Follow these steps:
Manage Windows 10 software updates in Intune by creating update rings and enabling a collection of settings that configure when Windows 10 updates will be installed.
Select Devices > Windows > Windows 10 Update Rings > Create.
Under Update ring settings, configure settings for your business needs.
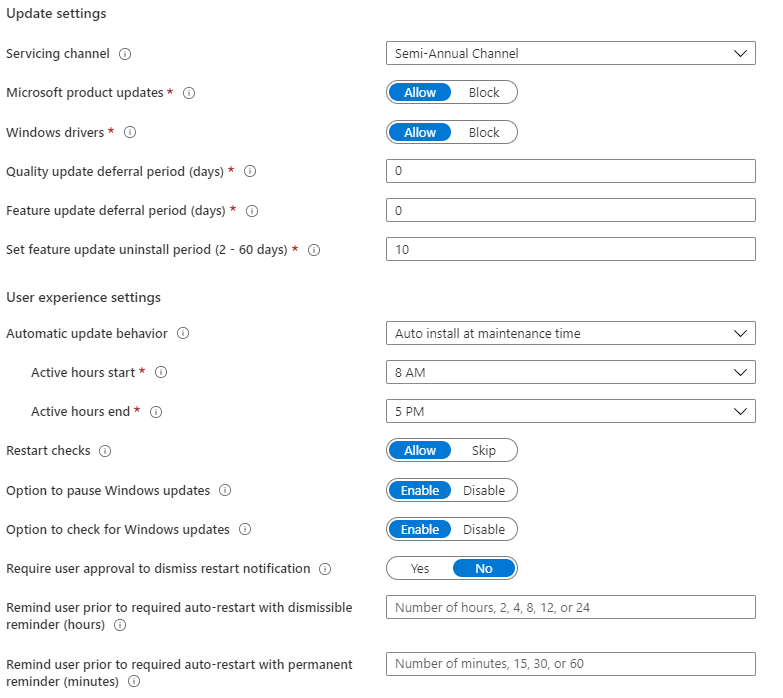
Under Assignments, choose + Select groups to include, and then assign the update ring to one or more groups. To fine-tune the assignment, use + Select groups to exclude.
Manage Windows 10 feature updates in Intune to bring devices to the Windows version you specify (i.e., 1803 or 1809) and freeze the feature set on those devices until you choose to update them to a later Windows version.
Select Devices > Windows > Windows 10 Feature updates > Create.
Under Basics, specify a name, a description (optional), and, for Feature update to deploy, select the version of Windows with the feature set you want, and then select Next.
Under Assignments, choose and select groups to include and then assign the feature update deployment to one or more groups.
For corporate-enrolled devices, configure iOS updates to simplify the update management experience for users and ensure that devices are automatically updated to meet the required compliance level. Configure iOS update policy.
Follow these steps:
Select Devices > Update policies for iOS/iPadOS > Create profile.
On the Basics tab, specify a name for this policy, specify a description (optional), and then select Next.
On the Update policy settings tab, configure the following:
Select version to install. You can choose from:
Latest update: This deploys the most recently released update for iOS/iPadOS.
Any previous version that is available in the dropdown box. If you select a previous version, you must also deploy a device configuration policy to delay visibility of software updates.
Schedule type: Configure the schedule for this policy:
Update at next check-in. The update installs on the device the next time it checks in with Intune. This is the simplest option and has no additional configurations.
Update during scheduled time. You configure one or more windows of time during which the update will install upon check-in.
Update outside of scheduled time. You configure one or more windows of time during which the updates won't install upon check-in.
Weekly schedule: If you choose a schedule type other than update at next check-in, configure the following options:
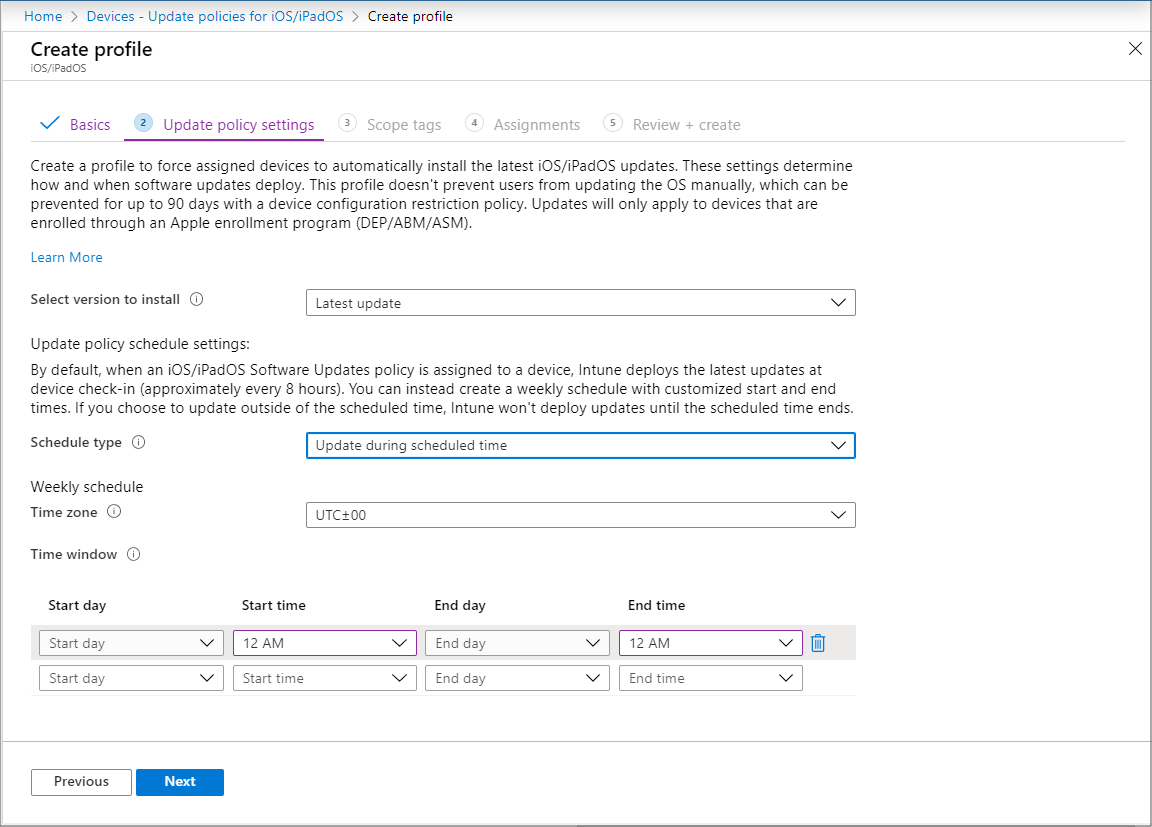
Choose a time zone.
Define a time window. Define one or more blocks of time that restrict when the updates install. Options include start day, start time, end day, and end time. By using a start day and end day, overnight blocks are supported. If you do not configure times to start or end, the configuration results in no restriction and updates can install at any time.
Ensure devices are encrypted
Configure Bitlocker to encrypt Windows 10 devices
Select Devices > Configuration profiles > Create profile.
Set the following options:
Platform: Windows 10 and later
Profile type: Endpoint protection
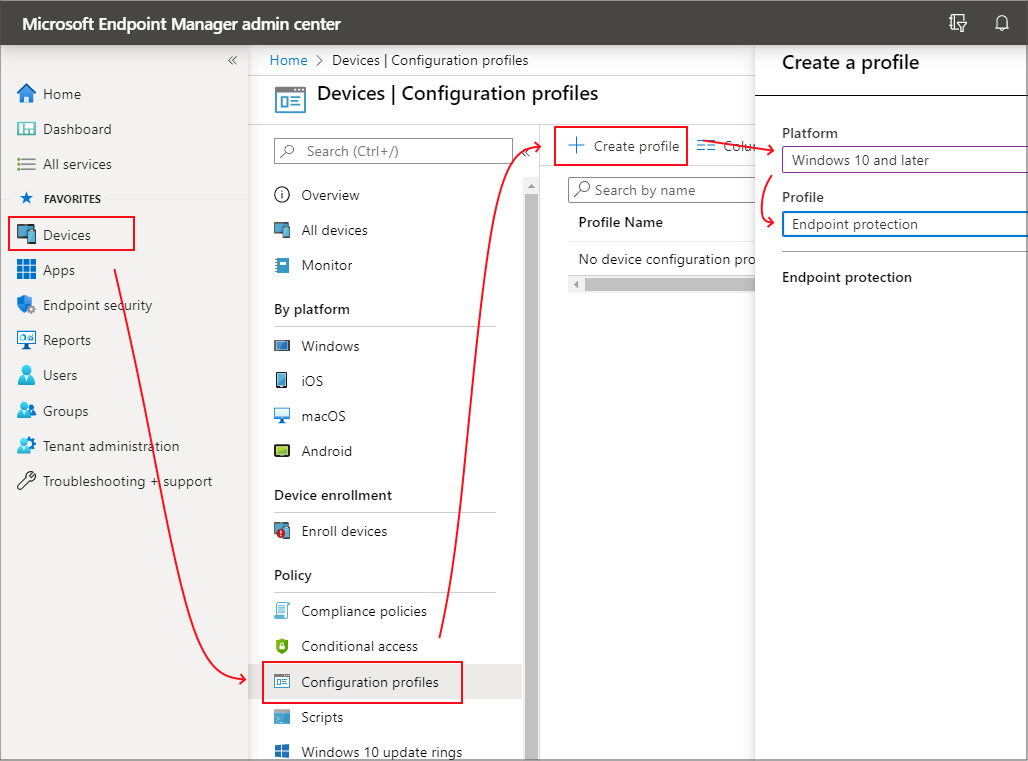
Select Settings > Windows Encryption.
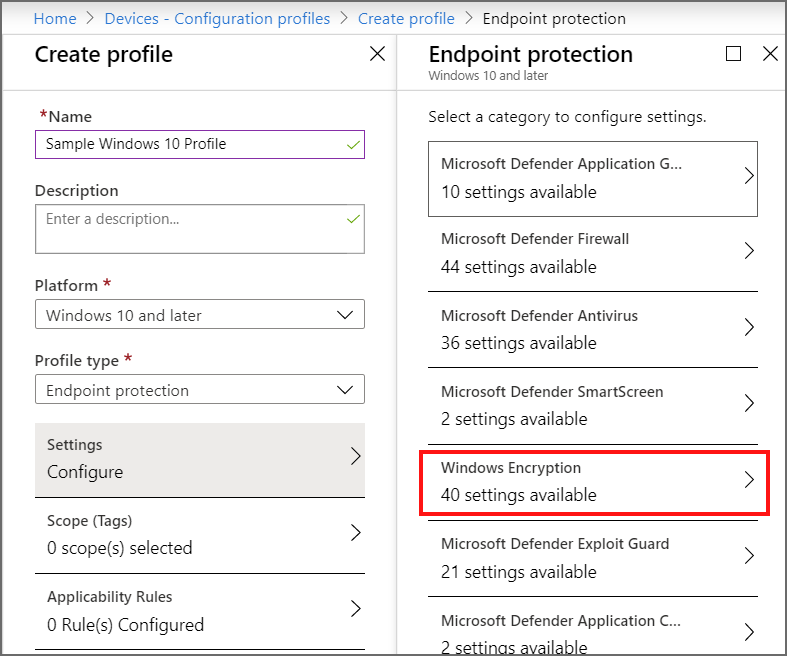
Configure settings for BitLocker to meet your business needs, and then select OK.
Configure FileVault encryption on macOS devices
Select Devices > Configuration profiles > Create profile.
Set the following options:
Platform: macOS.
Profile type: Endpoint protection.
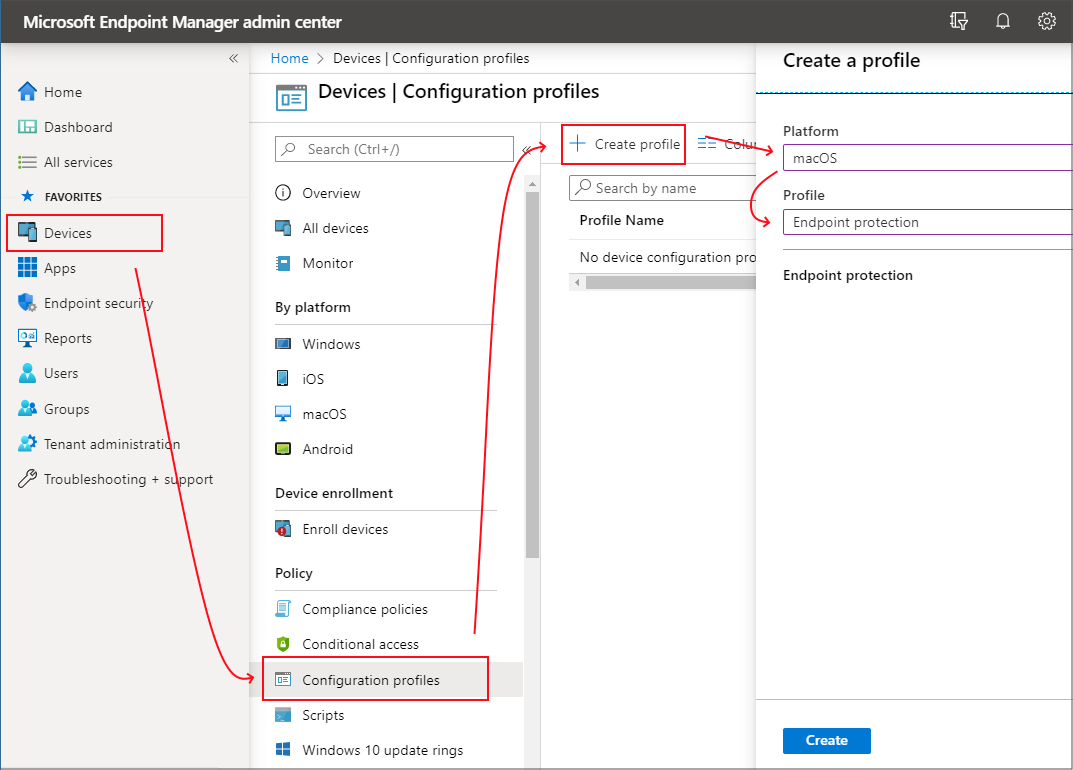
Select Settings > FileVault.
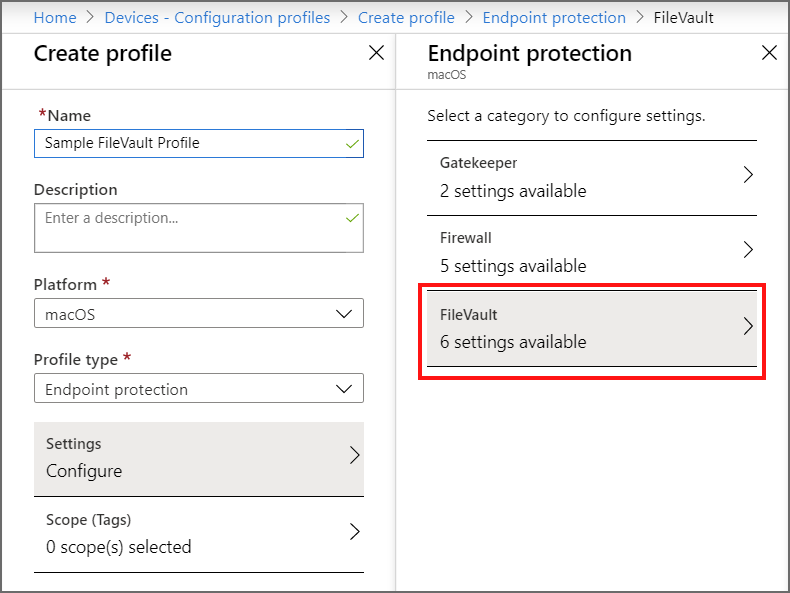
For FileVault, select Enable.
For Recovery key type, only Personal key is supported.
Configure the remaining FileVault settings to meet your business needs, and then select OK.
Create application protection policies to protect corporate data at the app-level
To ensure your data remains safe or contained in a managed app, create app protection policies (APP). A policy can be a rule that is enforced when the user attempts to access or move "corporate" data, or a set of actions that are prohibited or monitored when the user is inside the app.
The APP data protection framework is organized into three distinct configuration levels, with each level building off the previous level:
Enterprise basic data protection (Level 1) ensures that apps are protected with a PIN and encrypted, and performs selective wipe operations. For Android devices, this level validates Android device attestation. This is an entry-level configuration that provides similar data protection control in Exchange Online mailbox policies and introduces IT and the user population to APP.
Enterprise enhanced data protection (Level 2) introduces APP data leakage prevention mechanisms and minimum OS requirements. This is the configuration that is applicable to most mobile users accessing work or school data.
Enterprise high data protection (Level 3) introduces advanced data protection mechanisms, enhanced PIN configuration, and APP Mobile Threat Defense. This configuration is desirable for users that are accessing high-risk data.
Follow these steps:
In Intune portal, choose Apps > App protection policies. This selection opens the App protection policies details, where you create new policies and edit existing policies.
Select Create policy and select either iOS/iPadOS or Android. The Create policy pane is displayed.
Choose the apps that you would like to apply the App Protection Policy to.
Configure Data Protection Settings:
iOS/iPadOS data protection. For information, see iOS/iPadOS app protection policy settings - Data protection.
Android data protection. For information, see Android app protection policy settings - Data protection.
Configure Access Requirement Settings:
iOS/iPadOS access requirements. For information, see iOS/iPadOS app protection policy settings - Access requirements.
Android access requirements. For information, see Android app protection policy settings - Access requirements.
Configure Conditional Launch Settings:
iOS/iPadOS conditional launch. For information, see iOS/iPadOS app protection policy settings - Conditional launch.
Android conditional launch. For information, see Android app protection policy settings - Conditional launch.
Click Next to display the Assignments page.
When you are done, click Create to create the app protection policy in Intune.
|
|
Additional deployment objectives |
IV. Endpoint threat detection is used to monitor device risk
Once you've accomplished your first three objectives, the next step is to configure endpoint security so that advanced protection is provisioned, activated, and monitored. A single pane of glass is used to consistently manage all endpoints together.
Route endpoint logs and transactions to a SIEM or Power BI
Using the Intune Data warehouse, send device and app management data to reporting or SIEM tools for intelligent filtering of alerts to reduce noise.
Follow these steps:
Select Reports > Intune Data warehouse > Data warehouse.
Copy the custom feed URL. For example:
https://fef.tenant.manage.microsoft.com/ReportingService/DataWarehouseFEService?api-version=v1.0Open Power BI Desktop or your SIEM solution.
From your SIEM solution
Choose the option to import or get data from an Odata feed.
From PowerBI
From the menu, select File > Get Data > OData feed.
Paste the custom feed URL that you copied from the earlier step into the URL box in the OData feed window.
Select Basic.
Select OK.
Select Organization account, and then sign in with your Intune credentials.
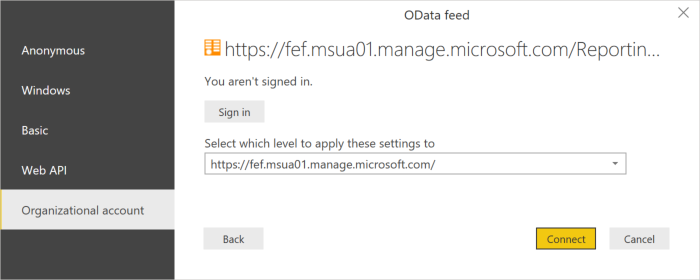
Select Connect. The Navigator will open and show you the list of tables in the Intune Data Warehouse.
Select the devices and the ownerTypes tables. Select Load. Power BI loads data to the model.
Create a relationship. You can import multiple tables to analyze not just the data in a single table, but related data across tables. Power BI has a feature called autodetect that attempts to find and create relationships for you. The tables in the Data Warehouse have been built to work with the autodetect feature in Power BI. However, even if Power BI doesn't automatically find the relationships, you can still manage the relationships.
Select Manage Relationships.
Select Autodetect if Power BI has not already detected the relationships.
V. Access control is gated on endpoint risk for both corporate devices and BYOD
Corporate devices are enrolled with a cloud enrollment service such as DEP, Android Enterprise, or Windows AutoPilot
Building and maintaining customized operating system images is a time-consuming process, and may include spending time applying custom operating system images to new devices to prepare them for use.
With Microsoft Intune cloud enrollment services, you can give new devices to your users without the need to build, maintain, and apply custom operating system images to the devices.
Windows Autopilot is a collection of technologies used to set up and preconfigure new devices, getting them ready for productive use. You can also use Windows Autopilot to reset, repurpose, and recover devices.
Configure Windows Autopilot to automate Microsoft Entra join and enroll new corporate-owned devices into Intune.
Configure Apple DEP to automatically enroll iOS and iPadOS devices.
Products covered in this guide
Microsoft Azure
Microsoft 365
Microsoft Intune (includes Microsoft Intune and Configuration Manager)
Microsoft Defender for Endpoint
Zero Trust and your OT networks
Microsoft Defender for IoT is a unified security solution built specifically to identify devices, vulnerabilities, and threats across IoT and operational technology (OT) networks. Use Defender for IoT to apply security across your entire IoT/OT environment, including existing devices that may not have built-in security agents.
OT networks often differ from traditional IT infrastructure, and need a specialized approach to zero trust. OT systems use unique technology with proprietary protocols, and may have aging platforms with limited connectivity and power, or specific safety requirements and unique exposures to physical attacks.
Defender for IoT supports zero trust principles by addressing OT-specific challenges, such as:
- Helping you control remote connections into your OT systems
- Reviewing and helping you reduce interconnections between dependent systems
- Finding single points of failure in your network
Deploy Defender for IoT network sensors to detect devices and traffic and watch for OT-specific vulnerabilities. Segment your sensors into sites and zones across your network to monitor traffic between zones, and follow Defender for IoT's risk-based mitigation steps to lower risk across your OT environment. Defender for IoT then continuously monitors your devices for anomalous or unauthorized behavior.
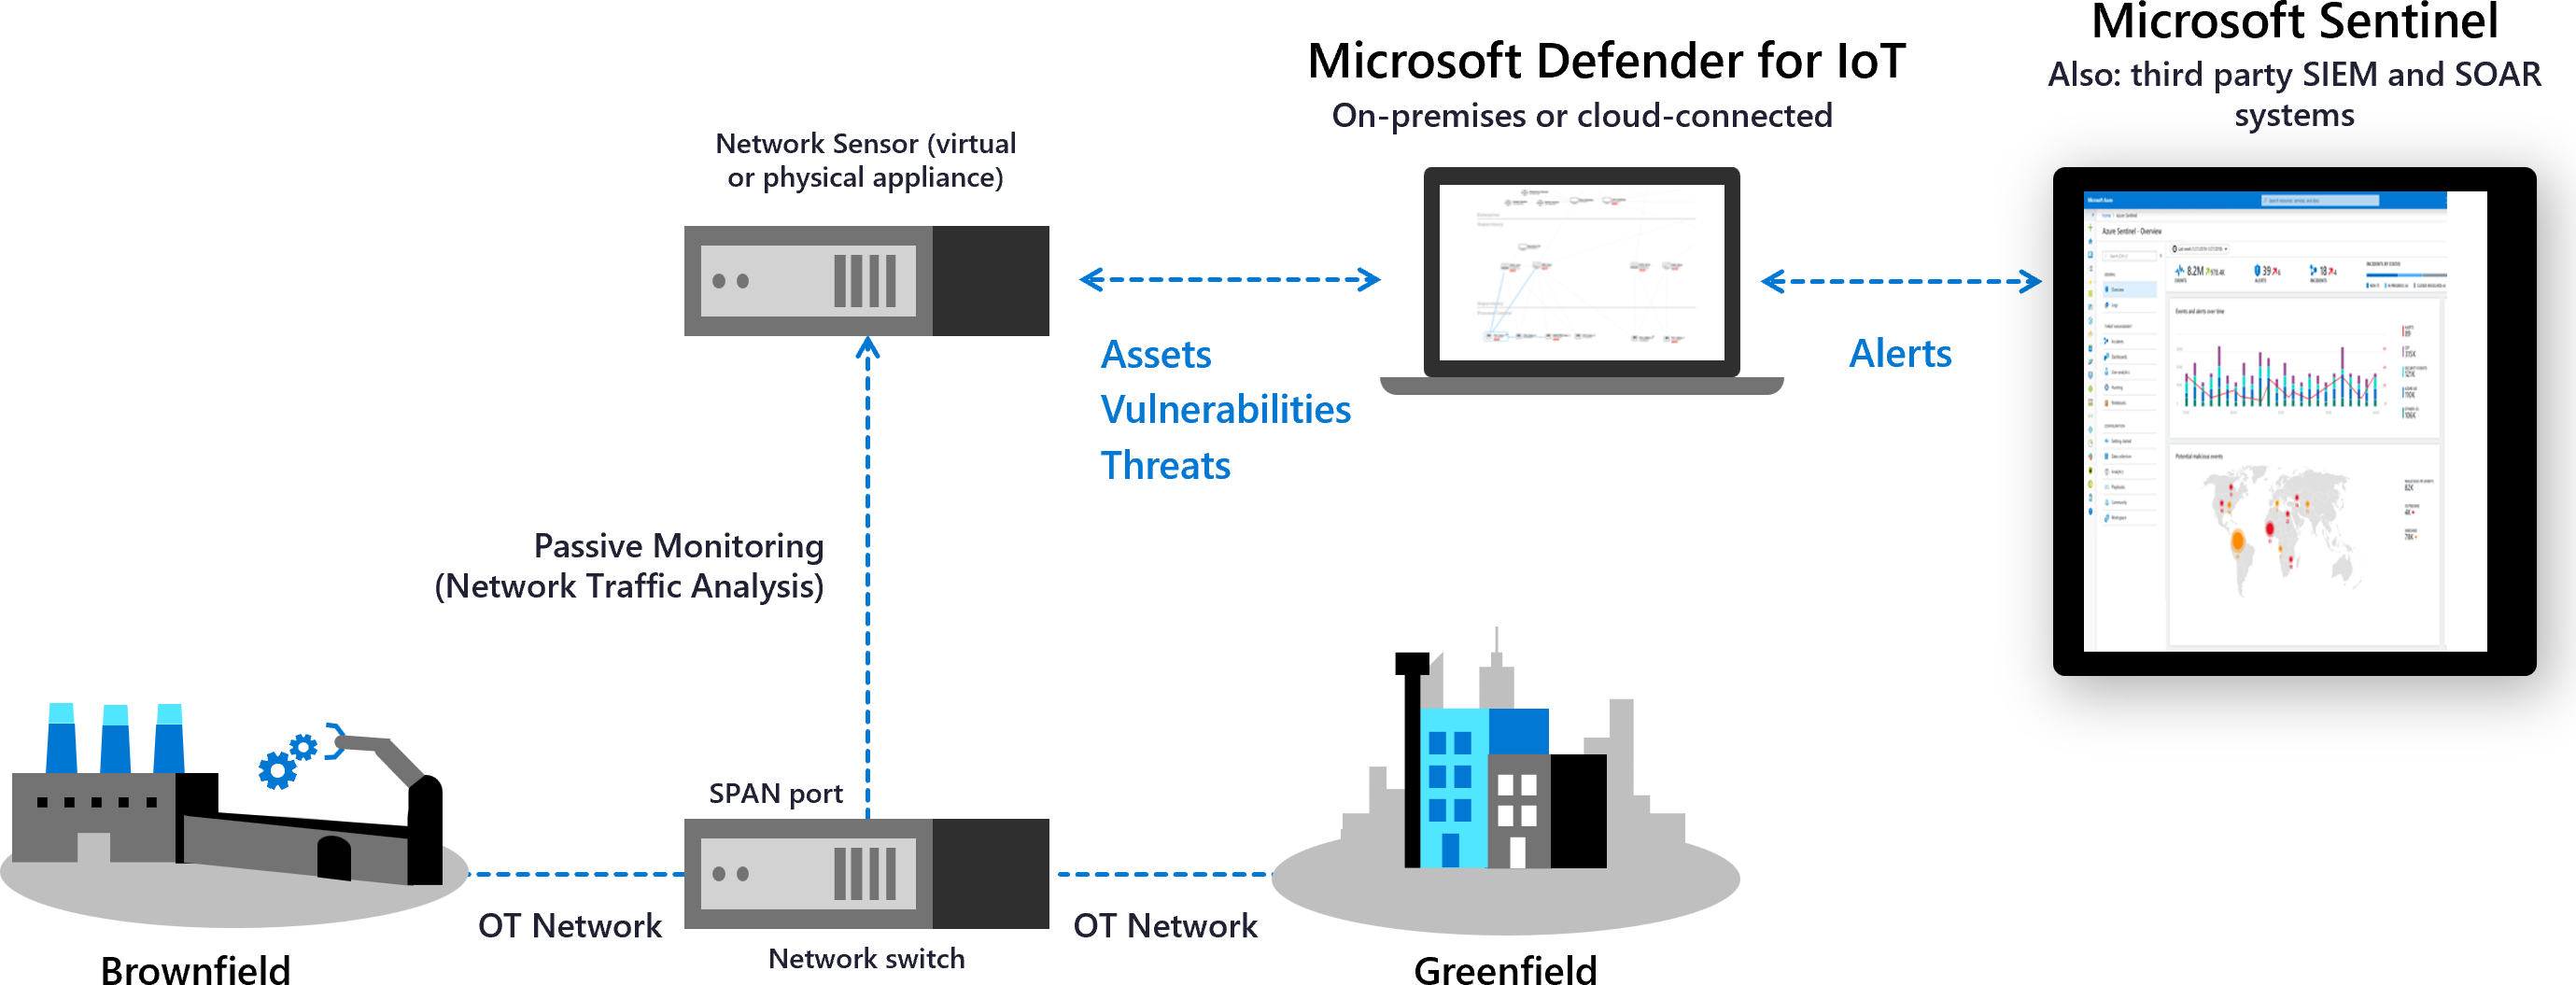
Integrate with Microsoft services, such as Microsoft Sentinel and other partner services, including both SIEM and ticketing systems, to share Defender for IoT data across your organization.
For more information, see:
- Zero Trust and your OT networks
- Monitor your OT networks with Zero Trust principles
- Investigate Defender for IoT incidents with Microsoft Sentinel
Conclusion
A Zero Trust approach can significantly strengthen the security posture of your devices and endpoints. For further information or help with implementation, please contact your Customer Success team, or continue to read through the other chapters of this guide that spans all Zero Trust pillars.
The Zero Trust deployment guide series