How to configure client communication ports in Configuration Manager
Applies to: Configuration Manager (current branch)
You can change the request port numbers that Configuration Manager clients use to communicate with site systems that use HTTP and HTTPS for communication. Although HTTP or HTTPS is more likely to be already configured for firewalls, client notification that uses HTTP or HTTPS requires more CPU usage and memory on the management point computer than if you use a custom port number. You can also specify the site port number to use if you wake up clients by using traditional wake-up packets.
When you specify HTTP and HTTPS request ports, you can specify both a default port number and an alternative port number. If communication fails with the default port, clients automatically try the alternative port. You can specify port settings for HTTP and HTTPS data communication.
The default values for client request ports are 80 for HTTP traffic and 443 for HTTPS traffic. Change them only if you don't want to use these default values. A typical scenario for using custom ports is when you use a custom website in IIS rather than the default website. If you change the default port numbers for the default website in IIS, and other applications also use the default website, they're likely to fail.
Important
Don't change the port numbers in Configuration Manager without understanding the consequences. For example:
- If you change the port numbers for the client request services as a site configuration, and existing clients aren't reconfigured to use the new port numbers, these clients will be unmanaged.
- Before you configure a non-default port number, make sure that firewalls and all intervening network devices support this configuration. If you will manage clients on the internet, and change the default HTTPS port number of 443, routers and firewalls on the internet might block this communication.
To make sure that clients don't become unmanaged after you change the request port numbers, configure clients to use the new request port numbers. When you change the request ports on a primary site, any attached secondary sites automatically inherit the same port configuration.
How clients get the port configuration
When the Configuration Manager site is published to Active Directory Domain Services, new and existing clients that can access this information will automatically be configured with their site port settings. You don't need to take further action.
Clients that can't access this information published to Active Directory include:
- Workgroup clients
- Clients from another Active Directory forest
- Clients that are configured for internet-only
- Clients that are currently on the internet.
If you change the default port numbers after you install these clients, reinstall them.
Install any new clients by using one of the following methods:
Reinstall the clients by using the Client Push Installation Wizard. Client push installation automatically configures clients with the current site port configuration. For more information, see How to install Configuration Manager clients with client push.
Reinstall the clients by using CCMSetup.exe and the client.msi installation properties of CCMHTTPPORT and CCMHTTPSPORT. For more information, see About client installation properties.
Reinstall the clients by using a method that searches Active Directory Domain Services for Configuration Manager client installation properties. For more information, see About client installation properties published to Active Directory Domain Services.
To reconfigure the port numbers for existing clients, you can also use the script Portswitch.vbs. Find this script on the installation media in the SMSSETUP\Tools\PortConfiguration folder.
Important
For existing and new clients that are currently on the internet, configure the non-default port numbers by using the CCMSetup.exe client.msi properties of CCMHTTPPORT and CCMHTTPSPORT.
After changing the request ports on the site, when you install new clients with the site-wide client push installation method, they're automatically configured with the current port numbers for the site.
Configure ports for a site
In the Configuration Manager console, go to the Administration workspace, expand Site Configuration, and select the Sites node.
Select the primary site to configure.
On the Home tab of the ribbon, select Properties.
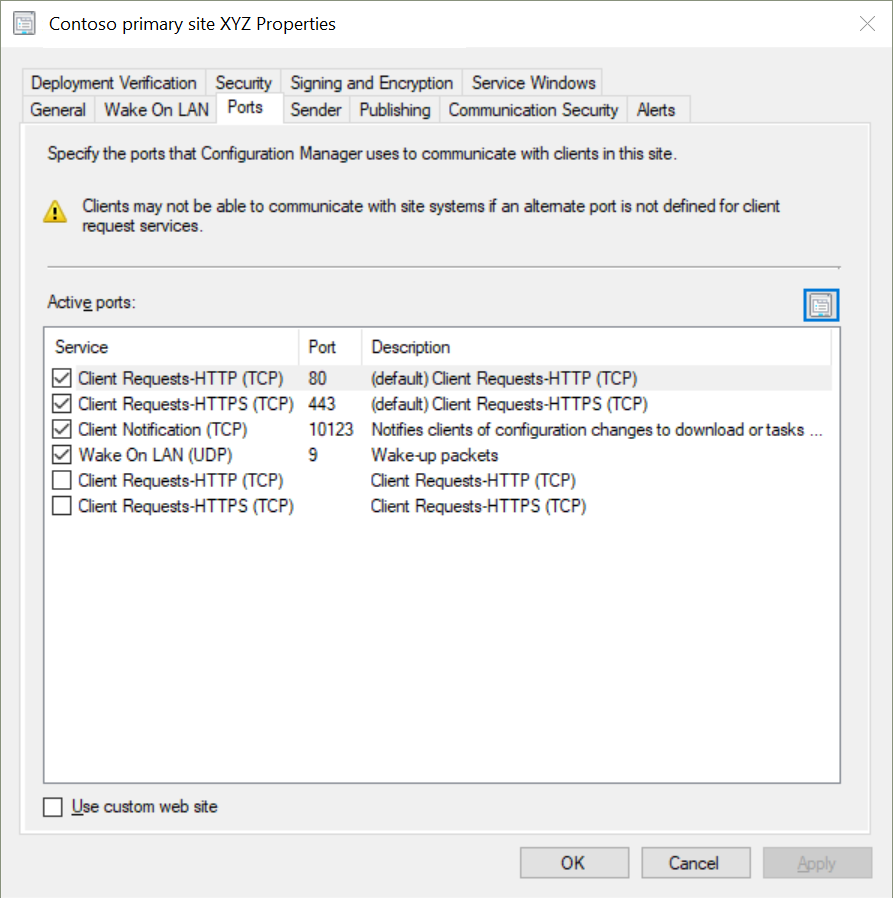
Switch to the Ports tab.

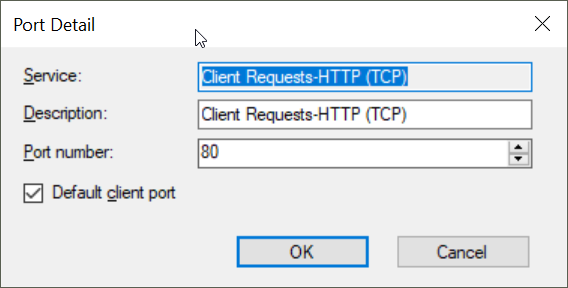
Select a service, and then select the Properties icon to open the Port Detail window.

Specify the port number and description for the item, and then select OK.
If you want to use the custom website SMSWeb for site systems that run IIS, select Use custom web site. For more information, see Websites for site system servers.
Select OK to save the configuration and close the site properties window.
Repeat this procedure for all primary sites in the hierarchy.