Create a Postman collection for a custom connector
Note
This topic is part of a tutorial series on creating and using custom connectors in Azure Logic Apps, Power Automate, and Power Apps. Make sure you read the custom connector overview to understand the process.
Postman is an app for making HTTP requests, and Postman collections help you organize and group related API requests. Collections can make custom connector development faster and easier if you don't already have an OpenAPI definition for your API.
In this article, you create a collection that includes a request and response from the Azure Cognitive Services Text Analytics API. In a related topic, you create a connector by using this collection.
Prerequisites
Create an HTTP request for the API
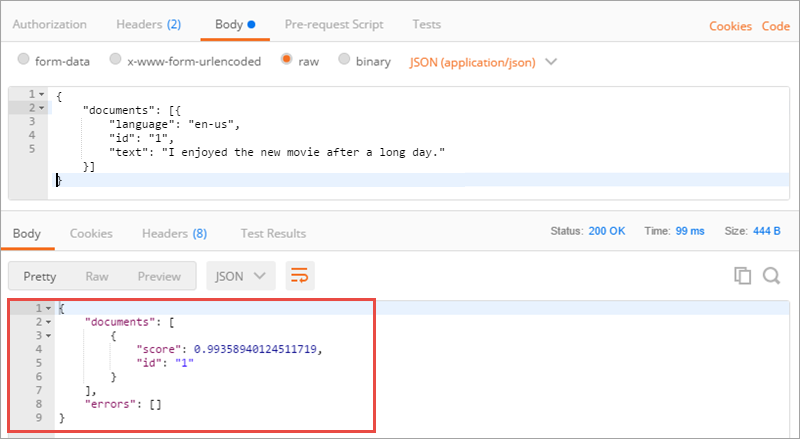
In Postman, on the Builder tab, select the HTTP method, enter the request URL for the API endpoint, and select an authorization protocol, if any.

Parameter Value HTTP method POST Request URL https://westus.api.cognitive.microsoft.com/text/analytics/v2.0/sentimentAuthorization No Auth (you specify an API key in the next step) Enter key-value pairs for the request header. For common HTTP headers, you can select from the dropdown list.

Key Value Ocp-Apim-Subscription-Key Your-API-subscription-key, which you can find in your Cognitive Services account. Content-Type application/json Enter content that you want to send in the request body. To check that the request works by getting a response back, select Send.

{
    "documents": [{
        "language": "en-us",
        "id": "1",
        "text": "I enjoyed the new movie after a long day."
    }]
}
The response field contains the full response from the API, which includes the result or an error, if one occurred.
Save the collection
Select Save.

On the Save request dialog, enter a request name and description. The custom connector uses these values for the API operation summary and description.
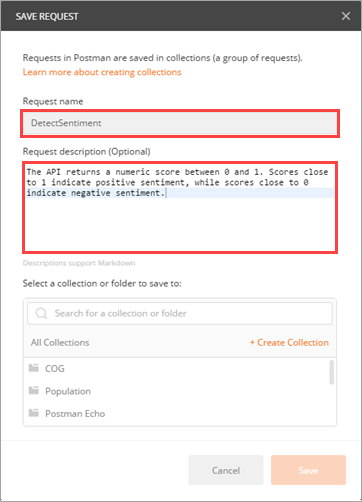
Parameter Value Request name DetectSentiment Request description The API returns a numeric score between 0 and 1. Scores close to 1 indicate positive sentiment, while scores close to 0 indicate negative sentiment. Select + Create Collection, and enter name for the collection. The custom connector uses this value when you call the API. Select the check mark (✓), which creates a collection folder, and then select Save to SentimentDemo.
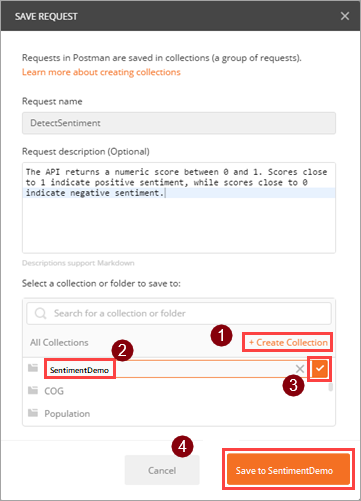
Parameter Value Collection name SentimentDemo
Save the request response
Now that you've saved your request, you can save the response. That way, the response will appear as an example when you load the request later.
Above the response window, select Save Response.

Custom connectors support only one response per request. If you save multiple responses per request, only the first one will be used.
At the top of the app, enter a name for your example response, and then select Save Example.

If your API has additional features, you can continue to build your Postman collection with any additional requests and responses.
Export the Postman collection
You now export the collection as a JSON file, which you import by using the custom connector wizard. Before you export the collection, remove the content type and security headers—these were required to make API requests, but they're handled differently in the custom connector.
On the Headers tab, hover over each header and select the X next to the header to remove it. Select Save to save the collection again.

Select the ellipsis (…) next to the collection, and then select Export.
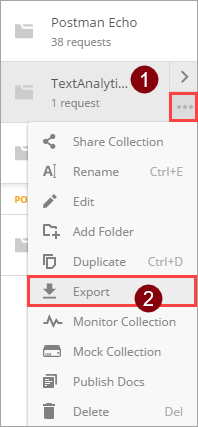
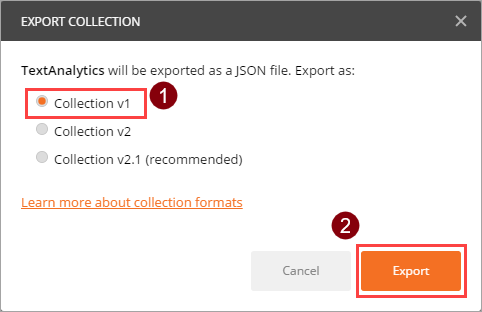
Select the Collection v1 export format, select Export, and then browse to the location where you want to save the JSON file.
Note
Currently, you can use only v1 collections for custom connectors.
Next steps
You're now ready to define a custom connector based on the Postman collection you created:
Provide feedback
We greatly appreciate feedback on issues with our connector platform, or new feature ideas. To provide feedback, go to Submit issues or get help with connectors and select your feedback type.