This article explains how to deploy microservice applications to Azure Spring Apps using the well-known sample app PetClinic.
The Pet Clinic sample demonstrates the microservice architecture pattern. The following diagram shows the architecture of the PetClinic application on the Azure Spring Apps Enterprise plan.
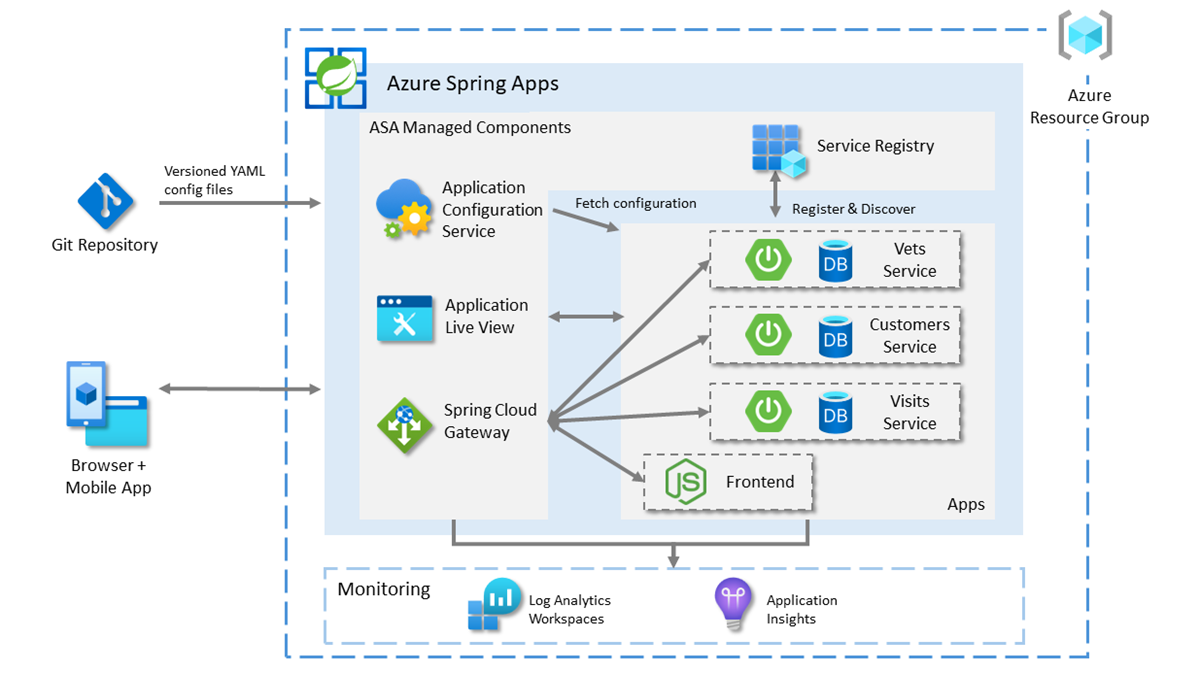
The diagram shows the following architectural flows and relationships of the Pet Clinic sample:
- Uses Azure Spring Apps to manage the frontend and backend apps. The backend apps are built with Spring Boot and each app uses HSQLDB as the persistent store. The reforged frontend app builds upon Pet Clinic API Gateway App with Node.js serving as a standalone frontend web application.
- Uses the managed components on Azure Spring Apps, including Service Registry, Application Configuration Service, Spring Cloud Gateway, and Application Live View. The Application Configuration Service reads the Git repository configuration.
- Exposes the URL of Spring Cloud Gateway to route request to backend service apps, and exposes the URL of the Application Live View to monitor the backend apps.
- Analyzes logs using the Log Analytics workspace.
- Monitors performance with Application Insights.
The Pet Clinic sample demonstrates the microservice architecture pattern. The following diagram shows the architecture of the PetClinic application on the Azure Spring Apps Standard plan.
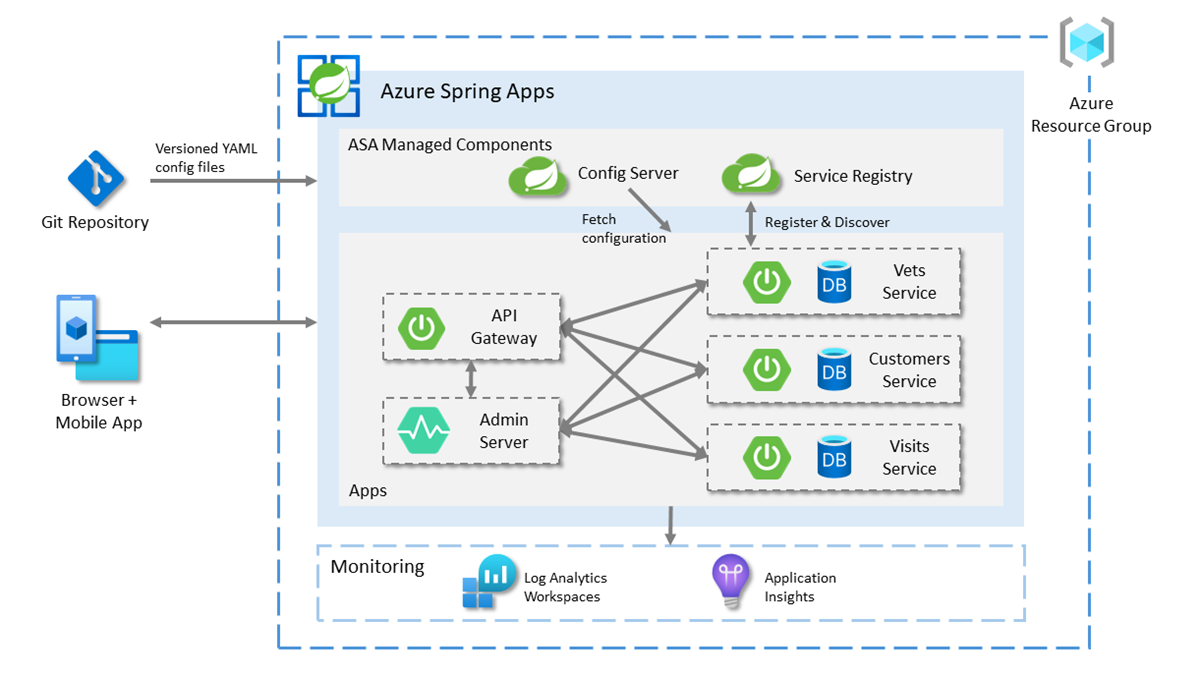
The diagram shows the following architectural flows and relationships of the Pet Clinic sample:
- Uses Azure Spring Apps to manage the Spring Boot apps. Each app uses HSQLDB as the persistent store.
- Uses the managed components Spring Cloud Config Server and Eureka Service Registry on Azure Spring Apps. The Config Server reads the Git repository configuration.
- Exposes the URL of API Gateway to load balance requests to service apps, and exposes the URL of the Admin Server to manage the applications.
- Analyzes logs using the Log Analytics workspace.
- Monitors performance with Application Insights.
Note
This article uses a simplified version of PetClinic, using an in-memory database that isn't production-ready to quickly deploy to Azure Spring Apps.
The deployed app admin-server exposes public access, which is a risk point. The production environment needs to secure the Spring Boot Admin application.
This article provides the following options for deploying to Azure Spring Apps:
- The Azure portal option is the easiest and the fastest way to create resources and deploy applications with a single click. This option is suitable for Spring developers who want to quickly deploy applications to Azure cloud services.
- The Azure portal + Maven plugin option is a more conventional way to create resources and deploy applications step by step. This option is suitable for Spring developers using Azure cloud services for the first time.
- The Azure CLI option uses a powerful command line tool to manage Azure resources. This option is suitable for Spring developers who are familiar with Azure cloud services.
- The Azure portal + Maven plugin option is a more conventional way to create resources and deploy applications step by step. This option is suitable for Spring developers using Azure cloud services for the first time.
- The Azure Developer CLI option is a more efficient way to automatically create resources and deploy applications through simple commands. The Azure Developer CLI uses a template to provision the Azure resources needed and to deploy the application code. This option is suitable for Spring developers who are familiar with Azure cloud services.
1. Prerequisites
2. Prepare the Spring project
Use the following steps to prepare the sample locally:
Clone the sample project by using the following command:
git clone https://github.com/Azure-Samples/spring-petclinic-microservices.git
Navigate to the project root directory and then use the following command to run the sample project locally:
bash ./scripts/run_all_without_infra.sh
After the script completes successfully, go to http://localhost:8080 in your browser to access the PetClinic application.
Use the following steps to initialize the Pet Clinic application using Azure Developer CLI templates:
In the Bash window, create a new, empty folder and then navigate to it.
Use the following command to initialize the project:
azd init --template Azure-Samples/spring-petclinic-microservices
The following list describes the command interaction:
- Enter a new environment name: Provide an environment name, which is used as a suffix for the resource group that is created to hold all Azure resources. This name should be unique within your Azure subscription.
The console outputs messages similar to the following example:
Initializing a new project (azd init)

Downloading template code to: <your-local-path>
(✓) Done: Initialized git repository
Enter a new environment name: <your-env-name>

SUCCESS: New project initialized!
You can view the template code in your directory: <your-local-path>
Learn more about running 3rd party code on our DevHub: https://aka.ms/azd-third-party-code-notice
3. Prepare the cloud environment
This section describes how to create an Azure Spring Apps service instance and prepare the Azure cloud environment.
3.1. Sign in to the Azure portal
Go to the Azure portal, enter your credentials, and sign in to the portal. The default view is your service dashboard.
3.2. Create an Azure Spring Apps instance
Use the following steps to create the service instance:
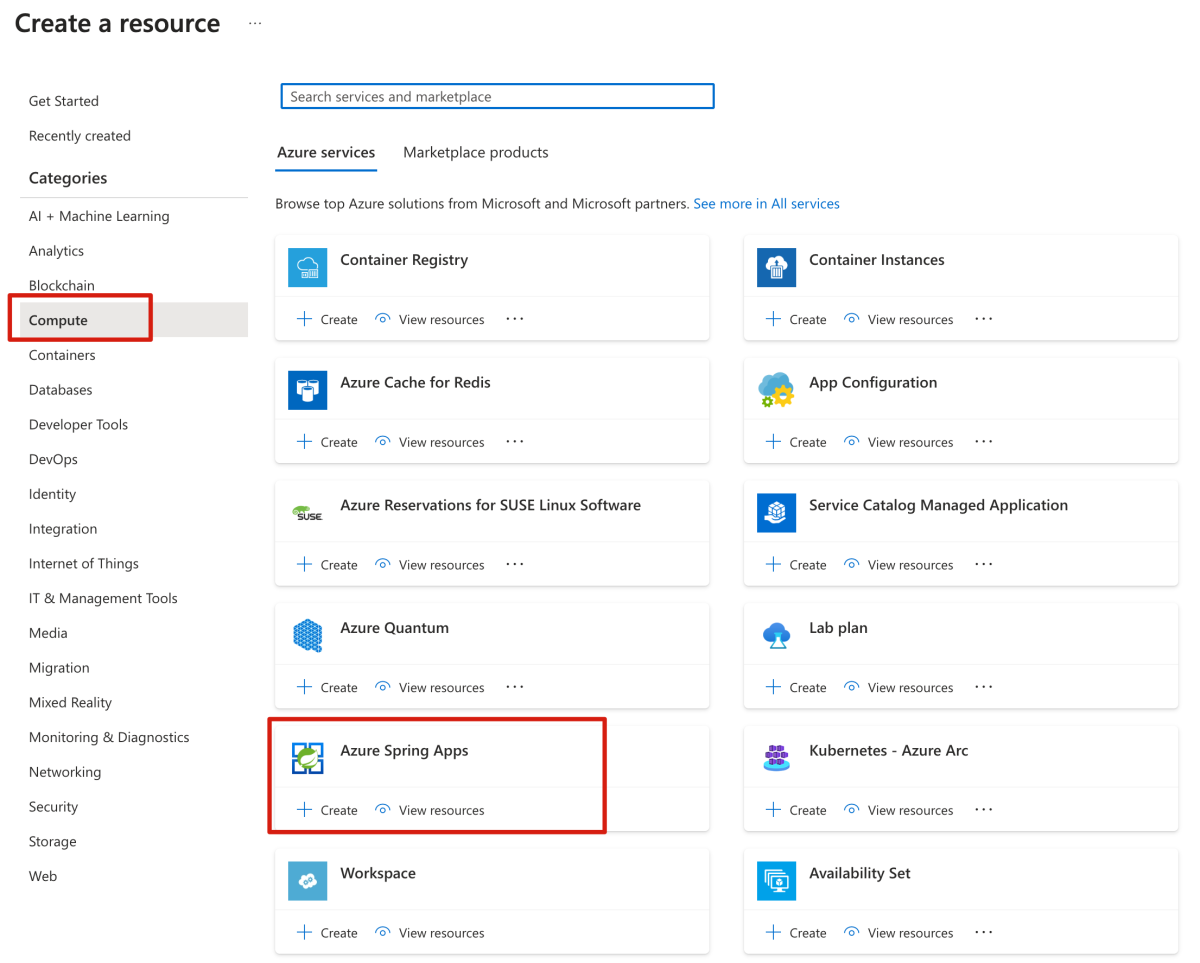
Select Create a resource in the corner of the Azure portal.
On the Azure Services tab, select Compute > Azure Spring Apps.
On the Create Azure Spring Apps page, fill out the form on the Basics tab.
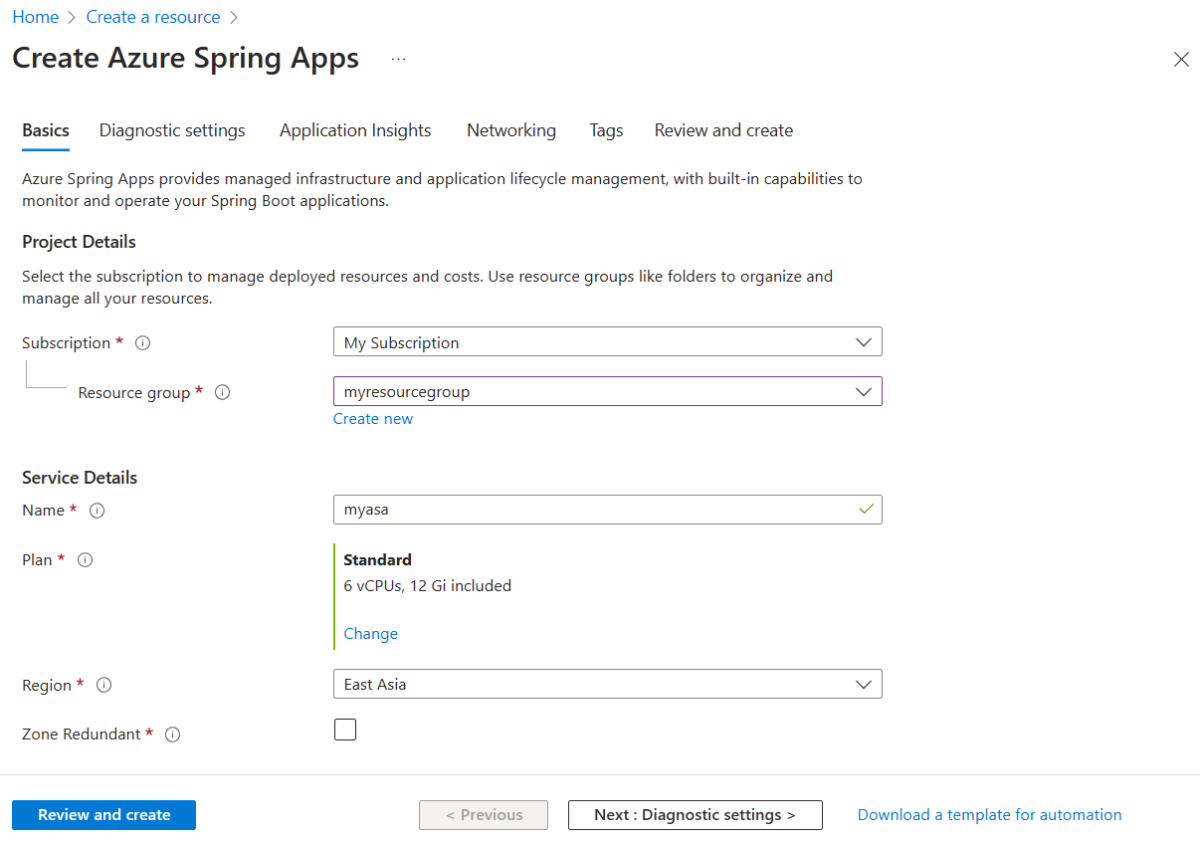
Use the following table as a guide for completing the form. The recommended Plan is Standard.
| Setting |
Suggested value |
Description |
| Subscription |
Your subscription name. |
The Azure subscription that you want to use for your server. If you have multiple subscriptions, choose the subscription for which you'd like to be billed for the resource. |
| Resource group |
myresourcegroup |
A new resource group name or an existing one from your subscription. |
| Name |
myasa |
A unique name that identifies your Azure Spring Apps instance. The name must be between 4 and 32 characters long and can contain only lowercase letters, numbers, and hyphens. The first character of the service name must be a letter and the last character must be either a letter or a number. |
| Plan |
Standard |
The pricing plan determines the resources and cost associated with your instance. |
| Region |
The region closest to your users. |
The location that is closest to your users. |
| Zone Redundant |
Unselected |
Creates your Azure Spring Apps service in an Azure availability zone. Not currently supported in all regions. |
Navigate to the Diagnostic settings tab on the Create Azure Spring Apps page and then select Create new to create a new Log Analytics workspaces instance. On the Create new Log Analytics workspace page, update the name of the Log Analytics workspace as needed, and then select OK to confirm the creation.
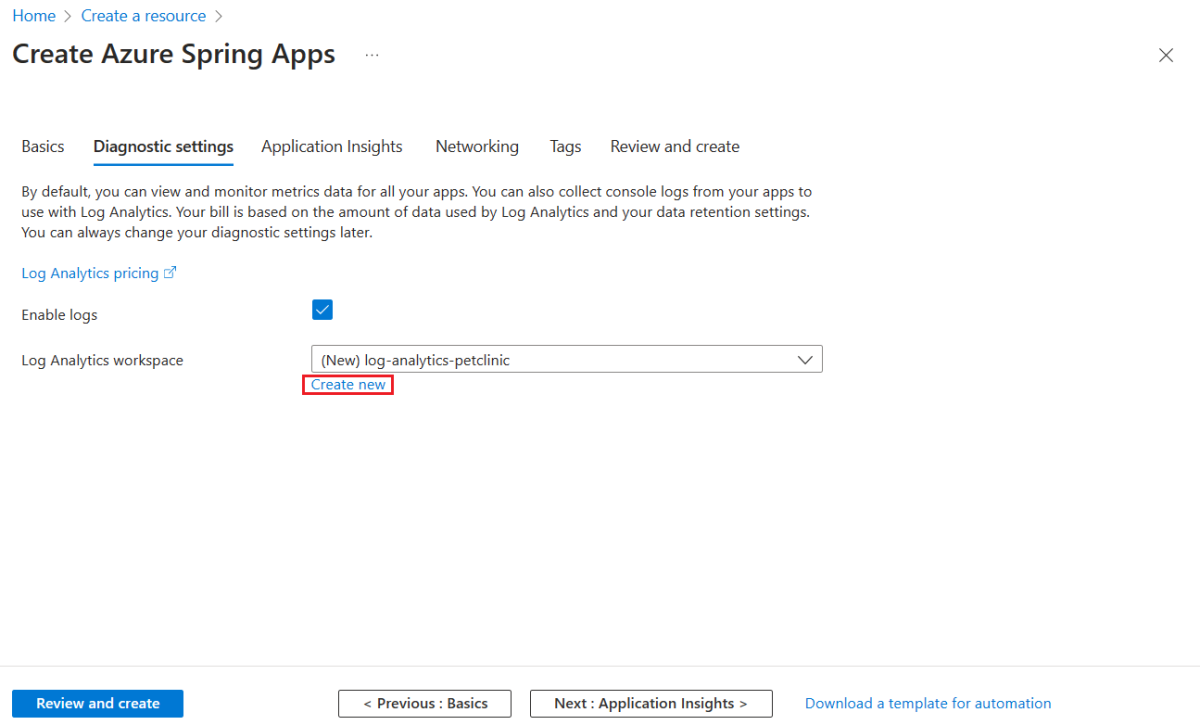
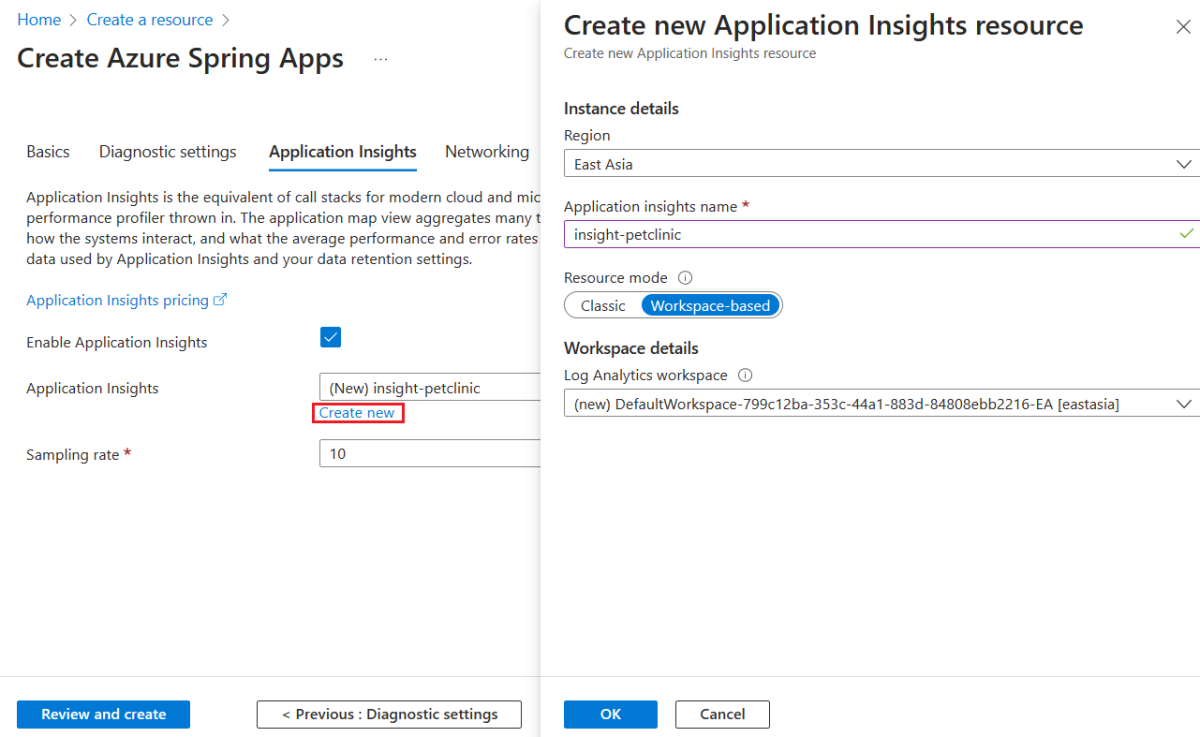
Navigate to the Application Insights tab on the Create Azure Spring Apps page and then select Create new to create a new Application Insights instance. On the Create new Application Insights resource page, update the Application insights name as needed, select Workspace-based for Resource mode, and then select OK to confirm the creation.
Select Review and Create to review your selections. Then, select Create to provision the Azure Spring Apps instance.
Select the Notifications icon (a bell) to monitor the deployment process. After the deployment finishes, you can select Pin to dashboard to create a shortcut on your Azure portal dashboard to the service's Overview page.
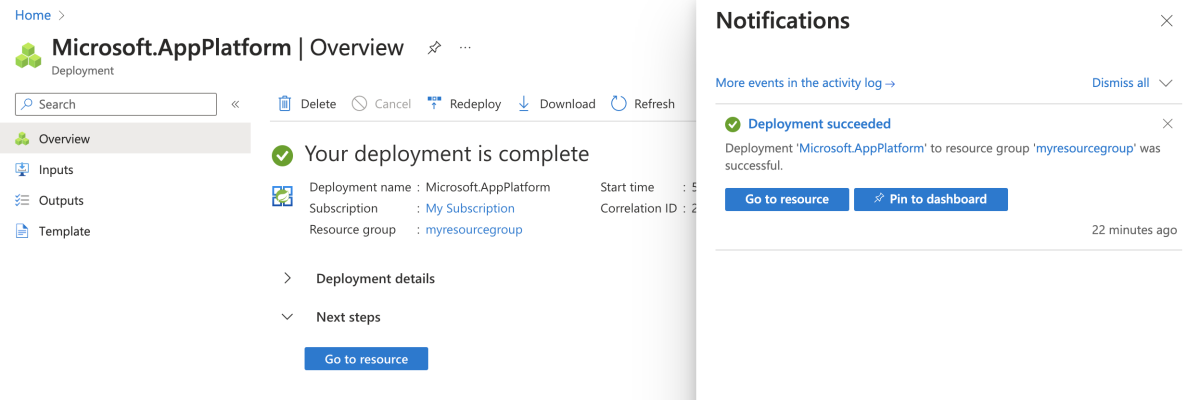
Select Go to resource to go to the Azure Spring Apps Overview page.
Select Config Server in the navigation pane.
On the Config Server page, for URI, enter https://github.com/Azure-Samples/spring-petclinic-microservices-config.git and then select Validate.
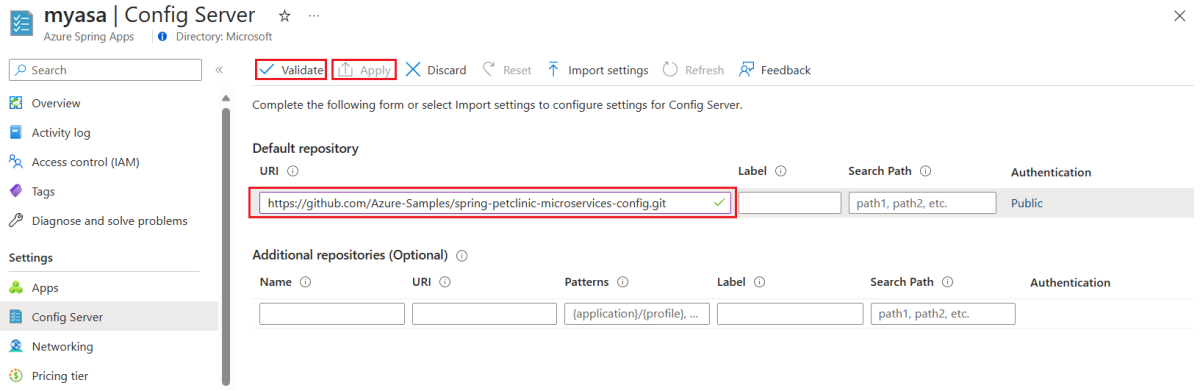
After validation, select Apply to finish the Config Server configuration.
Use the following steps to create the required resources:
Use the following command to sign in to Azure with OAuth2. Ignore this step if you already signed in.
azd auth login
The console outputs messages similar to the following example:
Logged in to Azure.
Use the following command to package a deployable copy of your application, provision the template's infrastructure to Azure, and then deploy the application code to those newly provisioned resources:
azd provision
The following list describes the command interactions:
- Select an Azure Subscription to use: Use arrows to move, type to filter, then press Enter.
- Select an Azure location to use: Use arrows to move, type to filter, then press Enter.
The console outputs messages similar to the following example:
SUCCESS: Your application was provisioned in Azure in xx minutes xx seconds.
You can view the resources created under the resource group rg-<your-environment-name> in Azure Portal:
https://portal.azure.com/#@/resource/subscriptions/<your-subscription-id>/resourceGroups/rg-<your-environment-name>/overview
Note
This command may take a while to complete. You're shown a progress indicator as it provisions Azure resources.
4. Deploy the apps to Azure Spring Apps
You can now deploy the app to Azure Spring Apps.
Use the following steps to deploy the microservice applications using the Maven plugin for Azure Spring Apps:
Navigate to the sample project directory and then use the following command to configure the apps for Azure Spring Apps:
./mvnw -P spring-apps com.microsoft.azure:azure-spring-apps-maven-plugin:1.17.0:config
The following list describes the command interactions:
- Select child modules to configure(input numbers separated by comma, eg: [1-2,4,6], ENTER to select ALL): Press Enter to select all.
- OAuth2 login: Authorize the sign in to Azure based on the OAuth2 protocol.
- Select subscription: Select the subscription list number of the Azure Spring Apps instance you created, which defaults to the first subscription in the list. If you use the default number, press Enter directly.
- Select Azure Spring Apps for deployment: Select the list number of the Azure Spring Apps instance you created. If you use the default number, press Enter directly.
- Select apps to expose public access:(input numbers separated by comma, eg: [1-2,4,6], ENTER to select NONE): Enter 1,5 for
admin-server and api-gateway.
- Confirm to save all the above configurations (Y/n): Press y. If you press n, the configuration isn't saved in the POM files.
Use the following command to build and deploy each application:
./mvnw azure-spring-apps:deploy
For the OAuth2 login prompt, authorize the login to Azure based on the OAuth2 protocol.
Note
Deployment to Azure Spring Apps can take up to 25 minutes.
After the command runs, a log displays output similar to the following example, which indicates that all deployments are successful:
[INFO] Deployment(default) is successfully updated.
[INFO] Deployment Status: Running
[INFO]   InstanceName:admin-server-default-xx-xx-xxx  Status:Running Reason:null       DiscoverStatus:UP
[INFO] Getting public url of app(admin-server)...
[INFO] Application url: https://<your-Azure-Spring-Apps-instance-name>-admin-server.azuremicroservices.io

...

[INFO] Getting public url of app(api-gateway)...
[INFO] Application url: https://<your-Azure-Spring-Apps-instance-name>-api-gateway.azuremicroservices.io
Use the following steps to package the app, provision the Azure resources required by the web application, and then deploy to Azure Spring Apps:
Use the following command to package a deployable copy of your application:
azd package
The console outputs messages similar to the following example:
SUCCESS: Your application was packaged for Azure in xx minutes xx seconds.
Use the following command to deploy the application code to those newly provisioned resources:
azd deploy
The console outputs messages similar to the following example:
Deploying services (azd deploy)

(✓) Done: Deploying service admin-server
- Endpoint: https://<your-Azure-Spring-Apps-instance-name>-admin-server.azuremicroservices.io

(✓) Done: Deploying service api-gateway
- Endpoint: https://<your-Azure-Spring-Apps-instance-name>-api-gateway.azuremicroservices.io

(✓) Done: Deploying service customers-service
- No endpoints were found

(✓) Done: Deploying service vets-service
- No endpoints were found

(✓) Done: Deploying service visits-service
- No endpoints were found


SUCCESS: Your application was deployed to Azure in xx minutes xx seconds.
You can view the resources created under the resource group rg-<your-environment-name> in Azure Portal:
https://portal.azure.com/#@/resource/subscriptions/<your-subscription-id>/resourceGroups/rg-<your-environment-name>/overview
Note
You can also use azd up to combine the previous three commands: azd package (packages a deployable copy of your application), azd provision (provisions Azure resources), and azd deploy (deploys application code). For more information, see Azure-Samples/spring-petclinic-microservices.
2. Prepare the Spring project
The Deploy to Azure button in the next section launches an Azure portal experience that deploys source code from the Spring PetClinic repository. No local preparation steps are needed.
Use the following steps on your local machine when you want to verify the application before deploying it to the cloud:
Use the following command to clone the Pet Clinic application from GitHub:
git clone https://github.com/Azure-Samples/spring-petclinic-microservices.git
Navigate to the project root directory and then use the following command to build the project:
./mvnw clean package -DskipTests
Use the following steps if you want to run the application locally. Otherwise, you can skip these steps.
Open a new Bash window and then use the following command to start Config Server:
./mvnw spring-boot:run -pl spring-petclinic-config-server
Open a new Bash window and then use the following command to start Discovery Server:
./mvnw spring-boot:run -pl spring-petclinic-discovery-server
For the Customers, Vets, Visits, and Spring Cloud Gateway services, open a new Bash window and use the following commands to start the services:
./mvnw spring-boot:run -pl spring-petclinic-customers-service
./mvnw spring-boot:run -pl spring-petclinic-vets-service
./mvnw spring-boot:run -pl spring-petclinic-visits-service
./mvnw spring-boot:run -Dspring-boot.run.profiles=default,development \
    -pl spring-petclinic-api-gateway
Open a new Bash window and navigate to the project spring-petclinic-frontend directory. Use the following commands to install dependencies and run the frontend application:
npm install
npm run start
After the script completes successfully, go to http://localhost:8080 in your browser to access the PetClinic application.
3. Prepare the cloud environment
The main resource you need to run this sample is an Azure Spring Apps instance. This section describes how to create this resource.
This section uses a Deploy to Azure button to launch a deployment experience in the Azure portal. This experience uses an ARM template to create Azure resources.
3.1. Sign in to the Azure portal
Go to the Azure portal, enter your credentials, and sign in to the portal. The default view is your service dashboard.
3.2. Create Azure resources
Use the following steps to create all the Azure resources that the app depends on:
Select the following Deploy to Azure button to launch the deployment experience in the Azure portal:

Fill out the form on the Basics tab. Use the following table as a guide for completing the form:
| Setting |
Suggested value |
Description |
| Subscription |
Your subscription name. |
The Azure subscription that you want to use for your server. If you have multiple subscriptions, choose the subscription in which you'd like to be billed for the resource. |
| Resource group |
myresourcegroup |
A new resource group name or an existing one from your subscription. |
| Region |
The region closest to your users. |
The region is used to create the resource group. |

Select Review and Create to review your selections. Then, select Create to deploy the app to Azure Spring Apps.
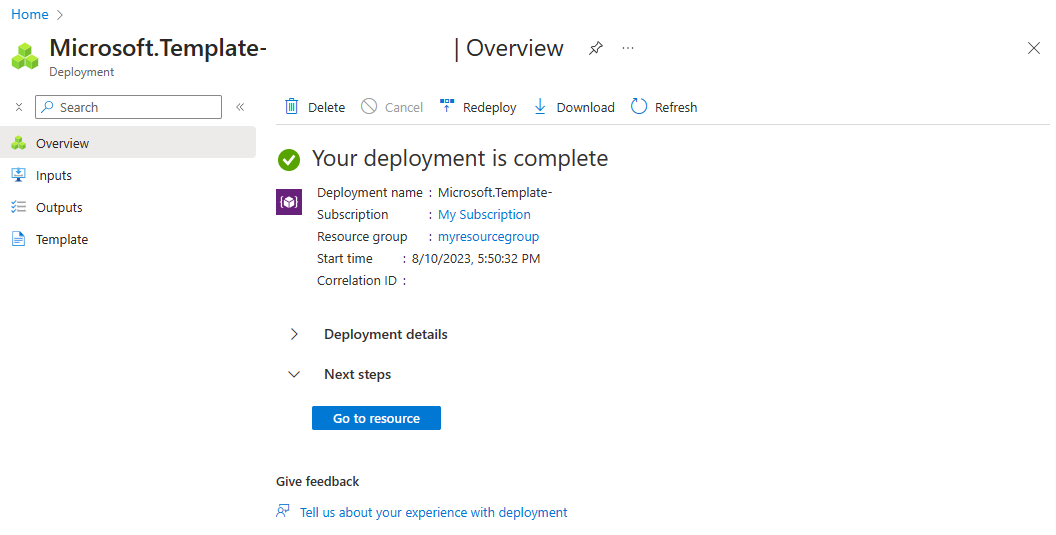
On the toolbar, select the Notifications icon (a bell) to monitor the deployment process. After the deployment finishes, you can select Pin to dashboard, which creates a tile for this service on your Azure portal dashboard as a shortcut to the service's Overview page. Select Go to resource to open the service's Overview page.
3.1. Sign in to the Azure portal
Go to the Azure portal and enter your credentials to sign in to the portal. The default view is your service dashboard.
3.2. Create an Azure Spring Apps instance
Use the following steps to create the service instance:
Select Create a resource in the corner of the Azure portal.
Select Compute > Azure Spring Apps.
Fill out the form on the Basics tab. Use the following table as a guide for completing the form:
| Setting |
Suggested value |
Description |
| Subscription |
Your subscription name. |
The Azure subscription that you want to use for your server. If you have multiple subscriptions, choose the subscription in which you'd like to be billed for the resource. |
| Resource group |
myresourcegroup |
A new resource group name or an existing one from your subscription. |
| Name |
myasa |
A unique name that identifies your Azure Spring Apps service. The name must be between 4 and 32 characters long and can contain only lowercase letters, numbers, and hyphens. The first character of the service name must be a letter and the last character must be either a letter or a number. |
| Region |
The region closest to your users. |
The location that is closest to your users. |
| Hosting options and plans |
Enterprise |
The pricing plan that determines the resource and cost associated with your instance. |
| Zone Redundant |
Unselected |
The option to create your Azure Spring Apps service in an Azure availability zone. This feature isn't currently supported in all regions. |
| Software IP Plan |
Pay-as-you-go |
The pricing plan that lets you pay as you go with Azure Spring Apps. |
| Deploy sample project |
Unselected |
The option to use the built-in sample application. |
Navigate to the Diagnostic settings tab on the Create Azure Spring Apps page and then select Create new to create a new Log Analytics workspaces instance. On the Create new Log Analytics workspace page, update the name of the Log Analytics workspace as needed and then select OK to confirm the creation.
Navigate to the Application Insights tab on the Create Azure Spring Apps page and then select Create new to create a new Application Insights instance. On the Create new Application Insights resource page, update the Application insights name as needed, select Workspace-based for Resource mode, and then select OK to confirm the creation.
Select Review and Create to review your selections. Then, select Create to provision the Azure Spring Apps instance.
Select the Notifications icon (a bell) to monitor the deployment process. After the deployment finishes, you can select Pin to dashboard to create a shortcut on your Azure portal dashboard to the service's Overview page.
Select Go to resource to go to the Azure Spring Apps Overview page.
The following sections show you how to configure the service instance.
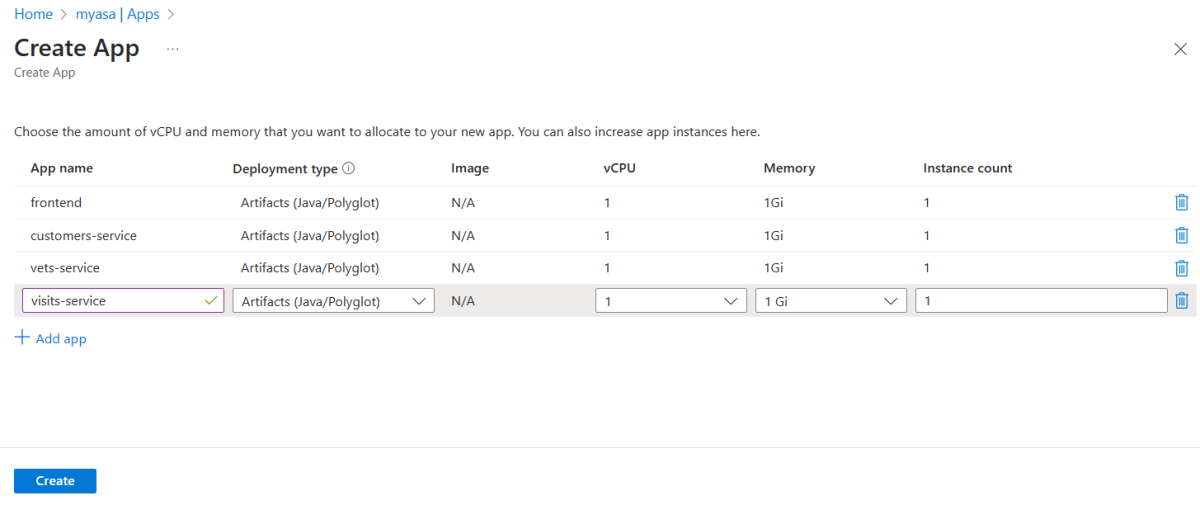
Create the apps
Use the following steps to create the apps:
From the navigation pane, select Apps and then select Create App.
On the Create App page, for the App name, use frontend and leave all the other fields with their default values.
Repeat the previous step using each of the following application names:
customers-servicevets-servicevisits-service
Select Create to finish the app creation.
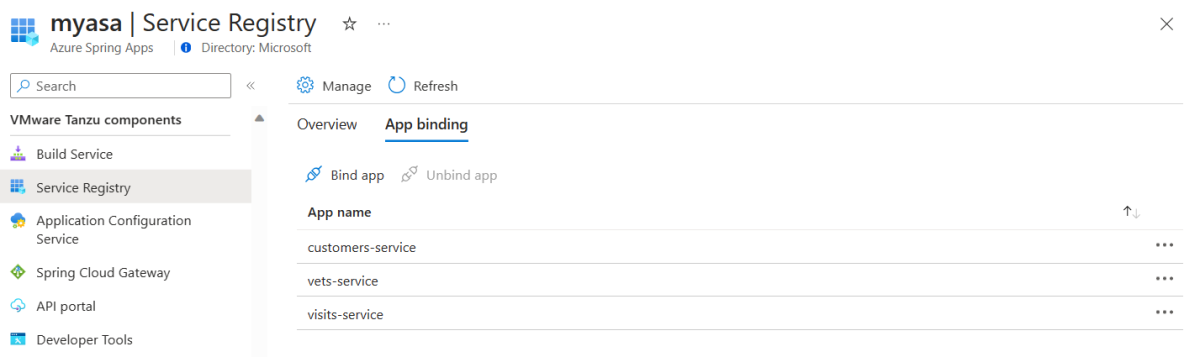
Use the following steps to configure Service Registry:
From the navigation pane, select Service Registry.
Select App binding, select Bind app, select customers-service from the list, and then select Apply.
Repeat the previous step to bind the following applications:
vets-servicevisits-service
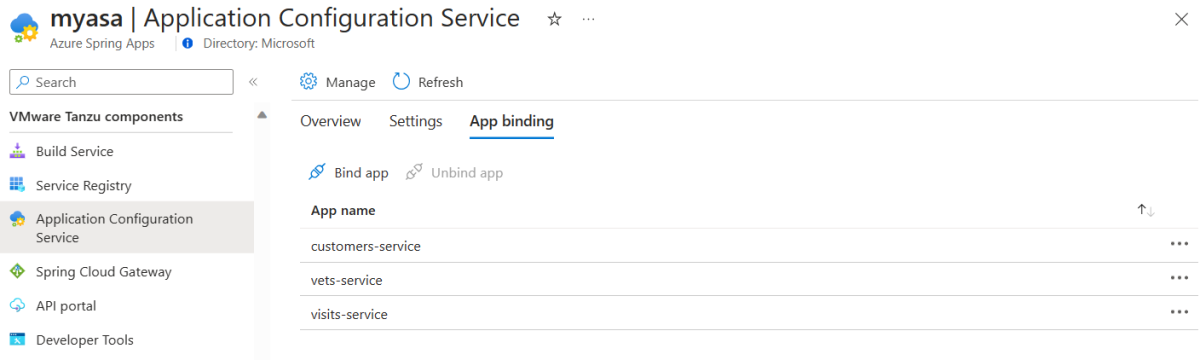
Use the following steps to configure Application Configuration Service:
From the navigation pane, select Application Configuration Service and then select Settings.
Fill out the repository with the following information, and then select Validate:
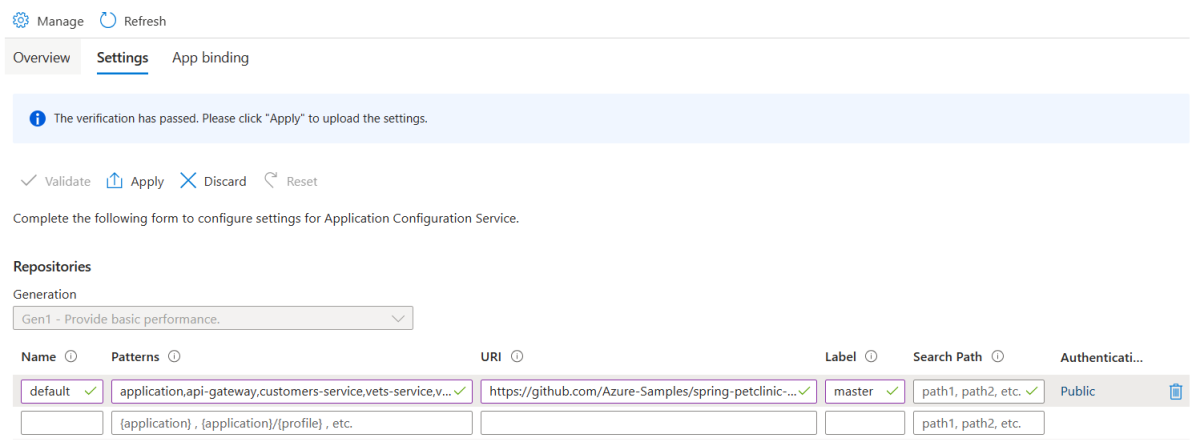
After validation, select Apply to finish the Application Configuration Service configuration.
Select App binding, select Bind app, select customers-service from the list, and then select Apply.
Repeat the previous step to bind the following applications:
vets-servicevisits-service
Set the config file patterns for apps
Use the following steps to set the config file patterns:
From the navigation pane, select Apps and then select the customers-service app.
On the App overview page, select Configuration, select Config file patterns in the General settings tab, and then select application and customers-service. Select Save to set the config file patterns.
Repeat the previous step to save the config file patterns for the following applications:
vets-service: Select application and vets-service.visits-service: Select application and visits-service.
This section shows you how to configure Spring Cloud Gateway.
First, use the following steps to assign an endpoint for the gateway access:
From the navigation pane, select Spring Cloud Gateway.
On the Overview tab, select Yes to assign an endpoint. Save the endpoint URL to use later.
Next, configure the routing for Spring Cloud Gateway. Because the Azure portal doesn't currently support route configuration for Spring Cloud Gateway, open a Bash window and use the following Azure CLI steps to configure the routing:
Use the following command to sign in to the Azure CLI:
az login
Use the following commands to install the Azure Spring Apps extension for the Azure CLI and register the namespace Microsoft.SaaS:
az extension add --name spring --upgrade
az provider register --namespace Microsoft.SaaS
Use the following command to accept the legal terms and privacy statements:
Note
This step is necessary only if your subscription has never been used to create an Enterprise plan instance of Azure Spring Apps.
az term accept \
    --publisher vmware-inc \
    --product azure-spring-cloud-vmware-tanzu-2 \
    --plan asa-ent-hr-mtr
Create variables to hold the resource names by using the following commands. Be sure to replace the placeholders with your own values.
export SUBSCRIPTION_ID=<subscription-ID>
export RESOURCE_GROUP=<resource-group-name>
export SPRING_APPS_NAME=<Azure-Spring-Apps-instance-name>
export APP_CUSTOMERS_SERVICE=customers-service
export APP_VETS_SERVICE=vets-service
export APP_VISITS_SERVICE=visits-service
export APP_FRONTEND=frontend
Use the following command to set the default subscription:
az account set --subscription ${SUBSCRIPTION_ID}
Use the following command to set the routing for the customers-service app:
az spring gateway route-config create \
    --resource-group ${RESOURCE_GROUP} \
    --service ${SPRING_APPS_NAME} \
    --name ${APP_CUSTOMERS_SERVICE} \
    --app-name ${APP_CUSTOMERS_SERVICE} \
    --routes-json \
      '[
        {
          "predicates": [
            "Path=/api/customer/**"
          ],
          "filters": [
            "StripPrefix=2"
          ]
        }
      ]'
Use the following command to set the routing for the vets-service app:
az spring gateway route-config create \
    --resource-group ${RESOURCE_GROUP} \
    --service ${SPRING_APPS_NAME} \
    --name ${APP_VETS_SERVICE} \
    --app-name ${APP_VETS_SERVICE} \
    --routes-json \
      '[
         {
           "predicates": [
             "Path=/api/vet/**"
           ],
           "filters": [
             "StripPrefix=2"
           ]
         }
       ]'
Use the following command to set the routing for the visits-service app:
az spring gateway route-config create \
    --resource-group ${RESOURCE_GROUP} \
    --service ${SPRING_APPS_NAME} \
    --name ${APP_VISITS_SERVICE} \
    --app-name ${APP_VISITS_SERVICE} \
    --routes-json \
      '[
         {
           "predicates": [
             "Path=/api/visit/**"
           ],
           "filters": [
             "StripPrefix=2"
           ]
         }
       ]'
Use the following command to set the routing for the frontend app:
az spring gateway route-config create \
    --resource-group ${RESOURCE_GROUP} \
    --service ${SPRING_APPS_NAME} \
    --name ${APP_FRONTEND} \
    --app-name ${APP_FRONTEND} \
    --routes-json \
      '[
         {
           "predicates": [
             "Path=/**"
           ],
           "filters": [
             "StripPrefix=0"
           ],
           "order": 1000
         }
       ]'
Use the following steps to configure the Developer Tools.
From the navigation pane, select Developer Tools.
Select Assign endpoint to assign an endpoint for Developer Tools.
Save the endpoint of App Live View to use later.
3.1. Provide names for each resource
Create variables to hold the resource names by using the following commands. Be sure to replace the placeholders with your own values.
export LOCATION=<location>
export RESOURCE_GROUP=myresourcegroup
export SPRING_APPS=myasa
export APP_FRONTEND=frontend
export APP_CUSTOMERS_SERVICE=customers-service
export APP_VETS_SERVICE=vets-service
export APP_VISITS_SERVICE=visits-service
export GIT_CONFIG_REPO=default
3.2. Sign in to the Azure CLI
Use the following steps to sign in:
Use the following command to sign in to the Azure CLI:
az login
Use the following command to list all available subscriptions to determine the subscription ID to use:
az account list --output table
Use the following command to set the default subscription:
az account set --subscription <subscription-ID>
3.3. Create a new resource group
Use the following steps to create a new resource group:
Use the following command to set the default location:
az configure --defaults location=${LOCATION}
Use the following command to create a resource group:
az group create --resource-group ${RESOURCE_GROUP}
Use the following command to set the newly created resource group as the default resource group:
az configure --defaults group=${RESOURCE_GROUP}
3.4. Install extension and register namespace
Use the following commands to install the Azure Spring Apps extension for the Azure CLI and register the Microsoft.SaaS namespace:
az extension add --name spring --upgrade
az provider register --namespace Microsoft.SaaS
3.5. Create an Azure Spring Apps instance
Use the following steps to create the service instance:
Use the following command to accept the legal terms and privacy statements for the Enterprise plan:
Note
This step is necessary only if your subscription has never been used to create an Enterprise plan instance of Azure Spring Apps.
az term accept \
    --publisher vmware-inc \
    --product azure-spring-cloud-vmware-tanzu-2 \
    --plan asa-ent-hr-mtr
Use the following command to create an Azure Spring Apps service instance with the necessary Tanzu components:
az spring create \
    --name ${SPRING_APPS} \
    --sku Enterprise \
    --enable-application-configuration-service \
    --enable-service-registry \
    --enable-gateway \
    --enable-application-live-view
Use the following steps to configure the service instance:
Use the following command to configure diagnostic settings for the Azure Spring Apps instance:
export SPRING_APPS_RESOURCE_ID=$(az spring show \
    --name ${SPRING_APPS} \
    --query id \
    --output tsv)
az monitor diagnostic-settings create \
    --resource ${SPRING_APPS_RESOURCE_ID} \
    --name logs-and-metrics \
    --workspace ${SPRING_APPS} \
    --logs '[
      {
        "category": "ApplicationConsole",
        "enabled": true,
        "retentionPolicy": {
          "enabled": false,
          "days": 0
        }
      },
      {
         "category": "SystemLogs",
         "enabled": true,
         "retentionPolicy": {
           "enabled": false,
           "days": 0
         }
      },
      {
         "category": "IngressLogs",
         "enabled": true,
         "retentionPolicy": {
           "enabled": false,
           "days": 0
          }
      }
    ]' \
    --metrics '[
      {
        "category": "AllMetrics",
        "enabled": true,
        "retentionPolicy": {
          "enabled": false,
          "days": 0
        }
      }
    ]'
Use the following commands to create applications for the Azure Spring Apps instance:
az spring app create --service ${SPRING_APPS} --name ${APP_FRONTEND}
az spring app create --service ${SPRING_APPS} --name ${APP_CUSTOMERS_SERVICE}
az spring app create --service ${SPRING_APPS} --name ${APP_VETS_SERVICE}
az spring app create --service ${SPRING_APPS} --name ${APP_VISITS_SERVICE}
Use the following commands to bind applications for the Service Registry:
az spring service-registry bind --service ${SPRING_APPS} --app ${APP_CUSTOMERS_SERVICE}
az spring service-registry bind --service ${SPRING_APPS} --app ${APP_VETS_SERVICE}
az spring service-registry bind --service ${SPRING_APPS} --app ${APP_VISITS_SERVICE}
Use the following command to create a configuration repository for the Application Configuration Service:
az spring application-configuration-service git repo add \
    --service ${SPRING_APPS} \
    --name ${GIT_CONFIG_REPO} \
    --patterns application,api-gateway,customers-service,vets-service,visits-service \
    --uri https://github.com/Azure-Samples/spring-petclinic-microservices-config.git \
    --label master
Use the following commands to bind applications to the Application Configuration Service:
az spring application-configuration-service bind \
    --service ${SPRING_APPS} \
    --app ${APP_CUSTOMERS_SERVICE}
az spring application-configuration-service bind \
    --service ${SPRING_APPS} \
    --app ${APP_VETS_SERVICE}
az spring application-configuration-service bind \
    --service ${SPRING_APPS} \
    --app ${APP_VISITS_SERVICE}
Use the following command to assign an endpoint to Spring Cloud Gateway:
az spring gateway update --service ${SPRING_APPS} --assign-endpoint
Use the following command to set routing for the customers-service application:
az spring gateway route-config create \
    --service ${SPRING_APPS} \
    --name ${APP_CUSTOMERS_SERVICE} \
    --app-name ${APP_CUSTOMERS_SERVICE} \
    --routes-json '[
      {
        "predicates": [
          "Path=/api/customer/**"
        ],
        "filters": [
          "StripPrefix=2"
        ]
      }
   ]'
Use the following command to set routing for the vets-service application:
az spring gateway route-config create \
    --service ${SPRING_APPS} \
    --name ${APP_VETS_SERVICE} \
    --app-name ${APP_VETS_SERVICE} \
    --routes-json '[
      {
        "predicates": [
          "Path=/api/vet/**"
        ],
        "filters": [
          "StripPrefix=2"
        ]
      }
    ]'
Use the following command to set routing for the visits-service application:
az spring gateway route-config create \
    --service ${SPRING_APPS} \
    --name ${APP_VISITS_SERVICE} \
    --app-name ${APP_VISITS_SERVICE} \
    --routes-json '[
      {
        "predicates": [
          "Path=/api/visit/**"
        ],
        "filters": [
          "StripPrefix=2"
        ]
      }
    ]'
Use the following command to set routing for the frontend application:
az spring gateway route-config create \
    --service ${SPRING_APPS} \
    --name ${APP_FRONTEND} \
    --app-name ${APP_FRONTEND} \
    --routes-json '[
      {
        "predicates": [
          "Path=/**"
        ],
        "filters": [
          "StripPrefix=0"
        ],
        "order": 1000
      }
    ]'
Use the following command to assign an endpoint to Application Live View:
az spring dev-tool update --service ${SPRING_APPS} --assign-endpoint
4. Deploy the apps to Azure Spring Apps
The Deploy to Azure button in the previous section launches an Azure portal experience that includes application deployment, so nothing else is needed.
Use the following steps to deploy using the Maven plugin for Azure Spring Apps:
Navigate to the project root directory and then run the following command to configure the apps in Azure Spring Apps:
./mvnw -P spring-apps-enterprise com.microsoft.azure:azure-spring-apps-maven-plugin:1.19.0:config
The following list describes the command interactions:
- Select child modules to configure: Press Enter to select all.
- Select subscription: Select the subscription list number of the Azure Spring Apps instance you created, which defaults to the first subscription in the list. If you use the default number, press Enter directly.
- Use existing Azure Spring Apps in Azure: Press y to use the existing Azure Spring Apps instance.
- Select apps to expose public access: Press Enter to select none.
- Confirm to save all the above configurations: Press y. If you press n, the configuration isn't saved in the POM files.
Use the following command to deploy the backend applications:
./mvnw azure-spring-apps:deploy
After the command runs, you can see from the following log messages that the deployment was successful:
[INFO] Start deploying artifact(customers-service-3.0.1.jar) to deployment(default) of app(customers-service)...
[INFO] Artifact(customers-service-3.0.1.jar) is successfully deployed to deployment(default) of app(customers-service).
[INFO] Starting Spring App after deploying artifacts...
[INFO] Deployment Status: Running

...

[INFO] Start deploying artifact(vets-service-3.0.1.jar) to deployment(default) of app(vets-service)...
[INFO] Artifact(vets-service-3.0.1.jar) is successfully deployed to deployment(default) of app(vets-service).
[INFO] Starting Spring App after deploying artifacts...
[INFO] Deployment Status: Running

...

[INFO] Start deploying artifact(visits-service-3.0.1.jar) to deployment(default) of app(visits-service)...
[INFO] Artifact(visits-service-3.0.1.jar) is successfully deployed to deployment(default) of app(visits-service).
[INFO] Starting Spring App after deploying artifacts...
[INFO] Deployment Status: Running
The Azure portal doesn't support deploying the frontend applications, so use the following Azure CLI command to deploy the frontend application:
az spring app deploy \
    --resource-group ${RESOURCE_GROUP} \
    --service ${SPRING_APPS_NAME} \
    --name ${APP_FRONTEND} \
    --source-path spring-petclinic-frontend \
    --build-env BP_WEB_SERVER=nginx
After the command runs, you can see from the following log messages that the deployment was successful:
[5/5] Updating deployment in app "frontend" (this operation can take a while to complete)
Azure Spring Apps will use rolling upgrade to update your deployment, you have 1 instance, Azure Spring Apps will update the deployment in 1 round.
The deployment is in round 1, 1 old instance is deleted/deleting and 1 new instance is started/starting
Your application is successfully deployed.
Use the following steps to deploy the apps:
Enter the project root directory and use the following command to build and deploy the frontend application:
az spring app deploy \
    --service ${SPRING_APPS} \
    --name ${APP_FRONTEND} \
    --build-env BP_WEB_SERVER=nginx \
    --source-path ./spring-petclinic-frontend
Use the following command to build and deploy the customers-service application:
az spring app deploy \
    --service ${SPRING_APPS} \
    --name ${APP_CUSTOMERS_SERVICE} \
    --source-path \
    --config-file-pattern application,customers-service \
    --build-env \
        BP_MAVEN_BUILT_MODULE=spring-petclinic-customers-service \
        BP_JVM_VERSION=17
Use the following command to build and deploy the vets-service application:
az spring app deploy \
    --service ${SPRING_APPS} \
    --name ${APP_VETS_SERVICE} \
    --source-path \
    --config-file-pattern application,vets-service \
    --build-env \
        BP_MAVEN_BUILT_MODULE=spring-petclinic-vets-service \
        BP_JVM_VERSION=17
Use the following command to build and deploy the visits-service application:
az spring app deploy \
    --service ${SPRING_APPS} \
    --name ${APP_VISITS_SERVICE} \
    --source-path \
    --config-file-pattern application,visits-service \
    --build-env \
        BP_MAVEN_BUILT_MODULE=spring-petclinic-visits-service \
        BP_JVM_VERSION=17
5. Validate the apps
The following sections describe how to validate the deployment.
5.1. Access the applications
After the deployment finishes, you can find the Spring Cloud Gateway URL from the deployment outputs, as shown in the following screenshot:

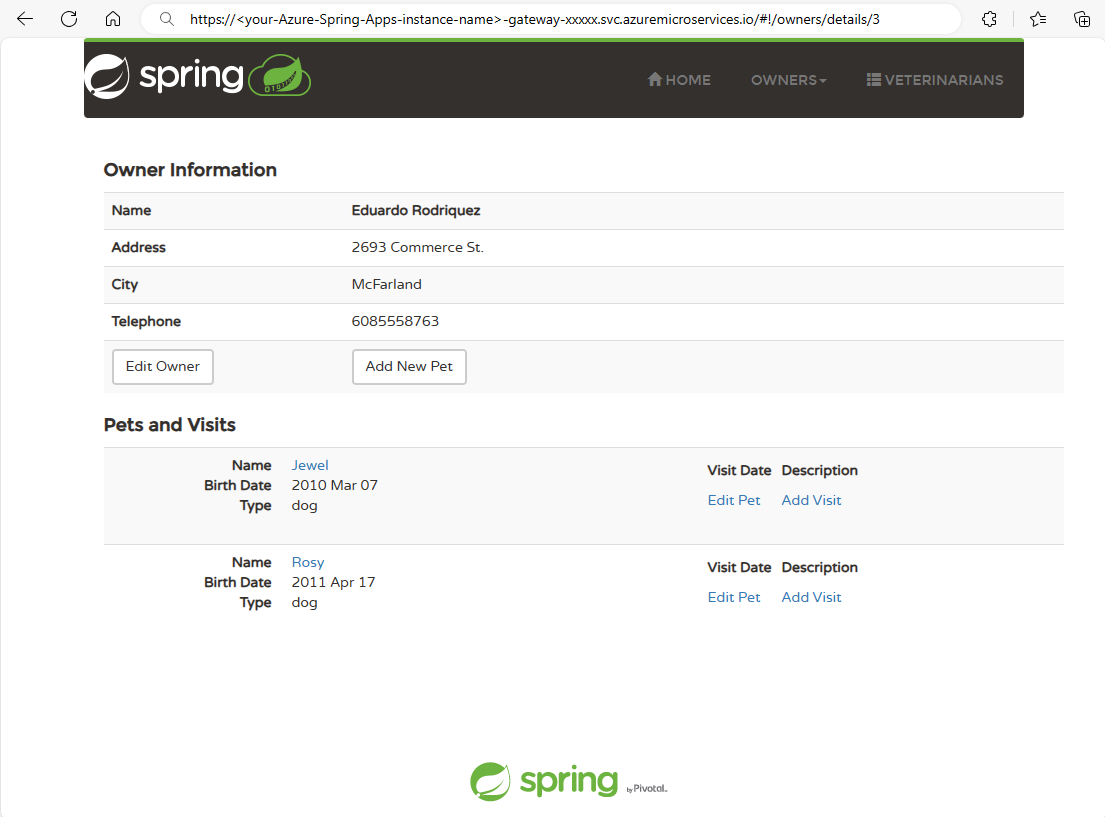
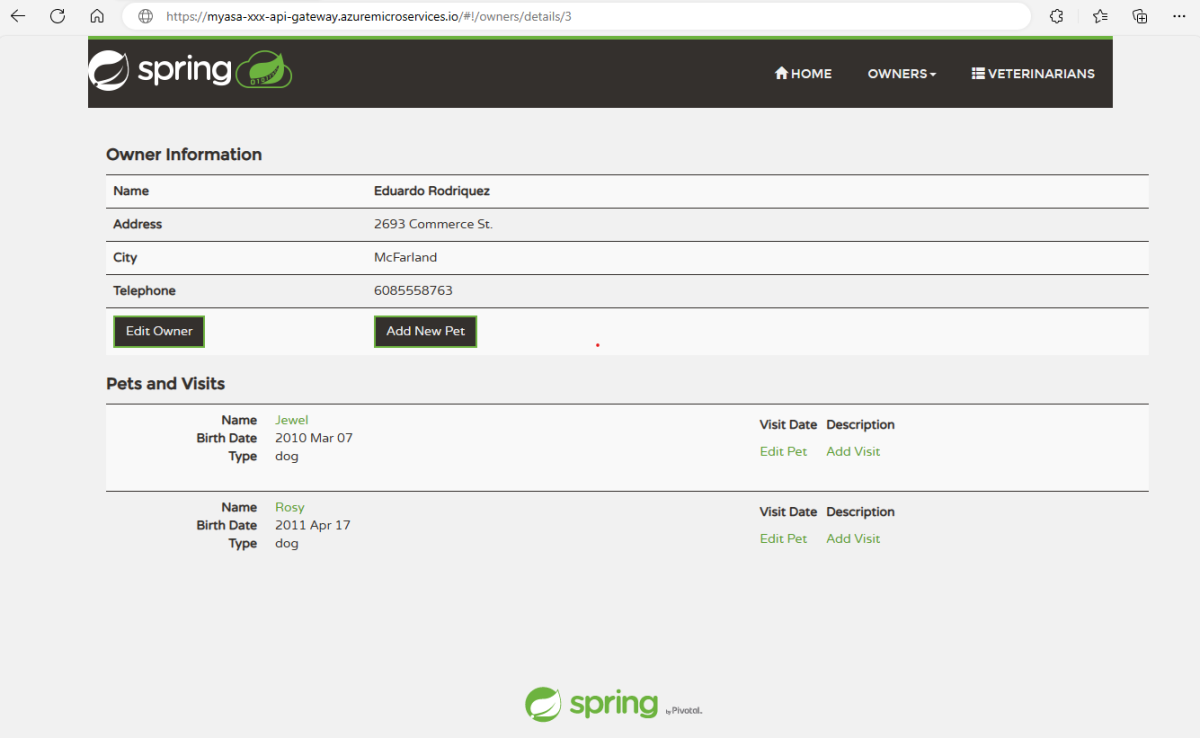
Open the gateway URL. The application should look similar to the following screenshot:
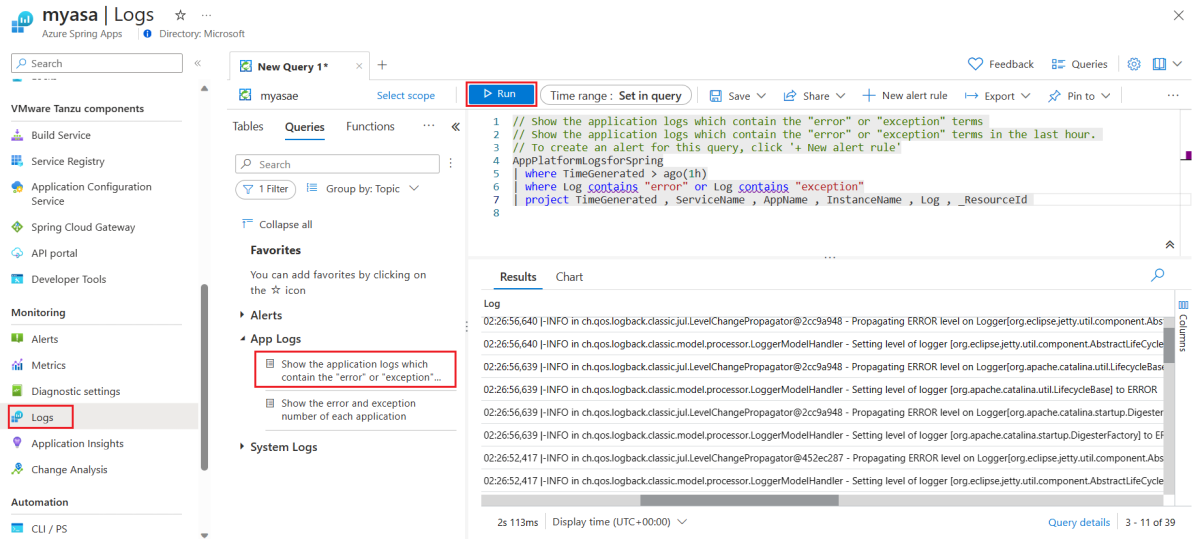
5.2. Query the application logs
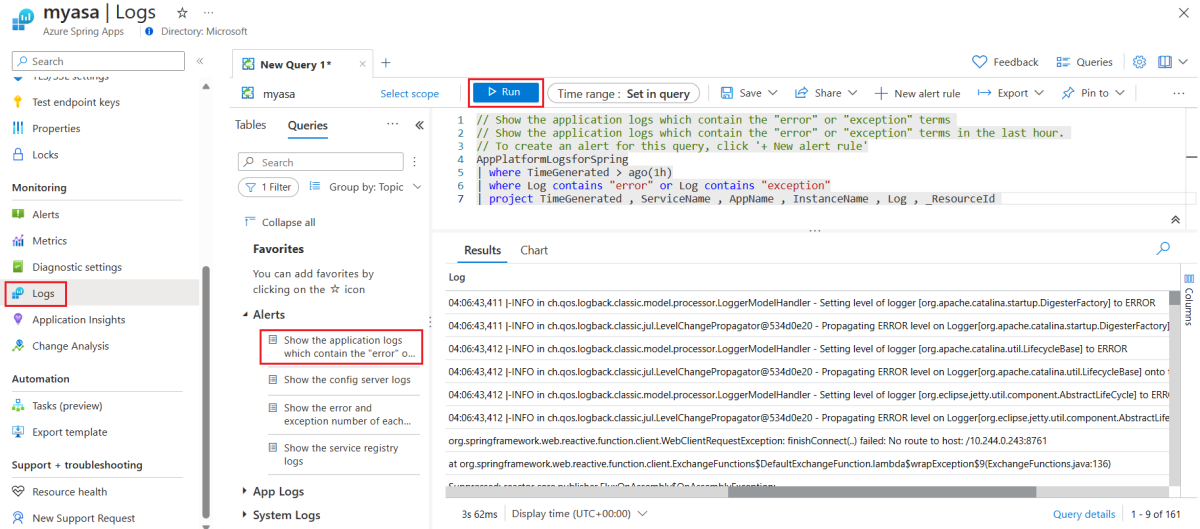
After you browse each function of the Pet Clinic, the Log Analytics workspace collects logs of each application. You can check the logs by using custom queries, as shown in the following screenshot:
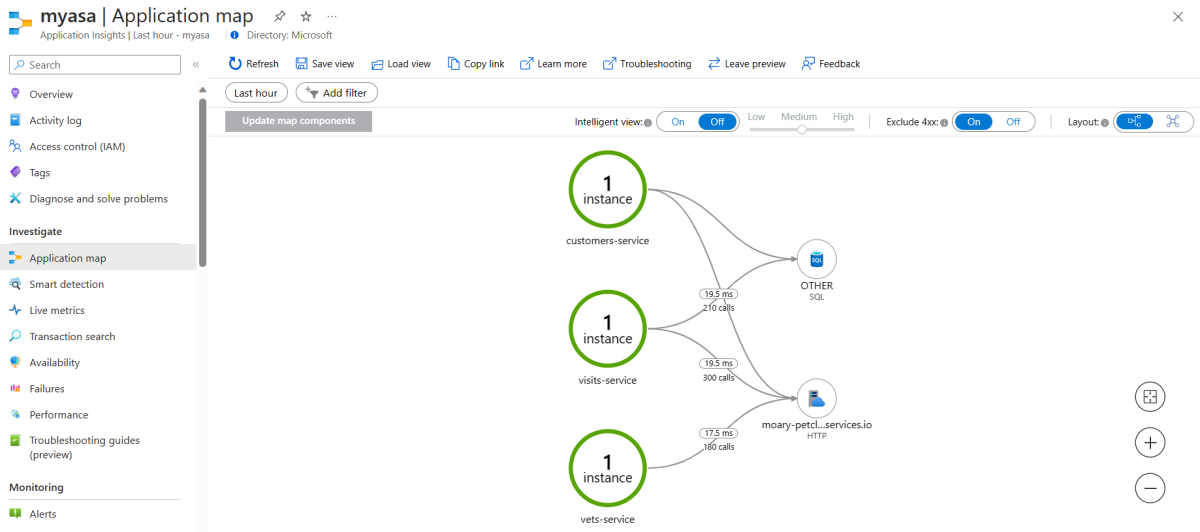
5.3. Monitor the applications
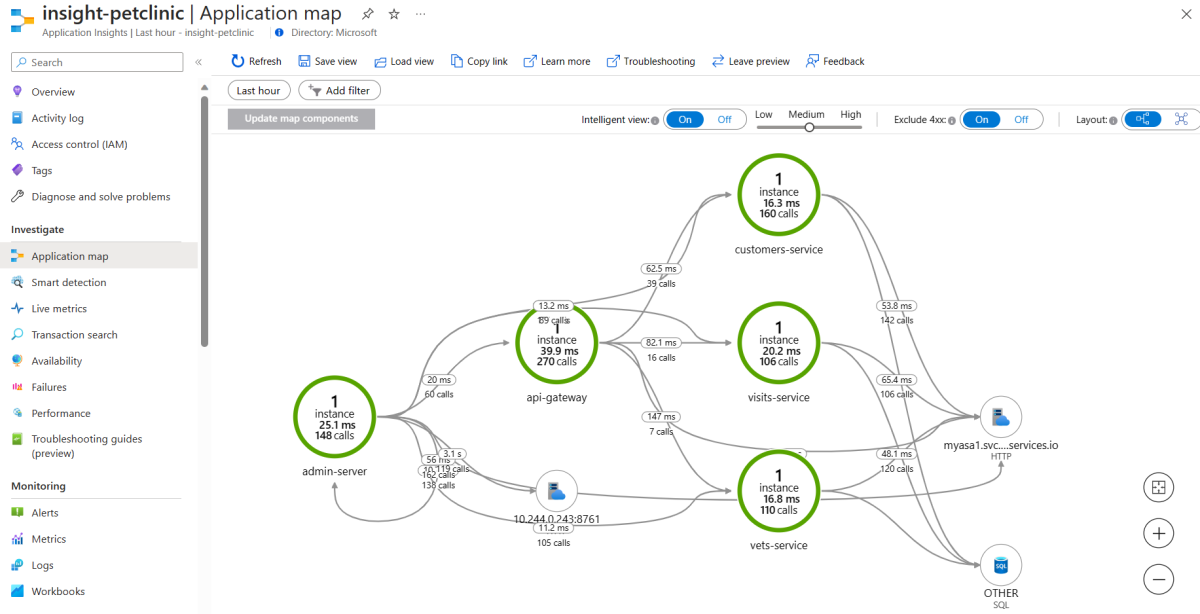
Application Insights monitors the application dependencies, as shown by the following application tracing map:
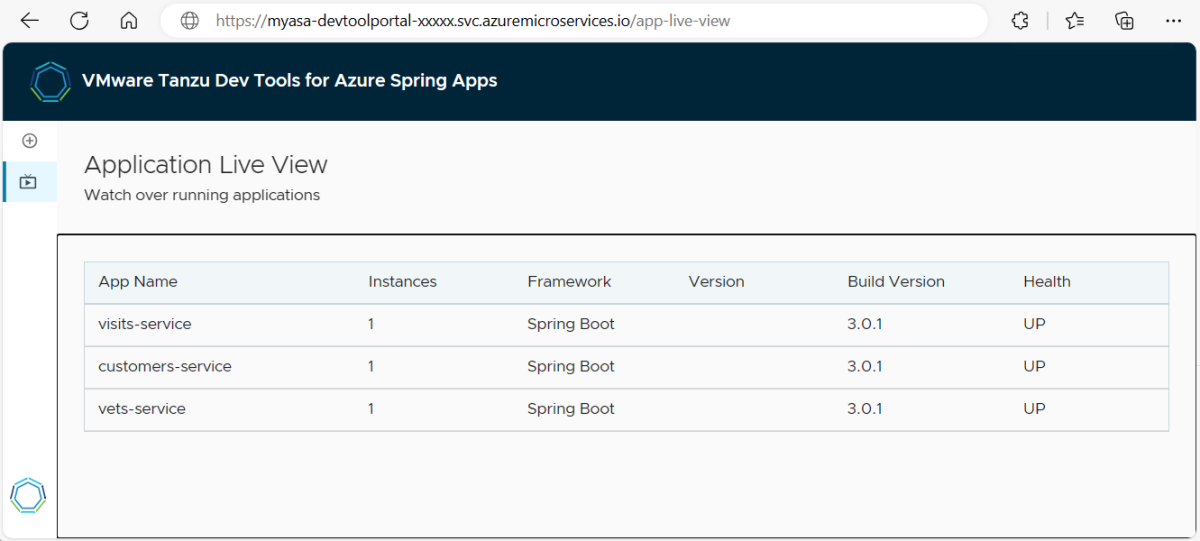
You can find the Application Live View URL from the deployment outputs. Open the Application Live View URL to monitor application runtimes, as shown in the following screenshot:
5.1. Access the applications
Use the endpoint assigned from Spring Cloud Gateway - for example, https://<your-Azure-Spring-Apps-instance-name>-gateway-xxxxx.svc.azuremicroservices.io. The application should look similar to the following screenshot:
5.2. Query the application logs
After you browse each function of the Pet Clinic, the Log Analytics workspace collects logs of each application. You can check the logs by using custom queries, as shown in the following screenshot:
5.3. Monitor the applications
Application Insights monitors the application dependencies, as shown by the following application tracing map:
Open the Application Live View URL exposed by the Developer Tools to monitor application runtimes, as shown in the following screenshot:
5.1. Access the applications
Use the following commands to retrieve the URL for Spring Cloud Gateway:
export GATEWAY_URL=$(az spring gateway show \
    --service ${SPRING_APPS} \
    --query properties.url \
    --output tsv)
echo "https://${GATEWAY_URL}"
The application should look similar to the following screenshot:
5.2. Query the application logs
After you browse each function of the Pet Clinic, the Log Analytics workspace collects logs of each application. You can check the logs by using custom queries, as shown in the following screenshot:
5.3. Monitor the applications
Application Insights monitors the application dependencies, as shown by the following application tracing map:
Use the following commands to retrieve the URL for Application Live View:
export DEV_TOOL_URL=$(az spring dev-tool show \
    --service ${SPRING_APPS} \
    --query properties.url \
    --output tsv)
echo "https://${DEV_TOOL_URL}/app-live-view"
Open the Application Live View URL to monitor application runtimes, as shown in the following screenshot:
5.1. Access the applications
Using the URL information in the deployment log output, open the URL exposed by the app named api-gateway - for example, https://<your-Azure-Spring-Apps-instance-name>-api-gateway.azuremicroservices.io. The application should look similar to the following screenshot:
5.2. Query the application logs
After you browse each function of the Pet Clinic, the Log Analytics workspace collects logs of each application. You can check the logs by using custom queries, as shown in the following screenshot:
5.3. Monitor the applications
Application Insights monitors the application dependencies, as shown by the following application tracing map:
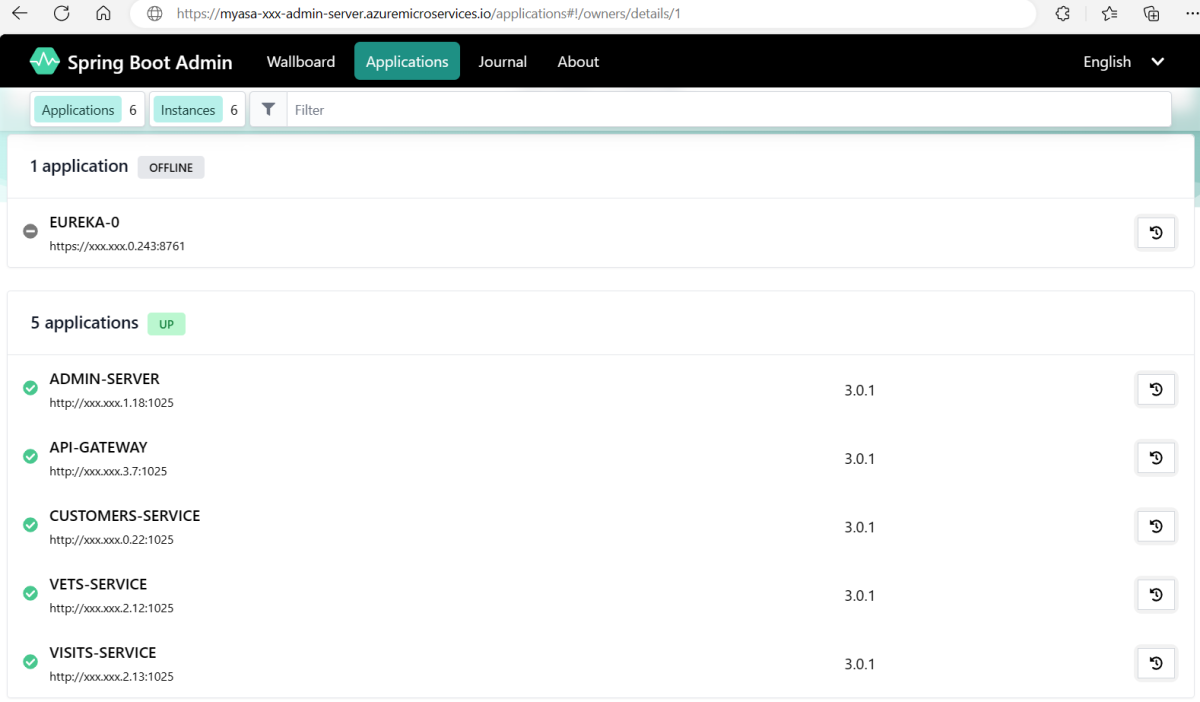
Open the URL exposed by the app admin-server to manage the applications through the Spring Boot Admin Server, as shown in the following screenshot:
6. Clean up resources
If you plan to continue working with subsequent quickstarts and tutorials, you might want to leave these resources in place. When you no longer need the resources, you can clean up unnecessary resources to avoid Azure charges.
Use the following steps to delete the entire resource group, including the newly created service instance:
Locate your resource group in the Azure portal. On the navigation menu, select Resource groups, and then select the name of your resource group.
On the Resource group page, select Delete. Enter the name of your resource group in the text box to confirm deletion, then select Delete.
Use the following command to delete all the Azure resources used in this sample application:
azd down
The following list describes the command interaction:
- Total resources to delete: <resources-total>, are you sure you want to continue?: Press y.
The console outputs messages similar to the following example:
SUCCESS: Your application was removed from Azure in xx minutes xx seconds.
Be sure to delete the resources you created in this article when you no longer need them. You can delete the Azure resource group, which includes all the resources in the resource group.
Use the following steps to delete the entire resource group:
Locate your resource group in the Azure portal. On the navigation menu, select Resource groups, and then select the name of your resource group.
On the Resource group page, select Delete. Enter the name of your resource group in the text box to confirm deletion, then select Delete.
Use the following command to delete the resource group:
az group delete --name ${RESOURCE_GROUP}
7. Next steps
For more information, see the following articles:


