Handle false positives in Microsoft Sentinel
Microsoft Sentinel analytics rules notify you when something suspicious occurs in your network. No analytics rule is perfect, and you're bound to get some false positives that need handling. This article describes how to handle false positives, either by using automation or by modifying scheduled analytics rules.
False positive causes and prevention
Even in a correctly built analytics rule, false positives often stem from specific entities like users or IP addresses that should be excluded from the rule.
Common scenarios include:
- Normal activities by certain users, usually service principals, show a pattern that seems suspicious.
- Intentional security scanning activity coming from known IP addresses is detected as malicious.
- A rule that excludes private IP addresses should also exclude some internal IP addresses that aren't private.
This article describes two methods for avoiding false positives:
- Automation rules create exceptions without modifying analytics rules.
- Scheduled analytics rules modifications permit more detailed and permanent exceptions.
The following table describes characteristics of each method:
| Method | Characteristic |
|---|---|
| Automation rules |
|
| Analytics rules modifications |
|
Add exceptions with automation rules (Azure portal only)
This procedure describes how to add an automation rule when you see a false positive incident. This procedure is supported in the Azure portal only.
If Microsoft Sentinel is onboarded to the Defender portal, create automation rules from scratch based on the details of your incident. For more information, see Automate threat response in Microsoft Sentinel with automation rules.
To add an automation rule to handle a false positive:
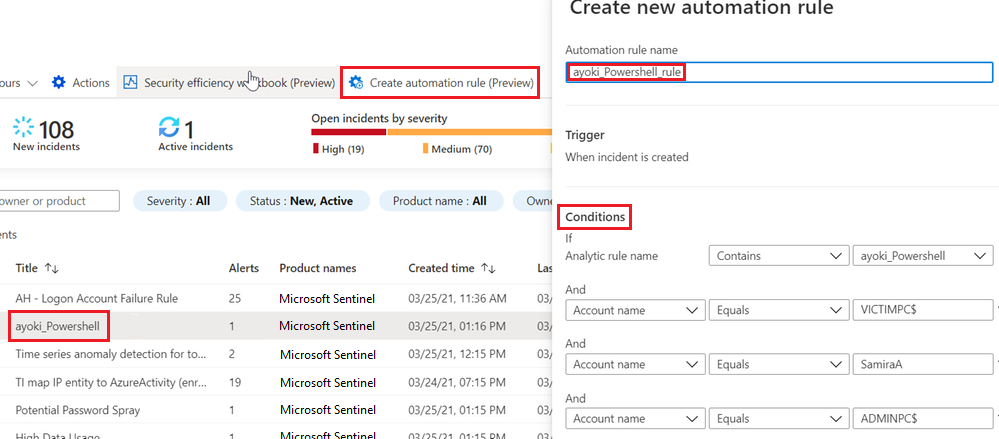
In Microsoft Sentinel, under Incidents, select the incident you want to create an exception for.
In the incident details pane on the side, select Actions > Create automation rule.
In the Create new automation rule sidebar, optionally modify the new rule name to identify the exception, rather than just the alert rule name.
Under Conditions, optionally add more Analytics rule names to apply the exception to. Select the drop-down box containing the analytics rule name and select more analytics rules from the list.
The sidebar presents the specific entities in the current incident that might have caused the false positive. Keep the automatic suggestions, or modify them to fine-tune the exception. For example, you could change a condition on an IP address to apply to an entire subnet.

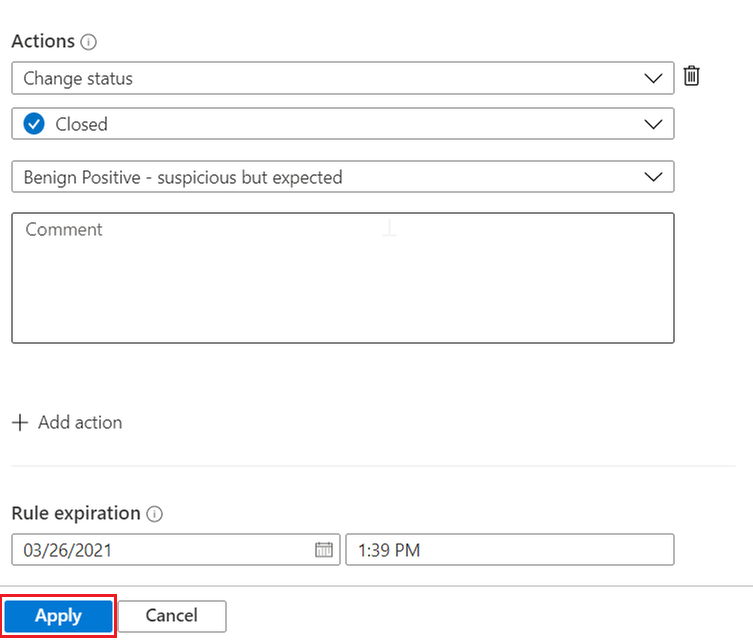
After you're satisfied with the conditions, scroll down in the side pane to continue to define what the rule does:

- The rule is already configured to close an incident that meets the exception criteria.
- You can keep the specified closing reason as is, or you can change it if another reason is more appropriate.
- You can add a comment to the automatically closed incident that explains the exception. For example, you could specify that the incident originated from known administrative activity.
- By default, the rule is set to expire automatically after 24 hours. This expiration might be what you want, and reduces the chance of false negative errors. If you want a longer exception, set Rule expiration to a later time.
You can add more actions if you want. For example, you can add a tag to the incident, or you can run a playbook to send an email or a notification or to synchronize with an external system.
Select Apply to activate the exception.
Add exceptions by modifying analytics rules
Another option for implementing exceptions is to modify the analytics rule query. You can include exceptions directly in the rule, or preferably, when possible, use a reference to a watchlist. You can then manage the exception list in the watchlist.
Modify the query
To edit existing analytics rules, select Automation from the Microsoft Sentinel left navigation menu. Select the rule you want to edit, and then select Edit at lower right to open the Analytics Rules Wizard.
For detailed instructions on using the Analytics Rules Wizard to create and edit analytics rules, see Create custom analytics rules to detect threats.
To implement an exception in a typical rule preamble, you can add a condition like where IPAddress !in ('<ip addresses>') near the beginning of the rule query. This line excludes specific IP addresses from the rule.
let timeFrame = 1d;
SigninLogs
| where TimeGenerated >= ago(timeFrame)
| where IPAddress !in ('10.0.0.8', '192.168.12.1')
...
This type of exception isn't limited to IP addresses. You can exclude specific users by using the UserPrincipalName field, or exclude specific apps by using AppDisplayName.
You can also exclude multiple attributes. For example, to exclude alerts from either the IP address 10.0.0.8 or the user user@microsoft.com, use:
| where IPAddress !in ('10.0.0.8')
| where UserPrincipalName != 'user@microsoft.com'
To implement a more fine-grained exception when applicable, and reduce the chance for false negatives, you can combine attributes. The following exception applies only if both values appear in the same alert:
| where IPAddress != '10.0.0.8' and UserPrincipalName != 'user@microsoft.com'
Exclude subnets
Excluding IP ranges used by an organization requires subnet exclusion. The following example shows how to exclude subnets.
The ipv4_lookup operator is an enrichment operator, not a filtering operator. The where isempty(network) line actually does the filtering, by inspecting those events that don't show a match.
let subnets = datatable(network:string) [ "111.68.128.0/17", "5.8.0.0/19", ...];
let timeFrame = 1d;
SigninLogs
| where TimeGenerated >= ago(timeFrame)
| evaluate ipv4_lookup(subnets, IPAddress, network, return_unmatched = true)
| where isempty(network)
...
Use watchlists to manage exceptions
You can use a watchlist to manage the list of exceptions outside the rule itself. When applicable, this solution has the following advantages:
- An analyst can add exceptions without editing the rule, which better follows SOC best practices.
- The same watchlist can apply to several rules, enabling central exception management.
Using a watchlist is similar to using a direct exception. Use _GetWatchlist('<watchlist name>') to call the watchlist:
let timeFrame = 1d;
let logonDiff = 10m;
let allowlist = (_GetWatchlist('ipallowlist') | project IPAddress);
SigninLogs
| where TimeGenerated >= ago(timeFrame)
| where IPAddress !in (allowlist)
...
You can also do subnet filtering by using a watchlist. For example, in the preceding subnets exclusion code, you could replace the subnets datatable definition with a watchlist:
let subnets = _GetWatchlist('subnetallowlist');
See more information on the following items used in the preceding examples, in the Kusto documentation:
- let statement
- where operator
- project operator
- datatable operator
- evaluate plugin operator
- ago() function
- isempty() function
- ipv4_lookup plugin
For more information on KQL, see Kusto Query Language (KQL) overview.
Other resources:
Example: Manage exceptions for the Microsoft Sentinel solution for SAP® applications
The Microsoft Sentinel solution for SAP® applications provides functions you can use to exclude users or systems from triggering alerts.
Exclude users. Use the SAPUsersGetVIP function to:
- Call tags for users you want to exclude from triggering alerts. Tag users in the SAP_User_Config watchlist, using asterisks (*) as wildcards to tag all users with a specified naming syntax.
- List specific SAP roles and/or profiles you want to exclude from triggering alerts.
Exclude systems. Use functions that support the SelectedSystemRoles parameter to determine that only specific types of systems trigger alerts, including only Production systems, only UAT systems, or both.
For more information, see Microsoft Sentinel solution for SAP® applications data reference.
Related content
For more information, see: