Tutorial: How to create a secure workspace with a managed virtual network
In this article, learn how to create and connect to a secure Azure Machine Learning workspace. The steps in this article use an Azure Machine Learning managed virtual network to create a security boundary around resources used by Azure Machine Learning.
In this tutorial, you accomplish the following tasks:
- Create an Azure Machine Learning workspace configured to use a managed virtual network.
- Create an Azure Machine Learning compute cluster. A compute cluster is used when training machine learning models in the cloud.
After completing this tutorial, you'll have the following architecture:
- An Azure Machine Learning workspace that uses a private endpoint to communicate using the managed network.
- An Azure Storage Account that uses private endpoints to allow storage services such as blob and file to communicate using the managed network.
- An Azure Container Registry that uses a private endpoint communicate using the managed network.
- An Azure Key Vault that uses a private endpoint to communicate using the managed network.
- An Azure Machine Learning compute instance and compute cluster secured by the managed network.
Prerequisites
- An Azure subscription. If you don't have an Azure subscription, create a free account before you begin. Try the free or paid version of Azure Machine Learning.
Create a jump box (VM)
There are several ways that you can connect to the secured workspace. In this tutorial, a jump box is used. A jump box is a virtual machine in an Azure Virtual Network. You can connect to it using your web browser and Azure Bastion.
The following table lists several other ways that you might connect to the secure workspace:
| Method | Description |
|---|---|
| Azure VPN gateway | Connects on-premises networks to an Azure Virtual Network over a private connection. A private endpoint for your workspace is created within that virtual network. Connection is made over the public internet. |
| ExpressRoute | Connects on-premises networks into the cloud over a private connection. Connection is made using a connectivity provider. |
Important
When using a VPN gateway or ExpressRoute, you will need to plan how name resolution works between your on-premises resources and those in the cloud. For more information, see Use a custom DNS server.
Use the following steps to create an Azure Virtual Machine to use as a jump box. From the VM desktop, you can then use the browser on the VM to connect to resources inside the managed virtual network, such as Azure Machine Learning studio. Or you can install development tools on the VM.
Tip
The following steps create a Windows 11 enterprise VM. Depending on your requirements, you might want to select a different VM image. The Windows 11 (or 10) enterprise image is useful if you need to join the VM to your organization's domain.
In the Azure portal, select the portal menu in the upper left corner. From the menu, select + Create a resource and then enter Virtual Machine. Select the Virtual Machine entry, and then select Create.
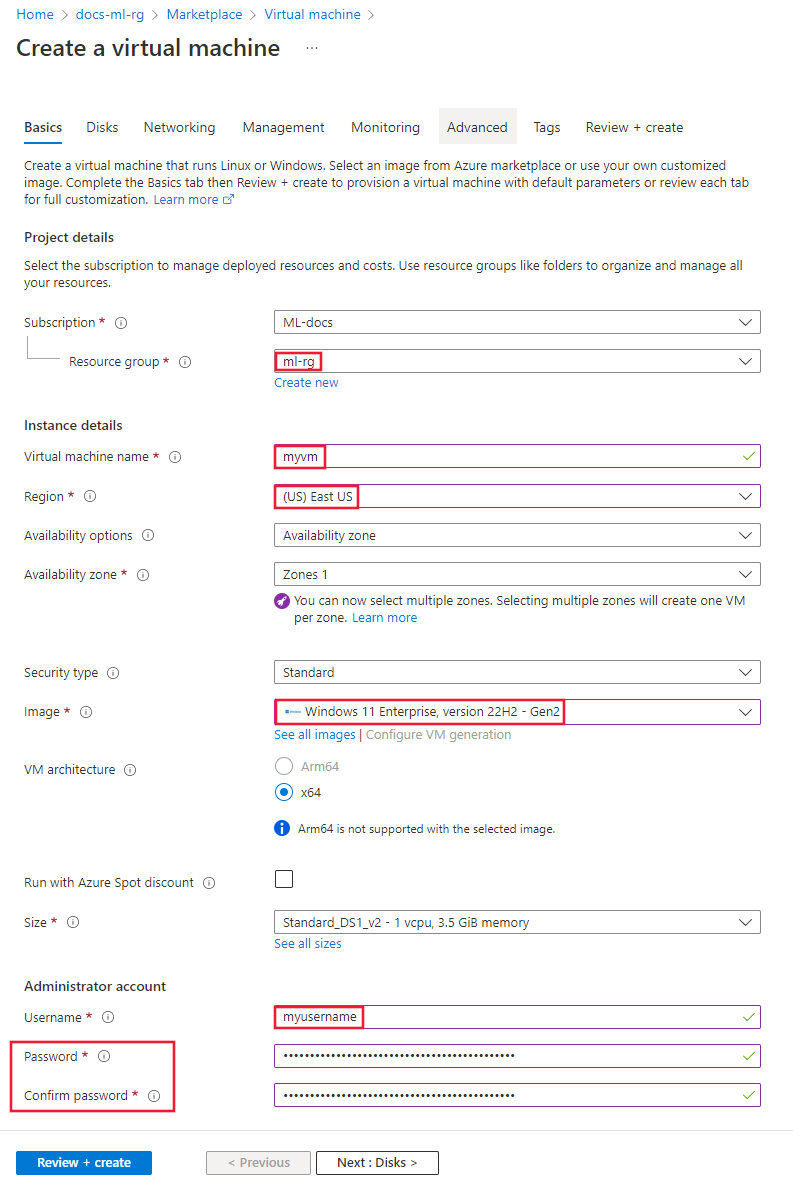
From the Basics tab, select the subscription, resource group, and Region to create the service in. Provide values for the following fields:
Virtual machine name: A unique name for the VM.
Username: The username you use to sign in to the VM.
Password: The password for the username.
Security type: Standard.
Image: Windows 11 Enterprise.
Tip
If Windows 11 Enterprise isn't in the list for image selection, use See all images_. Find the Windows 11 entry from Microsoft, and use the Select drop-down to select the enterprise image.
You can leave other fields at the default values.
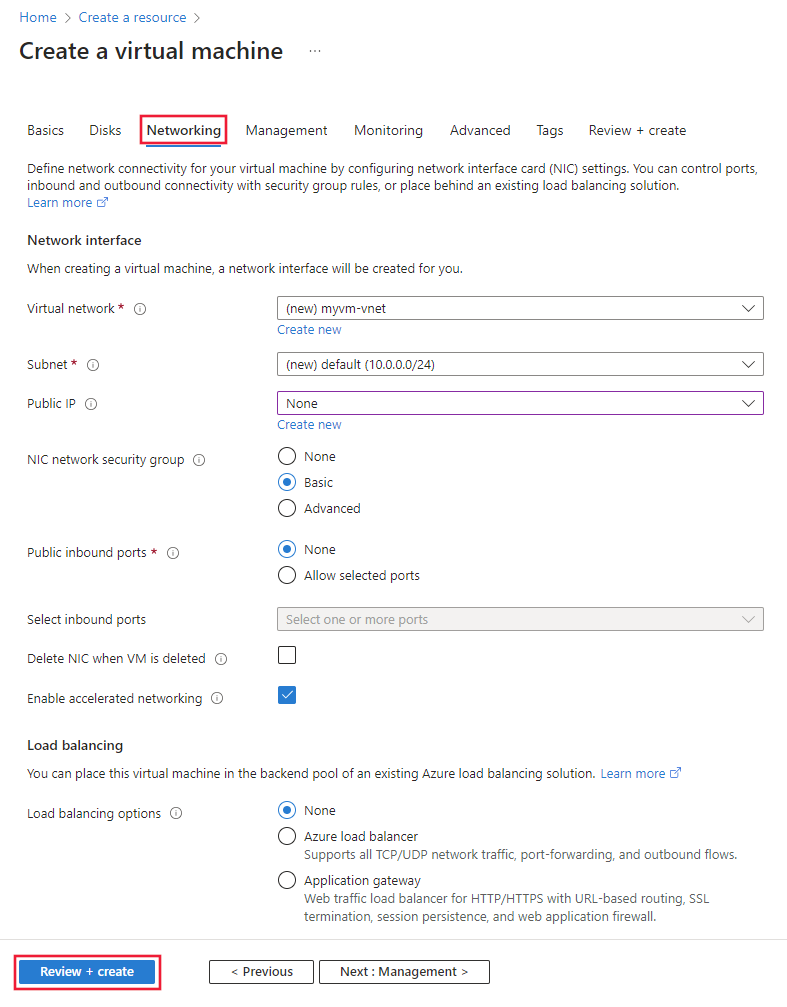
Select Networking. Review the networking information and make sure that it's not using the 172.17.0.0/16 IP address range. If it is, select a different range such as 172.16.0.0/16; the 172.17.0.0/16 range can cause conflicts with Docker.
Note
The Azure Virtual Machine creates its own Azure Virtual Network for network isolation. This network is separate from the managed virtual network used by Azure Machine Learning.
Select Review + create. Verify that the information is correct, and then select Create.
Enable Azure Bastion for the VM
Azure Bastion enables you to connect to the VM desktop through your browser.
In the Azure portal, select the VM you created earlier. From the Connect section of the page, select Bastion and then Deploy Bastion.
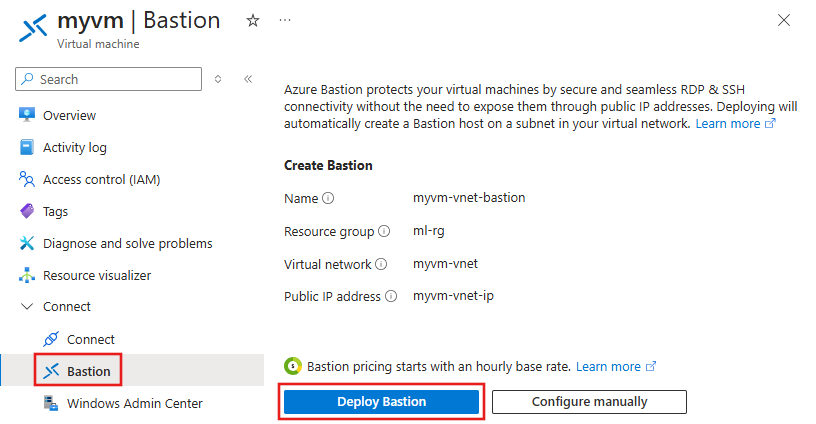
Once the Bastion service is deployed, you arrive at a connection dialog. Leave this dialog for now.
Create a workspace
In the Azure portal, select the portal menu in the upper left corner. From the menu, select + Create a resource and then enter Azure Machine Learning. Select the Azure Machine Learning entry, and then select Create.
From the Basics tab, select the subscription, resource group, and Region to create the service in. Enter a unique name for the Workspace name. Leave the rest of the fields at the default values; new instances of the required services are created for the workspace.
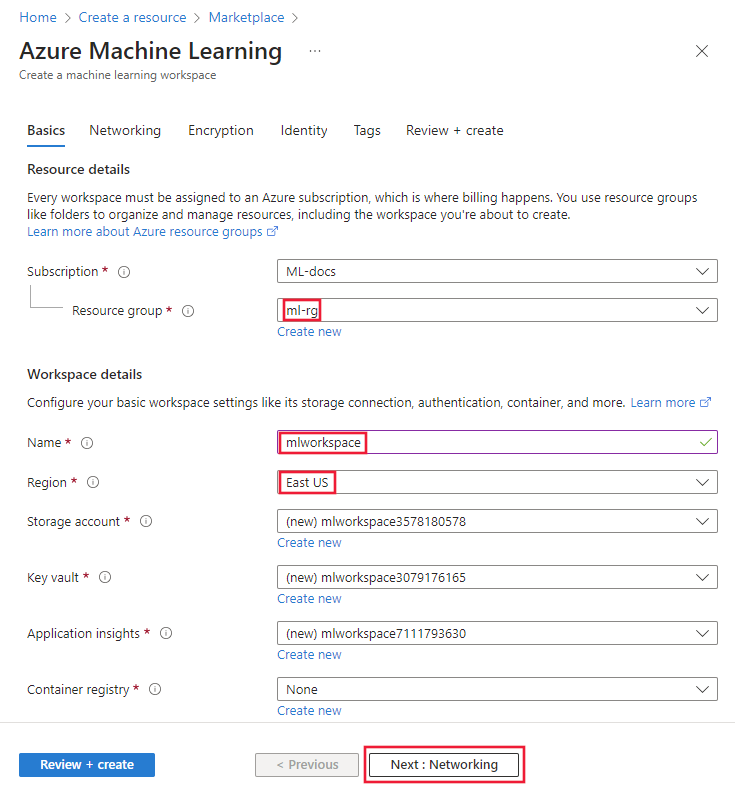
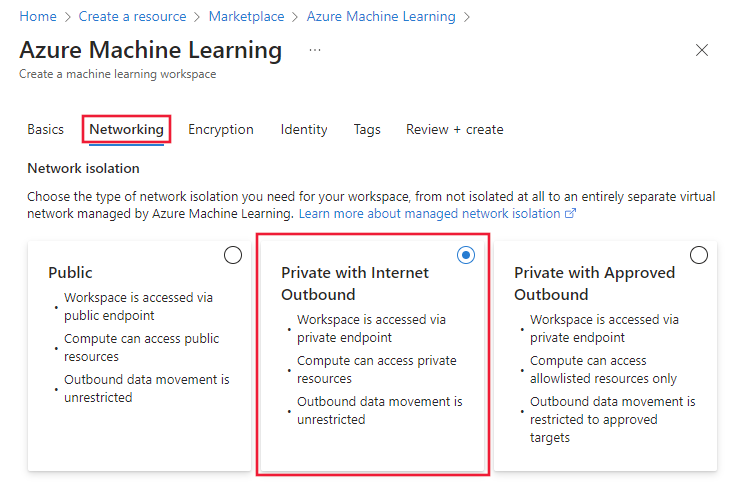
From the Networking tab, select Private with Internet Outbound.
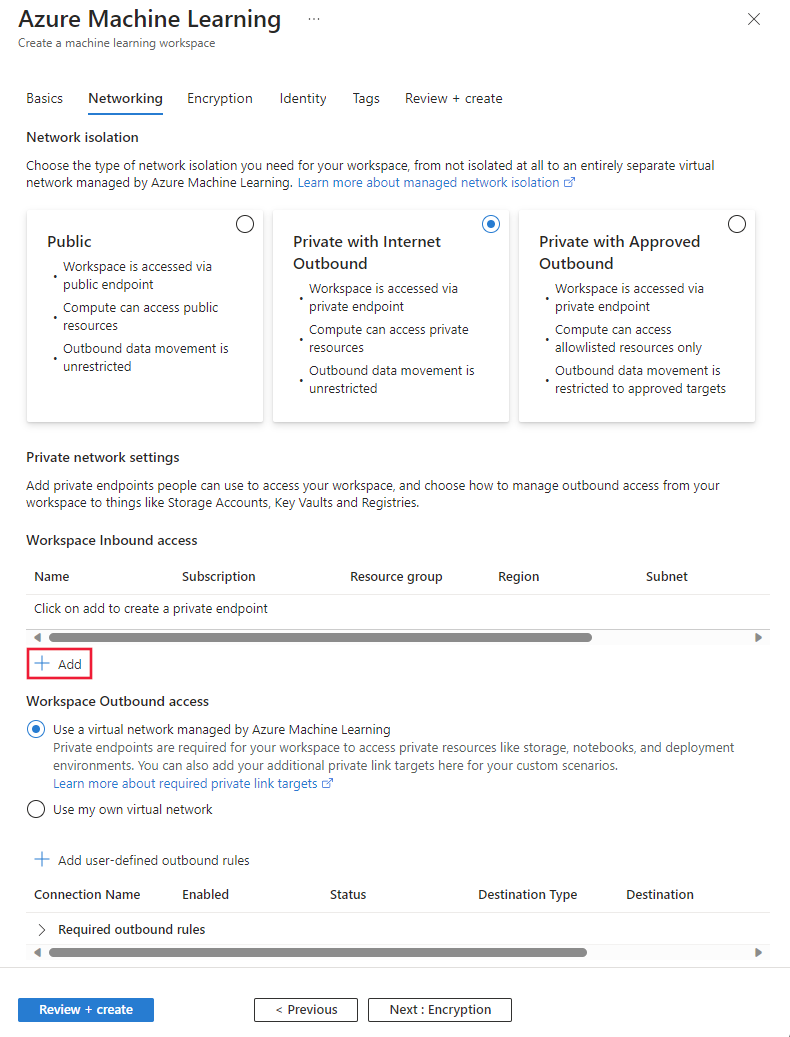
From the Networking tab, in the Workspace inbound access section, select + Add.
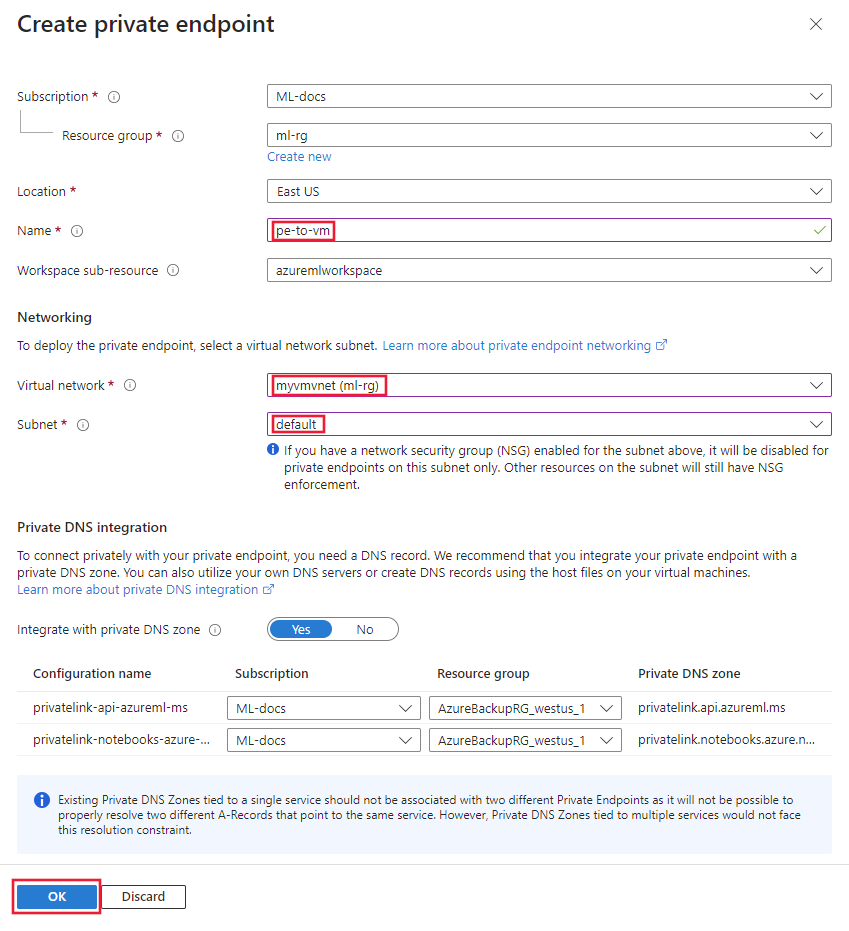
From the Create private endpoint form, enter a unique value in the Name field. Select the Virtual network created earlier with the VM, and select the default Subnet. Leave the rest of the fields at the default values. Select OK to save the endpoint.
Select Review + create. Verify that the information is correct, and then select Create.
Once the workspace is created, select Go to resource.
Connect to the VM desktop
From the Azure portal, select the VM you created earlier.
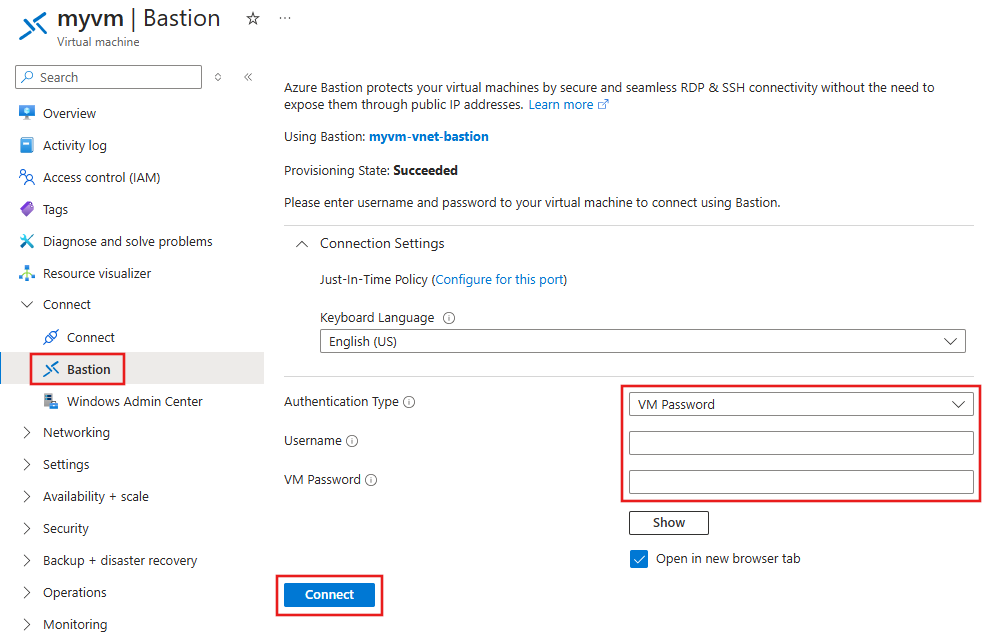
From the Connect section, select Bastion. Enter the username and password you configured for the VM, and then select Connect.
Connect to studio
At this point, the workspace is created but the managed virtual network is not. The managed virtual network is configured when you create the workspace. To create the managed virtual network, create a compute resource or manually provision the network.
Use the following steps to create a compute instance.
From the VM desktop, use the browser to open the Azure Machine Learning studio and select the workspace you created earlier.
From studio, select Compute, Compute instances, and then + New.
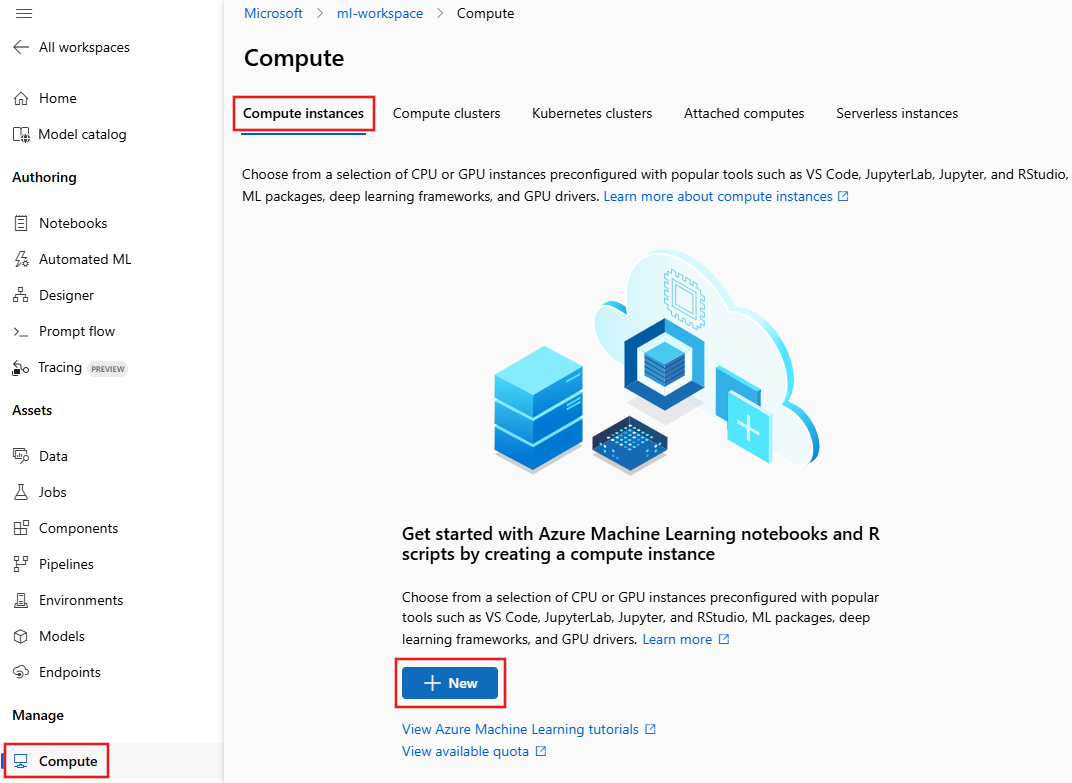
From the Configure required settings dialog, enter a unique value as the Compute name. Leave the rest of the selections at the default value.
Select Create. The compute instance takes a few minutes to create. The compute instance is created within the managed network.
Tip
It may take several minutes to create the first compute resource. This delay occurs because the managed virtual network is also being created. The managed virtual network isn't created until the first compute resource is created. Subsequent managed compute resources will be created much faster.
Enable studio access to storage
Since the Azure Machine Learning studio partially runs in the web browser on the client, the client needs to be able to directly access the default storage account for the workspace to perform data operations. To enable direct access, use the following steps:
From the Azure portal, select the jump box VM you created earlier. From the Overview section, copy the Public IP address.
From the Azure portal, select the workspace you created earlier. From the Overview section, select the link for the Storage entry.
From the storage account, select Networking, and add the jump box's public IP address to the Firewall section.
Tip
In a scenario where you use a VPN gateway or ExpressRoute instead of a jump box, you could add a private endpoint or service endpoint for the storage account to the Azure Virtual Network. Using a private endpoint or service endpoint would allow multiple clients connecting through the Azure Virtual Network to successfully perform storage operations through studio.
At this point, you can use the studio to interactively work with notebooks on the compute instance and run training jobs. For a tutorial, see Tutorial: Model development.
Stop compute instance
While it's running (started), the compute instance continues charging your subscription. To avoid excess cost, stop it when not in use.
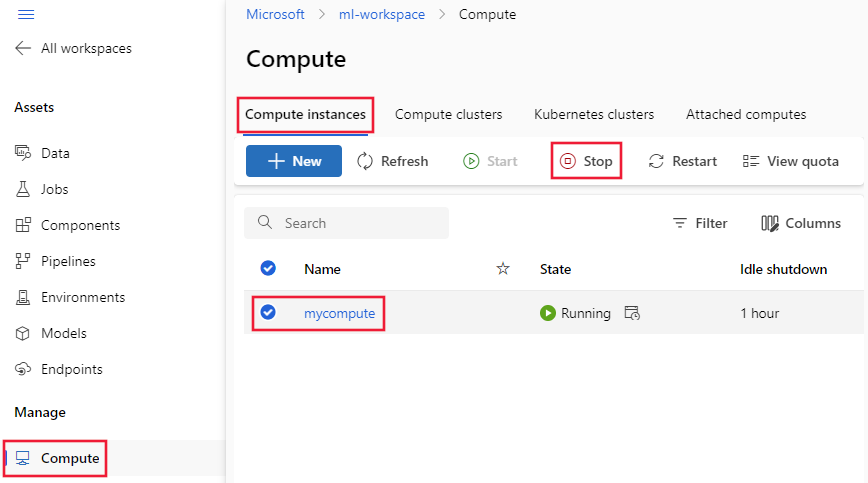
From studio, select Compute, Compute instances, and then select the compute instance. Finally, select Stop from the top of the page.
Clean up resources
If you plan to continue using the secured workspace and other resources, skip this section.
To delete all resources created in this tutorial, use the following steps:
In the Azure portal, select Resource groups.
From the list, select the resource group that you created in this tutorial.
Select Delete resource group.

Enter the resource group name, then select Delete.
Next steps
Now that you have a secure workspace and can access studio, learn how to deploy a model to an online endpoint with network isolation.
For more information on the managed virtual network, see Secure your workspace with a managed virtual network.