Share your code with Azure Repos and Visual Studio
Azure DevOps Services | Azure DevOps Server 2022 - Azure DevOps Server 2019
Visual Studio 2019 | Visual Studio 2022
Share your Visual Studio solution with others by hosting your code in an Azure Repos Git repository. You can use Visual Studio to manage Azure Repos Git repositories or GitHub repositories. This article provides procedures for the following tasks:
- Add a project or solution to a local Git repository
- Publish your code to an Azure Repos Git repository or GitHub repository
- Review your code changes before publishing
- Link work items to your commits
- Commit and push updates
- Pull changes from the main branch of your repository
To clone a GitHub repository, get the clone URL as described in Cloning a repository.
For an overview of the Git workflow, see Azure Repos Git tutorial.
Prerequisites
Repos must be enabled in your Azure DevOps project settings. If the Repos hub and associated pages don't display, see Turn an Azure DevOps service on or off to reenable Repos.
To view code in private projects, be a member of an Azure DevOps project with at least Basic access. For public projects, everyone can view the code.
If you don't have a project, create one or sign up for free.
If you aren't a project member, get added.
To clone or contribute to code for a private project, be a member of the Contributors security group or have the corresponding permissions set. For public projects, anyone can clone and contribute code. For more information, see What is a public project?
Note
For public projects, users granted Stakeholder access have full access to Azure Repos.
Repos must be enabled in your Azure DevOps project settings. If the Repos hub and associated pages don't display, see Turn an Azure DevOps service on or off to reenable Repos.
To view code, be a member of the Azure DevOps project with at least Basic access. If you aren't a project member, get added.
To clone or contribute to code, be a member of the Contributors security group, or have the corresponding permissions, in the project you want to change.
For more information about permissions and access, see Default Git repository and branch permissions and About access levels.
Note
Visual Studio 2019 version 16.8 and later versions provide a new Git menu for managing the Git workflow with less context switching than Team Explorer. Procedures provided in this article under the Visual Studio tab provide information for using the Git experience as well as Team Explorer. For more information, see Side-by-side comparison of Git and Team Explorer.
Add a project or solution to a new local Git repository
The first step to sharing your Visual Studio solution with others using Git is to create a local Git repo for your code. If it's your first time using Visual Studio to connect to Azure Repos, see Connect to a project from Visual Studio for details.
- Visual Studio 2022
- Visual Studio 2019 - Git menu
- Visual Studio 2019 - Team Explorer
- Git Command Line
Create a new local Git repo for your Visual Studio solution, by right-clicking the solution name in Solution Explorer, and then selecting Create Git Repository. Or, choose Add to Source Control on the status bar in the lower right-hand corner of Visual Studio, and then select Git. If you don't see these options, then your code is already in a Git repo.
Or, choose Git > Create Git Repository from the menu bar to launch the Create a Git repository window. If you don't see this option, then your code is already in a Git repo.
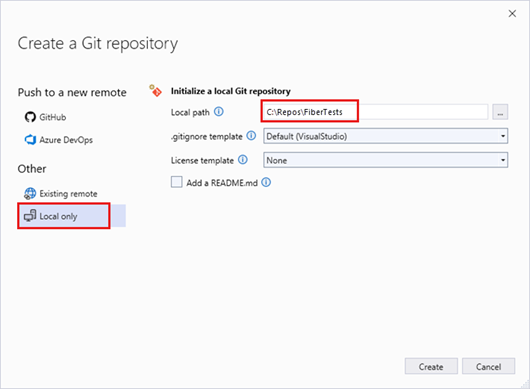
This step only applies to the Visual Studio Git version control experience: in the Create a Git repository window, choose Local only, verify the local path is correct, and then choose Create.
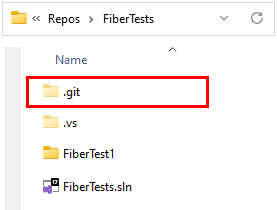
You've now created a local Git repo in the Visual Studio solution folder and committed your code into that repo. Your local Git repo contains both your Visual Studio solution and Git resources.
Publish your code
You can share your work with others by publishing your local Git repo to an Azure Repos Git repo.
- Visual Studio 2022
- Visual Studio 2019 - Git menu
- Visual Studio 2019 - Team Explorer
- Git Command Line
Visual Studio 2022 provides a Git version control experience by using the Git menu, Git Changes, and through context menus in Solution Explorer. Visual Studio 2019 version 16.8 also offers the Team Explorer Git user interface. For more information, see the Visual Studio 2019 - Team Explorer tab.
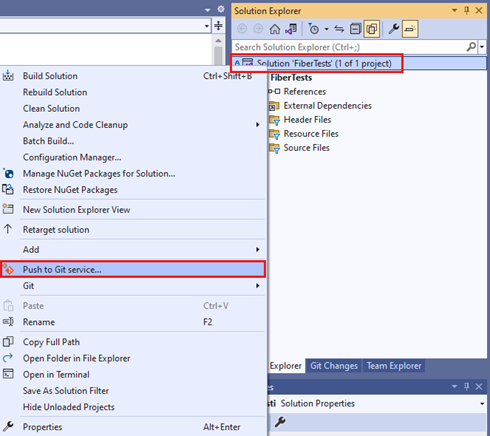
Connect to an Azure DevOps repo by right-clicking the solution name in Solution Explorer, and then selecting Push to Git service to launch the Create a Git repository window.
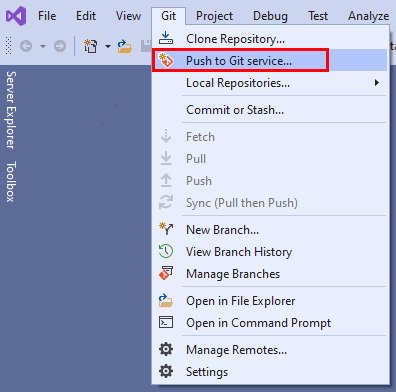
Or, choose Git > Push to Git service from the menu bar to launch the Create a Git repository window.
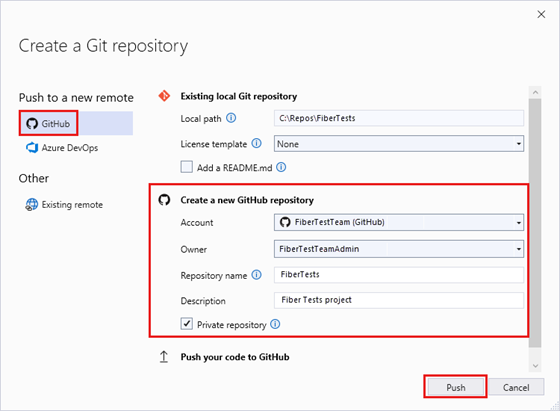
In the Create a Git repository dialog, select GitHub. Enter any required values under Create a new GitHub repository. Then select Push.
You can verify that the repo is created by going to GitHub and searching for your repo name in your account.
Review commit changes
It's good practice to review the code changes in your commit before publishing. Visual Studio provides a diff view that helps you see all the changes you've made since the previous commit.
- Visual Studio 2022
- Visual Studio 2019 - Git menu
- Visual Studio 2019 - Team Explorer
- Git Command Line
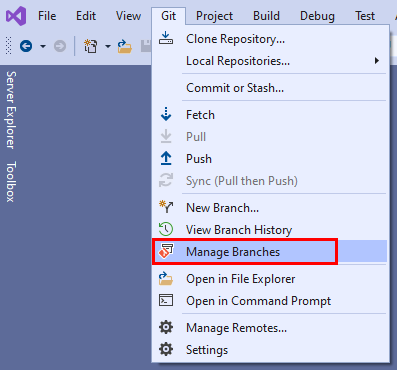
To see what's changed in a commit, select Git > Manage Branches to open the Git Repository window.
In the Git Repository window, select your branch, right-click the commit, and then choose View Commit Details to open the Commit window.
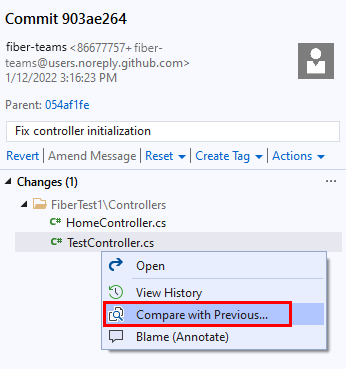
In the Commit window, you can right-click on any file and select Compare with Previous to view the file changes made by the commit.
Link work items to your commits
As you develop your software, you can capture which commits support the completion of work items like Azure DevOps tasks or bug fixes. The audit trail of work items linked to commits lets your team understand how tasks and bugs were resolved.
Note
The #ID syntax is supported when you connect to an Azure Repos Git repository. If you connect to a GitHub repository, you can still link to work items, but must use the #ABID syntax, and have previously set up an Azure Boards-GitHub connection.
- Visual Studio 2022
- Visual Studio 2019 - Git menu
- Visual Studio 2019 - Team Explorer
- Git Command Line
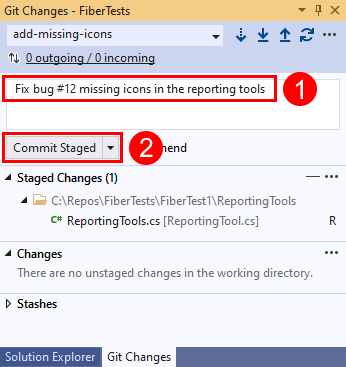
You can link work items to commits by adding #ID into the commit message. For example, the commit message "Fix bug #12 Missing icons in the reporting tools" would link work item 12 to the commit when the commit is pushed to Azure Repos.
Push commit changes
- Visual Studio 2022
- Visual Studio 2019 - Git menu
- Visual Studio 2019 - Team Explorer
- Git Command Line
As you write your code, your changes are automatically tracked by Visual Studio. When you're satisfied with your changes, you can save them in Git using a commit, and then push your commit to Azure Repos.
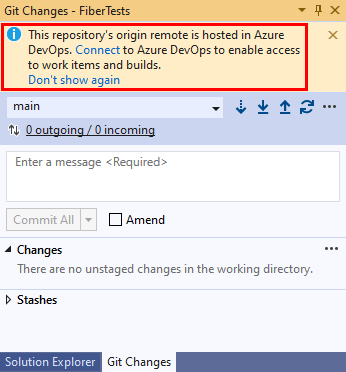
In the Git Changes window, enter a message that describes the changes, and then choose Commit All. Commit All commits unstaged changes and skips the staging area. You can choose to stage all files before committing by selecting the stage all + (plus) button at the top of the Changes section of the Git Changes window.
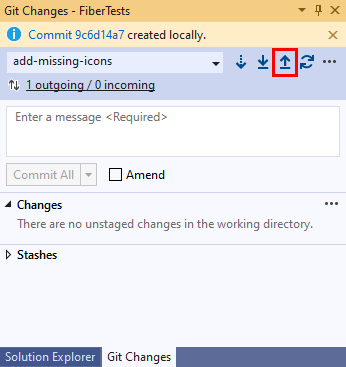
To push your commit to Azure Repos, select the up-arrow push button.
Or, you can push your commit from the Git Repository window. To open the Git Repository window, select the outgoing / incoming link in the Git Changes window.
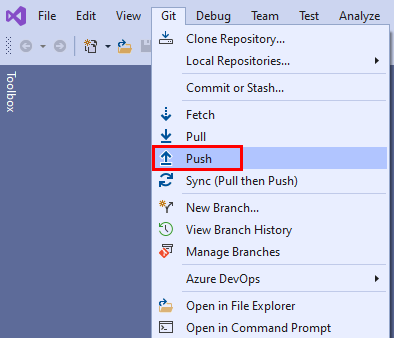
Or, you can choose Git > Push from the menu bar.
Pull changes
You can keep your local branches in sync with their remote counterparts by pulling commits created by others. While you're working on your feature branch, it's a good idea to periodically switch to your main branch and pull new commits to keep it current with the remote main branch.
Note
In Visual Studio, Fetch and Pull links can be found in different views and in the Git menu on the menu bar. Those links all do the same thing—fetch or pull from the remote repo to the current branch of the local repo.
- Visual Studio 2022
- Visual Studio 2019 - Git menu
- Visual Studio 2019 - Team Explorer
- Git Command Line
In the Git Changes window, you can check for the latest commits on the remote branch by using the down-arrow fetch link, then selecting the outgoing / incoming link to open the Git Repository window. Fetch downloads remote commits that aren't in your local branch, but won't merge them into your local branch. Fetched commits show up in the Incoming Commits section of the Git Repository window. You can double-click a fetched commit to view its file changes.
Choose Pull to merge the fetched remote commits into your local repo. Pull performs a fetch and then merges the downloaded commits into your local branch.
FAQs
Q: Why does the sign-in page differ between the web portal and Visual Studio?
A: Your sign-in page depends on whether you used a Microsoft account or a work account with Azure DevOps. Always sign in with the credentials that you use for Azure DevOps.
Q: Can I use the Git command prompt with Visual Studio?
A: Visual Studio's Team Explorer and the Git command-line work great together. Changes to your repos made in either tool will be reflected in the other. Make sure to install the latest release of Git for Windows, which has tools to help you connect to your Azure DevOps Services/TFS repos.
See the Azure Repos Git tutorial and the command reference for additional help using Git from the command line.


