Deploy VMs on your Azure Stack Edge Pro GPU device via templates
APPLIES TO:  Azure Stack Edge Pro - GPU
 Azure Stack Edge Pro 2
 Azure Stack Edge Pro R
 Azure Stack Edge Mini R
This tutorial describes how to create and manage a VM on your Azure Stack Edge Pro device using templates. These templates are JavaScript Object Notation (JSON) files that define the infrastructure and configuration for your VM. In these templates, you specify the resources to deploy and the properties for those resources.
Templates are flexible in different environments as they can take parameters as input at runtime from a file. The standard naming structure is TemplateName.json for the template and TemplateName.parameters.json for the parameters file. For more information on ARM templates, go to What are Azure Resource Manager templates?.
In this tutorial, we’ll use pre-written sample templates for creating resources. You won’t need to edit the template file and you can modify just the .parameters.json files to customize the deployment to your machine.
VM deployment workflow
To deploy Azure Stack Edge Pro VMs across many devices, you can use a single sysprepped VHD for your full fleet, the same template for deployment, and just make minor changes to the parameters to that template for each deployment location (these changes could be by hand as we’re doing here, or programmatic.)
The high level summary of the deployment workflow using templates is as follows:
Configure prerequisites - There are three types of prerequisites: device, client, and for the VM.
Device prerequisites
- Connect to Azure Resource Manager on device.
- Enable compute via the local UI.
Client prerequisites
- Download the VM templates and associated files on client.
- Optionally configure TLS 1.2 on client.
- Download and install Microsoft Azure Storage Explorer on your client.
VM prerequisites
- Create a resource group in the device location that will contain all the VM resources.
- Create a storage account to upload the VHD used to create VM image.
- Add local storage account URI to DNS or hosts file on the client accessing your device.
- Install the blob storage certificate on the device and on the local client accessing your device. Optionally install the blob storage certificate on the Storage Explorer.
- Create and upload a VHD to the storage account created earlier.
Create VM from templates
- Create a VM image using
CreateImage.parameters.jsonparameters file andCreateImage.jsondeployment template. - Create a VM with previously created resources using
CreateVM.parameters.jsonparameters file andCreateVM.jsondeployment template.
- Create a VM image using
Device prerequisites
Configure these prerequisites on your Azure Stack Edge Pro device.
Before you can deploy VMs on your Azure Stack Edge device, you must configure your client to connect to the device via Azure Resource Manager over Azure PowerShell. For detailed instructions, see Connect to Azure Resource Manager on your Azure Stack Edge device.
Make sure that you can use the following steps to access the device from your client. You've already done this configuration when you connected to Azure Resource Manager, and now you're verifying that the configuration was successful.
Verify that Azure Resource Manager communication is working by running the following command:
To call the local device APIs to authenticate, enter:
If you configured compute for Kubernetes, you can skip this step. Otherwise, ensure that you've enabled a network interface for compute by doing the following:
a. On your local user interface, go to Compute settings.
b. Select the network interface that you want to use to create a virtual switch. The VMs you create will be attached to a virtual switch that's attached to this port and the associated network. Be sure to choose a network that matches the IP address you'll use for the VM.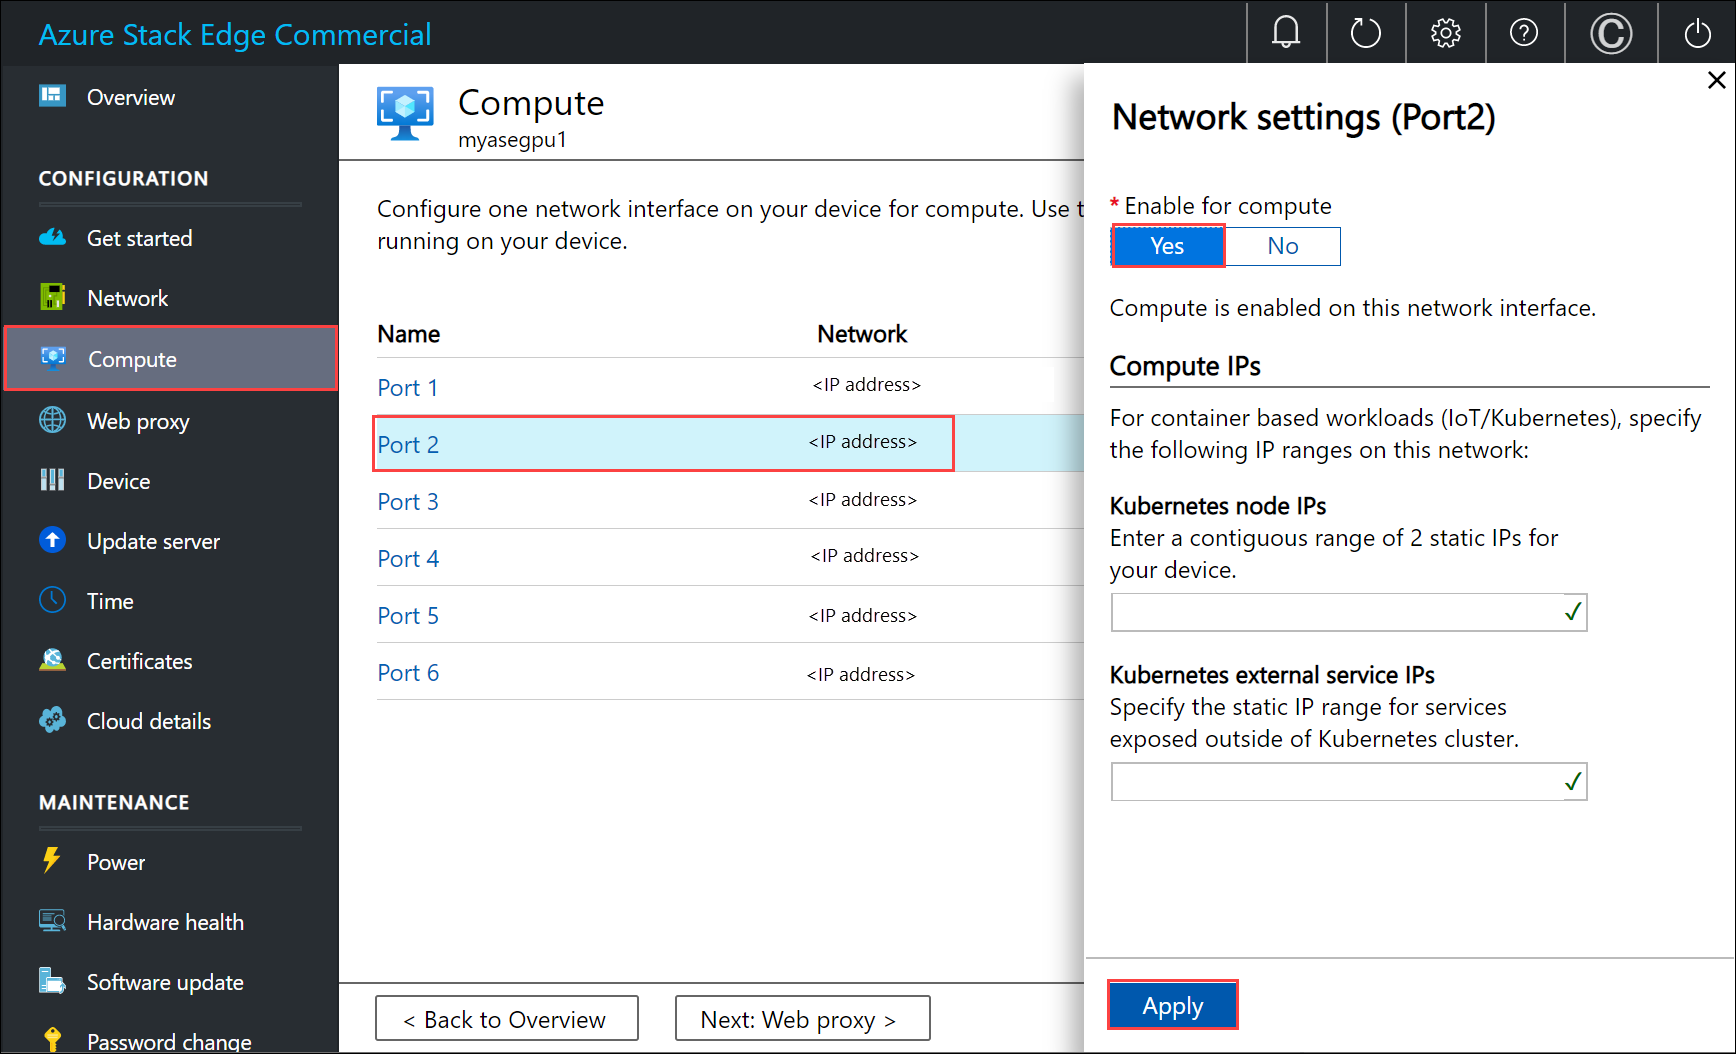
c. Under Enable for compute on the network interface, select Yes. Azure Stack Edge will create and manage a virtual switch that corresponds to that network interface. Don't enter specific IPs for Kubernetes at this time. It can take several minutes to enable compute.
Note
If you're creating GPU VMs, select a network interface that's connected to the internet. Doing so enables you to install a GPU extension on your device.
Client prerequisites
Configure these prerequisites on your client that will be used to access the Azure Stack Edge Pro device.
- Download Storage Explorer if you're using it to upload a VHD. Alternatively, you can download AzCopy to upload a VHD. You may need to configure TLS 1.2 on your client machine if running older versions of AzCopy.
- Download the VM templates and parameters files to your client machine. Unzip it into a directory you’ll use as a working directory.
VM prerequisites
Configure these prerequisites to create the resources needed for VM creation.
Create a resource group
Create an Azure resource group with New-AzResourceGroup. A resource group is a logical container into which the Azure resources such as storage account, disk, managed disk are deployed and managed.
Important
All the resources are created in the same location as that of the device and the location is set to DBELocal.
New-AzResourceGroup -Name <Resource group name> -Location DBELocal
Here's a sample output:
PS C:\WINDOWS\system32> New-AzResourceGroup -Name myaserg1 -Location DBELocal

ResourceGroupName : myaserg1
Location          : dbelocal
ProvisioningState : Succeeded
Tags              :
ResourceId        : /subscriptions/aaaa0a0a-bb1b-cc2c-dd3d-eeeeee4e4e4e/resourceGroups/myaserg1

PS C:\WINDOWS\system32>
Create a storage account
Create a new storage account using the resource group created in the previous step. This account is a local storage account that will be used to upload the virtual disk image for the VM.
New-AzStorageAccount -Name <Storage account name> -ResourceGroupName <Resource group name> -Location DBELocal -SkuName Standard_LRS
Note
Only the local storage accounts such as Locally redundant storage (Standard_LRS or Premium_LRS) can be created via Azure Resource Manager. To create tiered storage accounts, see the steps in Add, connect to storage accounts on your Azure Stack Edge Pro.
Here's a sample output:
PS C:\WINDOWS\system32>New-AzStorageAccount -Name myasesa1 -ResourceGroupName myaserg1 -Location DBELocal -SkuName Standard_LRS

StorageAccountName ResourceGroupName PrimaryLocation SkuName Kind AccessTier CreationTime ProvisioningState EnableHttpsTrafficOnly
------------------ ----------------- --------------- ------- ---- ---------- ------------ ----------------- ------
myasesa1        myaserg1 DBELocal Standard_LRS Storage 4/18/2022 8:35:09 PM Succeeded False

PS C:\WINDOWS\system32>
To get the storage account key, run the Get-AzStorageAccountKey command. Here's a sample output:
PS C:\WINDOWS\system32> Get-AzStorageAccountKey

cmdlet Get-AzStorageAccountKey at command pipeline position 1
Supply values for the following parameters:
(Type !? for Help.)
ResourceGroupName: myaserg1
Name: myasesa1

KeyName Value                                                                                    Permissions
------- -----                                                                                    -----------
key1    7a707uIh43qADXvuhwqtw39mwq3M97r1BflhoF2yZ6W9FNkGOCblxb7nDSiYVGQprpkKk0Au2AjmgUXUT6yCog== Full
key2    2v1VQ6qH1CJ9bOjB15p4jg9Ejn7iazU95Qe8hAGE22MTL21Ac5skA6kZnE3nbe+rdiXiORBeVh9OpJcMOfoaZg== Full

PS C:\WINDOWS\system32>
Add blob URI to hosts file
Make sure that you've already added the blob URI in hosts file for the client that you're using to connect to Blob storage. Run Notepad as administrator and add the following entry for the blob URI in the C:\windows\system32\drivers\etc\hosts:
<Device IP> <storage account name>.blob.<Device name>.<DNS domain>
In a typical environment, you would have your DNS configured so that all storage accounts would point to the Azure Stack Edge Pro device with a *.blob.devicename.domainname.com entry.
(Optional) Install certificates
Skip this step if you'll connect via Storage Explorer using http. If you're using https, then you need to install appropriate certificates in Storage Explorer. In this case, install the blob endpoint certificate. For more information, see how to create and upload certificates in Manage certificates.
Create and upload a VHD
Make sure that you have a virtual disk image that you can use to upload in the later step. Follow the steps in Create a VM image.
Copy any disk images to be used into page blobs in the local storage account that you created in the earlier steps. You can use a tool such as Storage Explorer or AzCopy to upload the VHD to the storage account that you created in earlier steps.
Use Storage Explorer for upload
Open Storage Explorer. Go to Edit and make sure that the application is set to Target Azure Stack APIs.

Install the client certificate in PEM format. Go to Edit > SSL Certificates > Import certificates. Point to the client certificate.

If you're using device generated certificates, download and convert the blob storage endpoint
.cercertificate to a.pemformat. Run the following command.PS C:\windows\system32> Certutil -encode 'C:\myasegpu1_Blob storage (1).cer' .\blobstoragecert.pem Input Length = 1380 Output Length = 1954 CertUtil: -encode command completed successfully.If you're bringing your own certificate, use the signing chain root certificate in
.pemformat.
After you've imported the certificate, restart Storage Explorer for the changes to take effect.

In the left pane, right-click Storage accounts and select Connect to Azure Storage.

Select Use a storage account name and key. Select Next.
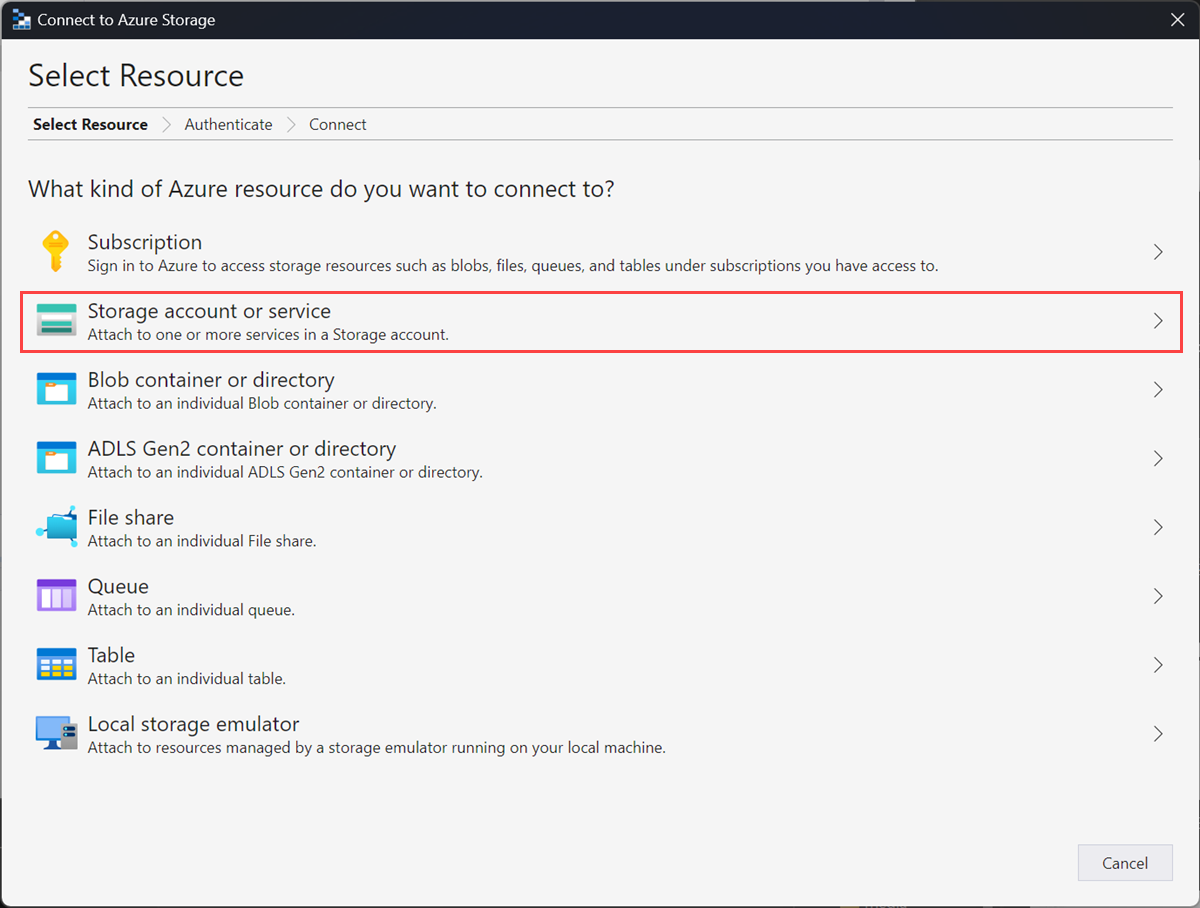
In the Connect with Name and Key, provide the Display name, Storage account name, Azure Storage Account key. Select Other Storage domain and then provide the
<device name>.<DNS domain>connection string. If you didn’t install a certificate in Storage Explorer, check the Use HTTP option. Select Next.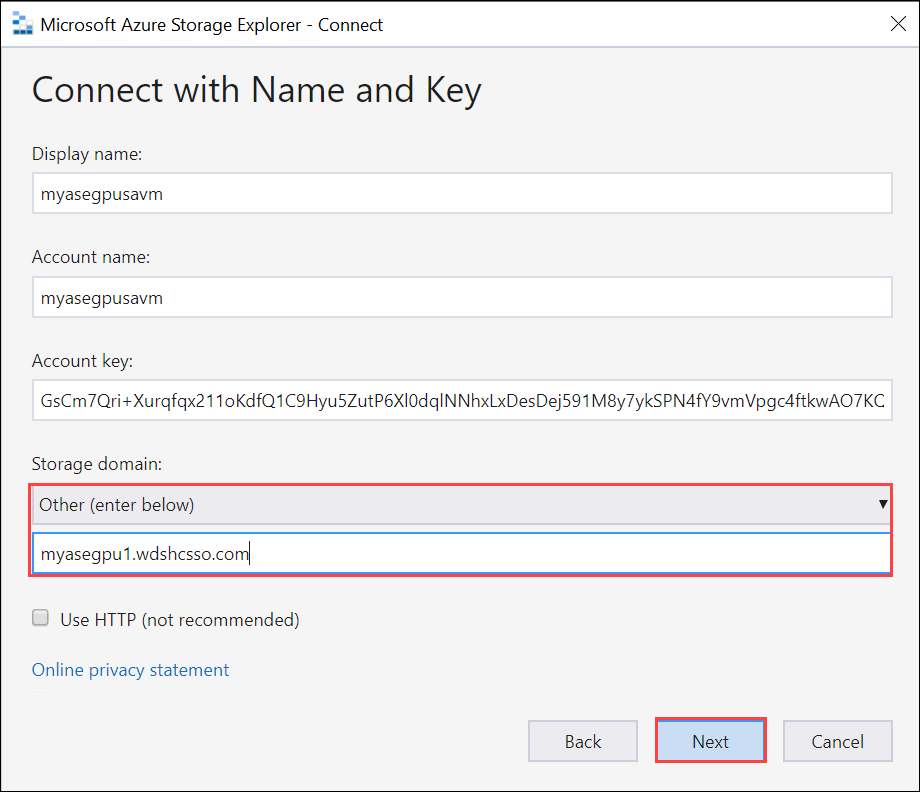
Review the Connection summary and select Connect.
The storage account appears in the left-pane. Select and expand the storage account. Select Blob containers, right-click, and select Create Blob Container. Provide a name for your blob container.
Select the container you just created, and then in the right-pane, select Upload > Upload files.
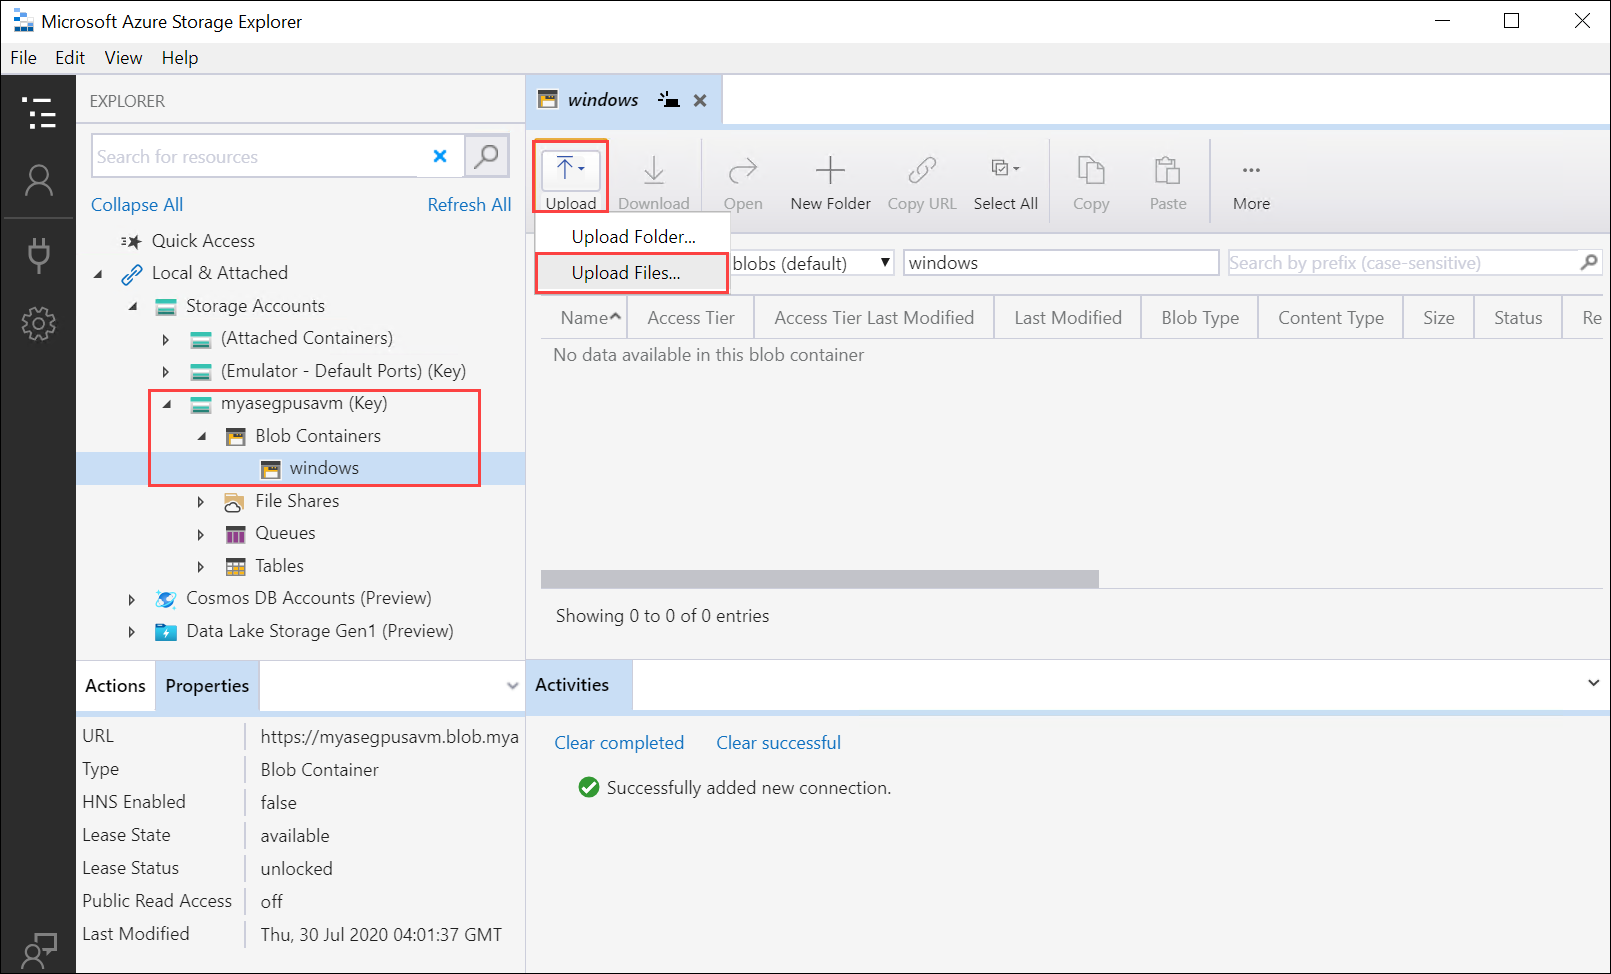
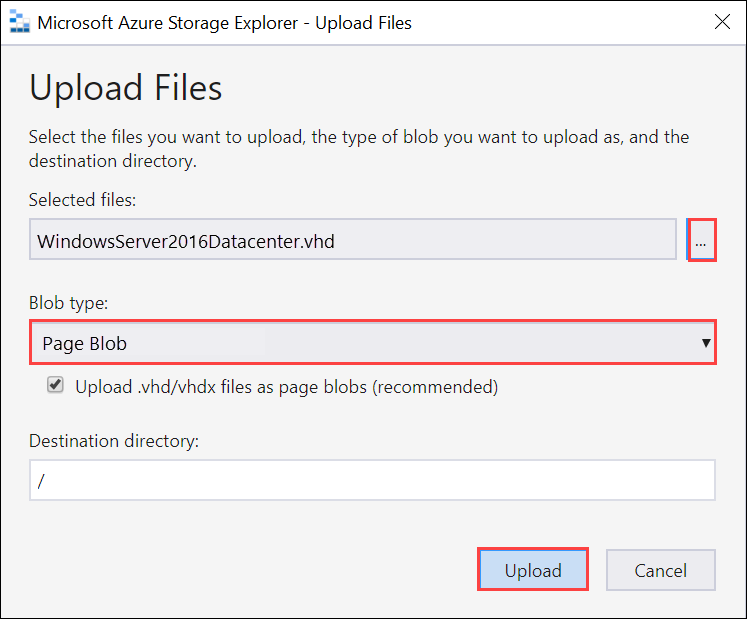
Browse and point to the VHD that you want to upload in the Selected files. Select Blob type as Page blob and select Upload.
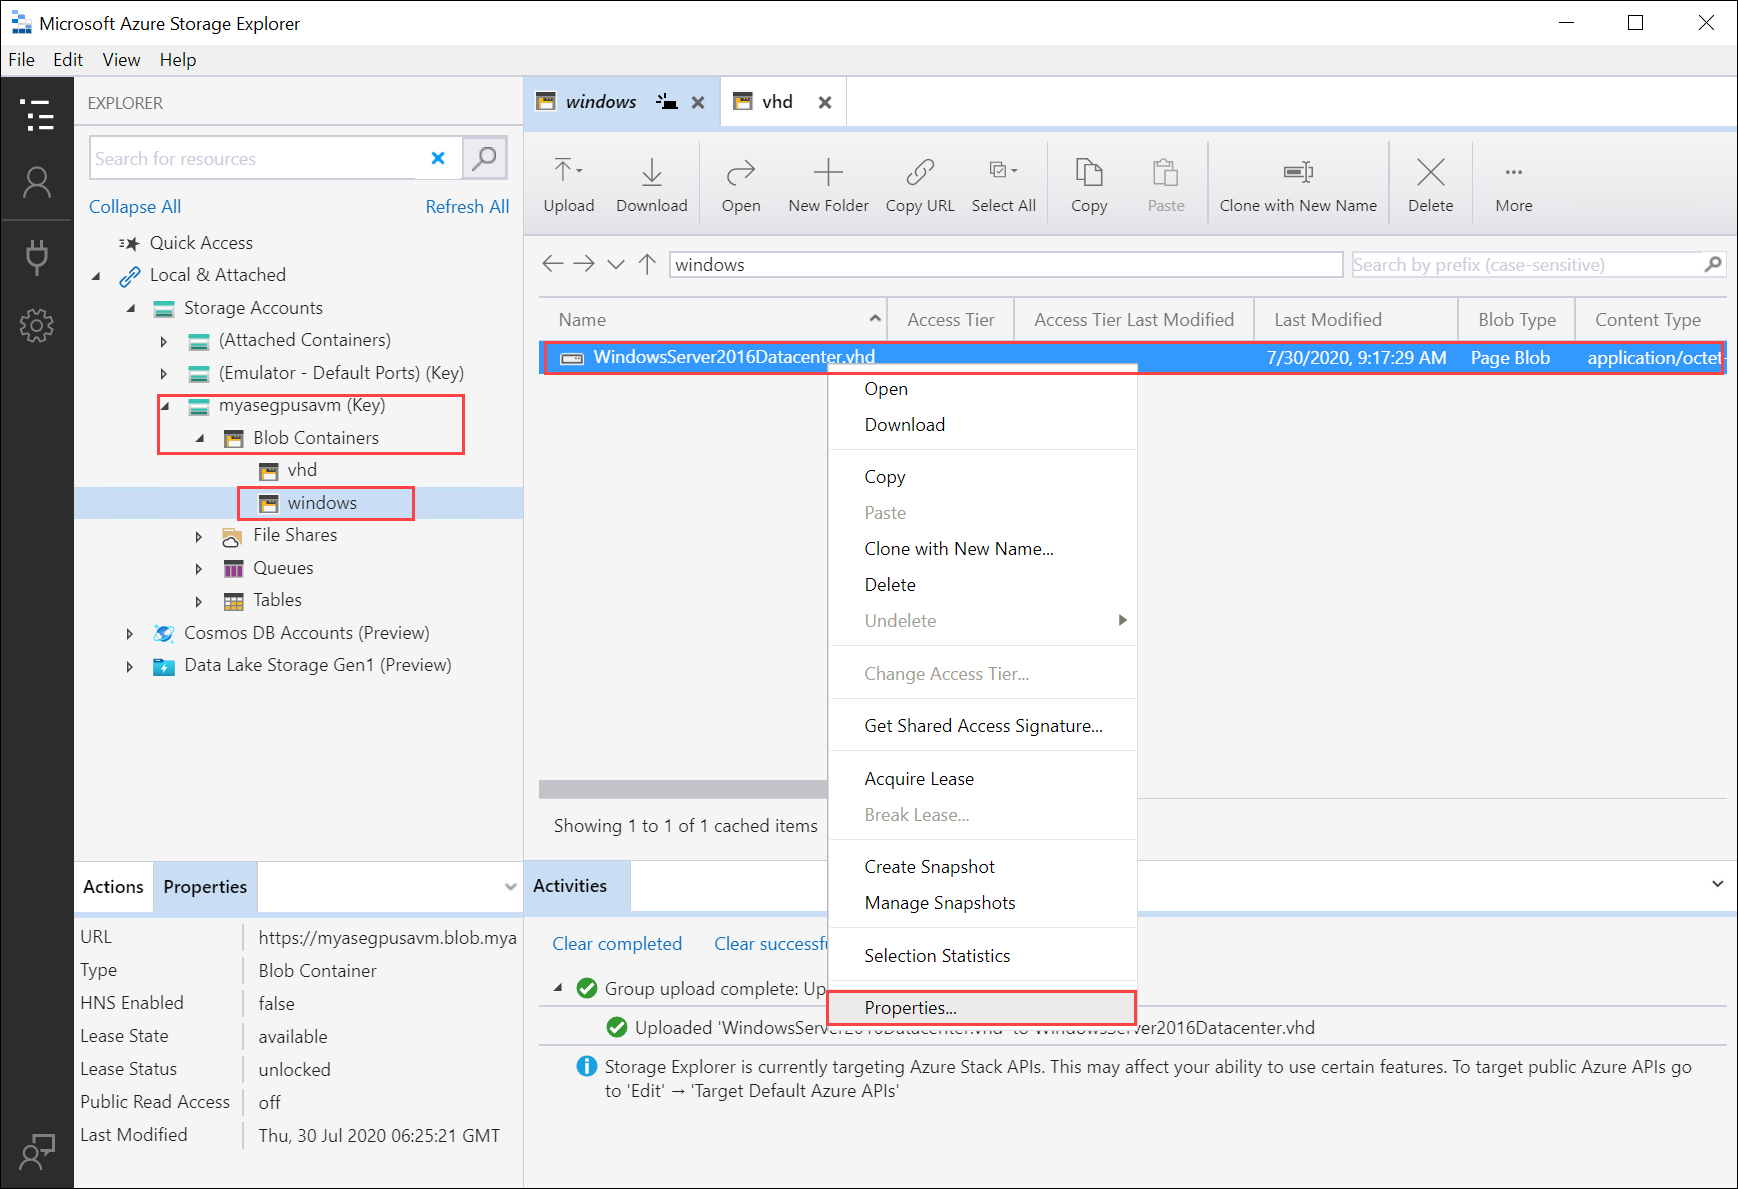
Once the VHD is loaded to the blob container, select the VHD, right-click, and then select Properties.
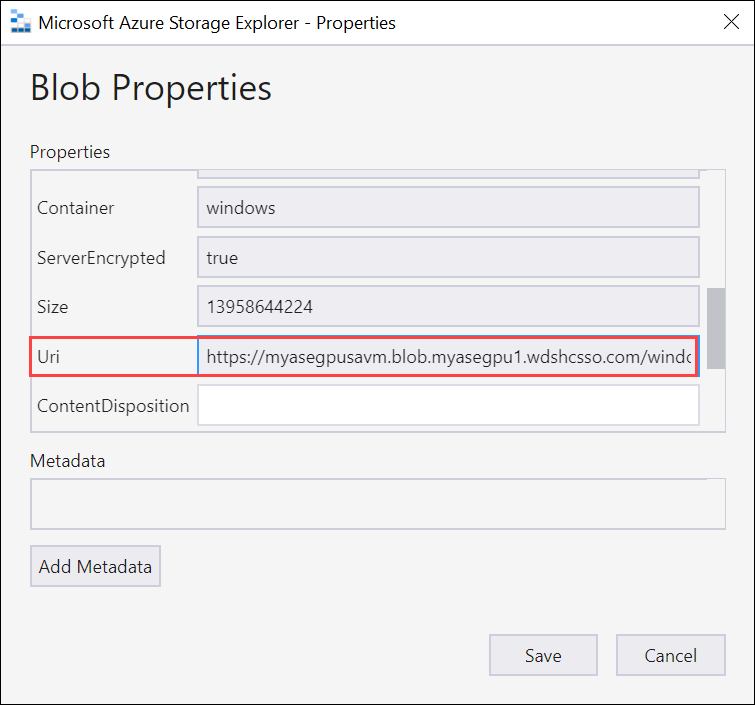
Copy and save the Uri, which you'll use in later steps.
Create image for your VM
To create image for your VM, edit the CreateImage.parameters.json parameters file and then deploy the template CreateImage.json that uses this parameter file.
Edit parameters file
The file CreateImage.parameters.json takes the following parameters:
"parameters": {
    "osType": {
        "value": "<Operating system corresponding to the VHD you upload can be Windows or Linux>"
    },
    "imageName": {
        "value": "<Name for the VM image>"
    },
    "imageUri": {
        "value": "<Path to the VHD that you uploaded in the Storage account>"
    },
    "hyperVGeneration": {
        "type": "string",
        "value": "<Generation of the VM, V1 or V2>"
    },
}
Edit the file CreateImage.parameters.json to include the following values for your Azure Stack Edge Pro device:
Provide the OS type and Hyper V Generation corresponding to the VHD you'll upload. The OS type can be Windows or Linux and the VM Generation can be V1 or V2.
"parameters": {
        "osType": {
          "value": "Windows"
        },
        "hyperVGeneration": {
          "value": "V2"
    },
}
Change the image URI to the URI of the image you uploaded in the earlier step:
"imageUri": {
    "value": "https://myasegpusavm.blob.myasegpu1.wdshcsso.com/windows/WindowsServer2016Datacenter.vhd"
    },
If you’re using http with Storage Explorer, change the URI to an http URI.
Provide a unique image name. This image is used to create VM in the later steps.
Here's a sample json that is used in this article.
{
    "$schema": "https://schema.management.azure.com/schemas/2015-01-01/deploymentParameters.json#",
    "contentVersion": "1.0.0.0",
  "parameters": {
    "osType": {
      "value": "Linux"
    },
    "hyperVGeneration": {
     "value": "V1"
    },
    "imageName": {
      "value": "myaselinuximg"
    },
    "imageUri": {
      "value": "https://sa2.blob.myasegpuvm.wdshcsso.com/con1/ubuntu18.04waagent.vhd"
    }
  }
}
Save the parameters file.
Deploy template
Deploy the template CreateImage.json. This template deploys the image resources that will be used to create VMs in the later step.
Note
When you deploy the template if you get an authentication error, your Azure credentials for this session may have expired. Rerun the login-Az command to connect to Azure Resource Manager on your Azure Stack Edge Pro device again.
Run the following command:
$templateFile = "Path to CreateImage.json"
$templateParameterFile = "Path to CreateImage.parameters.json"
$RGName = "<Name of your resource group>"
New-AzResourceGroupDeployment `
    -ResourceGroupName $RGName `
    -TemplateFile $templateFile `
    -TemplateParameterFile $templateParameterFile `
    -Name "<Name for your deployment>"
This command deploys an image resource.
To query the resource, run the following command:
Get-AzImage -ResourceGroupName <Resource Group Name> -name <Image Name>Here's a sample output:
PS C:\WINDOWS\system32> $templateFile = "C:\12-09-2020\CreateImage\CreateImage.json"
PS C:\WINDOWS\system32> $templateParameterFile = "C:\12-09-2020\CreateImage\CreateImage.parameters.json"
PS C:\WINDOWS\system32> $RGName = "myaserg1"
PS C:\WINDOWS\system32> New-AzResourceGroupDeployment -ResourceGroupName $RGName -TemplateFile $templateFile -TemplateParameterFile $templateParameterFile -Name "deployment1"

DeploymentName          : deployment1
ResourceGroupName       : myaserg1
ProvisioningState       : Succeeded
Timestamp               : 4/18/2022 9:24:26 PM
Mode                    : Incremental
TemplateLink            :
Parameters              :
                      Name             Type                       Value
                      ===============  =========================  ==========
                      osType           String                     Linux
                      imageName        String                     myaselinuximg1
                      imageUri         String
                      https://myasepro2stor.blob.dm1176047910p.wdshcsso.com/myasepro2cont1/ubuntu13.vhd

Outputs                 :
DeploymentDebugLogLevel :

PS C:\WINDOWS\system32>
Create VM
Edit parameters file to create VM
To create a VM, use the CreateVM.parameters.json parameter file. It takes the following parameters.
"vmName": {
            "value": "<Name for your VM>"
        },
        "adminUsername": {
            "value": "<Username to log into the VM>"
        },
        "Password": {
            "value": "<Password to log into the VM>"
        },
        "imageName": {
            "value": "<Name for your image>"
        },
        "vmSize": {
            "value": "<A supported size for your VM>"
        },
        "vnetName": {
            "value": "<Name for the virtual network, use ASEVNET>"
        },
        "subnetName": {
            "value": "<Name for the subnet, use ASEVNETsubNet>"
        },
        "vnetRG": {
            "value": "<Resource group for Vnet, use ASERG>"
        },
        "nicName": {
            "value": "<Name for the network interface>"
        },
        "privateIPAddress": {
            "value": "<Private IP address, enter a static IP in the subnet created earlier or leave empty to assign DHCP>"
        },
        "IPConfigName": {
            "value": "<Name for the ipconfig associated with the network interface>"
        }
Assign appropriate parameters in CreateVM.parameters.json for your Azure Stack Edge Pro device.
Provide a unique name, network interface name, and ipconfig name.
Enter a username, password, and a supported VM size.
When you enabled the network interface for compute, a virtual switch and a virtual network were automatically created on that network interface. You can query the existing virtual network to get the Vnet name, Subnet name, and Vnet resource group name.
Run the following command:
Get-AzVirtualNetworkHere's the sample output:
PS C:\WINDOWS\system32> Get-AzVirtualNetwork

Name                   : ASEVNET
ResourceGroupName      : ASERG
Location               : dbelocal
Id                     : /subscriptions/cccc2c2c-dd3d-ee4e-ff5f-aaaaaa6a6a6a/resourceGroups/ASERG/providers/Microsoft
                         .Network/virtualNetworks/ASEVNET
Etag                   : W/"990b306d-18b6-41ea-a456-b275efe21105"
ResourceGuid           : f8309d81-19e9-42fc-b4ed-d573f00e61ed
ProvisioningState      : Succeeded
Tags                   :
AddressSpace           : {
                           "AddressPrefixes": [
                             "10.57.48.0/21"
                           ]
                         }
DhcpOptions            : null
Subnets                : [
                           {
                             "Name": "ASEVNETsubNet",
                             "Etag": "W/\"990b306d-18b6-41ea-a456-b275efe21105\"",
                             "Id": "/subscriptions/cccc2c2c-dd3d-ee4e-ff5f-aaaaaa6a6a6a/resourceGroups/ASERG/provider
                         s/Microsoft.Network/virtualNetworks/ASEVNET/subnets/ASEVNETsubNet",
                             "AddressPrefix": "10.57.48.0/21",
                             "IpConfigurations": [],
                             "ResourceNavigationLinks": [],
                             "ServiceEndpoints": [],
                             "ProvisioningState": "Succeeded"
                           }
                         ]
VirtualNetworkPeerings : []
EnableDDoSProtection   : false
EnableVmProtection     : false

PS C:\WINDOWS\system32>
Use ASEVNET for Vnet name, ASEVNETsubNet for Subnet name, and ASERG for Vnet resource group name.
Now you’ll need a static IP address to assign to the VM that is in the subnet network defined above. Replace PrivateIPAddress with this address in the parameter file. To have the VM get an IP address from your local DHCP server, leave the
privateIPAddressvalue blank."privateIPAddress": { "value": "5.5.153.200" },Save the parameters file.
Here is a sample json used in this article.
{
  "$schema": "https://schema.management.azure.com/schemas/2015-01-01/deploymentParameters.json#",
  "contentVersion": "1.0.0.0",
  "parameters": {
      "vmName": {
          "value": "vm1"
      },
      "adminUsername": {
          "value": "Administrator"
      },
      "Password": {
          "value": "Password1"
      },
    "imageName": {
      "value": "myaselinuximg1"
    },
    "vmSize": {
      "value": "Standard_NC4as_T4_v3"
    },
    "vnetName": {
      "value": "vswitch1"
    },
    "subnetName": {
      "value": "vswitch1subNet"
    },
    "vnetRG": {
      "value": "myaserg1"
    },
    "nicName": {
      "value": "nic1"
    },
    "privateIPAddress": {
      "value": ""
    },
    "IPConfigName": {
      "value": "ipconfig1"
    }
  }
}
Deploy template to create VM
Deploy the VM creation template CreateVM.json. This template creates a network interface from the existing VNet and creates VM from the deployed image.
Run the following command:
Command:

    $templateFile = "<Path to CreateVM.json>"
    $templateParameterFile = "<Path to CreateVM.parameters.json>"
    $RGName = "<Resource group name>"

    New-AzResourceGroupDeployment `
        -ResourceGroupName $RGName `
        -TemplateFile $templateFile `
        -TemplateParameterFile $templateParameterFile `
        -Name "<DeploymentName>"
The VM creation will take 15-20 minutes. Here's a sample output of a successfully created VM:
PS C:\WINDOWS\system32> $templateFile = "C:\12-09-2020\CreateVM\CreateVM.json"
PS C:\WINDOWS\system32> $templateParameterFile = "C:\12-09-2020\CreateVM\CreateVM.parameters.json"
PS C:\WINDOWS\system32> $RGName = "myaserg1"
PS C:\WINDOWS\system32> New-AzureRmResourceGroupDeployment -ResourceGroupName $RGName -TemplateFile $templateFile -TemplateParameterFile $templateParameterFile -Name "Deployment2"

DeploymentName          : Deployment2
ResourceGroupName       : myaserg1
ProvisioningState       : Succeeded
Timestamp               : 04/18/2022 1:51:28 PM
Mode                    : Incremental
TemplateLink            :
Parameters              :
                      Name             Type                       Value
                      ===============  =========================  ==========
                      vmName           String                     vm1
                      adminUsername    String                     Administrator
                      password         String                     Password1
                      imageName        String                     myaselinuximg
                      vmSize           String                     Standard_NC4as_T4_v3
                      vnetName         String                     vswitch1
                      vnetRG           String                     myaserg1
                      subnetName       String                     vswitch1subNet
                      nicName          String                     nic1
                      ipConfigName     String                     ipconfig1
                      privateIPAddress  String

Outputs                 :
DeploymentDebugLogLevel :

PS C:\WINDOWS\system32
You can also run the
New-AzResourceGroupDeploymentcommand asynchronously with–AsJobparameter. Here's a sample output when the cmdlet runs in the background. You can then query the status of job that is created using theGet-Jobcmdlet.PS C:\WINDOWS\system32> New-AzResourceGroupDeployment ` >> -ResourceGroupName $RGName ` >> -TemplateFile $templateFile ` >> -TemplateParameterFile $templateParameterFile ` >> -Name "Deployment4" ` >> -AsJob Id Name PSJobTypeName State HasMoreData Location Command -- ---- ------------- ----- ----------- -------- ------- 4 Long Running... AzureLongRun... Running True localhost New-AzureRmResourceGro... PS C:\WINDOWS\system32> Get-Job -Id 4 Id Name PSJobTypeName State HasMoreData Location Command -- ---- ------------- ----- ----------- -------- -------Check if the VM is successfully provisioned. Run the following command:
Get-AzVm
Connect to a VM
Depending on whether you created a Windows or a Linux VM, the steps to connect can be different.
Connect to Windows VM
Follow these steps to connect to a Windows VM.
Connect to your Windows VM by using the Remote Desktop Protocol (RDP) via the IP that you passed during the VM creation.
On your client, open RDP.
Go to Start, and then enter mstsc.
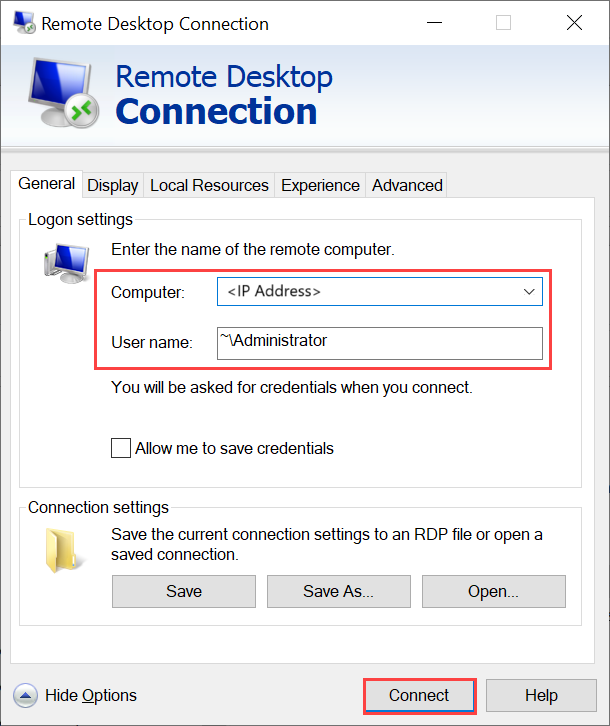
On the Remote Desktop Connection pane, enter the IP address of the VM and the access credentials you used in the VM template parameters file. Then select Connect.
Note
You might need to approve connecting to an untrusted machine.
You're now signed in to your VM that runs on the appliance.
Connect to Linux VM
Follow these steps to connect to a Linux VM.
Connect to the VM by using the private IP that you passed during the VM creation.
Open an SSH session to connect with the IP address.
ssh -l <username> <ip address>At the prompt, provide the password that you used when you created the VM.
If you need to provide the SSH key, use this command.
ssh -i c:/users/Administrator/.ssh/id_rsa Administrator@5.5.41.236Here's an example output when you connect to the VM:
PS C:\WINDOWS\system32> ssh -l myazuser "10.126.76.60"
The authenticity of host '10.126.76.60 (10.126.76.60)' can't be established.
ECDSA key fingerprint is SHA256:V649Zbo58zAYMKreeP7M6w7Na0Yf9QPg4SM7JZVV0E4.
Are you sure you want to continue connecting (yes/no/[fingerprint])? yes
Warning: Permanently added '10.126.76.60' (ECDSA) to the list of known hosts.
myazuser@10.126.76.60's password:
Welcome to Ubuntu 18.04.2 LTS (GNU/Linux 4.18.0-1013-azure x86_64)

 * Documentation:  https://help.ubuntu.com
 * Management:     https://landscape.canonical.com
 * Support:        https://ubuntu.com/advantage

 System information disabled due to load higher than 1.0

  Get cloud support with Ubuntu Advantage Cloud Guest:
    http://www.ubuntu.com/business/services/cloud

284 packages can be updated.
192 updates are security updates.

The programs included with the Ubuntu system are free software;
the exact distribution terms for each program are described in the
individual files in /usr/share/doc/*/copyright.

Ubuntu comes with ABSOLUTELY NO WARRANTY, to the extent permitted by
applicable law.

To run a command as administrator (user "root"), use "sudo <command>".
See "man sudo_root" for details.

myazuser@myazvmfriendlyname:~$ client_loop: send disconnect: Connection reset
PS C:\WINDOWS\system32>