Tutorial: Run a Batch job through Data Factory with Batch Explorer, Storage Explorer, and Python
This tutorial walks you through creating and running an Azure Data Factory pipeline that runs an Azure Batch workload. A Python script runs on the Batch nodes to get comma-separated value (CSV) input from an Azure Blob Storage container, manipulate the data, and write the output to a different storage container. You use Batch Explorer to create a Batch pool and nodes, and Azure Storage Explorer to work with storage containers and files.
In this tutorial, you learn how to:
- Use Batch Explorer to create a Batch pool and nodes.
- Use Storage Explorer to create storage containers and upload input files.
- Develop a Python script to manipulate input data and produce output.
- Create a Data Factory pipeline that runs the Batch workload.
- Use Batch Explorer to look at the output log files.
Prerequisites
- An Azure account with an active subscription. If you don't have one, create a free account.
- A Batch account with a linked Azure Storage account. You can create the accounts by using any of the following methods: Azure portal | Azure CLI | Bicep | ARM template | Terraform.
- A Data Factory instance. To create the data factory, follow the instructions in Create a data factory.
- Batch Explorer downloaded and installed.
- Storage Explorer downloaded and installed.
- Python 3.8 or above, with the azure-storage-blob package installed by using
pip. - The iris.csv input dataset downloaded from GitHub.
Use Batch Explorer to create a Batch pool and nodes
Use Batch Explorer to create a pool of compute nodes to run your workload.
Sign in to Batch Explorer with your Azure credentials.
Select your Batch account.
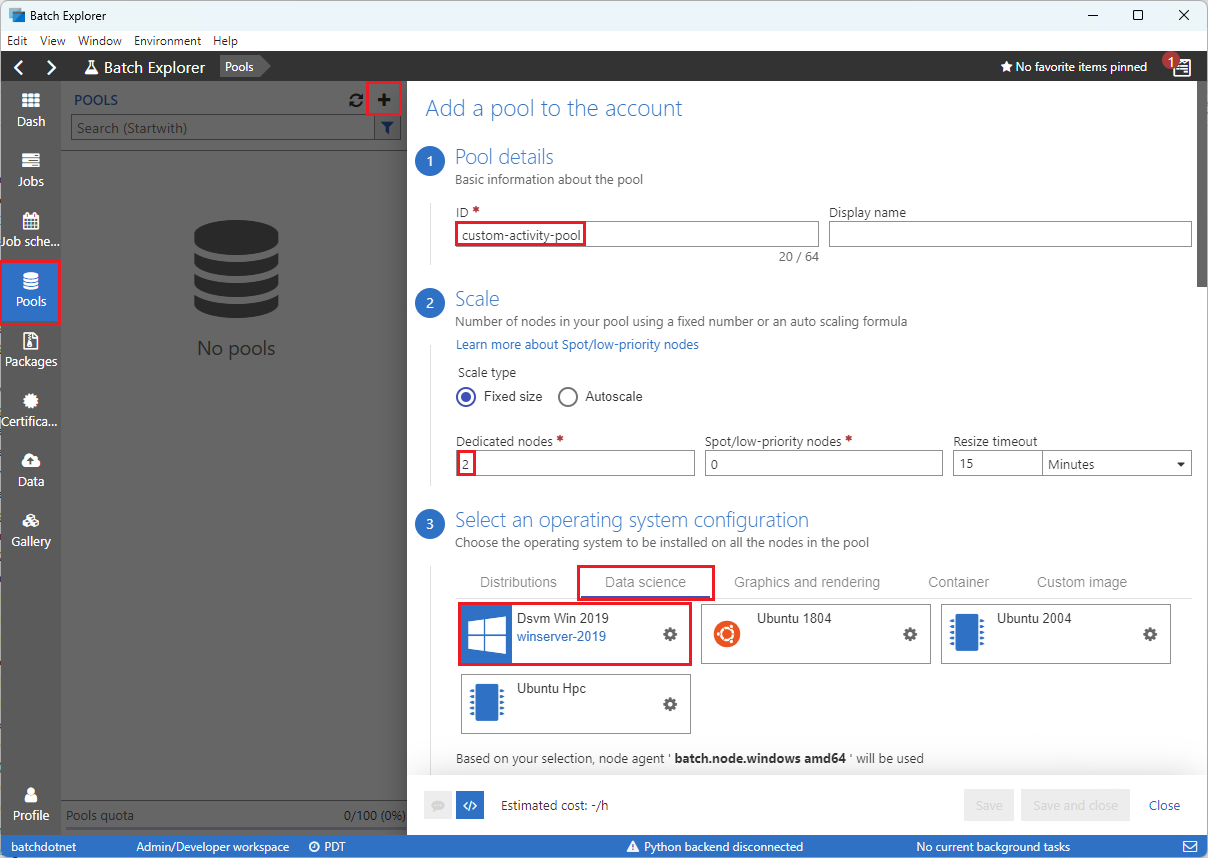
Select Pools on the left sidebar, and then select the + icon to add a pool.
Complete the Add a pool to the account form as follows:
- Under ID, enter custom-activity-pool.
- Under Dedicated nodes, enter 2.
- For Select an operating system configuration, select the Data science tab, and then select Dsvm Win 2019.
- For Choose a virtual machine size, select Standard_F2s_v2.
- For Start Task, select Add a start task.
On the start task screen, under Command line, enter
cmd /c "pip install azure-storage-blob pandas", and then select Select. This command installs theazure-storage-blobpackage on each node as it starts up.
Select Save and close.
Use Storage Explorer to create blob containers
Use Storage Explorer to create blob containers to store input and output files, and then upload your input files.
- Sign in to Storage Explorer with your Azure credentials.
- In the left sidebar, locate and expand the storage account that's linked to your Batch account.
- Right-click Blob Containers, and select Create Blob Container, or select Create Blob Container from Actions at the bottom of the sidebar.
- Enter input in the entry field.
- Create another blob container named output.
- Select the input container, and then select Upload > Upload files in the right pane.
- On the Upload files screen, under Selected files, select the ellipsis ... next to the entry field.
- Browse to the location of your downloaded iris.csv file, select Open, and then select Upload.
Develop a Python script
The following Python script loads the iris.csv dataset file from your Storage Explorer input container, manipulates the data, and saves the results to the output container.
The script needs to use the connection string for the Azure Storage account that's linked to your Batch account. To get the connection string:
- In the Azure portal, search for and select the name of the storage account that's linked to your Batch account.
- On the page for the storage account, select Access keys from the left navigation under Security + networking.
- Under key1, select Show next to Connection string, and then select the Copy icon to copy the connection string.
Paste the connection string into the following script, replacing the <storage-account-connection-string> placeholder. Save the script as a file named main.py.
Important
Exposing account keys in the app source isn't recommended for Production usage. You should restrict access to credentials and refer to them in your code by using variables or a configuration file. It's best to store Batch and Storage account keys in Azure Key Vault.
# Load libraries
# from azure.storage.blob import BlobClient
from azure.storage.blob import BlobServiceClient
import pandas as pd
import io

# Define parameters
connectionString = "<storage-account-connection-string>"
containerName = "output"
outputBlobName	= "iris_setosa.csv"

# Establish connection with the blob storage account
blob = BlobClient.from_connection_string(conn_str=connectionString, container_name=containerName, blob_name=outputBlobName)

# Initialize the BlobServiceClient (This initializes a connection to the Azure Blob Storage, downloads the content of the 'iris.csv' file, and then loads it into a Pandas DataFrame for further processing.)
blob_service_client = BlobServiceClient.from_connection_string(conn_str=connectionString)
blob_client = blob_service_client.get_blob_client(container_name=containerName, blob_name=outputBlobName)

# Download the blob content
blob_data = blob_client.download_blob().readall()

# Load iris dataset from the task node
# df = pd.read_csv("iris.csv")
df = pd.read_csv(io.BytesIO(blob_data))

# Take a subset of the records
df = df[df['Species'] == "setosa"]

# Save the subset of the iris dataframe locally in the task node
df.to_csv(outputBlobName, index = False)

with open(outputBlobName, "rb") as data:
    blob.upload_blob(data, overwrite=True)
For more information on working with Azure Blob Storage, refer to the Azure Blob Storage documentation.
Run the script locally to test and validate functionality.
python main.py
The script should produce an output file named iris_setosa.csv that contains only the data records that have Species = setosa. After you verify that it works correctly, upload the main.py script file to your Storage Explorer input container.
Set up a Data Factory pipeline
Create and validate a Data Factory pipeline that uses your Python script.
Get account information
The Data Factory pipeline uses your Batch and Storage account names, account key values, and Batch account endpoint. To get this information from the Azure portal:
From the Azure Search bar, search for and select your Batch account name.
On your Batch account page, select Keys from the left navigation.
On the Keys page, copy the following values:
- Batch account
- Account endpoint
- Primary access key
- Storage account name
- Key1
Create and run the pipeline
If Azure Data Factory Studio isn't already running, select Launch studio on your Data Factory page in the Azure portal.
In Data Factory Studio, select the Author pencil icon in the left navigation.
Under Factory Resources, select the + icon, and then select Pipeline.
In the Properties pane on the right, change the name of the pipeline to Run Python.
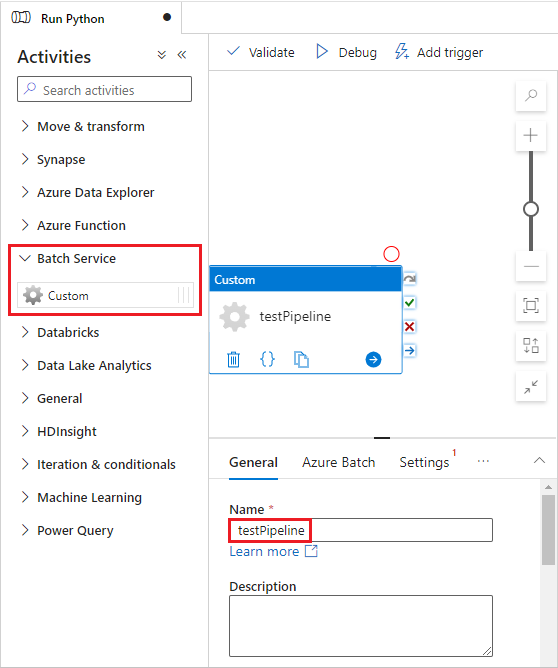
In the Activities pane, expand Batch Service, and drag the Custom activity to the pipeline designer surface.
Below the designer canvas, on the General tab, enter testPipeline under Name.

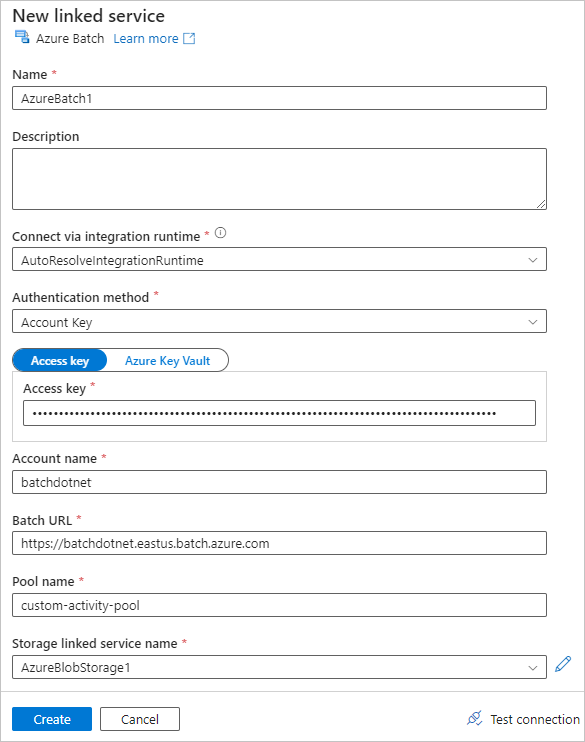
Select the Azure Batch tab, and then select New.
Complete the New linked service form as follows:
- Name: Enter a name for the linked service, such as AzureBatch1.
- Access key: Enter the primary access key you copied from your Batch account.
- Account name: Enter your Batch account name.
- Batch URL: Enter the account endpoint you copied from your Batch account, such as
https://batchdotnet.eastus.batch.azure.com. - Pool name: Enter custom-activity-pool, the pool you created in Batch Explorer.
- Storage account linked service name: Select New. On the next screen, enter a Name for the linked storage service, such as AzureBlobStorage1, select your Azure subscription and linked storage account, and then select Create.
At the bottom of the Batch New linked service screen, select Test connection. When the connection is successful, select Create.

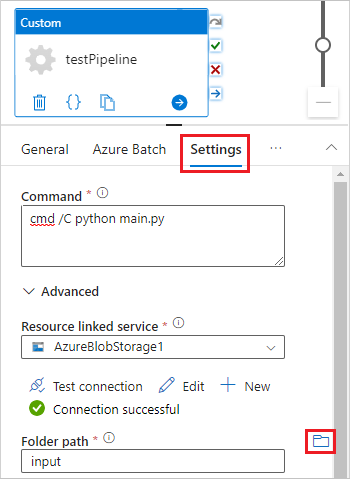
Select the Settings tab, and enter or select the following settings:
- Command: Enter
cmd /C python main.py. - Resource linked service: Select the linked storage service you created, such as AzureBlobStorage1, and test the connection to make sure it's successful.
- Folder path: Select the folder icon, and then select the input container and select OK. The files from this folder download from the container to the pool nodes before the Python script runs.

- Command: Enter
Select Validate on the pipeline toolbar to validate the pipeline.
Select Debug to test the pipeline and ensure it works correctly.
Select Publish all to publish the pipeline.
Select Add trigger, and then select Trigger now to run the pipeline, or New/Edit to schedule it.

Use Batch Explorer to view log files
If running your pipeline produces warnings or errors, you can use Batch Explorer to look at the stdout.txt and stderr.txt output files for more information.
- In Batch Explorer, select Jobs from the left sidebar.
- Select the adfv2-custom-activity-pool job.
- Select a task that had a failure exit code.
- View the stdout.txt and stderr.txt files to investigate and diagnose your problem.
Clean up resources
Batch accounts, jobs, and tasks are free, but compute nodes incur charges even when they're not running jobs. It's best to allocate node pools only as needed, and delete the pools when you're done with them. Deleting pools deletes all task output on the nodes, and the nodes themselves.
Input and output files remain in the storage account and can incur charges. When you no longer need the files, you can delete the files or containers. When you no longer need your Batch account or linked storage account, you can delete them.
Next steps
In this tutorial, you learned how to use a Python script with Batch Explorer, Storage Explorer, and Data Factory to run a Batch workload. For more information about Data Factory, see What is Azure Data Factory?


