Tutorial: Prerequisites for single-subnet availability groups - SQL Server on Azure VMs
Applies to:
SQL Server on Azure VM
Tip
There are many methods to deploy an availability group. Simplify your deployment and eliminate the need for an Azure Load Balancer or distributed network name (DNN) for your Always On availability group by creating your SQL Server virtual machines (VMs) in multiple subnets within the same Azure virtual network. If you've already created your availability group in a single subnet, you can migrate it to a multi-subnet environment.
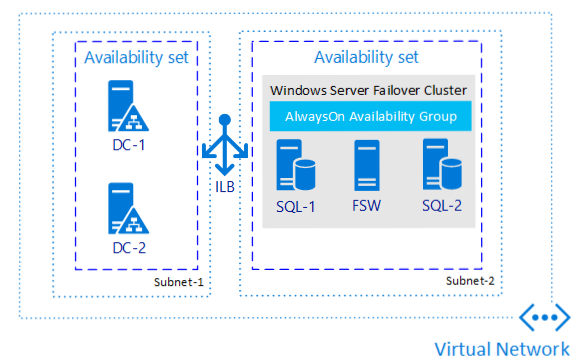
This tutorial shows how to complete the prerequisites for creating a SQL Server Always On availability group on Azure virtual machines within a single subnet. When you've completed the prerequisites, you'll have a domain controller, two SQL Server VMs, and a witness server in a single resource group.
This article manually configures the availability group environment. It's also possible to automate the steps by using the Azure portal, PowerShell or the Azure CLI, or Azure quickstart templates.
Time estimate: It might take a couple of hours to complete the prerequisites. You'll spend much of this time creating virtual machines.
The following diagram illustrates what you build in the tutorial.
Note
It's now possible to lift and shift your availability group solution to SQL Server on Azure VMs by using Azure Migrate. To learn more, see Migrate an availability group.
Review availability group documentation
This tutorial assumes that you have a basic understanding of SQL Server Always On availability groups. If you're not familiar with this technology, see Overview of Always On availability groups (SQL Server).
Create an Azure account
You need an Azure account. You can open a free Azure account or activate Visual Studio subscriber benefits.
Create a resource group
To create the resource group in the Azure portal, follow these steps:
Sign in to the Azure portal.
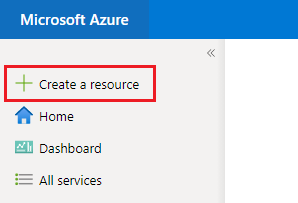
Select + Create a resource.
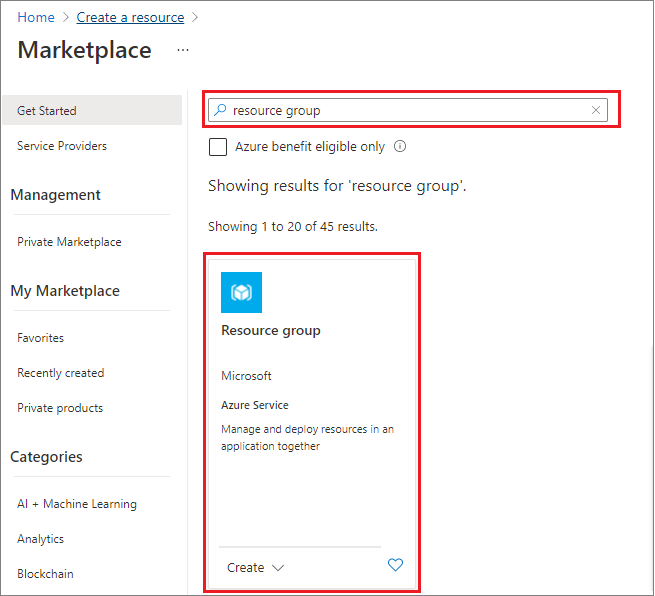
Search for resource group in the Marketplace search box, and then choose the Resource group tile from Microsoft. Select Create.
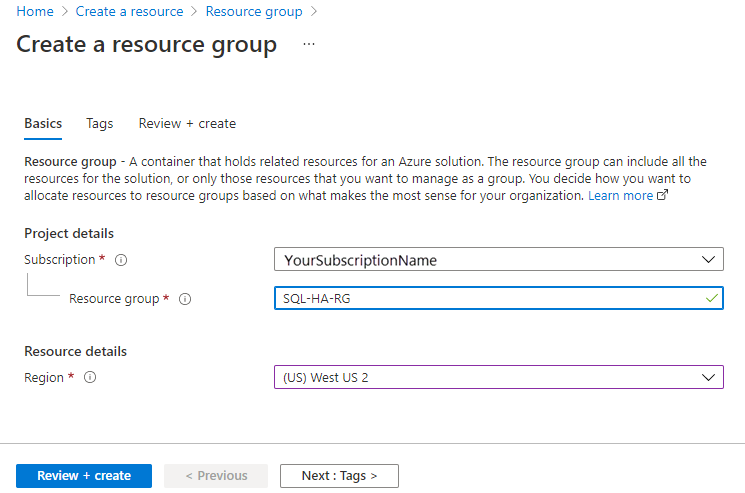
On the Create a resource group page, fill out the values to create the resource group:
- Choose the appropriate Azure subscription from the dropdown list.
- Provide a name for your resource group, such as SQL-HA-RG.
- Choose a region from the dropdown list, such as West US 2. Be sure to deploy all subsequent resources to this location.
- Select Review + create to review your resource parameters, and then select Create to create your resource group.
Create the network and subnet
The next step is to create the network and subnet in the Azure resource group.
The solution in this tutorial uses one virtual network and one subnet. The virtual network overview provides more information about networks in Azure.
To create the virtual network in the Azure portal, follow these steps:
Go to your resource group in the Azure portal and select + Create.
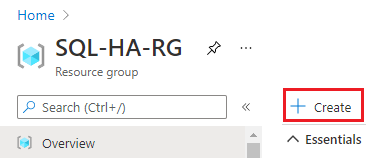
Search for virtual network in the Marketplace search box, and then choose the Virtual network tile from Microsoft. Select Create.
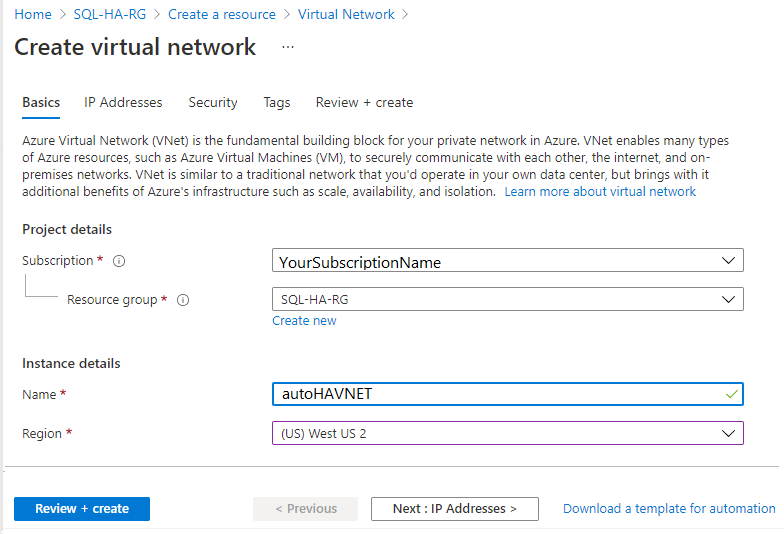
On the Create virtual network page, enter the following information on the Basics tab:
- Under Project details, for Subscription, choose the appropriate Azure subscription. For Resource group, select the resource group that you created previously, such as SQL-HA-RG.
- Under Instance details, provide a name for your virtual network, such as autoHAVNET. In the dropdown list, choose the same region that you chose for your resource group.
On the IP addresses tab, select the ellipsis (...) next to + Add a subnet. Select Delete address space to remove the existing address space, if you need a different address range.
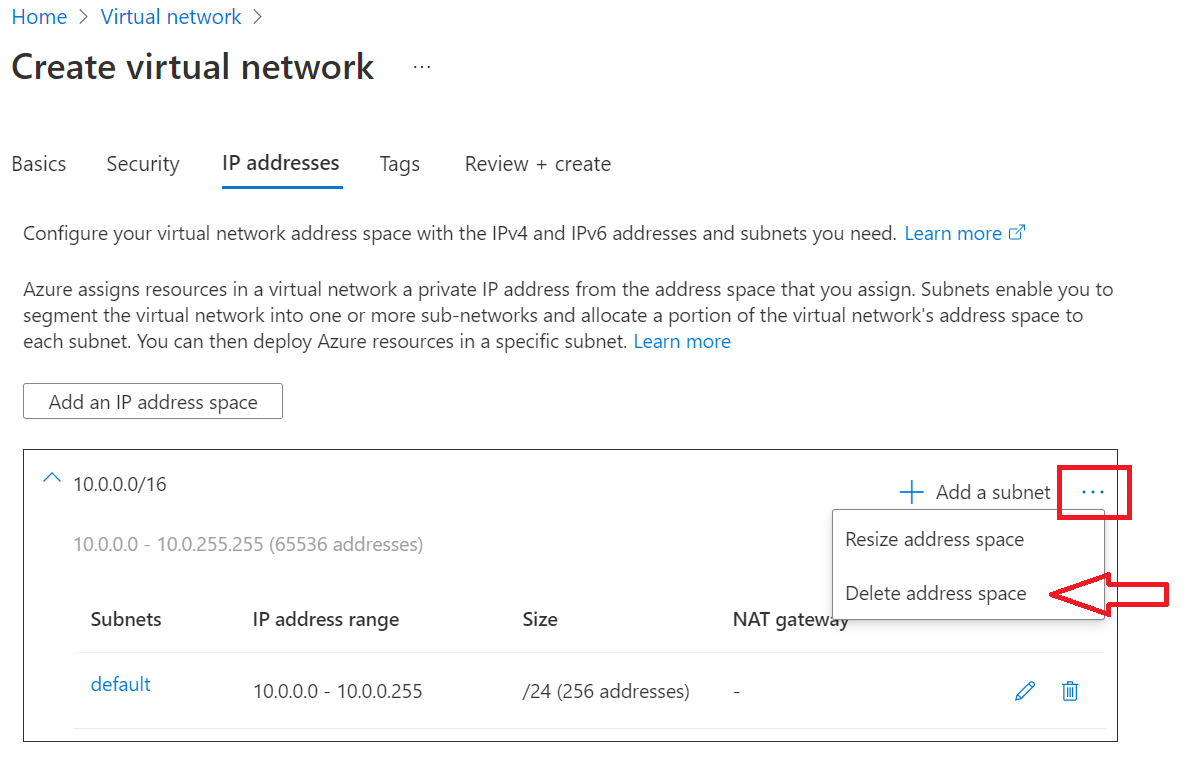
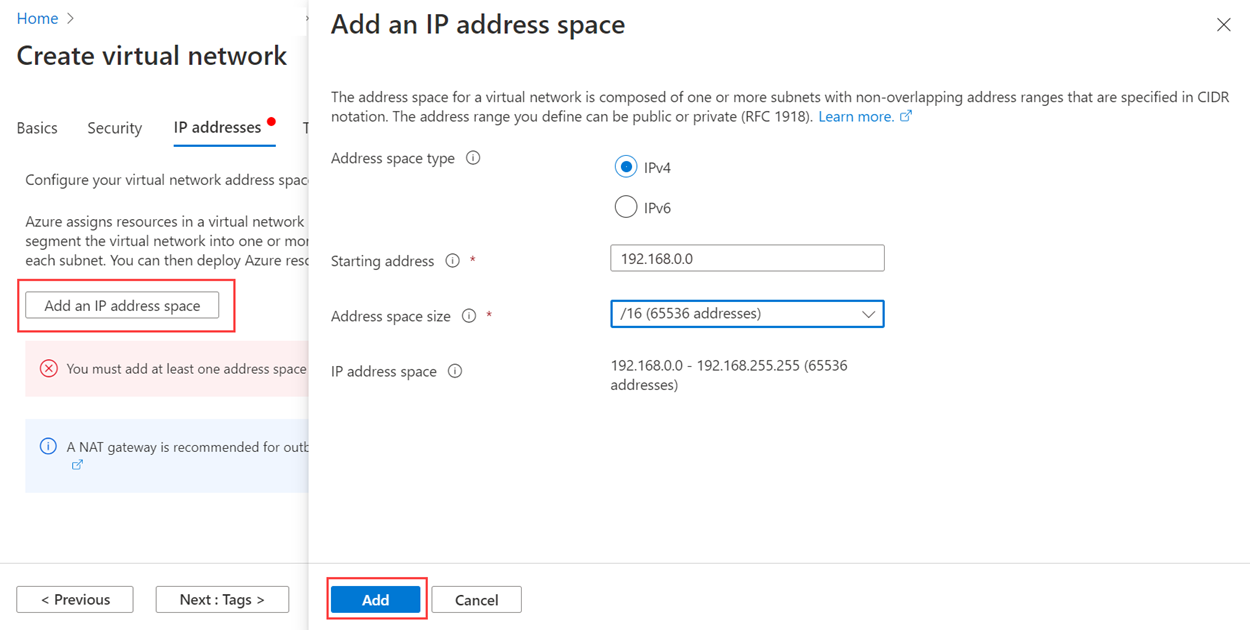
Select Add an IP address space to open the pane to create the address space that you need. This tutorial uses the address space of 192.168.0.0/16 (192.168.0.0 for Starting address and /16 for Address space size). Select Add to create the address space.
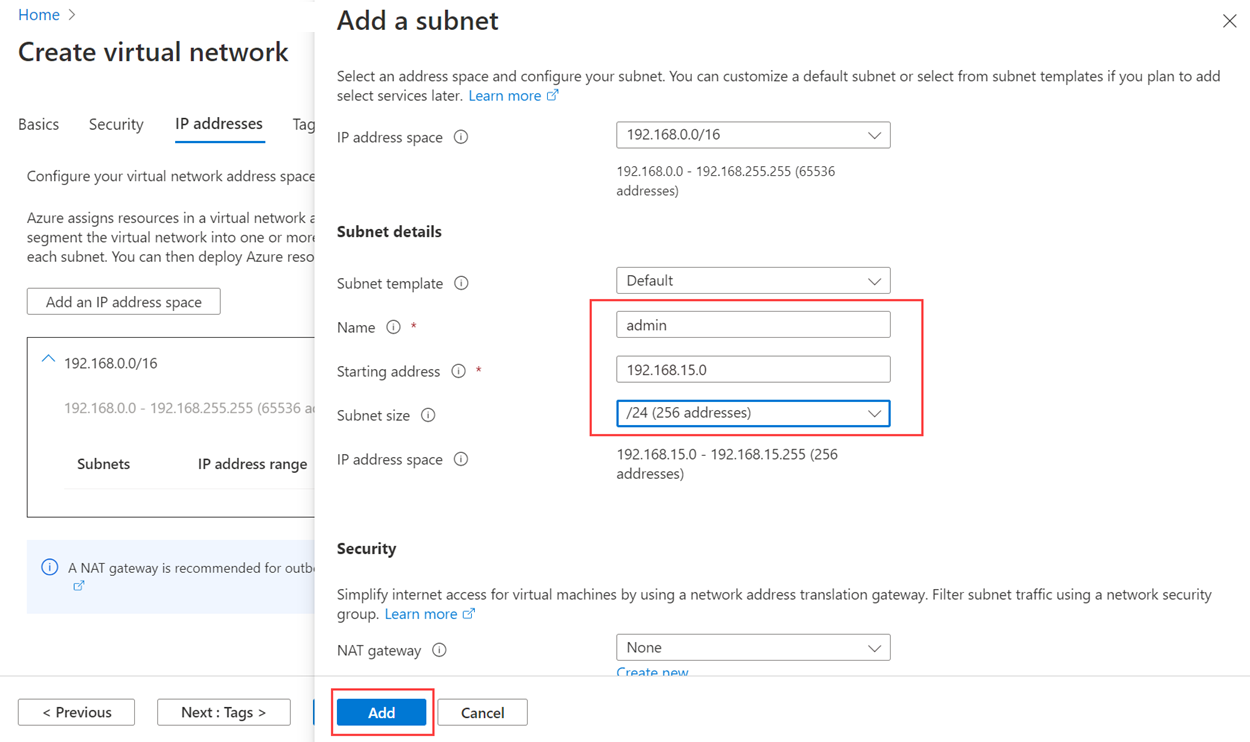
Select + Add a subnet, and then:
Provide a value for Subnet name, such as admin.
Provide a unique subnet address range within the virtual network address space.
For example, if your address range is 192.168.0.0/16, enter 192.168.15.0 for Starting address and /24 for Subnet size.
Select Add to add your new subnet.
Select Review + Create.
Azure returns you to the portal dashboard and notifies you when the new network is created.
Create availability sets
Before you create virtual machines, you need to create availability sets. Availability sets reduce the downtime for planned or unplanned maintenance events.
An Azure availability set is a logical group of resources that Azure places on these physical domains:
- Fault domain: Ensures that the members of the availability set have separate power and network resources.
- Update domain: Ensures that members of the availability set aren't brought down for maintenance at the same time.
For more information, see Manage the availability of virtual machines.
You need two availability sets. One is for the domain controllers. The second is for the SQL Server VMs.
To create an availability set:
- Go to the resource group and select Add.
- Filter the results by typing availability set. Select Availability Set in the results.
- Select Create.
Configure two availability sets according to the parameters in the following table:
| Field | Domain controller availability set | SQL Server availability set |
|---|---|---|
| Name | adavailabilityset | sqlavailabilityset |
| Resource group | SQL-HA-RG | SQL-HA-RG |
| Fault domains | 3 | 3 |
| Update domains | 5 | 3 |
After you create the availability sets, return to the resource group in the Azure portal.
Create domain controllers
After you've created the network, subnet, and availability sets, you're ready to create and configure domain controllers.
Create virtual machines for the domain controllers
Now, create two virtual machines. Name them ad-primary-dc and ad-secondary-dc. Use the following steps for each VM:
- Return to the SQL-HA-RG resource group.
- Select Add.
- Type Windows Server 2016 Datacenter, and then select Windows Server 2016 Datacenter.
- In Windows Server 2016 Datacenter, verify that the deployment model is Resource Manager, and then select Create.
Note
The ad-secondary-dc virtual machine is optional, to provide high availability for Active Directory Domain Services.
The following table shows the settings for these two machines:
| Field | Value |
|---|---|
| Name | First domain controller: ad-primary-dc Second domain controller: ad-secondary-dc |
| VM disk type | SSD |
| User name | DomainAdmin |
| Password | Contoso!0000 |
| Subscription | Your subscription |
| Resource group | SQL-HA-RG |
| Location | Your location |
| Size | DS1_V2 |
| Storage | Use managed disks - Yes |
| Virtual network | autoHAVNET |
| Subnet | admin |
| Public IP address | Same name as the VM |
| Network security group | Same name as the VM |
| Availability set | adavailabilityset Fault domains: 3 Update domains: 5 |
| Diagnostics | Enabled |
| Diagnostics storage account | Automatically created |
Important
You can place a VM in an availability set only when you create it. You can't change the availability set after a VM is created. See Manage the availability of virtual machines.
Configure the primary domain controller
In the following steps, configure the ad-primary-dc machine as a domain controller for corp.contoso.com:
In the portal, open the SQL-HA-RG resource group and select the ad-primary-dc machine. On ad-primary-dc, select Connect to open a Remote Desktop Protocol (RDP) file for remote desktop access.

Sign in with your configured administrator account (\DomainAdmin) and password (Contoso!0000).
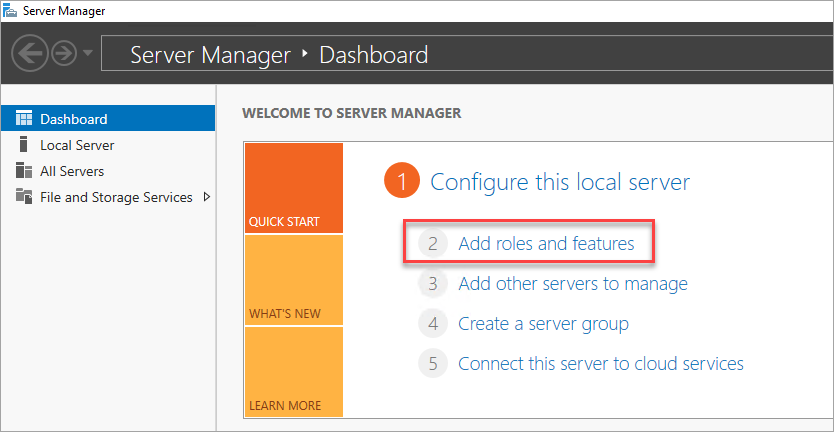
By default, the Server Manager dashboard should be displayed. Select the Add roles and features link on the dashboard.
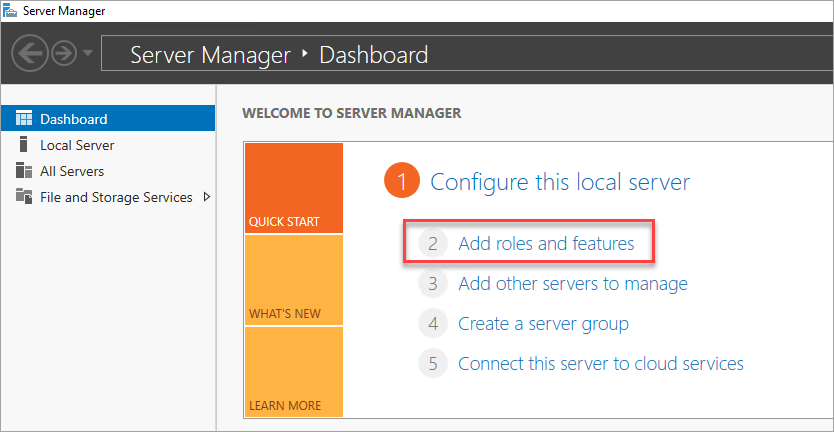
Select Next until you get to the Server Roles section.
Select the Active Directory Domain Services and DNS Server roles. When you're prompted, add any features that these roles require.
Note
Windows warns you that there is no static IP address. If you're testing the configuration, select Continue. For production scenarios, set the IP address to static in the Azure portal, or use PowerShell to set the static IP address of the domain controller machine.
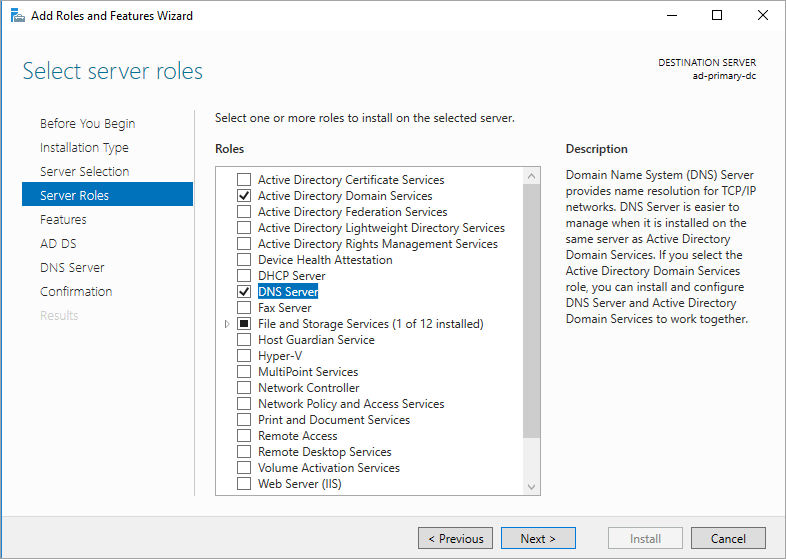
Select Next until you reach the Confirmation section. Select the Restart the destination server automatically if required checkbox.
Select Install.
After installation of the features finishes, return to the Server Manager dashboard.
Select the new AD DS option on the left pane.
Select the More link on the yellow warning bar.
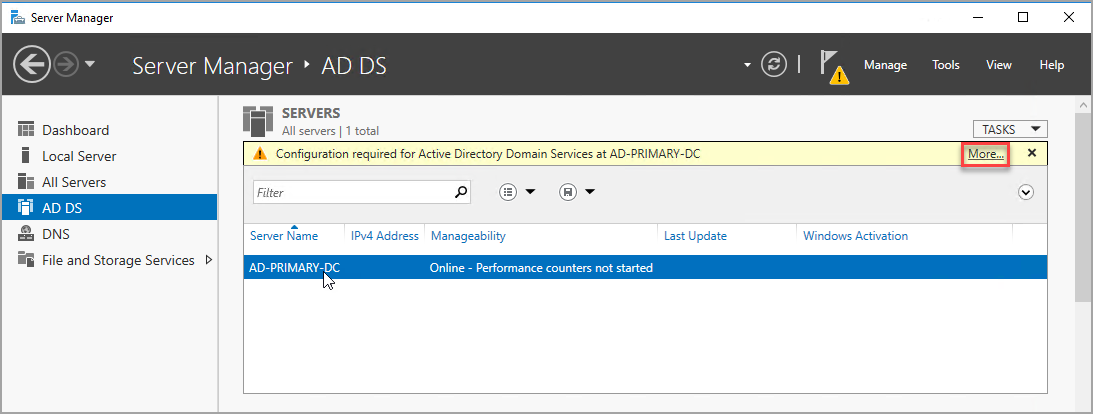
In the Action column of the All Server Task Details dialog, select Promote this server to a domain controller.
In the Active Directory Domain Services Configuration Wizard, use the following values:
Page Setting Deployment Configuration Add a new forest
Root domain name = corp.contoso.comDomain Controller Options DSRM Password = Contoso!0000
Confirm Password = Contoso!0000Select Next to go through the other pages in the wizard. On the Prerequisites Check page, verify that the following message appears: "All prerequisite checks passed successfully." You can review any applicable warning messages, but it's possible to continue with the installation.
Select Install. The ad-primary-dc virtual machine automatically restarts.
Note the IP address of the primary domain controller
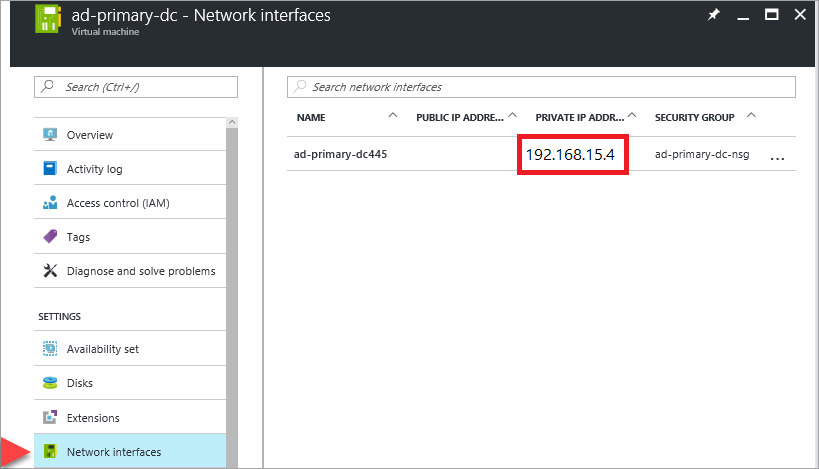
Use the primary domain controller for DNS. Note the primary domain controller's private IP address.
One way to get the primary domain controller's IP address is through the Azure portal:
Open the resource group.
Select the primary domain controller.
On the primary domain controller, select Network interfaces.
Configure the virtual network DNS
After you create the first domain controller and enable DNS on the first server, configure the virtual network to use this server for DNS:
In the Azure portal, select the virtual network.
Under Settings, select DNS Server.
Select Custom, and enter the private IP address of the primary domain controller.
Select Save.
Configure the secondary domain controller
After the primary domain controller restarts, you can use the following steps to configure the secondary domain controller. This optional procedure is for high availability.
Set preferred DNS server address
The preferred DNS server address should not be updated directly within a VM, it should be edited from the Azure portal, or Powershell, or Azure CLI. The steps below are to make the change inside of the Azure portal:
Sign-in to the Azure portal.
In the search box at the top of the portal, enter Network interface. Select Network interfaces in the search results.
Select the network interface for the second domain controller that you want to view or change settings for from the list.
In Settings, select DNS servers.
Select either:
Inherit from virtual network: Choose this option to inherit the DNS server setting defined for the virtual network the network interface is assigned to. This would automatically inherit the primary domain controller as the DNS server.
Custom: You can configure your own DNS server to resolve names across multiple virtual networks. Enter the IP address of the server you want to use as a DNS server. The DNS server address you specify is assigned only to this network interface and overrides any DNS setting for the virtual network the network interface is assigned to. If you select custom, then input the IP address of the primary domain controller, such as
192.168.15.4.
Select Save. If using a Custom DNS Server, return to the virtual machine in the Azure portal and restart the VM. Once the virtual machine has restarted, you can join the VM to the domain.
Join the domain
Next, join the corp.contoso.com domain. To do so, follow these steps:
- Remotely connect to the virtual machine using the BUILTIN\DomainAdmin account. This account is the same one used when creating the domain controller virtual machines.
- Open Server Manager, and select Local Server.
- Select WORKGROUP.
- In the Computer Name section, select Change.
- Select the Domain checkbox and type corp.contoso.com in the text box. Select OK.
- In the Windows Security popup dialog, specify the credentials for the default domain administrator account (CORP\DomainAdmin) and the password (Contoso!0000).
- When you see the "Welcome to the corp.contoso.com domain" message, select OK.
- Select Close, and then select Restart Now in the popup dialog.
Configure domain controller
Once your server has joined the domain, you can configure it as the second domain controller. To do so, follow these steps:
If you're not already connected, open an RDP session to your secondary domain controller, and open Server Manager Dashboard (which may be open by default).
Select the Add roles and features link on the dashboard.
Select Next until you get to the Server Roles section.
Select the Active Directory Domain Services and DNS Server roles. When you're prompted, add any additional features that are required by these roles.
After the features finish installing, return to the Server Manager dashboard.
Select the new AD DS option on the left-hand pane.
Select the More link on the yellow warning bar.
In the Action column of the All Server Task Details dialog, select Promote this server to a domain controller.
Under Deployment Configuration, select Add a domain controller to an existing domain.
Click Select.
Connect by using the administrator account (CORP.CONTOSO.COM\domainadmin) and password (Contoso!0000).
In Select a domain from the forest, choose your domain and then select OK.
In Domain Controller Options, use the default values and set a DSRM password.
Note
The DNS Options page might warn you that a delegation for this DNS server can't be created. You can ignore this warning in non-production environments.
Select Next until the dialog reaches the Prerequisites check. Then select Install.
After the server finishes the configuration changes, restart the server.
Add the private IP address of the secondary domain controller to the VPN DNS server
In the Azure portal, under Virtual network, change the DNS server to include the IP address of the secondary domain controller. This setting allows the DNS service redundancy.
Configure the domain accounts
Next, configure two accounts in total in Active Directory, one installation account and then a service account for both SQL Server VMs. For example, use the values in the following table for the accounts:
| Account | VM | Full domain name | Description |
|---|---|---|---|
| Install | Both | Corp\Install | Log into either VM with this account to configure the cluster and availability group. |
| SQLSvc | Both (sqlserver-0 and sqlserver-1) | Corp\SQLSvc | Use this account for the SQL Server service and SQL Agent Service account on the both SQL Server VMs. |
Use the following steps to create each account:
Sign in to the ad-primary-dc machine.
In Server Manager, select Tools, and then select Active Directory Administrative Center.
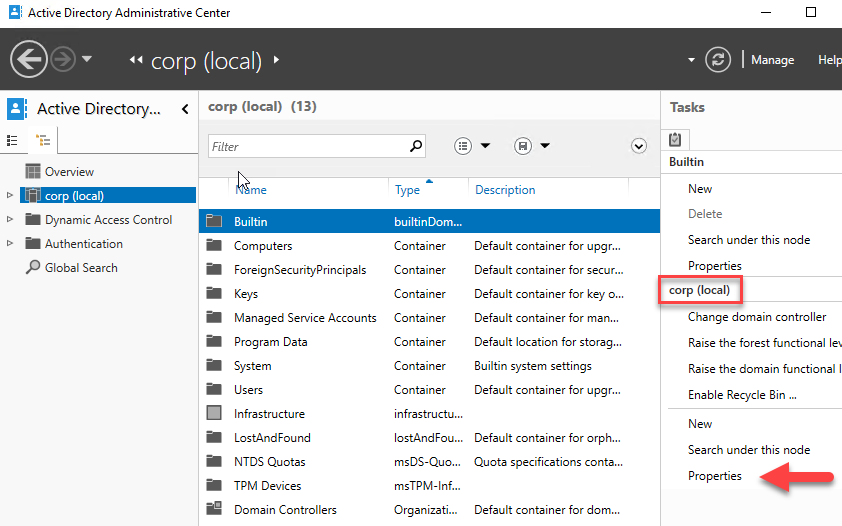
Select corp (local) from the left pane.
On the Tasks pane, select New, and then select User.
Tip
Set a complex password for each account. For non-production environments, set the user account to never expire.
Select OK to create the user.
Grant the required permissions to the installation account
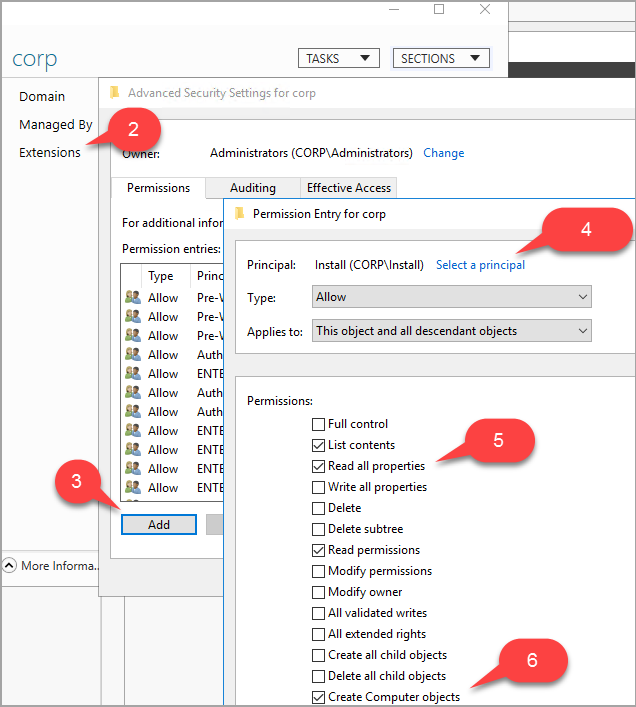
In Active Directory Administrative Center, select corp (local) on the left pane. On the Tasks pane, select Properties.
Select Extensions, and then select the Advanced button on the Security tab.
In the Advanced Security Settings for corp dialog, select Add.
Choose Select a principal, search for CORP\Install, and then select OK.
Select the Read all properties checkbox.
Select the Create Computer objects checkbox.
Select OK, and then select OK again. Close the corp properties window.
Now that you've finished configuring Active Directory and the user objects, you can create additional VMs that you'll join to the domain.
Create SQL Server VMs
The solution in this tutorial requires you to create three virtual machines: two with SQL Server instances and one that functions as a witness.
Windows Server 2016 can use a cloud witness. But for consistency with previous operating systems, this article uses a virtual machine for a witness.
Before you proceed, consider the following design decisions:
Storage: Azure managed disks
For the virtual machine storage, use Azure managed disks. We recommend managed disks for SQL Server virtual machines. Managed disks handle storage behind the scenes. In addition, when virtual machines with managed disks are in the same availability set, Azure distributes the storage resources to provide appropriate redundancy.
For more information, see Introduction to Azure managed disks. For specifics about managed disks in an availability set, see Availability options for Azure virtual machines.
Network: Private IP addresses in production
For the virtual machines, this tutorial uses public IP addresses. A public IP address enables remote connection directly to a virtual machine over the internet and makes configuration steps easier. In production environments, we recommend only private IP addresses to reduce the vulnerability footprint of the SQL Server instance's VM resource.
Network: Number of NICs per server
Use a single network interface card (NIC) per server (cluster node) and a single subnet. Azure networking has physical redundancy, which makes additional NICs and subnets unnecessary on an Azure VM guest cluster.
The cluster validation report will warn you that the nodes are reachable only on a single network. You can ignore this warning on Azure VM guest failover clusters.
Create and configure the VMs
Go back to the SQL-HA-RG resource group, and then select Add.
Search for the appropriate gallery item, select Virtual Machine, and then select From Gallery.
Use the information in the following table to finish creating the three VMs:
Page VM1 VM2 VM3 Select the appropriate gallery item Windows Server 2016 Datacenter SQL Server 2016 SP1 Enterprise on Windows Server 2016 SQL Server 2016 SP1 Enterprise on Windows Server 2016 Virtual machine configuration: Basics Name = cluster-fsw
User Name = DomainAdmin
Password = Contoso!0000
Subscription = Your subscription
Resource group = SQL-HA-RG
Location = Your Azure locationName = sqlserver-0
User Name = DomainAdmin
Password = Contoso!0000
Subscription = Your subscription
Resource group = SQL-HA-RG
Location = Your Azure locationName = sqlserver-1
User Name = DomainAdmin
Password = Contoso!0000
Subscription = Your subscription
Resource group = SQL-HA-RG
Location = Your Azure locationVirtual machine configuration: Size SIZE = DS1_V2 (1 vCPU, 3.5 GB) SIZE = DS2_V2 (2 vCPUs, 7 GB)
The size must support SSD storage (premium disk support).SIZE = DS2_V2 (2 vCPUs, 7 GB) Virtual machine configuration: Settings Storage = Use managed disks
Virtual network = autoHAVNET
Subnet = admin (192.168.15.0/24)
Public IP address = Automatically generated
Network security group = None
Monitoring Diagnostics = Enabled
Diagnostics storage account = Use an automatically generated storage account
Availability set = sqlAvailabilitySetStorage = Use managed disks
Virtual network = autoHAVNET
Subnet = admin (192.168.15.0/24)
Public IP address = Automatically generated
Network security group = None
Monitoring Diagnostics = Enabled
Diagnostics storage account = Use an automatically generated storage account
Availability set = sqlAvailabilitySetVirtual machine configuration: SQL Server settings Not applicable SQL connectivity = Private (within virtual network)
Port = 1433
SQL Authentication = Disabled
Storage configuration = General
Automated patching = Sunday at 2:00
Automated backup = Disabled
Azure Key Vault integration = DisabledSQL connectivity = Private (within virtual network)
Port = 1433
SQL Authentication = Disabled
Storage configuration = General
Automated patching = Sunday at 2:00
Automated backup = Disabled
Azure Key Vault integration = Disabled
Note
The machine sizes suggested here are meant for testing availability groups in Azure virtual machines. For the best performance on production workloads, see the recommendations for SQL Server machine sizes and configuration in Performance best practices for SQL Server in Azure virtual machines.
After the three VMs are fully provisioned, you need to join them to the corp.contoso.com domain and grant CORP\Install administrative rights to the machines.
Join the servers to the domain
Complete the following steps for both the SQL Server VMs and the file share witness server:
- Remotely connect to the virtual machine with BUILTIN\DomainAdmin.
- In Server Manager, select Local Server.
- Select the WORKGROUP link.
- In the Computer Name section, select Change.
- Select the Domain checkbox, and enter corp.contoso.com in the text box. Select OK.
- In the Windows Security popup dialog, specify the credentials for the default domain administrator account (CORP\DomainAdmin) and the password (Contoso!0000).
- When you see the "Welcome to the corp.contoso.com domain" message, select OK.
- Select Close, and then select Restart Now in the popup dialog.
Add accounts
Add the installation account as an administrator on each VM, grant permission to the installation account and local accounts within SQL Server, and update the SQL Server service account.
Add the CORP\Install user as an administrator on each cluster VM
After each virtual machine restarts as a member of the domain, add CORP\Install as a member of the local administrators group:
Wait until the VM is restarted, and then open the RDP file again from the primary domain controller. Sign in to sqlserver-0 by using the CORP\DomainAdmin account.
Tip
Be sure to sign in with the domain administrator account. In the previous steps, you were using the BUILTIN administrator account. Now that the server is in the domain, use the domain account. In your RDP session, specify DOMAIN\username.
In Server Manager, select Tools, and then select Computer Management.
In the Computer Management window, expand Local Users and Groups, and then select Groups.
Double-click the Administrators group.
In the Administrators Properties dialog, select the Add button.
Enter the user CORP\Install, and then select OK.
Select OK to close the Administrator Properties dialog.
Repeat the previous steps on sqlserver-1 and cluster-fsw.
Create a sign-in on each SQL Server VM for the installation account
Use the installation account (CORP\install) to configure the availability group. This account needs to be a member of the sysadmin fixed server role on each SQL Server VM.
The following steps create a sign-in for the installation account. Complete them on both SQL Server VMs.
Connect to the server through RDP by using the <MachineName>\DomainAdmin account.
Open SQL Server Management Studio and connect to the local instance of SQL Server.
In Object Explorer, select Security.
Right-click Logins. Select New Login.
In Login - New, select Search.
Select Locations.
Enter the network credentials for the domain administrator. Use the installation account (CORP\install).
Set the sign-in to be a member of the sysadmin fixed server role.
Select OK.
Configure system account permissions
To create an account for the system and grant appropriate permissions, complete the following steps on each SQL Server instance:
Create an account for
[NT AUTHORITY\SYSTEM]by using the following script:USE [master] GO CREATE LOGIN [NT AUTHORITY\SYSTEM] FROM WINDOWS WITH DEFAULT_DATABASE=[master] GOGrant the following permissions to
[NT AUTHORITY\SYSTEM]:ALTER ANY AVAILABILITY GROUPCONNECT SQLVIEW SERVER STATE
The following script grants these permissions:
GRANT ALTER ANY AVAILABILITY GROUP TO [NT AUTHORITY\SYSTEM]
GO
GRANT CONNECT SQL TO [NT AUTHORITY\SYSTEM]
GO
GRANT VIEW SERVER STATE TO [NT AUTHORITY\SYSTEM]
GO
Set the SQL Server service accounts
On each SQL Server VM, complete the following steps to set the SQL Server service account. Use the accounts that you created when you configured the domain accounts.
- Open SQL Server Configuration Manager.
- Right-click the SQL Server service, and then select Properties.
- Set the account and password.
For SQL Server availability groups, each SQL Server VM needs to run as a domain account.
Add failover clustering
To add failover clustering features, complete the following steps on both SQL Server VMs:
Connect to the SQL Server virtual machine through RDP by using the CORP\install account. Open the Server Manager dashboard.
Select the Add roles and features link on the dashboard.

Select Next until you get to the Server Features section.
In Features, select Failover Clustering.
Add any required features.
Select Install.
Note
You can now automate this task, along with actually joining the SQL Server VMs to the failover cluster, by using the Azure CLI and Azure quickstart templates.
Tune network thresholds for a failover cluster
When you're running Windows failover cluster nodes in Azure VMs with SQL Server availability groups, change the cluster setting to a more relaxed monitoring state. This change will make the cluster more stable and reliable. For details, see IaaS with SQL Server: Tuning failover cluster network thresholds.
Configure the firewall on each SQL Server VM
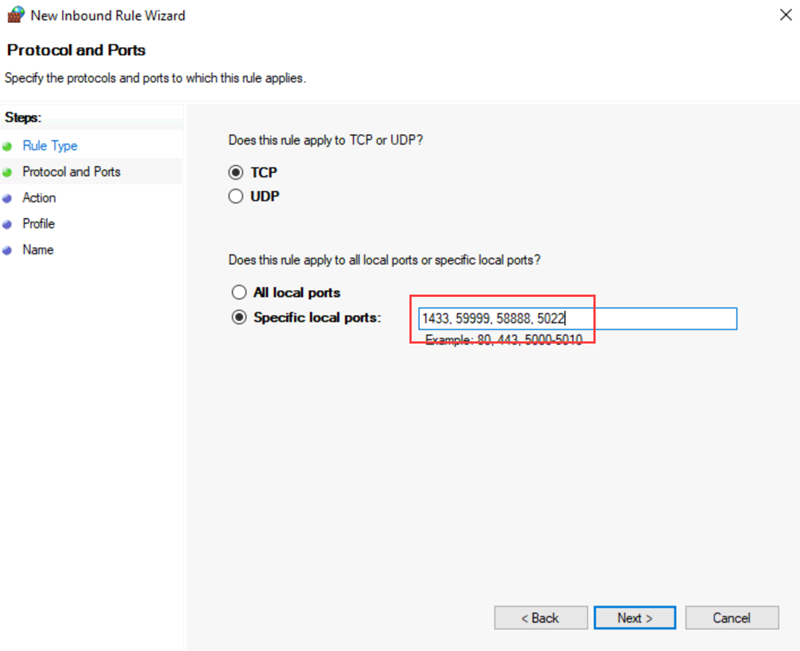
The solution requires the following TCP ports to be open in the firewall:
- SQL Server VM: Port 1433 for a default instance of SQL Server.
- Azure load balancer probe: Any available port. Examples frequently use 59999.
- Load balancer IP address health probe for cluster core: Any available port. Examples frequently use 58888.
- Database mirroring endpoint: Any available port. Examples frequently use 5022.
The firewall ports need to be open on both SQL Server VMs. The method of opening the ports depends on the firewall solution that you use. The following steps show how to open the ports in Windows Firewall:
On the first SQL Server Start screen, open Windows Firewall with Advanced Security.
On the left pane, select Inbound Rules. On the right pane, select New Rule.
For Rule Type, select Port.
For the port, specify TCP and enter the appropriate port numbers. The following screenshot shows an example:
Select Next.
On the Action page, keep Allow the connection selected, and then select Next.
On the Profile page, accept the default settings, and then select Next.
On the Name page, specify a rule name (such as Azure LB Probe) in the Name box, and then select Finish.
Next steps
Now that you've configured the prerequisites, get started with configuring your availability group.
To learn more, see:
