Quickstart: Add feature flags to an Azure Functions app
In this quickstart, you create an Azure Functions app and use feature flags in it. You use the feature management from Azure App Configuration to centrally store all your feature flags and control their states.
Prerequisites
- An Azure account with an active subscription. Create one for free.
- An App Configuration store. Create a store.
- Visual Studio with the Azure development workload.
Add a feature flag
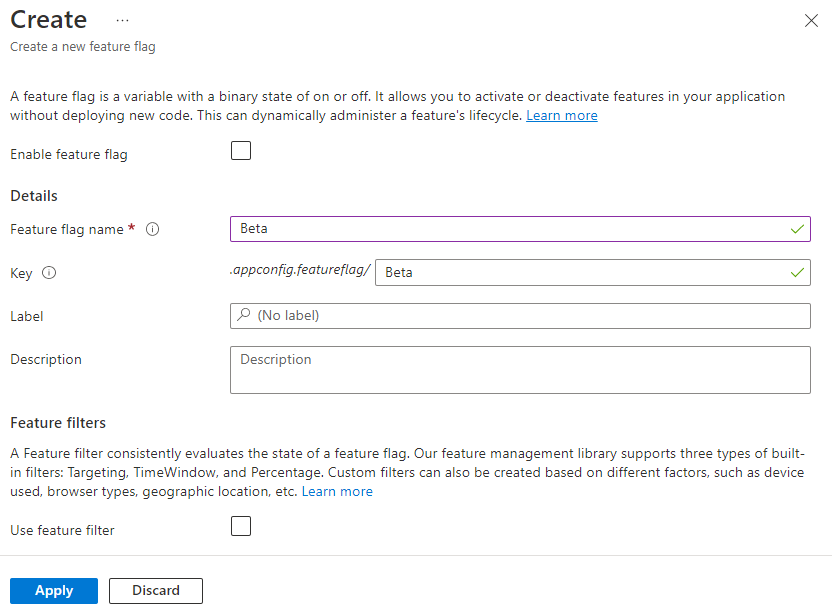
Add a feature flag called Beta to the App Configuration store and leave Label and Description with their default values. For more information about how to add feature flags to a store using the Azure portal or the CLI, go to Create a feature flag.
Create a Function App
Create an Azure Functions app using Visual Studio by selecting the Azure Functions (C#) template. This template guides you through configuring essential settings for your project. For detailed instructions, see Develop Azure Functions using Visual Studio.
Use the following table as a reference for key parameters when creating your Function App.
| Setting | Value |
|---|---|
| Functions worker | .NET 8.0 Isolated |
| Function | HTTP trigger |
| Authorization level | Anonymous |
Note
Azure App Configuration can be used with Azure Functions in either the isolated worker model or the in-process model. This quickstart uses the isolated worker model as an example. You can find complete code examples for both models in the Azure App Configuration GitHub repository.
Connect to an App Configuration store
You can connect to your App Configuration store using Microsoft Entra ID (recommended), or a connection string.
Right-click your project, and select Manage NuGet Packages. On the Browse tab, search for and add the latest stable version of following NuGet packages to your project.
- Microsoft.Azure.AppConfiguration.Functions.Worker
- Microsoft.FeatureManagement
- Azure.Identity
Open Program.cs and update the code as follows. You add Azure App Configuration as an extra configuration source by calling the
AddAzureAppConfigurationmethod.You use the
DefaultAzureCredentialto authenticate to your App Configuration store. Follow the instructions to assign your credential the App Configuration Data Reader role. Be sure to allow sufficient time for the permission to propagate before running your application.using Azure.Identity; using Microsoft.Azure.Functions.Worker.Builder; using Microsoft.Extensions.Configuration; using Microsoft.Extensions.Hosting; using Microsoft.FeatureManagement; var builder = FunctionsApplication.CreateBuilder(args); // Connect to Azure App Configuration builder.Configuration.AddAzureAppConfiguration(options => { Uri endpoint = new(Environment.GetEnvironmentVariable("AZURE_APPCONFIG_ENDPOINT") ?? throw new InvalidOperationException("The environment variable 'AZURE_APPCONFIG_ENDPOINT' is not set or is empty.")); options.Connect(endpoint, new DefaultAzureCredential()) // Load all feature flags with no label. To load feature flags with specific keys and labels, set via FeatureFlagOptions.Select. // Use the default refresh interval of 30 seconds. It can be overridden via FeatureFlagOptions.SetRefreshInterval. .UseFeatureFlags(); });The
UseFeatureFlags()method instructs the provider to load feature flags. By default, all feature flags without labels are loaded and refreshed every 30 seconds. The selection and refresh behavior of feature flags are configured independently from other configuration key-values. You can customize these behaviors by passing aFeatureFlagOptionsaction to theUseFeatureFlagsmethod. UseFeatureFlagOptions.Selectto specify the keys and labels of feature flags to load, and useFeatureFlagOptions.SetRefreshIntervalto override the default refresh interval.Tip
If you don't want any configuration other than feature flags to be loaded to your application, you can call
options.Select("_")to only load a nonexisting dummy key"_". By default, all configuration key-values without labels in your App Configuration store will be loaded if noSelectmethod is called.Update the Program.cs file to enable automatic feature flag refresh on each function execution by adding the Azure App Configuration middleware. You also register feature management service, allowing you to inject and use it in your function code later.
// Connect to Azure App Configuration
builder.Configuration.AddAzureAppConfiguration(options =>
{
    // Omitted the code added in the previous step.
});

// Add Azure App Configuration middleware and feature management to the service collection.
builder.Services
    .AddAzureAppConfiguration()
    .AddFeatureManagement();

// Use Azure App Configuration middleware for dynamic configuration and feature flag refresh.
builder.UseAzureAppConfiguration();

builder.ConfigureFunctionsWebApplication();

builder.Build().Run();
Open Function1.cs, and add the following namespace.
using Microsoft.FeatureManagement;Update the constructor to obtain an instance of
IVariantFeatureManagerSnapshotthrough dependency injection.private readonly IVariantFeatureManagerSnapshot _featureManager; private readonly ILogger<Function1> _logger; public Function1(IVariantFeatureManagerSnapshot featureManager, ILogger<Function1> logger) { _featureManager = featureManager; _logger = logger; }Update the
Runmethod to return a response message based on the state of the feature flag.[Function("Function1")] public async Task<IActionResult> Run([HttpTrigger(AuthorizationLevel.Anonymous, "get", "post")] HttpRequest req) { _logger.LogInformation("C# HTTP trigger function processed a request."); // Read feature flag string featureName = "Beta"; bool featureEnabled = await _featureManager.IsEnabledAsync(featureName, req.HttpContext.RequestAborted); return new OkObjectResult(featureEnabled ? $"The Feature Flag '{featureName}' is turned ON!" : $"The Feature Flag '{featureName}' is turned OFF"); }
Test the function locally
Set the environment variable.
Set the environment variable named AZURE_APPCONFIG_ENDPOINT to the endpoint of your App Configuration store found under the Overview of your store in the Azure portal.
If you use the Windows command prompt, run the following command and restart the command prompt to allow the change to take effect:
setx AZURE_APPCONFIG_ENDPOINT "<endpoint-of-your-app-configuration-store>"If you use PowerShell, run the following command:
$Env:AZURE_APPCONFIG_ENDPOINT = "<endpoint-of-your-app-configuration-store>"If you use macOS or Linux, run the following command:
export AZURE_APPCONFIG_ENDPOINT='<endpoint-of-your-app-configuration-store>'Press F5 to test your function. If prompted, accept the request from Visual Studio to download and install Azure Functions Core (CLI) tools. You might also need to enable a firewall exception so that the tools can handle HTTP requests.
Copy the URL of your function from the Azure Functions runtime output.

Paste the URL for the HTTP request into your browser's address bar. The following image shows the response indicating that the feature flag Beta is disabled.

In the Azure portal, navigate to your App Configuration store. Under Operations, select Feature manager, locate the Beta feature flag, and set the Enabled toggle to On.
Refresh the browser a few times. When the refresh interval time window passes, the page changes to indicate the feature flag Beta is turned on, as shown in the image.

Clean up resources
If you don't want to continue using the resources created in this article, delete the resource group you created here to avoid charges.
Important
Deleting a resource group is irreversible. The resource group and all the resources in it are permanently deleted. Ensure that you don't accidentally delete the wrong resource group or resources. If you created the resources for this article inside a resource group that contains other resources you want to keep, delete each resource individually from its respective pane instead of deleting the resource group.
- Sign in to the Azure portal, and select Resource groups.
- In the Filter by name box, enter the name of your resource group.
- In the result list, select the resource group name to see an overview.
- Select Delete resource group.
- You're asked to confirm the deletion of the resource group. Enter the name of your resource group to confirm, and select Delete.
After a few moments, the resource group and all its resources are deleted.
Next steps
In this quickstart, you created a feature flag and used it with an Azure Functions app.
For the full feature rundown of the .NET feature management library, continue to the following document.
To learn more about managing feature flags in Azure App Configuration, continue to the following tutorial.