Manage Key Vault in Azure Stack Hub using the portal
This article describes how to create and manage a key vault in Azure Stack Hub using the Azure Stack Hub portal.
Prerequisites
You must subscribe to an offer that includes the Azure Key Vault service.
Create a key vault
Sign in to the admin portal
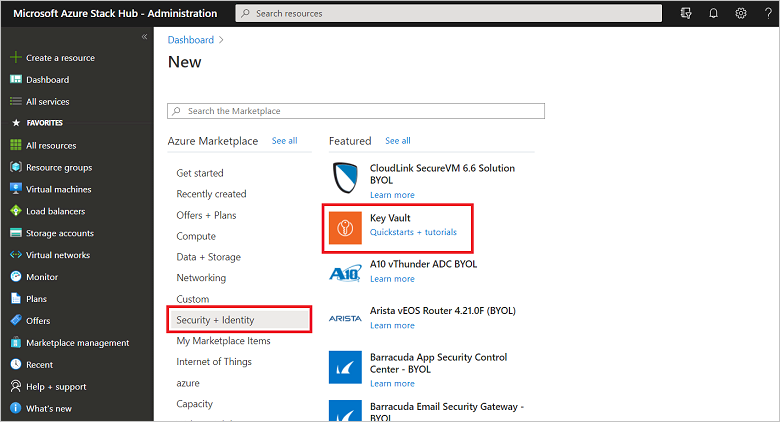
https://adminportal.local.azurestack.external.From the dashboard, select + Create a resource, then Security + Identity, then Key Vault.

In the Create Key Vault pane, assign a Name for your vault. Vault names can contain only alphanumeric characters and the hyphen (-) character. They shouldn't start with a number.
Choose a Subscription from the list of available subscriptions. All subscriptions that offer the Key Vault service are displayed in the drop-down list.
Select an existing Resource Group, or create a new one.
Select the Pricing tier. In the Azure Stack Development Kit (ASDK), key vaults support Standard SKUs only.
Choose one of the existing Access policies or create a new one. An access policy allows you to grant permissions for a user, an app, or a security group to perform operations with this vault.
Optionally, choose an Advanced access policy to enable access to features. For example: virtual machines (VMs) for deployment, Resource Manager for template deployment, and access to Azure Disk Encryption for volume encryption.
After you configure the settings, select OK, and then select Create. This step starts the key vault deployment.
Manage keys and secrets
After you create a key vault, use the following procedure to create and manage keys and secrets within the vault:
Create a key
Sign in to the Azure Stack Hub admin portal
https://adminportal.local.azurestack.external.From the dashboard, select All resources, select the key vault that you created earlier, and then select the Keys tile.
In the Keys pane, select Generate/Import.
In the Create a key pane, from the list of Options, choose the method that you want to use to create a key. You can Generate a new key, Upload an existing key, or use Restore Backup to select a backup of a key.
Enter a Name for your key. The key name can contain only alphanumeric characters and the hyphen (-) character.
Optionally, configure the Set activation date and Set expiration date values for your key.
Select Create to start the deployment.
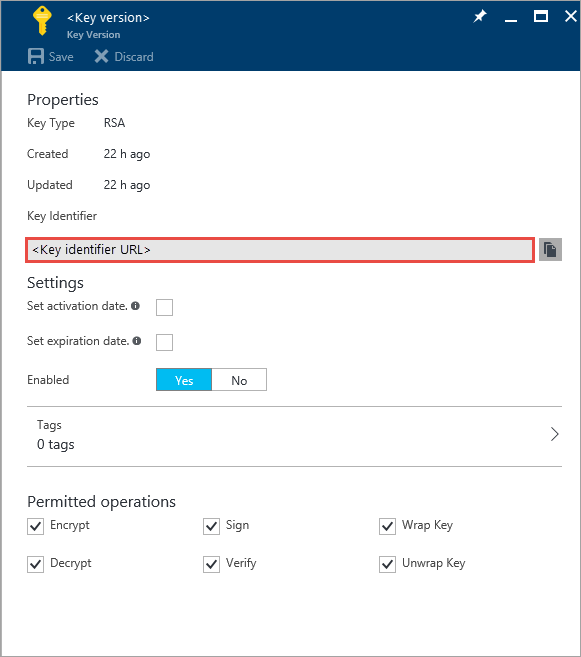
After the key is successfully created, you can select it under Keys and view or modify its properties. The properties section contains the Key Identifier, which is a Uniform Resource Identifier (URI) that external apps use to access this key. To limit operations on this key, configure the settings under Permitted operations.

Create a secret
Sign in to the admin portal
https://adminportal.local.azurestack.external.From the dashboard, select All resources, select the key vault that you created earlier, and then select the Secrets tile.
Under Secrets, select Add.
Under Create a secret, from the list of Upload options, choose an option with which you want to create a secret. You can create a secret Manually if you enter a value for the secret, or upload a Certificate from your local machine.
Enter a Name for the secret. The secret name can contain only alphanumeric characters and the hyphen (-) character.
Optionally, specify the Content type, and configure values for Set activation date and Set expiration date for the secret.
Select Create to start the deployment.
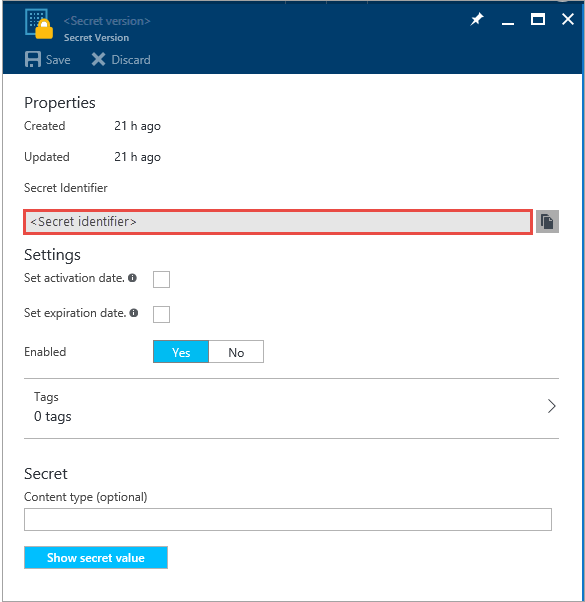
After the secret is successfully created, you can select it under Secrets and view or modify its properties. The Secret Identifier is a URI that external apps can use to access this secret.
