Configure storage quotas for a mailbox in Exchange Server
Tip
This article applies to on-premises Exchange servers. The cloud version of this article is available at Increase or customize Exchange Online mailbox size.
You can use the Exchange admin center (EAC) or the Exchange Management Shell to customize the mailbox storage quotas for specific mailboxes. Storage quotas let you control the size of mailboxes and manage the growth of mailbox databases. When a mailbox reaches or exceeds a specified storage quota, Exchange sends a descriptive notification to the mailbox owner.
Typically, you configure storage quotas on mailbox databases, because the quotas apply to all existing and future mailboxes in the database. For more information, see Manage mailbox databases in Exchange Server.
This article shows you how to customize storage settings for specific mailboxes that override the storage settings from the mailbox database. For more management tasks related to user mailboxes, see Manage user mailboxes.
What do you need to know before you begin?
- Estimated time to complete: 2 minutes.
- To open the Exchange admin center (EAC), see Exchange admin center in Exchange Server. To open the Exchange Management Shell, see Open the Exchange Management Shell.
- You need to be assigned permissions before you can perform these procedures. To see what permissions you need, see the "Recipient Provisioning Permissions" section in the Recipients Permissions article.
- For information about keyboard shortcuts that might apply to the procedures in this article, see Keyboard shortcuts in the Exchange admin center.
Tip
Having problems? Ask for help in the Exchange Server forum.
Use the EAC to set storage quotas for a mailbox
In the EAC, go to Recipients > Mailboxes tab.
On the Mailboxes tab, select the mailbox that you want to modify, and then select
 Edit.
Edit.On the mailbox properties page that opens, select the Mailbox usage tab, and then select More options to show the mailbox quota settings.
On the Mailbox usage tab, select Customize the quota settings for this mailbox, and then configure the following settings:
Issue a warning at (GB): At this mailbox size, the user receives a descriptive warning message.
Note
The warning message isn't sent unless the Issue a warning value is at least 50% of the Prohibit send value. For example, if the Prohibit send value is 800 MB, the Issue warning value must be at least 400 MB. Otherwise, the warning message isn't sent.
Prohibit send at (GB): At this mailbox size, Exchange prevents the user from sending new messages from the mailbox and displays a descriptive error message.
Prohibit send and receive at (GB): At this mailbox size, Exchange prevents the user from sending messages from the mailbox and doesn't deliver new messages to the mailbox. Any messages sent to the mailbox are returned to the sender in a descriptive nondelivery report (also known as an NDR or bounce message).
Valid values for these quotas are:
- 0 through 2,047 gigabytes (GB).
- The value unlimited.
When you're finished on the Mailbox usage tab, select Save.
Use the EAC to set storage quotas for many mailboxes
In the EAC, go to Recipients > Mailboxes tab.
On the Mailboxes tab, do one of the following steps:
- Press and hold the CTRL key, and then individually select the mailboxes to modify.
- To select a continuous range of mailboxes, select a mailbox, press and hold the SHIFT key, and then select another mailbox farther down in the list.
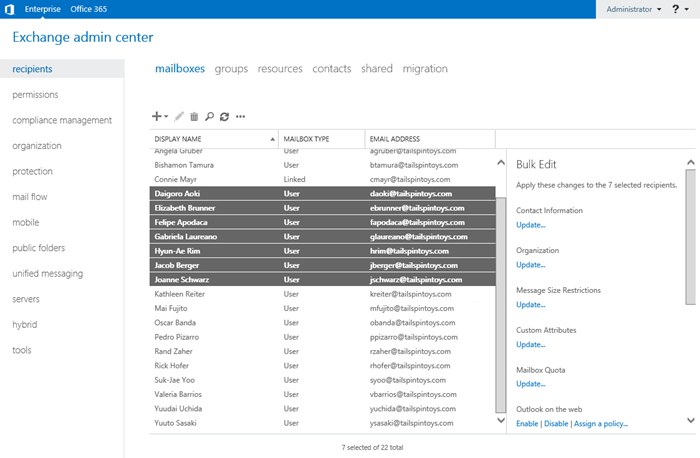
In the details pane, select Update in the Mailbox quota section.
On the Bulk edit mailbox quota page that opens, configure the following settings:
- Issue a warning at (GB)
- Prohibit send at (GB)
- Prohibit send and receive at (GB)
When you're finished on the Bulk edit mailbox quota page, select Save.
Tip
Although the Customize the quota settings for this mailbox isn't available on the Bulk edit mailbox quota page, entering a value for one of the quotas automatically selects the setting.
Use the Exchange Management Shell to configure storage quotas for a mailbox
To configure storage quotas for an individual mailbox, use the following syntax:
Set-Mailbox -Identity "<MailboxIdentity>" -UseDatabaseQuotaDefaults $false -IssueWarningQuota <ValueInMBorGB> -ProhibitSendQuota <ValueInMBorGB> -ProhibitSendReceiveQuota <ValueInMBorGB>
- <MailboxIdentity> is any value that uniquely identifies the mailbox. For example, name, distinguished name (DN), alias, user principal name (UPN), or email address. Quotation marks are required for values that contain spaces.
- The value
$falsefor the UseDatabaseQuotaDefaults parameter is required so the custom storage quotas override the mailbox database defaults.
This example sets the specified quotas for Joe Healy's mailbox.
Set-Mailbox -Identity "Joe Healy" -UseDatabaseQuotaDefaults $false -IssueWarningQuota 24.5GB -ProhibitSendQuota 24.75GB -ProhibitSendReceiveQuota 25GB
This example sets the specified quotas for Ayla Kol's mailbox.
Set-Mailbox -Identity "Ayla Kol" -UseDatabaseQuotaDefaults $false -IssueWarningQuota 900MB -ProhibitSendQuota 950MB -ProhibitSendReceiveQuota 1GB
For detailed syntax and parameter information, see Set-Mailbox.
Use the Exchange Management Shell to configure storage quotas for many mailboxes
To configure storage quotas for many mailboxes at the same time, you have the following options:
- Filter mailboxes based on an existing attribute: This method assumes the target mailboxes all share a unique filterable attribute. Some attributes (for example, Title, Department, address information, and telephone number) are available only from the Get-User cmdlet. Other attributes (for example, CustomAttribute1 to CustomAttribute15) are available only from the Get-Mailbox cmdlet.
- Use a list of specific mailboxes: After you generate the list of specific mailboxes, you can use that list to configure the mailbox storage quotas.
Filter mailboxes based on an existing attribute
Tip
If you're using the Get-User cmdlet to identify the target mailboxes, be sure to use an identity property that's available and acceptable to the Get-User and Set-Mailbox cmdlets that don't require quotation marks around the values (for example, UserPrincipalName).
To configure storage quotas for any number of mailboxes based on an existing attribute, use the following syntax:
$<VariableName> = <Get-Mailbox | Get-User> -ResultSize unlimited -Filter <Filter>

$<VariableName> | foreach {Set-Mailbox -Identity $_.UserPrincipalName -UseDatabaseQuotaDefaults $false -IssueWarningQuota <ValueInMBorGB> -ProhibitSendQuota <ValueInMBorGB> -ProhibitSendReceiveQuota <ValueInMBorGB>}
This example configures storage quotas for all user mailboxes where the associated user's Title attribute contains the value "Sales Associate".
$SA = Get-User -ResultSize unlimited -Filter "(RecipientType -eq 'UserMailbox') -and (Title -like 'Sales Associate*')"

$SA | foreach {Set-Mailbox -Identity $_.UserPrincipalName -UseDatabaseQuotaDefaults $false -IssueWarningQuota 24.5GB -ProhibitSendQuota 24.75GB -ProhibitSendReceiveQuota 25GB}
Use a list of specific mailboxes
To configure storage quotas for a list of specific mailboxes, use the following syntax:
$<VariableName> = Get-Content <text file>

$<VariableName> | foreach {Set-Mailbox -Identity $_ -UseDatabaseQuotaDefaults $false -IssueWarningQuota <ValueInMBorGB> -ProhibitSendQuota <ValueInMBorGB> -ProhibitSendReceiveQuota <ValueInMBorGB>}
The following example uses the text file C:\My Documents\MBQuotas.txt to identify the mailboxes by the associated UPNs. The text file must contain one mailbox on each line as follows:
akol@contoso.com
tjohnston@contoso.com
kakers@contoso.com
After you populate the text file with the mailboxes you want to update, run the following commands:
$MBQ = Get-Content "C:\My Documents\MBQuotas.txt"

$MBQ | foreach {Set-Mailbox -Identity $_ -UseDatabaseQuotaDefaults $false -IssueWarningQuota 900MB -ProhibitSendQuota 950MB -ProhibitSendReceiveQuota 1GB}
How do you successfully set the storage quotas for a mailbox?
To verify you successfully set the storage quotas for a mailbox, do either of the following procedures:
Exchange admin center:
- In the EAC, go to Recipients > Mailboxes tab.
- On the Mailboxes tab, select the mailbox that you want to modify, and then select
Edit.
- On the mailbox properties page that opens, select the Mailbox usage tab, and then select More options to show the mailbox quota settings.
Verify Customize the quota settings for this mailbox is selected, and verify the quota values.
Exchange Management Shell: Replace <MailboxIdentity> with the name, email address or alias of the mailbox, and then run the following command:
Get-Mailbox <MailboxIdentity> | Format-List UseDatabaseQuotaDefaults,IssueWarningQuota,ProhibitSendQuota,ProhibitSendReceiveQuota