여러 터치 포인트 검색 및 추적
다음 단계에서는 Windows Touch를 사용하여 여러 터치 포인트를 추적하는 방법을 설명합니다.
- 애플리케이션을 만들고 Windows Touch를 사용하도록 설정합니다.
- WM_TOUCH 및 트랙 지점에 대한 처리기를 추가합니다.
- 점을 그립니다.
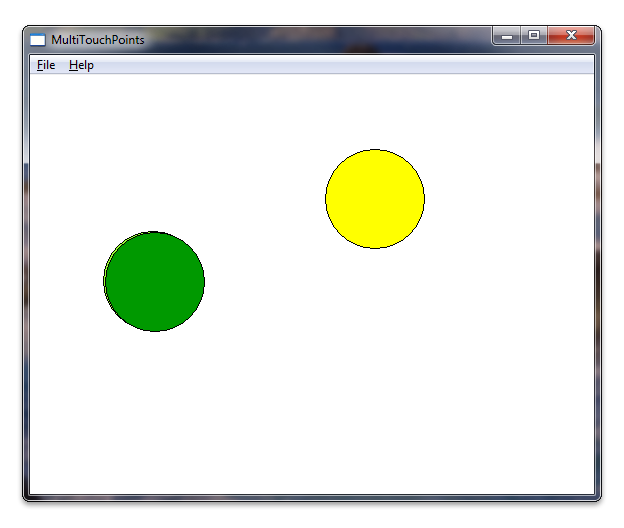
애플리케이션을 실행한 후에는 각 터치에서 원을 렌더링합니다. 다음 스크린샷은 실행하는 동안 애플리케이션의 모양을 보여 줍니다.

애플리케이션 만들기 및 Windows Touch 사용
Microsoft Visual Studio 마법사를 사용하여 Microsoft Win32 애플리케이션으로 시작합니다. 마법사를 완료한 후 targetver.h에서 Windows 버전을 설정하고 애플리케이션에 windows.h 및 windowsx.h를 포함하여 Windows Touch 메시지에 대한 지원을 추가합니다. 다음 코드에서는 targetver.h에서 Windows 버전을 설정하는 방법을 보여 줍니다.
#ifndef WINVER                  // Specifies that the minimum required platform is Windows 7.
#define WINVER 0x0601           // Change this to the appropriate value to target other versions of Windows.
#endif

#ifndef _WIN32_WINNT            // Specifies that the minimum required platform is Windows 7.
#define _WIN32_WINNT 0x0601     // Change this to the appropriate value to target other versions of Windows.
#endif

#ifndef _WIN32_WINDOWS          // Specifies that the minimum required platform is Windows 98.
#define _WIN32_WINDOWS 0x0410 // Change this to the appropriate value to target Windows Me or later.
#endif

#ifndef _WIN32_IE                       // Specifies that the minimum required platform is Internet Explorer 7.0.
#define _WIN32_IE 0x0700        // Change this to the appropriate value to target other versions of IE.
#endif
다음 코드에서는 include 지시문을 추가하는 방법을 보여 줍니다. 또한 나중에 사용할 일부 전역 변수를 만들 수 있습니다.
#include <windows.h>    // included for Windows Touch
#include <windowsx.h>   // included for point conversion

#define MAXPOINTS 10

// You will use this array to track touch points
int points[MAXPOINTS][2];

// You will use this array to switch the color / track ids
int idLookup[MAXPOINTS];


// You can make the touch points larger
// by changing this radius value
static int radius      = 50;

// There should be at least as many colors
// as there can be touch points so that you
// can have different colors for each point
COLORREF colors[] = { RGB(153,255,51),
                      RGB(153,0,0),
                      RGB(0,153,0),
                      RGB(255,255,0),
                      RGB(255,51,204),
                      RGB(0,0,0),
                      RGB(0,153,0),
                      RGB(153, 255, 255),
                      RGB(153,153,255),
                      RGB(0,51,153)
                    };
WM_TOUCH 및 트랙 지점에 대한 처리기 추가
먼저 WndProc에서 WM_TOUCH 처리기에서 사용하는 일부 변수를 선언합니다.
int wmId, wmEvent, i, x, y;

UINT cInputs;
PTOUCHINPUT pInputs;
POINT ptInput;
이제 터치 포인트를 저장하는 데 사용되는 변수를 초기화하고 InitInstance 메서드의 터치 입력 창을 등록합니다.
BOOL InitInstance(HINSTANCE hInstance, int nCmdShow)
{
   HWND hWnd;

   hInst = hInstance; // Store instance handle in our global variable

   hWnd = CreateWindow(szWindowClass, szTitle, WS_OVERLAPPEDWINDOW,
      CW_USEDEFAULT, 0, CW_USEDEFAULT, 0, NULL, NULL, hInstance, NULL);

   if (!hWnd) {
      return FALSE;
   }

   // register the window for touch instead of gestures
   RegisterTouchWindow(hWnd, 0);

   // the following code initializes the points
   for (int i=0; i< MAXPOINTS; i++){
     points[i][0] = -1;
     points[i][1] = -1;
     idLookup[i]  = -1;
   }

   ShowWindow(hWnd, nCmdShow);
   UpdateWindow(hWnd);

   return TRUE;
}
다음으로 WndProc 메서드에서 WM_TOUCH 메시지를 처리합니다. 다음 코드는 WM_TOUCH 대한 처리기의 구현을 보여 주는 코드입니다.
case WM_TOUCH:
  cInputs = LOWORD(wParam);
  pInputs = new TOUCHINPUT[cInputs];
  if (pInputs){
    if (GetTouchInputInfo((HTOUCHINPUT)lParam, cInputs, pInputs, sizeof(TOUCHINPUT))){
      for (int i=0; i < static_cast<INT>(cInputs); i++){
        TOUCHINPUT ti = pInputs[i];
        index = GetContactIndex(ti.dwID);
        if (ti.dwID != 0 && index < MAXPOINTS){
          // Do something with your touch input handle
          ptInput.x = TOUCH_COORD_TO_PIXEL(ti.x);
          ptInput.y = TOUCH_COORD_TO_PIXEL(ti.y);
          ScreenToClient(hWnd, &ptInput);

          if (ti.dwFlags & TOUCHEVENTF_UP){
            points[index][0] = -1;
            points[index][1] = -1;

            // Remove the old contact index to make it available for the new incremented dwID.
            // On some touch devices, the dwID value is continuously incremented.
            RemoveContactIndex(index);
          }else{
            points[index][0] = ptInput.x;
            points[index][1] = ptInput.y;
          }
        }
      }

      InvalidateRect(hWnd, NULL, FALSE);
    }
    // If you handled the message and don't want anything else done with it, you can close it
    CloseTouchInputHandle((HTOUCHINPUT)lParam);
    delete [] pInputs;
  }else{
    // Handle the error here
  }
이제 사용자가 화면을 터치하면 터치하는 위치가 포인트 배열에 저장됩니다. TOUCHINPUT 구조체의 dwID 멤버는 하드웨어에 종속되는 식별자를 저장합니다.
하드웨어에 종속되는 dwID 멤버의 문제를 해결하기 위해 WM_TOUCH 사례 처리기는 TOUCHINPUT 구조체의 dwID 멤버를 화면에 그려진 지점에 매핑하는 함수 GetContactIndex를 사용합니다. 다음 코드는 이 함수의 구현을 보여줍니다.
// This function is used to return an index given an ID
int GetContactIndex(int dwID){
  for (int i = 0; i < MAXPOINTS; i++) {
      if (idLookup[i] == dwID) {
          return i;
      }
  }

  for (int i = 0; i < MAXPOINTS; i++) {
      if (idLookup[i] == -1) {
          idLookup[i] = dwID;
          return i;
      }
  }
  // Out of contacts
  return -1;
}

// Mark the specified index as initialized for new use
BOOL RemoveContactIndex(int index) {
    if (index >= 0 && index < MAXPOINTS) {
        idLookup[index] = -1;
        return true;
    }

    return false;
}
Important
Windows 11 이상
일부 3-4-손가락 터치 조작은 기본적으로 Windows 앱에서 더 이상 작동하지 않습니다.
기본적으로 창을 전환하거나 최소화하고 가상 데스크톱을 변경하는 등의 작업을 위해 시스템에서 세 손가락 및 네 손가락 터치 조작을 사용합니다. 이제 이러한 조작이 시스템 수준에서 처리되기 때문에 이러한 변경으로 인해 앱 기능이 영향을 받을 수 있습니다.
애플리케이션 내에서 세 손가락 및 네 손가락 조작을 지원하기 위해 시스템에서 이러한 조작을 처리할지 여부를 지정하는 새로운 사용자 설정이 도입되었습니다.
Bluetooth 및 디바이스 > 터치 > "세 손가락 및 네 손가락 터치 제스처"
“켜짐”(기본값)으로 설정된 경우 시스템은 3 손가락 및 4 손가락 조작을 모두 처리합니다. 앱에서는 이러한 기능을 지원할 수 없습니다.
“꺼짐”으로 설정되면 앱에서 3 손가락 및 4 손가락 조작을 지원할 수 있습니다. 이러한 조작은 시스템에서 처리되지 않습니다.
애플리케이션에서 이러한 조작을 지원해야 하는 경우 이 설정을 사용자에게 알리고 해당 페이지에 설정 앱을 시작하는 링크를 제공하는 것이 좋습니다(ms-settings:devices-touch). 자세한 내용은 시작 관리자 참조하세요. LaunchUriAsync 메서드.
점 그리기
그리기 루틴에 대해 다음 변수를 선언합니다.
    // For double buffering
    static HDC memDC       = 0;
    static HBITMAP hMemBmp = 0;
    HBITMAP hOldBmp        = 0;

    // For drawing / fills
    PAINTSTRUCT ps;
    HDC hdc;
    HBRUSH hBrush;

    // For tracking dwId to points
    int index;
메모리 디스플레이 컨텍스트 memDC는 렌더링된 디스플레이 컨텍스트인 hdc와 교환되는 임시 그래픽 컨텍스트를 저장하여 깜박임을 제거하는 데 사용됩니다. 저장한 점을 사용하고 점에 원을 그리는 그리기 루틴을 구현합니다. 다음 코드에서는 WM_PAINT 처리기를 구현하는 방법을 보여줍니다.
  case WM_PAINT:
    hdc = BeginPaint(hWnd, &ps);
    RECT client;
    GetClientRect(hWnd, &client);

    // start double buffering
    if (!memDC){
      memDC = CreateCompatibleDC(hdc);
    }
    hMemBmp = CreateCompatibleBitmap(hdc, client.right, client.bottom);
    hOldBmp = (HBITMAP)SelectObject(memDC, hMemBmp);

    hBrush = CreateSolidBrush(RGB(255, 255, 255));
    FillRect(memDC, &client, hBrush);
    DeleteObject(hBrush);

    //Draw Touched Points
    for (i=0; i < MAXPOINTS; i++){
      hBrush = CreateSolidBrush(colors[i]);
      SelectObject( memDC, hBrush);

      x = points[i][0];
      y = points[i][1];
      if  (x >0 && y>0){
        Ellipse(memDC, x - radius, y - radius, x+ radius, y + radius);
      }

      DeleteObject(hBrush);
    }

    BitBlt(hdc, 0,0, client.right, client.bottom, memDC, 0,0, SRCCOPY);
    EndPaint(hWnd, &ps);

    SelectObject(memDC, hOldBmp);
    DeleteObject(hMemBmp);

    break;
애플리케이션을 실행할 때 이제 이 섹션의 시작 부분에 있는 그림과 같이 표시됩니다.
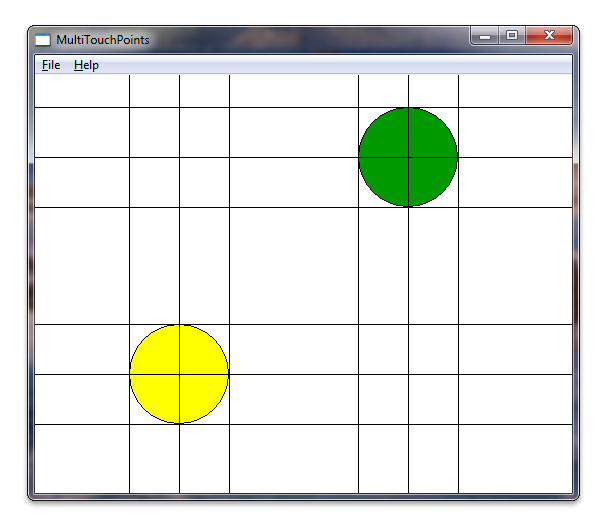
재미를 위해 터치 포인트 주위에 몇 가지 추가 선을 그릴 수 있습니다. 다음 스크린샷에서는 원 주위에 몇 개의 추가 선이 그려져 애플리케이션이 어떻게 보이는지 보여 줍니다.
