자습서: 3D 개체와 상호 작용
Babylon.js를 사용하여 Mixed Reality 환경에 대한 3D 개체 및 상호 작용을 만드는 방법에 대해 알아봅니다. 이 섹션에서는 개체를 선택할 때 큐브의 면을 색칠하는 간단한 작업으로 시작합니다.
이 자습서에서는 다음 항목을 다룹니다.
- 상호 작용을 추가하는 방법
- WebXR 몰입형 모드 사용
- Windows Mixed Reality 시뮬레이터에서 앱 실행
- Android Chrome에서 앱 실행 및 디버그
시작하기 전에
이전 자습서에서는 장면이 있는 기본 웹 페이지를 만들었습니다. 편집할 호스팅 웹 페이지를 엽니다.
<html>
<head>
    <script src="https://cdn.babylonjs.com/babylon.js"></script>
    <style>
        body,#renderCanvas { width: 100%; height: 100%;}
    </style>
</head>
<body>
    <canvas id="renderCanvas"></canvas>
    <script>
        const canvas = document.getElementById("renderCanvas");
        const engine = new BABYLON.Engine(canvas, true);

        const createScene = function() {
            const scene = new BABYLON.Scene(engine);
            scene.clearColor = new BABYLON.Color3.Black;

            const alpha =  Math.PI/4;
            const beta = Math.PI/3;
            const radius = 8;
            const target = new BABYLON.Vector3(0, 0, 0);

            const camera = new BABYLON.ArcRotateCamera("Camera", alpha, beta, radius, target, scene);
            camera.attachControl(canvas, true);

            const light = new BABYLON.HemisphericLight("light", new BABYLON.Vector3(1, 1, 0));

            const box = BABYLON.MeshBuilder.CreateBox("box", {});
            box.position.x = 0.5;
            box.position.y = 1;

            return scene;
        };

        const sceneToRender = createScene();
        engine.runRenderLoop(function(){
            sceneToRender.render();
        });
    </script>
</body>
</html>
상호 작용 추가
먼저 큐브를 만드는 코드를 업데이트해 보겠습니다. 그러면 큐브는 임의의 색으로 칠해집니다. 이를 위해 큐브에 재질을 추가합니다. 재질은 색과 텍스처를 지정하고 다른 개체를 포함하는 데 사용할 수 있습니다. 재질의 표시 방법은 장면에서 사용되는 광원 및 반응하도록 설정하는 방법에 따라 달라집니다. 예를 들어 diffuseColor는 연결된 메시 전체에 색을 분산합니다. 다음 코드를 추가합니다.
const boxMaterial = new BABYLON.StandardMaterial("material", scene);
boxMaterial.diffuseColor = BABYLON.Color3.Random();
box.material = boxMaterial;
이제 큐브가 임의의 색으로 칠해졌으므로 다음과 같이 상호 작용을 추가해 보겠습니다.
- 큐브를 클릭했을 때 색 변경
- 색이 변경된 후 큐브 이동
상호 작용을 추가하려면 작업을 사용해야 합니다. 작업은 이벤트 트리거에 대한 응답으로 시작됩니다. 예를 들어 사용자가 큐브를 클릭하는 경우입니다. BABYLON.ActionManager를 인스턴스화하고 특정 트리거에 대한 작업을 등록하기만 하면 됩니다. BABYLON.ExecuteCodeAction은 누군가 큐브를 클릭할 때 JavaScript 함수를 실행합니다.
box.actionManager = new BABYLON.ActionManager(scene);
box.actionManager.registerAction(new BABYLON.ExecuteCodeAction(
    BABYLON.ActionManager.OnPickTrigger,
    function (evt) {
        const sourceBox = evt.meshUnderPointer;

        //move the box upright
        sourceBox.position.x += 0.1;
        sourceBox.position.y += 0.1;

        //update the color
        boxMaterial.diffuseColor = BABYLON.Color3.Random();
    }));
웹 페이지의 최종 코드는 다음과 같습니다.
<html>
<head>
    <script src="https://cdn.babylonjs.com/babylon.js"></script>
    <style>
        body,#renderCanvas { width: 100%; height: 100%;}
    </style>
</head>
<body>
    <canvas id="renderCanvas"></canvas>
    <script>
        const canvas = document.getElementById("renderCanvas");
        const engine = new BABYLON.Engine(canvas, true);

        const createScene = function() {
            const scene = new BABYLON.Scene(engine);
            scene.clearColor = new BABYLON.Color3.Black;

            const alpha =  Math.PI/4;
            const beta = Math.PI/3;
            const radius = 8;
            const target = new BABYLON.Vector3(0, 0, 0);

            const camera = new BABYLON.ArcRotateCamera("Camera", alpha, beta, radius, target, scene);
            camera.attachControl(canvas, true);

            const light = new BABYLON.HemisphericLight("light", new BABYLON.Vector3(1, 1, 0));

            const box = BABYLON.MeshBuilder.CreateBox("box", {});
            box.position.x = 0.5;
            box.position.y = 1;

            const boxMaterial = new BABYLON.StandardMaterial("material", scene);
            boxMaterial.diffuseColor = BABYLON.Color3.Random();
            box.material = boxMaterial;

            box.actionManager = new BABYLON.ActionManager(scene);
            box.actionManager.registerAction(
                new BABYLON.ExecuteCodeAction(BABYLON.ActionManager.OnPickTrigger,
                function (evt) {
                    const sourceBox = evt.meshUnderPointer;
                    sourceBox.position.x += 0.1;
                    sourceBox.position.y += 0.1;

                    boxMaterial.diffuseColor = BABYLON.Color3.Random();
                }));

            return scene;
        };

        const sceneToRender = createScene();
        engine.runRenderLoop(function(){
            sceneToRender.render();
        });
    </script>
</body>
</html>
WebXR 몰입형 환경 사용 설정
이제 큐브의 색이 변경되었으므로 몰입형 환경을 사용해 볼 준비가 되었습니다.
이 단계에서는 지면을 소개합니다. 큐브가 공중에 매달려 있고 아래쪽에는 바닥이 보입니다. 다음과 같이 지면을 추가합니다.
const ground = BABYLON.MeshBuilder.CreateGround("ground", {width: 4, height: 4});이렇게 하면 단순한 4x4미터 바닥이 생성됩니다.
WebXR 지원을 추가하려면 프라미스 결과가 있는 createDefaultXRExperienceAsync를 호출해야 합니다. return scene; 대신 createScene 함수 끝에 다음 코드를 추가합니다.
const xrPromise = scene.createDefaultXRExperienceAsync({
    floorMeshes: [ground]
});
return xrPromise.then((xrExperience) => {
    console.log("Done, WebXR is enabled.");
    return scene;
});
이제 createScene 함수가 장면 대신 프라미스를 반환하므로 createScene 및 engine.runRenderLoop가 호출되는 방식을 수정해야 합니다. </script> 태그 바로 앞에 있는 이러한 함수의 현재 호출을 아래 코드로 바꿉니다.
createScene().then(sceneToRender => {
    engine.runRenderLoop(() => sceneToRender.render());
});
웹 페이지의 최종 코드는 다음과 같습니다.
<html>
<head>
    <script src="https://cdn.babylonjs.com/babylon.js"></script>
    <style>
        body,#renderCanvas { width: 100%; height: 100%;}
    </style>
</head>
<body>
    <canvas id="renderCanvas"></canvas>
    <script>
        const canvas = document.getElementById("renderCanvas");
        const engine = new BABYLON.Engine(canvas, true);

        const createScene = function() {
            const scene = new BABYLON.Scene(engine);
            scene.clearColor = new BABYLON.Color3.Black;

            const alpha =  Math.PI/4;
            const beta = Math.PI/3;
            const radius = 8;
            const target = new BABYLON.Vector3(0, 0, 0);

            const camera = new BABYLON.ArcRotateCamera("Camera", alpha, beta, radius, target, scene);
            camera.attachControl(canvas, true);

            const light = new BABYLON.HemisphericLight("light", new BABYLON.Vector3(1, 1, 0));

            const box = BABYLON.MeshBuilder.CreateBox("box", {});
            box.position.x = 0.5;
            box.position.y = 1;

            const boxMaterial = new BABYLON.StandardMaterial("material", scene);
            boxMaterial.diffuseColor = BABYLON.Color3.Random();
            box.material = boxMaterial;

            box.actionManager = new BABYLON.ActionManager(scene);
            box.actionManager.registerAction(
                new BABYLON.ExecuteCodeAction(BABYLON.ActionManager.OnPickTrigger,
                function (evt) {
                    const sourceBox = evt.meshUnderPointer;
                    sourceBox.position.x += 0.1;
                    sourceBox.position.y += 0.1;

                    boxMaterial.diffuseColor = BABYLON.Color3.Random();
                }));

            const ground = BABYLON.MeshBuilder.CreateGround("ground", {width: 4, height: 4});

            const xrPromise = scene.createDefaultXRExperienceAsync({
                floorMeshes: [ground]
            });

            return xrPromise.then((xrExperience) => {
                console.log("Done, WebXR is enabled.");
                return scene;
            });
        };

        createScene().then(sceneToRender => {
            engine.runRenderLoop(() => sceneToRender.render());
        });
    </script>
</body>
</html>
위의 코드는 브라우저 창에
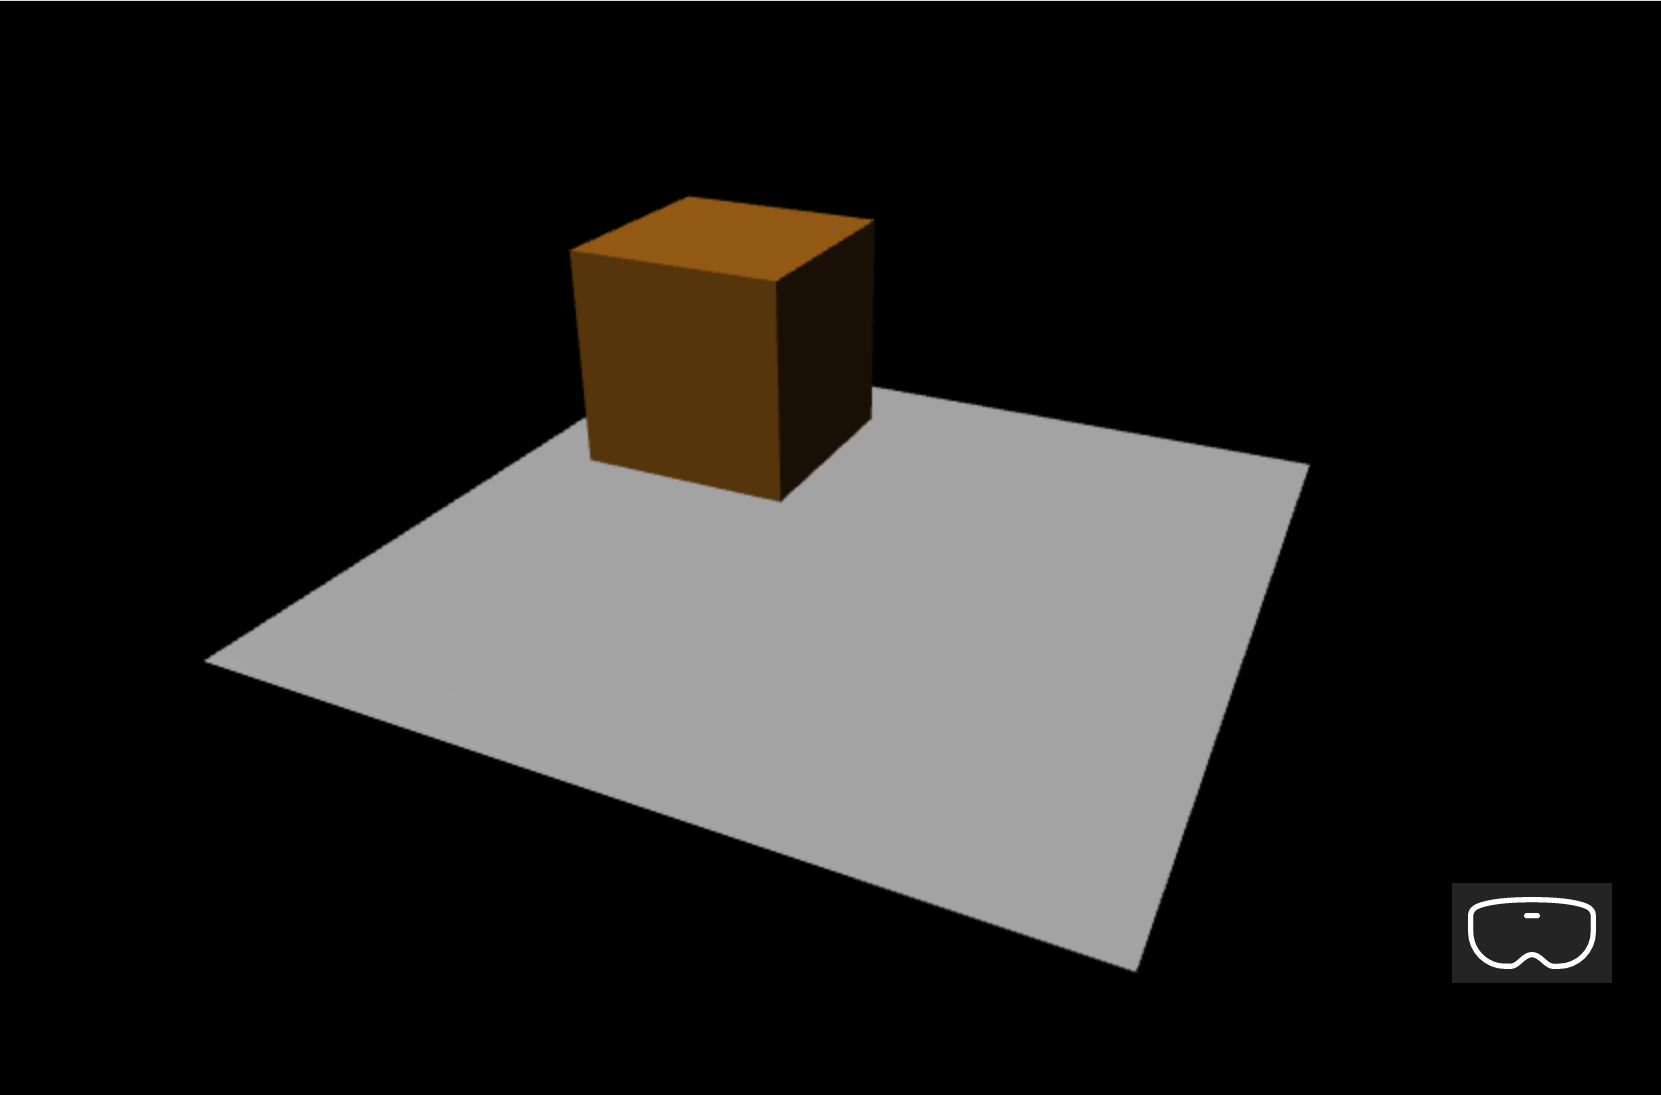 출력을 생성합니다.
Windows Mixed Reality 시뮬레이터에서 실행
이전에 사용하지 않은 경우 Windows Mixed Reality 시뮬레이터를 사용하도록 설정합니다.
오른쪽 하단에 있는 몰입형 VR 단추를 선택합니다.

이 작업을 수행하면 아래와 같이 Windows Mixed Reality 시뮬레이터 창이 시작됩니다.
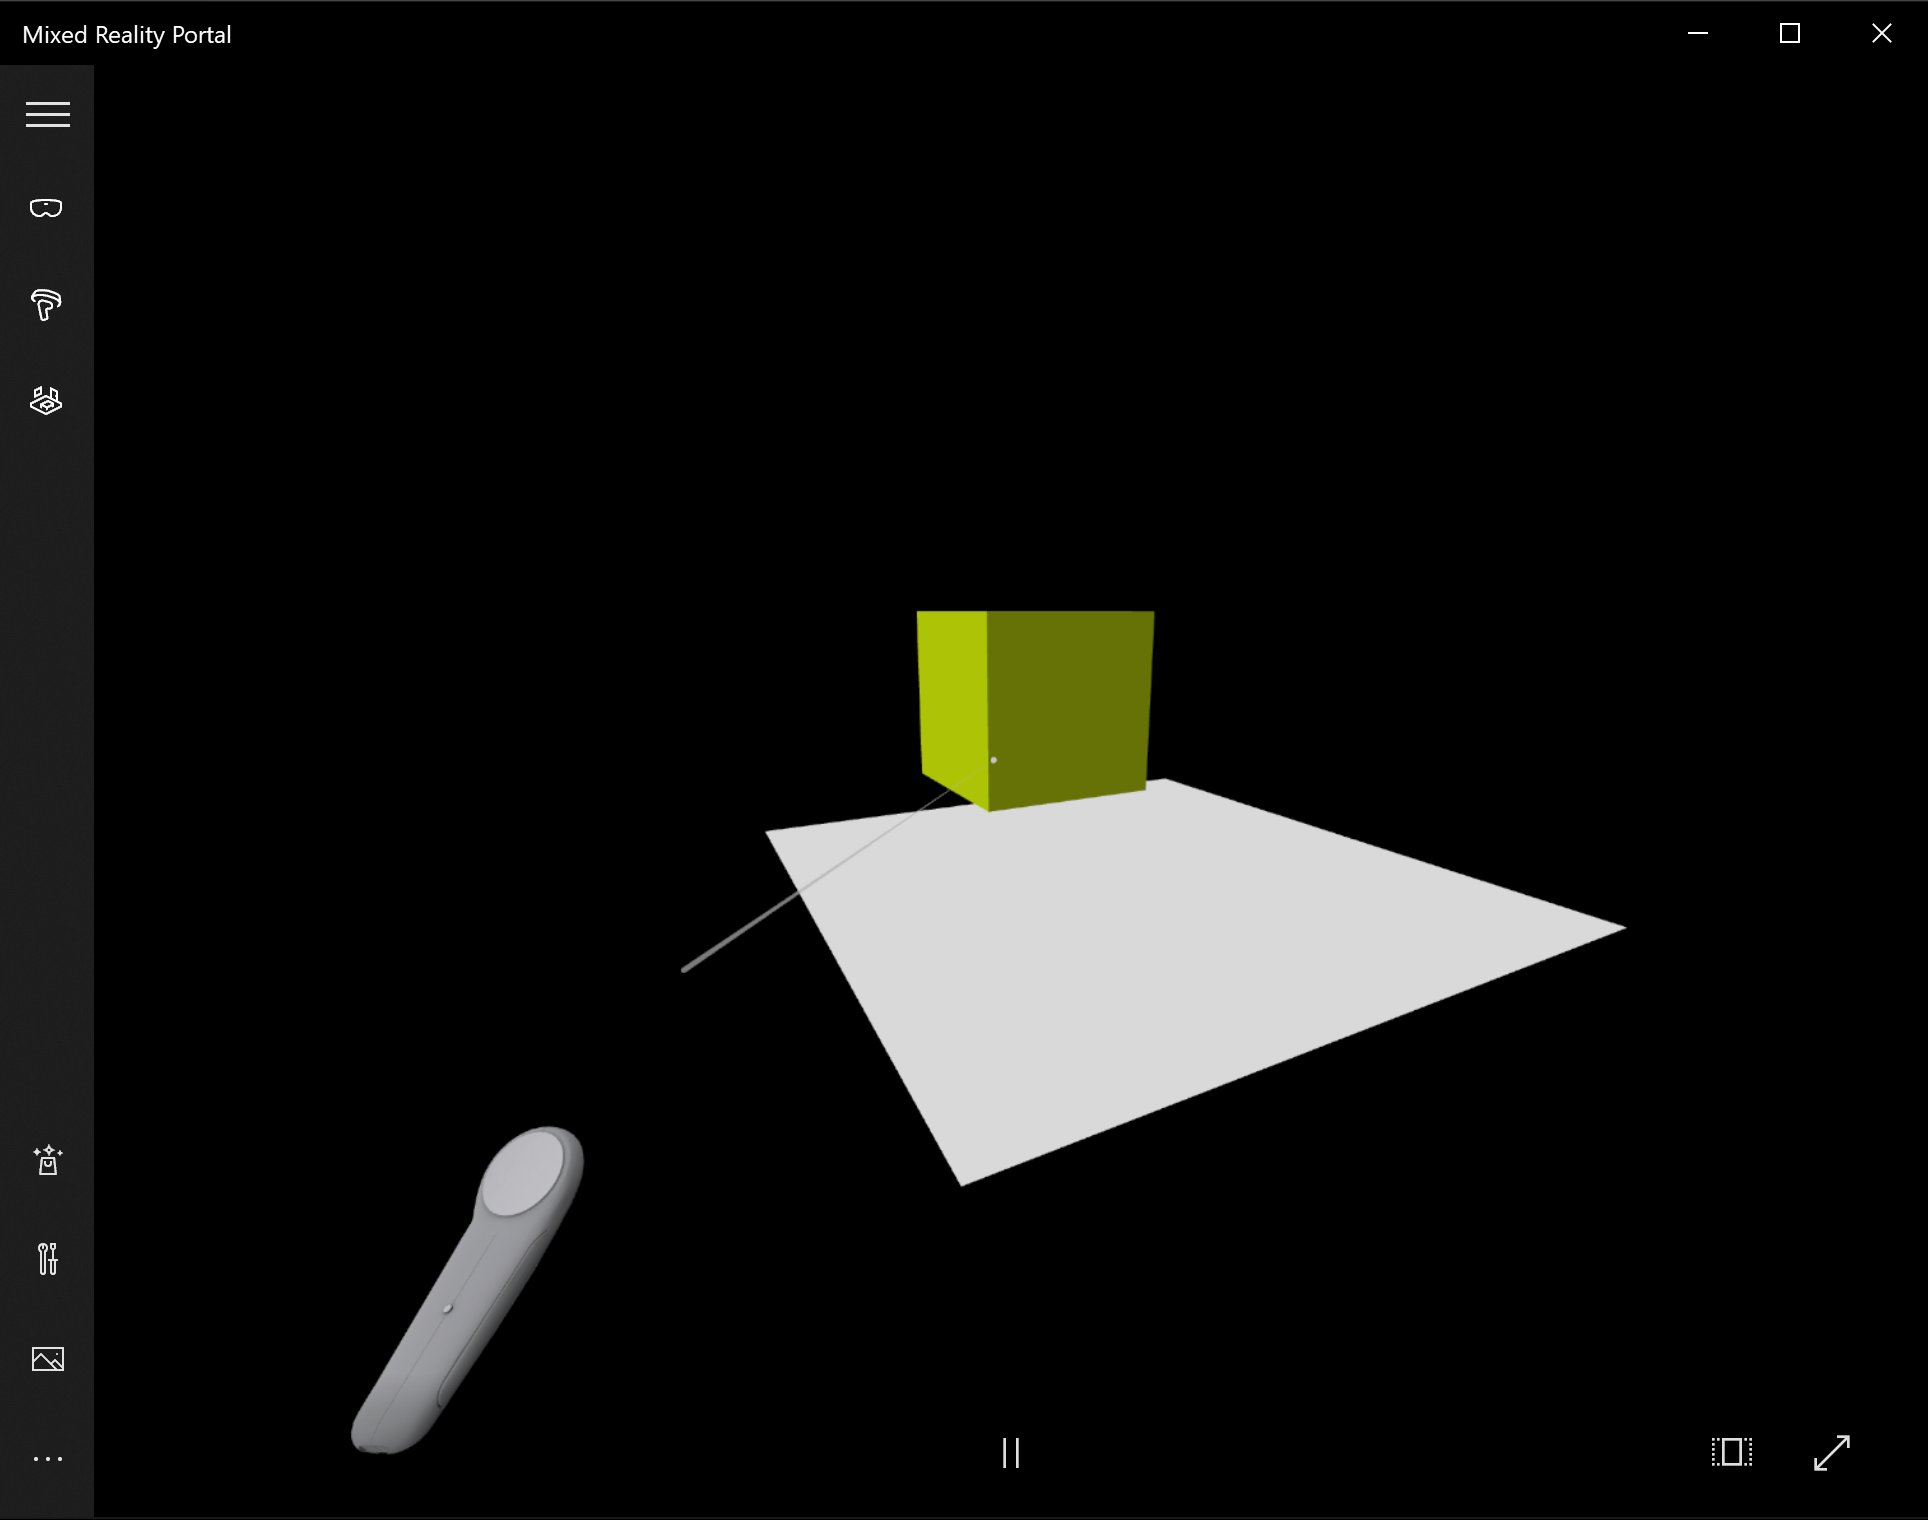
키보드에서 W, A, S 및 D 키를 사용하여 앞으로, 뒤로, 왼쪽 및 오른쪽으로 이동합니다. 시뮬레이션된 손을 사용하여 큐브를 대상으로 하고 키보드에서 Enter 키를 눌러 클릭 작업을 수행합니다. 큐브의 색이 변경되고 새 위치로 이동합니다.
참고
큐브를 대상으로 하는 경우 위 그림에 표시된 것처럼 손 광선(흰색 원)의 끝이 큐브와 교차하는지 확인합니다. 손으로 가리키기 및 커밋에 대해 자세히 알아봅니다.
Android 디바이스에서 실행 및 디버그
Android 디바이스에서 디버깅을 사용하도록 설정하려면 다음 단계를 수행합니다.
필수 조건
개발 컴퓨터에서 보안 컨텍스트(https:// 또는 localhost의 포트 전달을 통해)의 정적 html 페이지를 제공하는 웹 서버입니다. 예를 들어 serve npm 패키지를 정적 html 파일을 제공하는 간단한 경량 웹 서버로 활용하려면 더 많은 npm serve를 확인하세요.
디바이스는 원래 Google Play 스토어가 함께 제공되며 Android 7.0 이상 버전을 실행해야 합니다.
개발 워크스테이션과 디바이스 모두에서 최신 버전의 Google Chrome
디바이스가 WebXR을 실행하도록 올바르게 구성되었는지 확인하려면 디바이스에서 샘플 WebXR 페이지로 이동합니다. 다음 메시지가 표시됩니다.
브라우저는 WebXR을 지원하고 적절한 하드웨어가 있는 경우 가상 현실 및 증강 현실 환경을 실행할 수 있습니다.
Android 디바이스에서 개발자 모드 및 USB 디버깅을 사용하도록 설정합니다. 공식 문서 페이지 디바이스 개발자 옵션 구성에서 사용 중인 Android 버전에 대해 이 작업을 수행하는 방법을 참조하세요.
다음으로, USB 케이블을 통해 Android 디바이스를 개발 컴퓨터 또는 랩톱에 연결합니다.
개발 컴퓨터의 웹 서버가 실행되고 있는지 확인합니다. 예를 들어 웹 호스팅 페이지(index.html)를 포함하는 루트 폴더로 이동하고 다음 코드를 실행합니다(serve npm 패키지를 사용한다고 가정).
serve개발 컴퓨터에서 Google Chrome을 열고 주소 표시줄에 다음 텍스트를 입력합니다.
chrome://inspect#devices
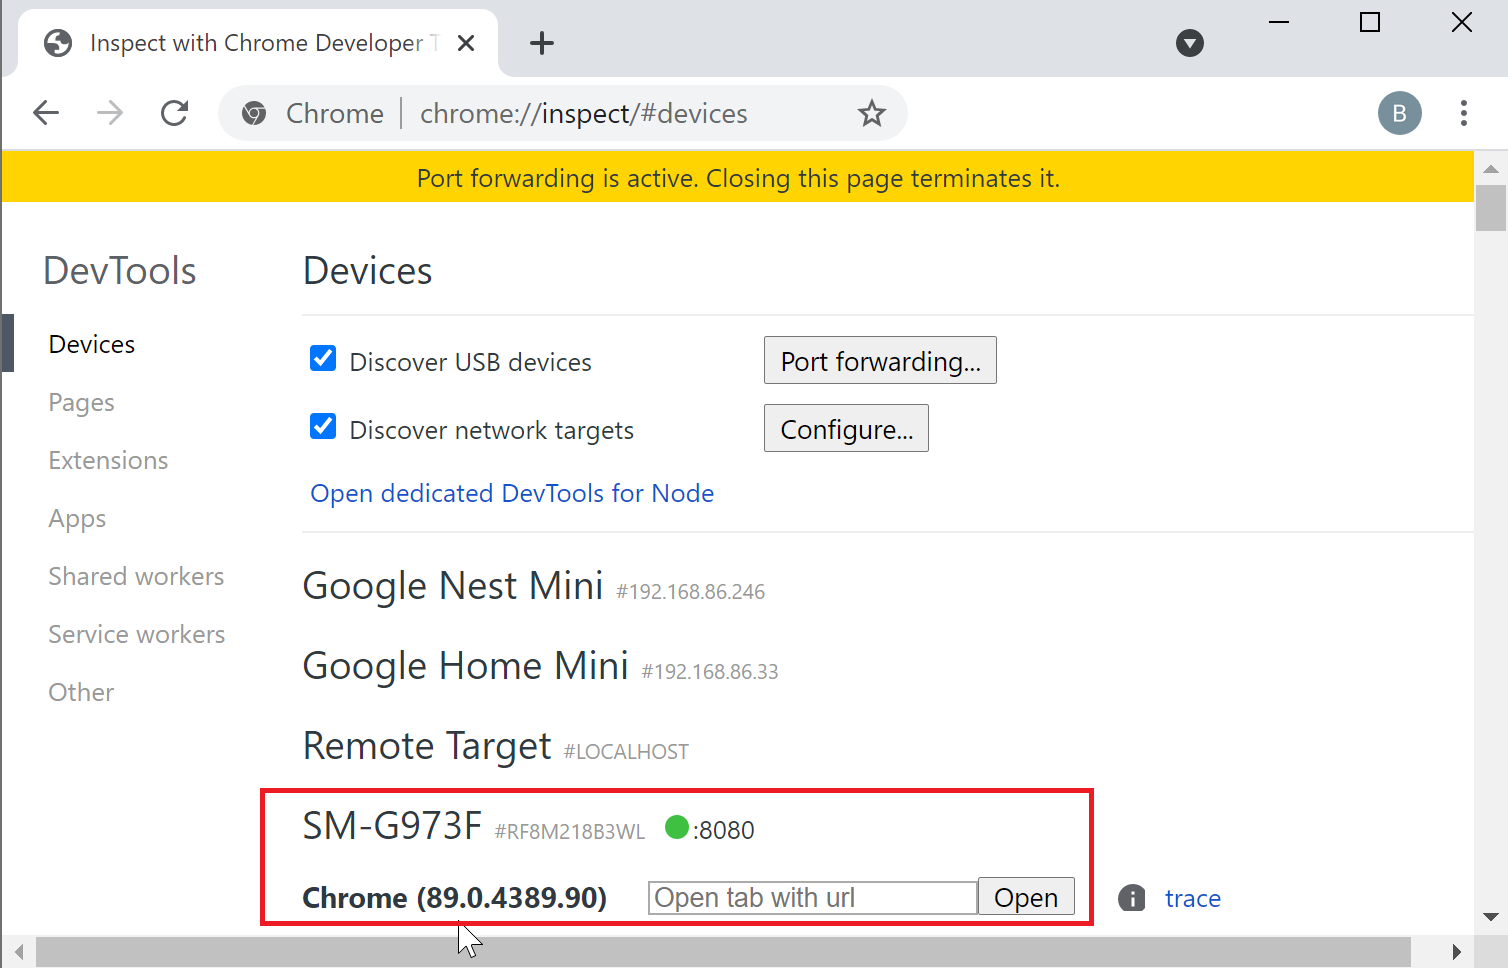
USB 디바이스 검색 확인란이 선택되어 있는지 확인합니다.
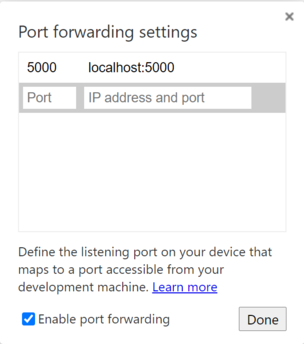
포트 전달 단추를 클릭하고 포트 전달이 사용하도록 설정되어 있고 아래와 같이 localhost:5000 항목이 포함되어 있는지 확인합니다.
연결된 Android 디바이스에서 Google Chrome 창을 열고 http://localhost:5000 으로 이동하면 큐브가 표시됩니다.
개발 컴퓨터의 Chrome에는 현재 디바이스와 여기에 열려있는 웹 페이지 목록이 표시됩니다.
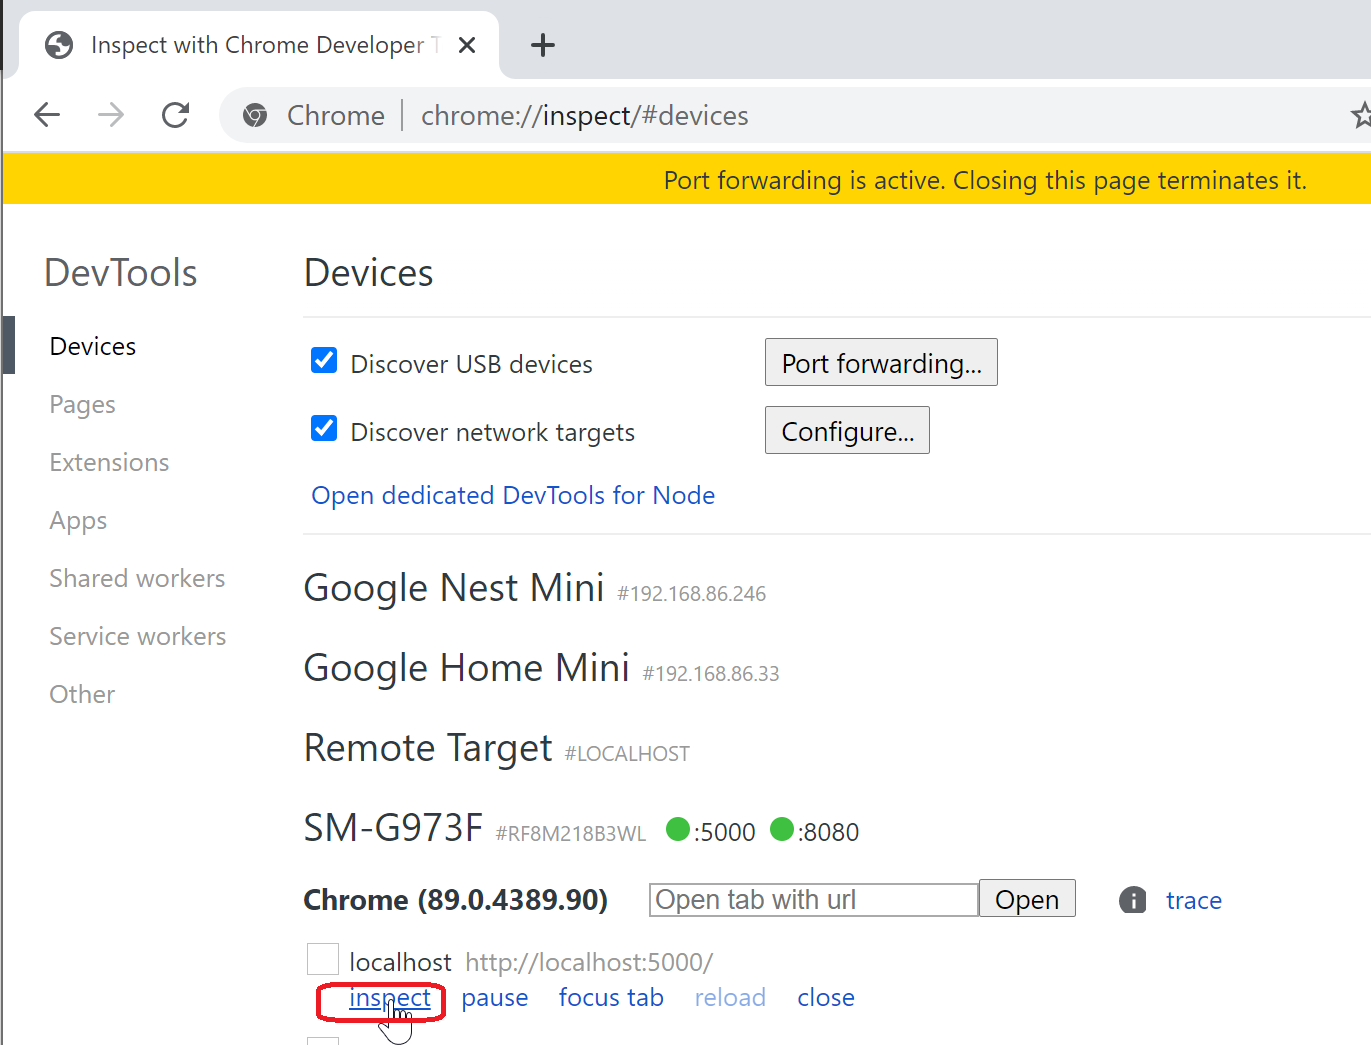
항목 http://localhost:5000 옆에 있는 검사 단추를 클릭합니다.
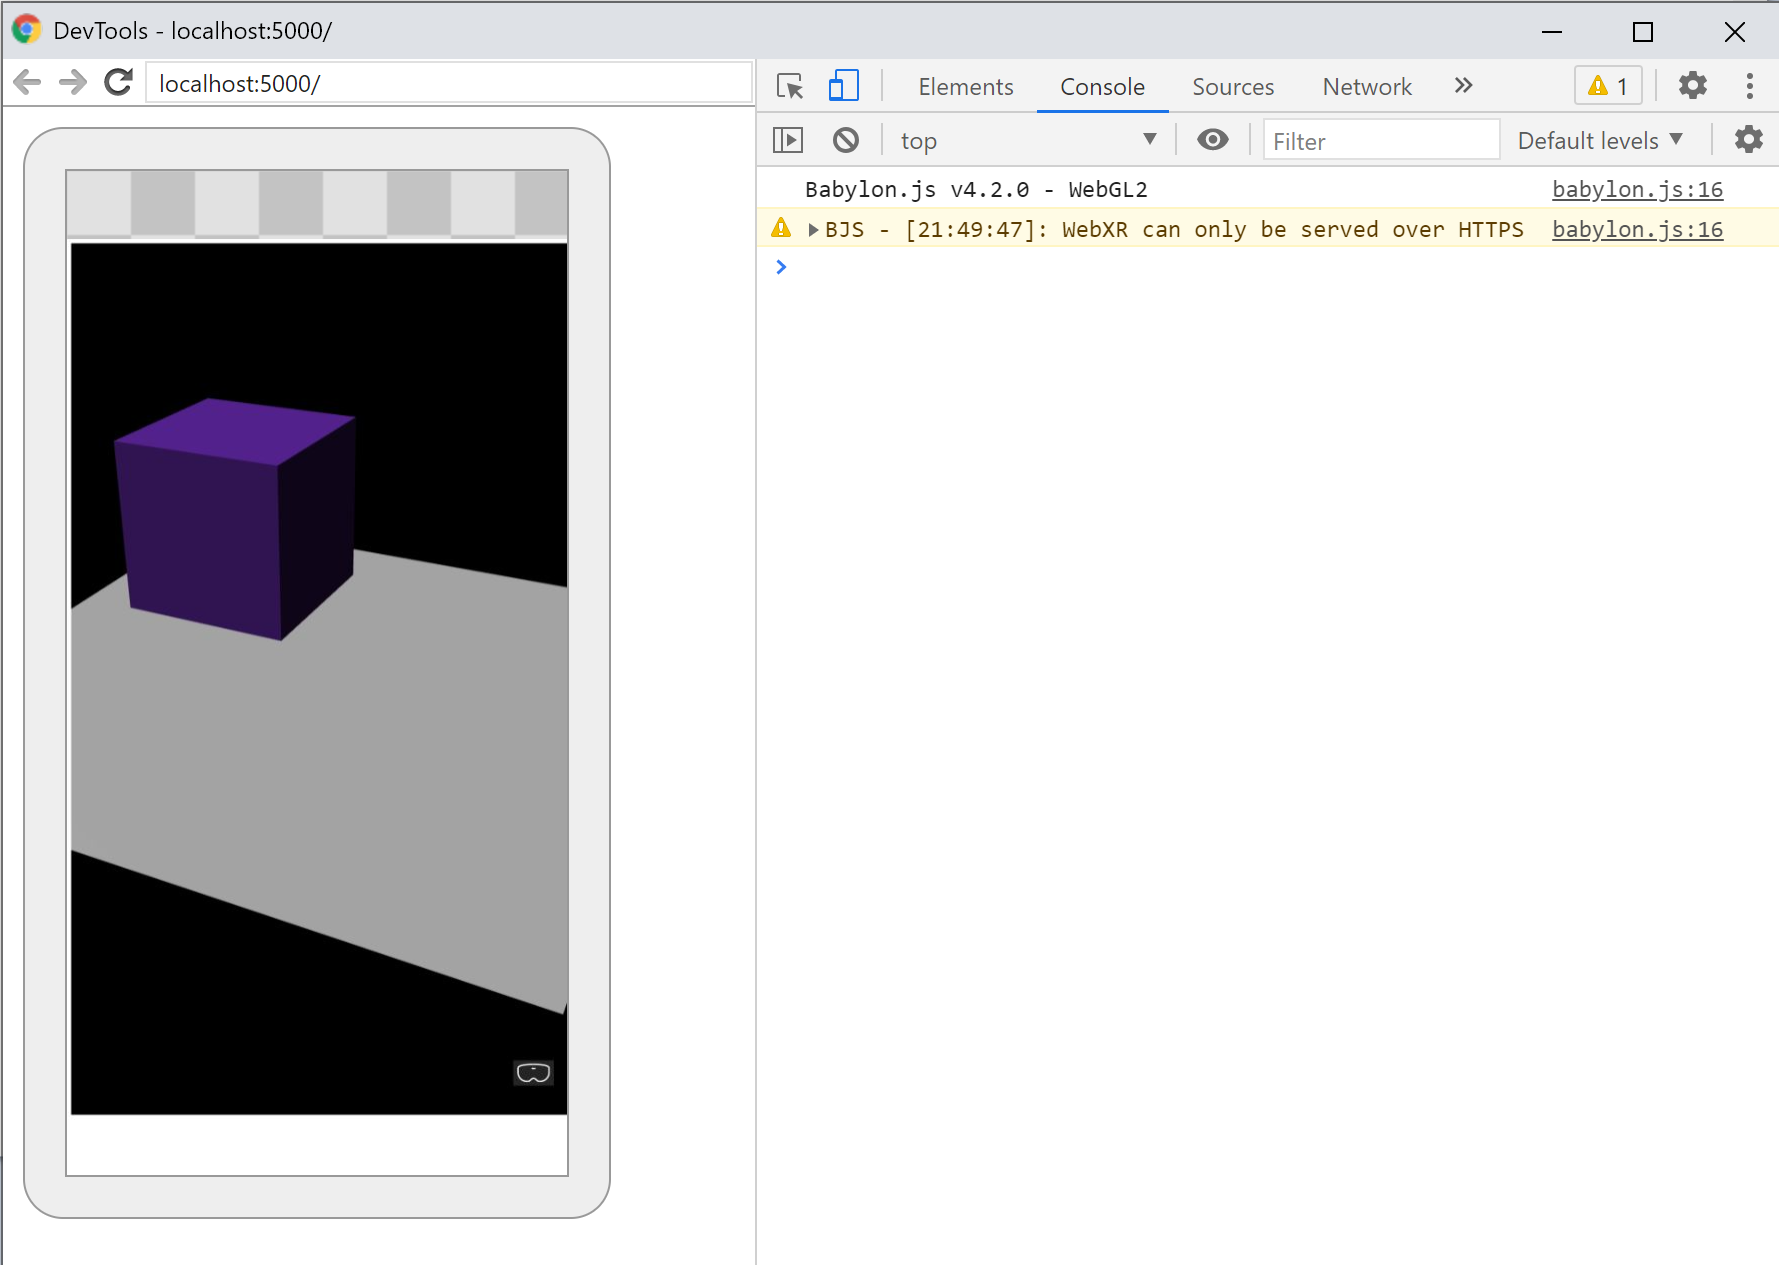
Chrome DevTools를 사용하여 페이지 디버그
핵심 내용
다음은 이 자습서에서 가장 중요한 내용입니다.
- Babylon.js를 사용하면 JavaScript를 사용하여 몰입형 환경을 간편하게 만들 수 있습니다.
- 가상 장면을 만들려면 로우 코드를 작성하거나 새로운 기술을 배울 필요가 없습니다.
- 헤드셋을 구입할 필요 없이 WebXR 지원 브라우저를 사용하여 Mixed Reality 애플리케이션을 빌드할 수 있습니다.
다음 단계
축하합니다! Babylon.js 자습서 시리즈를 완료하고 다음을 수행하는 방법을 알아보았습니다.
- 개발 환경 설정
- 결과를 표시할 새 웹 페이지 만들기
- 기본 3D 요소를 만들고 상호 작용하는 Babylon.js API
- Windows Mixed Reality 시뮬레이터에서 애플리케이션 실행 및 테스트
Mixed Reality JavaScript 개발에 대한 자세한 내용은 JavaScript 개발 개요를 참조하세요.
다른 Babylon.js 자습서를 찾고 있는 경우 피아노 빌드 자습서 시리즈를 확인하여 Babylon.js를 통해 VR 공간에서 피아노를 빌드하는 방법을 알아봅니다.