빠른 시작 Windows App SDK의 앱 알림
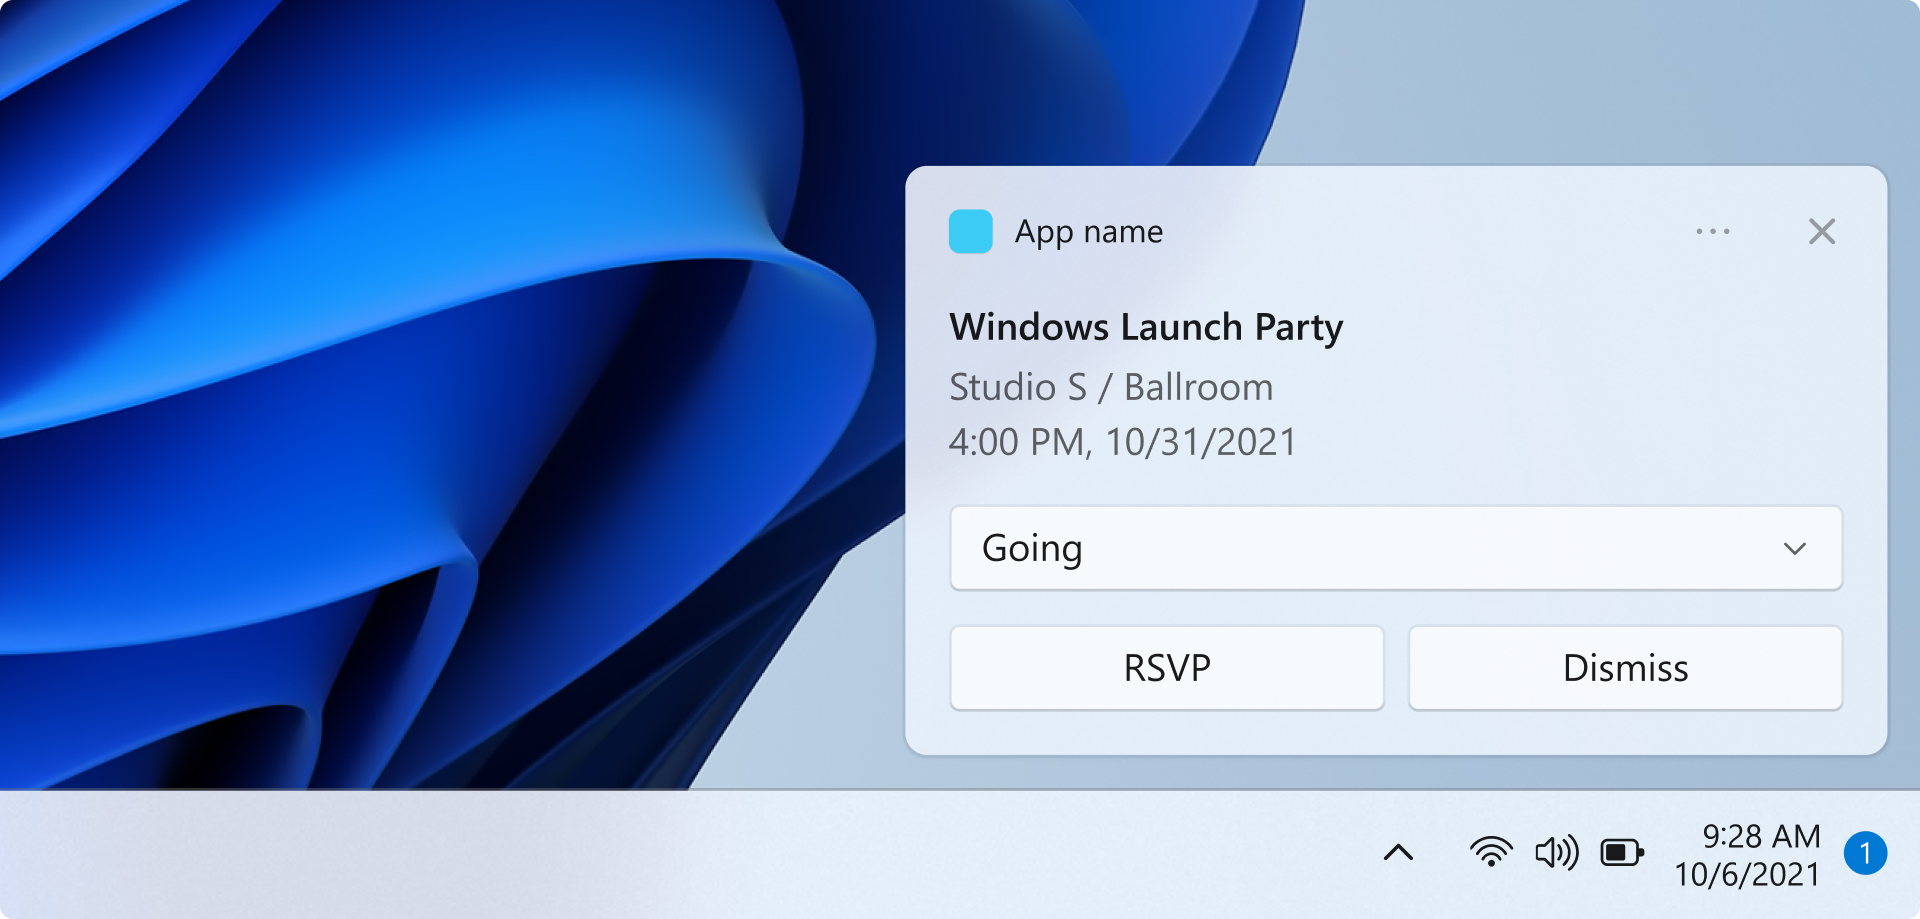
이 빠른 시작에서는 Windows 앱 SDK 를 사용하여로컬 앱 알림(알림 메시지라고도 함)을 보내고 받는 데스크톱 Windows 애플리케이션을 만듭니다.
중요한
상승된 권한(관리자 권한) 앱에 대한 알림은 현재 지원되지 않습니다.
필수 조건
샘플 앱
이 빠른 시작에서는 GitHub에 있는 알림 샘플 앱의 코드를 다룹니다.
API 참조
앱 알림에 대한 API 참조 설명서는 Microsoft.Windows.AppNotifications 네임스페이스를 참조하세요.
1단계: 네임스페이스 선언 추가
Windows 앱 SDK 앱 알림에 대한 네임스페이스를 추가합니다 Microsoft.Windows.AppNotifications.
using Microsoft.Windows.AppNotifications;
2단계: 앱의 매니페스트 업데이트
앱이 패키지화되지 않은 경우(즉, 런타임 시 패키지 ID가 없는 경우), 3단계: 앱 알림을 처리하는 등록으로 건너뛰십시오.
앱이 패키지된 경우(외부 위치와 함께 패키지되는 경우 포함):
- Package.appxmanifest 파일을 엽니다.
-
xmlns:com="http://schemas.microsoft.com/appx/manifest/com/windows10"에xmlns:desktop="http://schemas.microsoft.com/appx/manifest/desktop/windows10"및<Package>네임스페이스 추가 -
<desktop:Extension>를windows.toastNotificationActivation에 추가하여 COM 활성화를 위한 CLSID를 선언합니다. Visual Studio의 도구에서GUID 만들기로 이동하여 CLSID를 가져올 수 있습니다. - 동일한 CLSID를 사용하여 COM 활성화자에
<com:Extension>를 추가합니다.-
Executable속성에 .exe 파일을 지정하십시오. .exe 파일은Register()알림을 위해 앱을 등록할 때 호출하는 프로세스와 동일해야 하며, 3단계에서 자세히 설명합니다. 아래 예제에서는Executable="SampleApp\SampleApp.exe"을 사용합니다. - Windows App SDK가 알림의 페이로드를 AppNotification 종류로 처리할 수 있도록
Arguments="----AppNotificationActivated:"을 지정합니다. -
DisplayName을 지정하세요.
-
중요한
경고: appx 매니페스트에서 Windows.Protocol 앱 확장성 유형을 <uap:Protocol>으로 정의하면 앱이 이미 실행 중인 경우에도 알림을 클릭하면 동일한 앱의 새 프로세스가 시작됩니다.
<!--Packaged apps only-->
<!--package.appxmanifest-->

<Package
  xmlns:com="http://schemas.microsoft.com/appx/manifest/com/windows10"
  xmlns:desktop="http://schemas.microsoft.com/appx/manifest/desktop/windows10"
  ...
  <Applications>
    <Application>
      ...
      <Extensions>

        <!--Specify which CLSID to activate when notification is clicked-->
        <desktop:Extension Category="windows.toastNotificationActivation">
          <desktop:ToastNotificationActivation ToastActivatorCLSID="replaced-with-your-guid-C173E6ADF0C3" />
        </desktop:Extension>

        <!--Register COM CLSID-->
        <com:Extension Category="windows.comServer">
          <com:ComServer>
            <com:ExeServer Executable="SampleApp\SampleApp.exe" DisplayName="SampleApp" Arguments="----AppNotificationActivated:">
              <com:Class Id="replaced-with-your-guid-C173E6ADF0C3" />
            </com:ExeServer>
          </com:ComServer>
        </com:Extension>

      </Extensions>
    </Application>
  </Applications>
 </Package>
3단계: 앱 알림을 처리하도록 등록
알림을 처리하도록 앱을 등록한 다음 앱이 종료되면 등록을 취소합니다.
App.xaml 파일에서 AppNotificationManager::Default().NotificationInvoked에 등록한 다음, AppNotificationManager::Default().Register를 호출합니다. 이러한 호출의 순서가 중요합니다.
중요
AppInstance.GetCurrent.GetActivatedEventArgs로 전화하기 전에 AppNotificationManager::Default(.Register )로 전화해야 합니다.
앱이 종료되면 AppNotificationManager::D efault()를 호출 합니다. COM 서버를 해제하고 후속 호출이 새 프로세스를 시작할 수 있도록 등록 취소() 합니다.
// App.xaml.cs
namespace CsUnpackagedAppNotifications
{

    public partial class App : Application
    {
        private Window mainWindow;
        private NotificationManager notificationManager;

        public App()
        {
            this.InitializeComponent();
            notificationManager = new NotificationManager();
            AppDomain.CurrentDomain.ProcessExit += new EventHandler(OnProcessExit);
        }

        protected override void OnLaunched(LaunchActivatedEventArgs args)
        {
            mainWindow = new MainWindow();

            notificationManager.Init();

            // Complete in Step 5

            mainWindow.Activate();
        }

        void OnProcessExit(object sender, EventArgs e)
        {
            notificationManager.Unregister();
        }
    }
}


// NotificationManager.cs
namespace CsUnpackagedAppNotifications
{
    internal class NotificationManager
    {
        private bool m_isRegistered;

        private Dictionary<int, Action<AppNotificationActivatedEventArgs>> c_map;

        public NotificationManager()
        {
            m_isRegistered = false;

            // When adding new a scenario, be sure to add its notification handler here.
            c_map = new Dictionary<int, Action<AppNotificationActivatedEventArgs>>();
            c_map.Add(ToastWithAvatar.ScenarioId, ToastWithAvatar.NotificationReceived);
            c_map.Add(ToastWithTextBox.ScenarioId, ToastWithTextBox.NotificationReceived);
        }

        ~NotificationManager()
        {
            Unregister();
        }

        public void Init()
        {
            // To ensure all Notification handling happens in this process instance, register for
            // NotificationInvoked before calling Register(). Without this a new process will
            // be launched to handle the notification.
            AppNotificationManager notificationManager = AppNotificationManager.Default;

            notificationManager.NotificationInvoked += OnNotificationInvoked;

            notificationManager.Register();
            m_isRegistered = true;
        }

        public void Unregister()
        {
            if (m_isRegistered)
            {
                AppNotificationManager.Default.Unregister();
                m_isRegistered = false;
            }
        }

        public void ProcessLaunchActivationArgs(AppNotificationActivatedEventArgs notificationActivatedEventArgs)
        {
            // Complete in Step 5
        }

    }
}
4단계: 앱 알림 표시
MUST3단계: 앱 알림을 처리하기 위해 등록한 후 진행합니다.
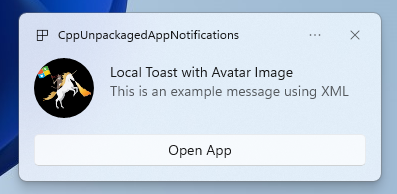
이제 이미지와 단추가 있는 appLogoOverride 간단한 앱 알림을 표시합니다.
AppNotificationBuilder 클래스를 사용하여 앱 알림을 생성한 다음 Show호출합니다. XML을 사용하여 앱 알림을 구성하는 방법에 대한 자세한 내용은 토스트 콘텐츠와알림 XML 스키마의 예제를 참조하십시오.
참고
앱이 패키지된 경우(외부 위치가 포함된 패키지 포함), 알림의 왼쪽 위 모서리에 있는 앱의 아이콘은 package.manifest에서 가져옵니다. 앱의 패키지가 해제된 경우 아이콘은 먼저 바로 가기를 조사한 다음 앱 프로세스에서 리소스 파일을 확인하여 제공됩니다. 모든 시도가 실패하면 Windows 기본 앱 아이콘이 사용됩니다. 지원되는 아이콘 파일 유형은 .jpg, .png, .bmp, .ico입니다.
// ToastWithAvatar.cs
class ToastWithAvatar
{
    public const int ScenarioId = 1;
    public const string ScenarioName = "Local Toast with Avatar Image";

    public static bool SendToast()
    {
        var appNotification = new AppNotificationBuilder()
            .AddArgument("action", "ToastClick")
            .AddArgument(Common.scenarioTag, ScenarioId.ToString())
            .SetAppLogoOverride(new System.Uri("file://" + App.GetFullPathToAsset("Square150x150Logo.png")), AppNotificationImageCrop.Circle)
            .AddText(ScenarioName)
            .AddText("This is an example message using XML")
            .AddButton(new AppNotificationButton("Open App")
                .AddArgument("action", "OpenApp")
                .AddArgument(Common.scenarioTag, ScenarioId.ToString()))
            .BuildNotification();

        AppNotificationManager.Default.Show(appNotification);

        return appNotification.Id != 0; // return true (indicating success) if the toast was sent (if it has an Id)
    }

    public static void NotificationReceived(AppNotificationActivatedEventArgs notificationActivatedEventArgs)
    {
        // Complete in Step 5
    }
}

// Call SendToast() to send a notification.
5단계: 알림을 선택하는 사용자 처리
사용자는 알림 본문 또는 단추를 선택할 수 있습니다. 앱은 알림과 상호 작용하는 사용자에 대한 응답으로 호출을 처리해야 합니다.
다음 두 가지 일반적인 방법으로 이 작업을 처리할 수 있습니다.
- 특정 UI 컨텍스트 또는에서 앱을 시작하도록 선택합니다.
- 앱이 UI를 렌더링하지 않고 동작별 동작(예: 알림 본문의 단추 누르기)을 평가하도록 선택합니다. 백그라운드 작업이라고도 합니다.
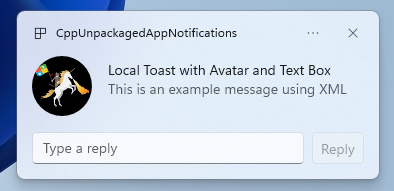
샘플 앱이 아닌 아래 코드 예제는 사용자가 생성한 작업을 처리하는 두 가지 방법을 보여 줍니다. 알림의 XML 페이로드에 launch 값(사용자가 알림 본문을 클릭한 경우에 해당), input 요소(빠른 응답 텍스트 상자) 및 arguments 값(사용자가 버튼을 클릭한 경우에 해당)이 있는 버튼을 추가합니다. 각 인수에 상응하는 대/소문자 규칙을 적용하십시오 ProcessLaunchActivationArgs.
중요
알림 XML 페이로드의 설정 activationType="background" 은 데스크톱 앱에 대해 무시됩니다. 대신 활성화 인수를 처리하고 이 단계에서 설명한 대로 창을 표시할지 여부를 결정해야 합니다.
// Example of how to process a user either selecting the notification body or inputting a quick reply in the text box.
// Notification XML payload
//<toast launch="action=openThread&threadId=92187">
// <visual>
// <binding template="ToastGeneric">
// <image placement="appLogoOverride" hint-crop="circle" src="C:\<fullpath>\Logo.png"/>
// <text>Local Toast with Avatar and Text box</text>
// <text>This is an example message using</text>
// </binding>
// </visual>
// <actions>
// <input id="replyBox" type="text" placeHolderContent="Reply" />
// <action
// content="Send"
// hint-inputId="replyBox"
// arguments="action=reply&threadId=92187" />
// </actions>
//</toast>
void ProcessLaunchActivationArgs(const winrt::AppNotificationActivatedEventArgs& notificationActivatedEventArgs)
{
// If the user clicks on the notification body, your app needs to launch the chat thread window
if (std::wstring(notificationActivatedEventArgs.Argument().c_str()).find(L"openThread") != std::wstring::npos)
{
GenerateChatThreadWindow();
}
else // If the user responds to a message by clicking a button in the notification, your app needs to reply back to the other user with no window launched
if (std::wstring(notificationActivatedEventArgs.Argument().c_str()).find(L"reply") != std::wstring::npos)
{
auto input = notificationActivatedEventArgs.UserInput();
auto replyBoxText = input.Lookup(L"replyBox");
// Process the reply text
SendReplyToUser(replyBoxText);
}
}
아래 지침을 따릅니다.
- 사용자가 알림을 선택했을 때 앱이 실행되지 않은 상태라면, 앱이 자동으로 시작되고 사용자가 알림의 문맥에서 메인 창을 볼 수 있어야 합니다.
- 사용자가 알림을 선택하고 앱이 최소화되면 앱이 포그라운드로 이동되고 알림 컨텍스트에서 새 창이 렌더링됩니다.
- 사용자가 알림 백그라운드 작업을 호출하는 경우(예: 사용자가 알림 텍스트 상자에 입력하고 회신을 눌러 알림에 응답하는 경우) 앱은 포그라운드 창을 렌더링하지 않고 페이로드를 처리합니다.
자세한 예제는 GitHub에서 찾은 샘플 앱 코드를 참조하세요.
6단계: 알림 제거
알림이 더 이상 사용자와 관련이 없는 경우 알림을 제거합니다.
이 예제에서는 사용자가 앱에서 그룹 채팅의 모든 메시지를 보았으므로 그룹 채팅에서 모든 알림을 지웁니다. 그런 다음 사용자가 친구를 음소거하면 그 친구의 모든 알림 메시지를 삭제합니다. 먼저 그룹 및 태그 속성을 알림에 추가한 후 표시하여 나중에 식별할 수 있도록 했습니다.
void SendNotification(winrt::hstring const& payload, winrt::hstring const& friendId, winrt::hstring const& groupChatId)
{
    winrt::AppNotification notification(payload);

    // Setting Group Id here allows clearing notifications from a specific chat group later
    notification.Group(groupChatId);

    // Setting Tag Id here allows clearing notifications from a specific friend later
    notification.Tag(friendId);

    winrt::AppNotificationManager::Default().Show(notification);
}

winrt::Windows::Foundation::IAsyncAction RemoveAllNotificationsFromGroupChat(const std::wstring groupChatId)
{
    winrt::AppNotificationManager manager = winrt::AppNotificationManager::Default();
    co_await manager.RemoveByGroupAsync(groupChatId);
}

winrt::Windows::Foundation::IAsyncAction RemoveAllNotificationsFromFriend(const std::wstring friendId)
{
    winrt::AppNotificationManager manager = winrt::AppNotificationManager::Default();
    co_await manager.RemoveByTagAsync(friendId);
}
추가 기능
클라우드 소스 앱 알림 보내기
클라우드에서 앱 알림을 보내려면 빠른 시작: Windows 앱 SDK 푸시 알림에서클라우드 소스 앱 알림 보내기를 따릅니다.
만료 시간 설정
알림의 메시지가 특정 기간 동안만 관련된 경우 속성을 사용하여 Expiration 앱 알림의 만료 시간을 설정합니다. 예를 들어 일정 이벤트 미리 알림을 보내는 경우 만료 시간을 일정 이벤트의 끝으로 설정합니다.
참고
기본 및 최대 만료 시간은 3일입니다.
class ToastWithAvatar
{
    public static bool SendToast()
    {

        var appNotification = new AppNotificationBuilder()
            .SetAppLogoOverride(new System.Uri("ms-appx:///images/logo.png"), AppNotificationImageCrop.Circle)
            .AddText("Example expiring notification")
            .AddText("This is an example message")
            .BuildNotification();


        appNotification.Expiration = DateTime.Now.AddDays(1);
        AppNotificationManager.Default.Show(appNotification);

        return appNotification.Id != 0; // return true (indicating success) if the toast was sent (if it has an Id)
    }
}
다시 부팅 시 알림이 만료되는지 확인
다시 부팅 시 알림을 삭제하려면 ExpiresOnReboot 속성을 True로 설정합니다.
class ToastWithAvatar
{
    public static bool SendToast()
    {

        var appNotification = new AppNotificationBuilder()
            .SetAppLogoOverride(new System.Uri("ms-appx:///images/logo.png"), AppNotificationImageCrop.Circle)
            .AddText("Example ExpiresOnReboot notification")
            .AddText("This is an example message")
            .BuildNotification();


            appNotification.ExpiresOnReboot = true;
            AppNotificationManager.Default.Show(appNotification);

            return appNotification.Id != 0; // return true (indicating success) if the toast was sent (if it has an Id)
    }
}
진행률 표시줄 알림 보내기 및 업데이트
알림에 진행률 표시줄 관련 업데이트를 표시할 수 있습니다.
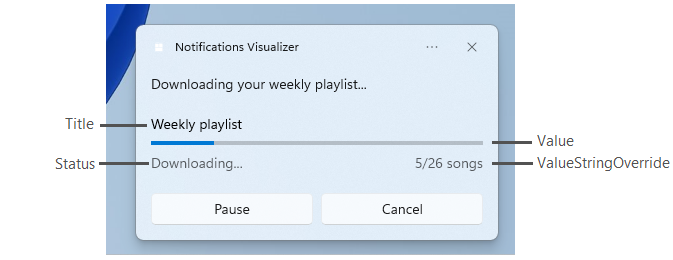
이 AppNotificationProgressData 구문을 사용하여 진행률 표시줄 알림을 업데이트합니다.
const winrt::hstring c_tag = L"weekly-playlist";
const winrt::hstring c_group = L"downloads";

// Send first Notification Progress Update
void SendUpdatableNotificationWithProgress()
{
    auto notification{ winrt::AppNotificationBuilder()
            .AddText(L"Downloading this week's new music...")
            .AddProgressBar(winrt::AppNotificationProgressBar()
                .BindTitle()
                .BindValue()
                .BindValueStringOverride()
                .BindStatus())
            .BuildNotification() }

    notification.Tag(c_tag);
    notification.Group(c_group);

    // Assign initial values for first notification progress UI
    winrt::AppNotificationProgressData data(1); // Sequence number
    data.Title(L"Weekly playlist"); // Binds to {progressTitle} in xml payload
    data.Value(0.6); // Binds to {progressValue} in xml payload
    data.ValueStringOverride(L"15/26 songs"); // Binds to {progressValueString} in xml payload
    data.Status(L"Downloading..."); // Binds to {progressStatus} in xml payload

    notification.Progress(data);
    winrt::AppNotificationManager::Default().Show(notification);
}

// Send subsequent progress updates
winrt::Windows::Foundation::IAsyncAction UpdateProgressAsync()
{
    // Assign new values
    winrt::AppNotificationProgressData data(2 /* Sequence number */ );
    data.Title(L"Weekly playlist"); // Binds to {progressTitle} in xml payload
    data.Value(0.7); // Binds to {progressValue} in xml payload
    data.ValueStringOverride(L"18/26 songs"); // Binds to {progressValueString} in xml payload
    data.Status(L"Downloading..."); // Binds to {progressStatus} in xml payload

    auto result = co_await winrt::AppNotificationManager::Default().UpdateAsync(data, c_tag, c_group);
    if (result == winrt::AppNotificationProgressResult::AppNotificationNotFound)
    {
        // Progress Update failed since the previous notification update was dismissed by the user! So account for this in your logic by stopping updates or starting a new Progress Update flow.
    }
}
리소스

Windows developer