데이터 준비
참고 항목
더 큰 기능을 위해 PyTorch를 Windows의 DirectML과 함께 사용할 수도 있습니다.
이 자습서의 이전 단계에서는 PyTorch를 머신에 설치했습니다. 이제 모델을 만드는 데 사용할 데이터로 코드를 설정하는 데 사용합니다.
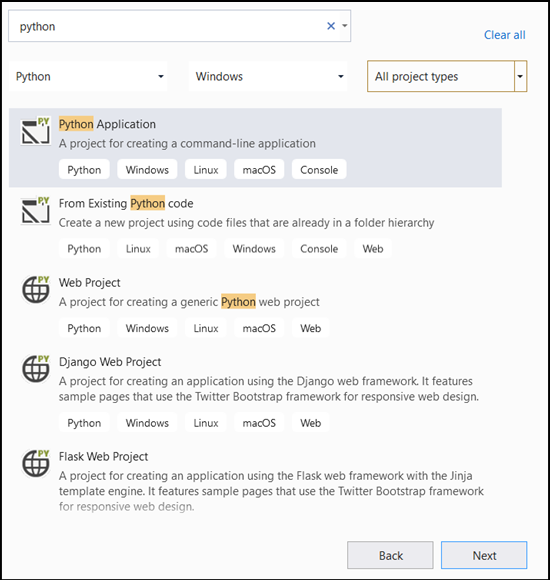
Visual Studio 내에서 새 프로젝트를 엽니다.
- Visual Studio를 열고,
create a new project를 선택합니다.

- 검색 창에서
Python을 입력하고Python Application을 프로젝트 템플릿으로 선택합니다.

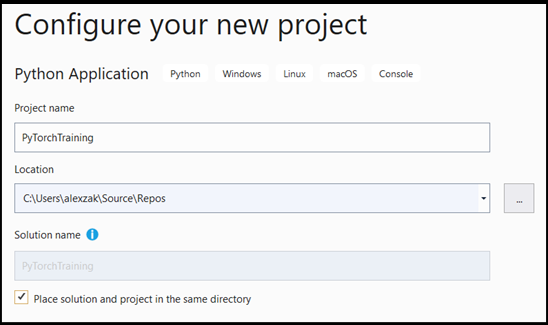
- 구성 창에서 다음을 수행합니다.
- 프로젝트 이름을 지정합니다. 여기서는 PyTorchTraining이라고 지정합니다.
- 프로젝트의 위치를 선택합니다.
- VS2019를 사용하는 경우
Create directory for solution을 선택해야 합니다. - VS 2017을 사용하는 경우
Place solution and project in the same directory의 선택을 취소해야 합니다.

create를 눌러 프로젝트를 만듭니다.
Python 인터프리터 만들기
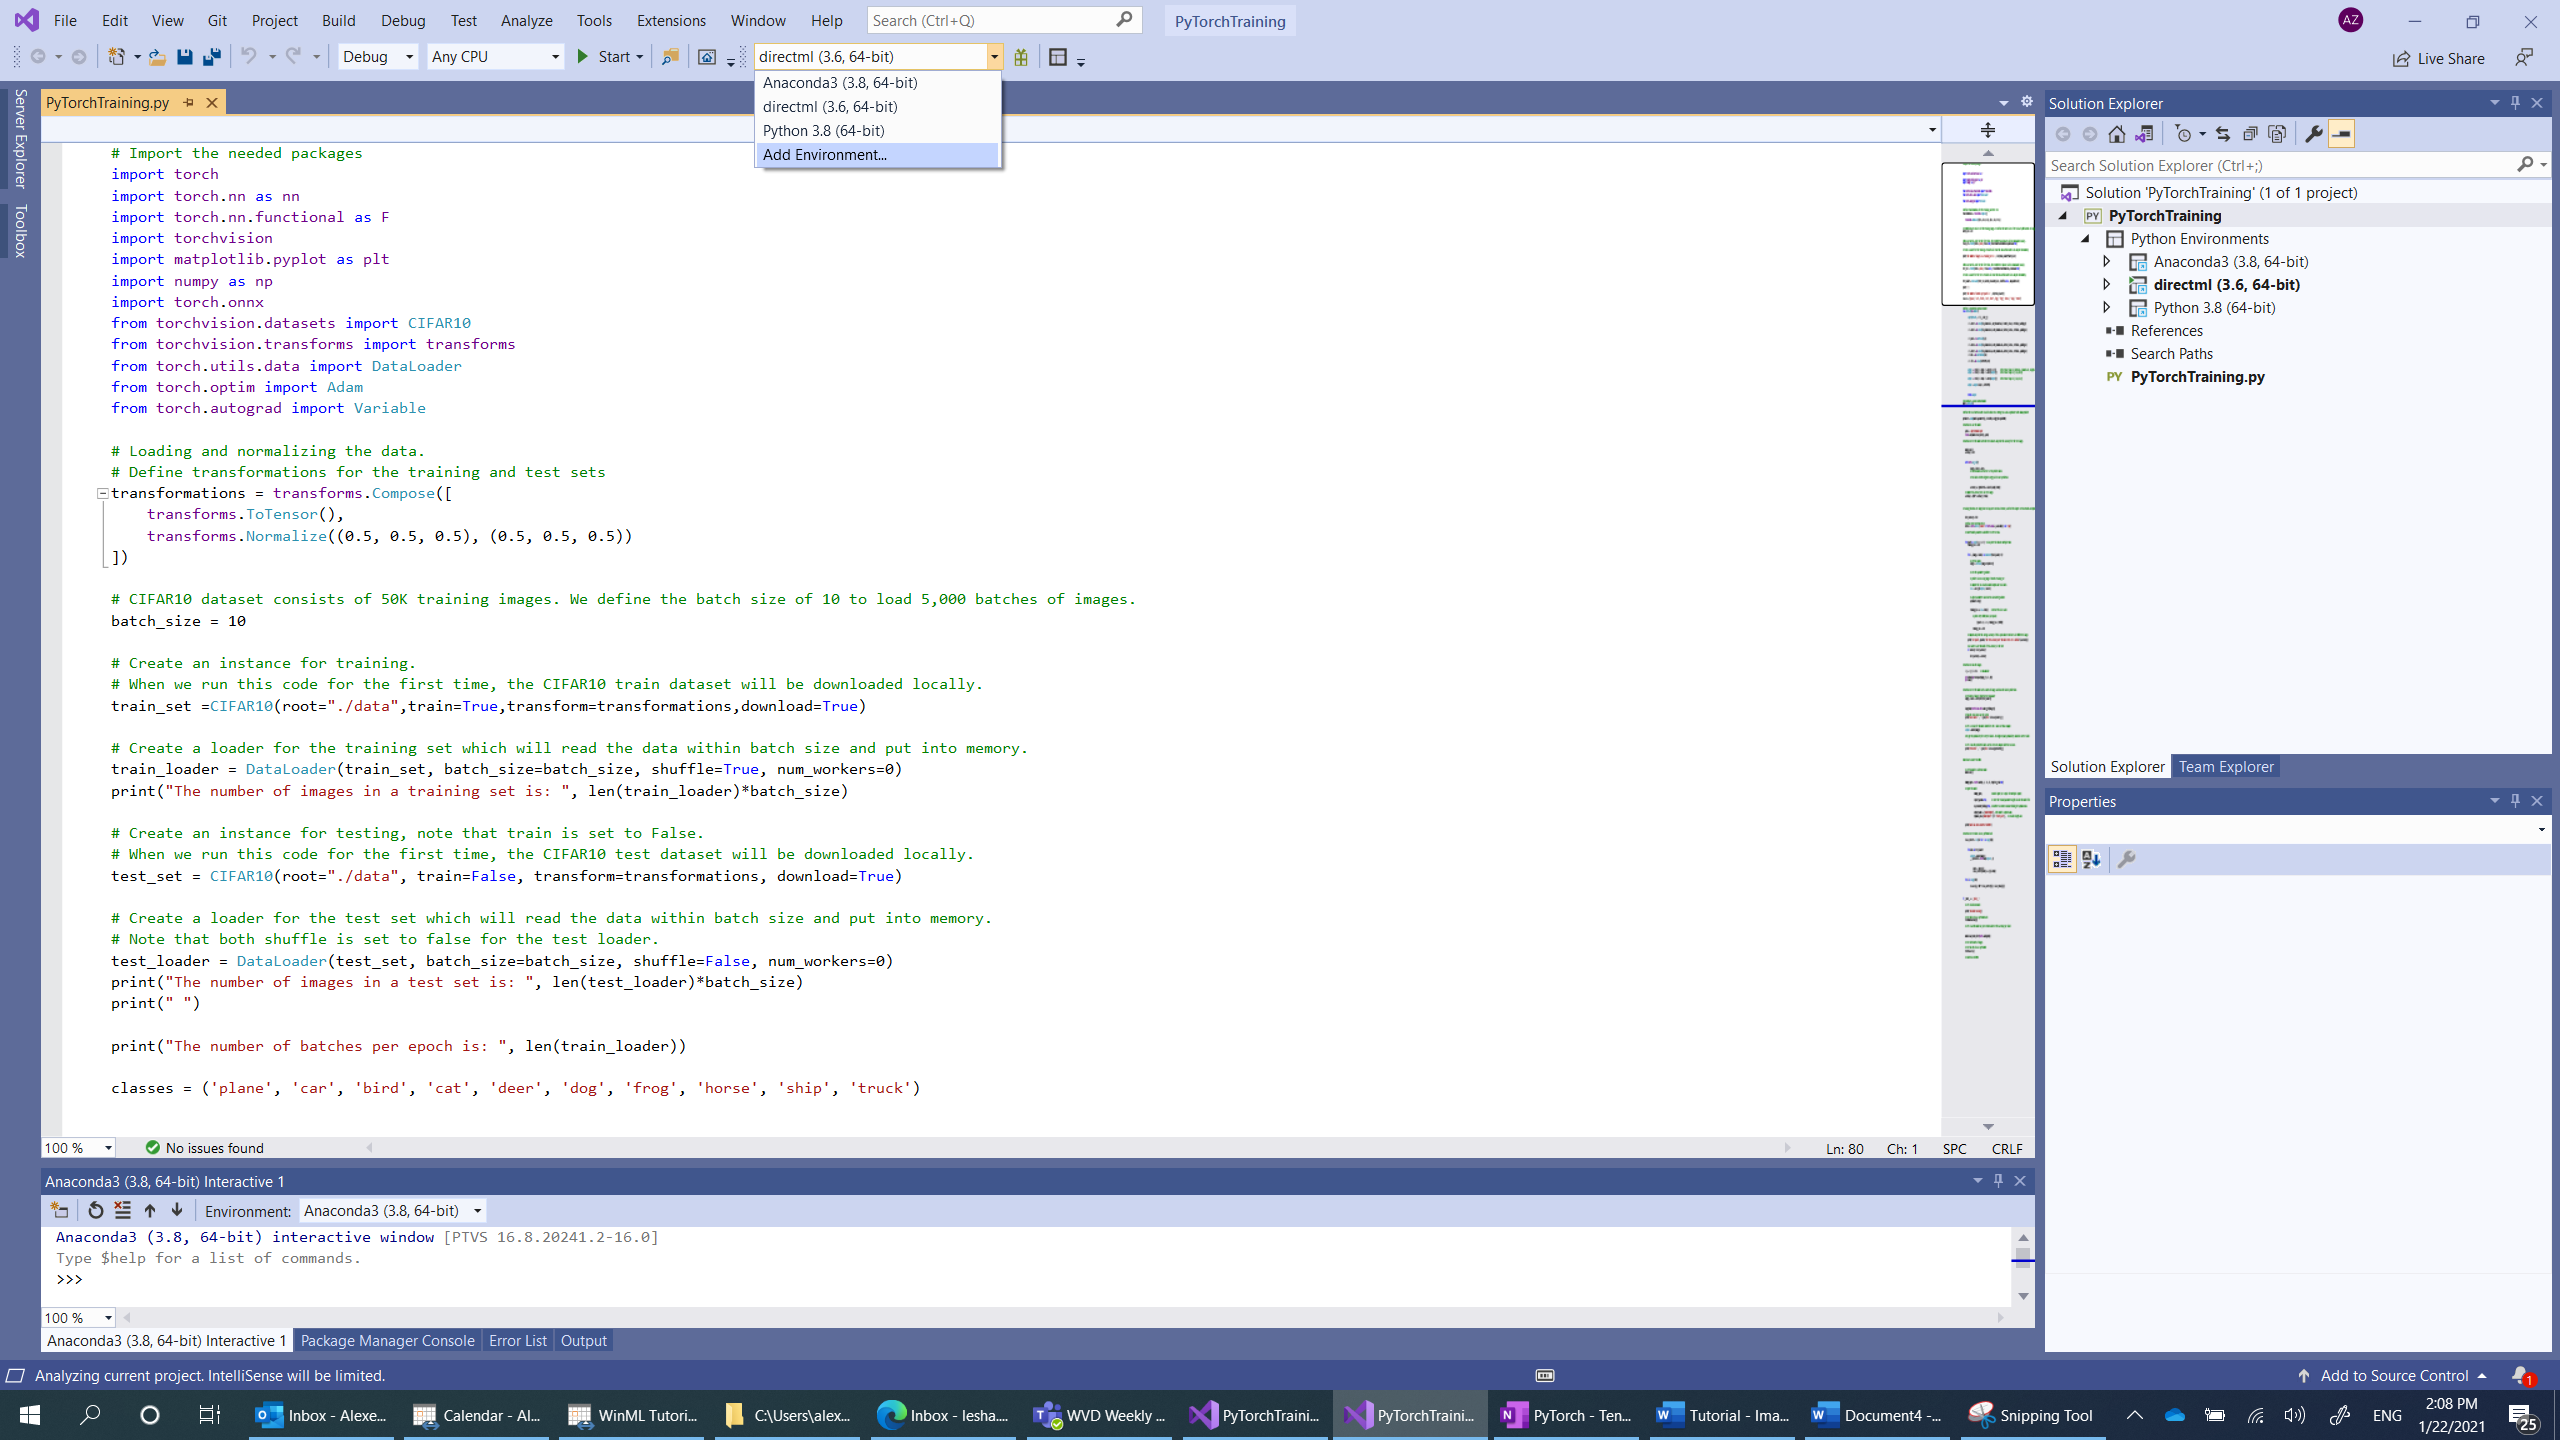
이제 새 Python 인터프리터를 정의해야 합니다. 이는 최근에 설치한 PyTorch 패키지를 포함해야 합니다.
- 인터프리터 선택 영역으로 이동하고,
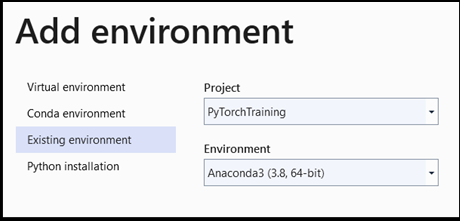
Add environment를 선택합니다.

Add environment창에서Existing environment를 선택하고,Anaconda3 (3.6, 64-bit)를 선택합니다. 여기에는 PyTorch 패키지가 포함됩니다.

새 Python 인터프리터 및 PyTorch 패키지를 테스트하려면 PyTorchTraining.py 파일에 다음 코드를 입력합니다.
from __future__ import print_function

import torch

x=torch.rand(2, 3)

print(x)
출력은 아래와 비슷한 임의의 5x3 텐서입니다.

참고 항목
더 알아보고 싶으신가요? PyTorch 공식 웹 사이트를 방문하세요.
데이터 세트 로드
PyTorch torchvision 클래스를 사용하여 데이터를 로드합니다.
Torchvision 라이브러리에는 컴퓨터 비전을 위한 Imagenet, CIFAR10, MNIST 등 모델 아키텍처 및 공통 이미지 변환과 같은 널리 사용되는 여러 데이터 세트가 포함되어 있습니다. 따라서 PyTorch에서 데이터를 로드하는 것은 매우 쉬운 프로세스입니다.
CIFAR10
여기서는 CIFAR10 데이터 세트를 사용하여 이미지 분류 모델을 작성하고 학습합니다. CIFAR10은 기계 학습 연구를 위해 널리 사용되는 데이터 세트입니다. 5만개의 학습 이미지와 1만개의 테스트 이미지로 구성되어 있습니다. 모두 크기가 3x32x32이며, 이는 크기가 32x32 픽셀인 3채널 색 이미지를 의미합니다.
이미지는 '비행기'(0), '자동차'(1), '새'(2), '고양이'(3), '사슴'(4), '개'(5), '개구리'(6), '말'(7), '배'(8), '트럭'(9) 등 10개 클래스로 나뉘어 있습니다.
PyTorch에서 CIFAR10 데이터 세트를 로드하고 읽으려면 다음 세 단계를 수행합니다.
- 이미지에 적용할 변환 정의: 모델을 학습하려면 이미지를 정규화된 범위 [-1,1]의 텐서로 변환해야 합니다.
- 사용 가능한 데이터 세트의 인스턴스를 만들고 데이터 세트를 로드합니다. 데이터를 로드하려면 데이터 세트를 나타내는 추상 클래스인
torch.utils.data.Dataset클래스를 사용합니다. 데이터 세트는 코드를 처음 실행할 때만 로컬로 다운로드됩니다. - DataLoader를 사용하여 데이터에 액세스합니다. 데이터에 대한 액세스를 가져오고 데이터를 메모리에 저장하려면
torch.utils.data.DataLoader클래스를 사용합니다. PyTorch의 DataLoader는 데이터 세트를 래핑하고 기본 데이터에 대한 액세스를 제공합니다. 이 래퍼는 정의된 일괄 처리 크기마다 이미지 일괄 처리를 보유합니다.
학습 및 테스트 집합 모두에 대해 이 세 단계를 반복합니다.
- Visual Studio에서
PyTorchTraining.py file을 열고, 다음 코드를 추가합니다. 이는 CIFAR10 데이터 세트의 학습 및 테스트 데이터 세트에 대한 위의 세 단계를 처리합니다.
from torchvision.datasets import CIFAR10
from torchvision.transforms import transforms
from torch.utils.data import DataLoader

# Loading and normalizing the data.
# Define transformations for the training and test sets
transformations = transforms.Compose([
    transforms.ToTensor(),
    transforms.Normalize((0.5, 0.5, 0.5), (0.5, 0.5, 0.5))
])

# CIFAR10 dataset consists of 50K training images. We define the batch size of 10 to load 5,000 batches of images.
batch_size = 10
number_of_labels = 10

# Create an instance for training.
# When we run this code for the first time, the CIFAR10 train dataset will be downloaded locally.
train_set =CIFAR10(root="./data",train=True,transform=transformations,download=True)

# Create a loader for the training set which will read the data within batch size and put into memory.
train_loader = DataLoader(train_set, batch_size=batch_size, shuffle=True, num_workers=0)
print("The number of images in a training set is: ", len(train_loader)*batch_size)

# Create an instance for testing, note that train is set to False.
# When we run this code for the first time, the CIFAR10 test dataset will be downloaded locally.
test_set = CIFAR10(root="./data", train=False, transform=transformations, download=True)

# Create a loader for the test set which will read the data within batch size and put into memory.
# Note that each shuffle is set to false for the test loader.
test_loader = DataLoader(test_set, batch_size=batch_size, shuffle=False, num_workers=0)
print("The number of images in a test set is: ", len(test_loader)*batch_size)

print("The number of batches per epoch is: ", len(train_loader))
classes = ('plane', 'car', 'bird', 'cat', 'deer', 'dog', 'frog', 'horse', 'ship', 'truck')
이 코드를 처음 실행할 때 CIFAR10 데이터 세트가 디바이스에 다운로드됩니다.

다음 단계
데이터가 준비되면 PyTorch 모델을 학습해야 합니다.