Azure DevOps를 사용하여 Cloud Services를 게시하는 방법(추가 지원)
이 문서에서는 ARM(Azure Resource Manager) 템플릿을 사용하여 Azure Cloud Services(추가 지원) 배포를 만들거나 업데이트하는 방법에 대한 지침을 제공합니다.
배경
Azure Cloud Services(추가 지원)는 Azure Cloud Services에 대한 새로운 ARM 기반 배포 모델입니다. Cloud Services(추가 지원)는 Azure Service Manager를 사용하여 배포된 Azure Cloud Services와 기능 패리티와 함께 지역적 복원력을 제공하는 주요 이점이 있습니다. 또한 RBAC(역할 기반 액세스 및 제어), 태그, 정책 및 배포 템플릿 지원과 같은 일부 ARM 기능을 제공합니다.
클래식 Cloud Services의 경우 Azure DevOps 기본 제공 파이프라인 작업 AzureCloudPowerShellDeployment@1 CI/CD 진행률을 쉽게 관리할 수 있습니다. 그러나 Cloud Services(추가 지원)에 대한 작업은 아직 준비되지 않았습니다.
Cloud Services 게시의 주요 포인트(추가 지원)
- ARM 템플릿 배포를 준비하기 위해 스토리지 계정에 대한 일부 변수를 정의합니다.
- VSBuild@1 - Visual Studio 빌드 v1 작업을 사용하여 클라우드 서비스 프로젝트를 빌드하고 클라우드 서비스 패키지 파일 또는 구성 파일을 출력합니다.
- 기본 제공 AzureFileCopy@5 - Azure 파일 복사 v5 작업을 사용하여 Blob Storage에 빌드 디렉터리를 업로드합니다.
- 액세스 키를 포함한 스토리지 참조를 사용하여 AzurePowerShell@5 의해 SAS 토큰 을 생성합니다. - Azure PowerShell v5 작업, 다음 작업에서 사용할 변수에 토큰을 출력합니다.
- 이전 작업의 출력과 AzureResourceManagerTemplateDeployment@3 - ARM 템플릿 배포 v3 작업의 값을 사용합니다.

Cloud Services를 게시하는 단계(추가 지원)
시작 파이프라인을 만들고 스토리지 계정에 업로드할 준비를 합니다. 이러한 변수는 다음과 같은 추가 작업에 도움이 될 수 있습니다.
- <스토리지 계정 이름 stg_account>
- <스토리지 계정의 액세스 키 stg_key>
- <스토리지 계정의 컨테이너 이름 stg_container>
- stg_prefix $[format('{0:yyyyMMddHHmm}', pipeline.startTime)]
- stg_url
https://$(stg_account).blob.core.windows.net/$(stg_container) - <구성 파일의 이름 cscfg_name>
- <패키지 파일의 이름 cspkg_name>
- url_cscfg $(stg_url)/$(stg_prefix)/$(cscfg_name)
- url_cspkg $(stg_url)/$(stg_prefix)/$(cspkg_name)

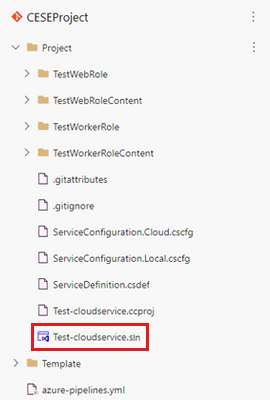
Visual Studio 빌드 작업을 사용하여 클라우드 서비스 프로젝트 솔루션 파일을 기반으로 작업을 빌드하고 에이전트의 로컬 경로에 출력합니다. 자세한 내용은 MSBuild를 참조하세요.

프로젝트를 빌드하는 YAML 파일은 다음과 같습니다.
# Build your project under your repository.
# 1. Restore the NuGet dependency.

- task: NuGetCommand@2
  inputs:
    command: 'restore'
    restoreSolution: '**/*.sln'
    feedsToUse: 'select'
    vstsFeed: xxx

# 2. Use MS build to output the cloud service project configuration and package to the temporary location of the local agent.

- task: VSBuild@1
  inputs:
    solution: '**\*.sln'
    msbuildArgs: '/t:Publish /p:DeployOnBuild=true /p:AutomatedBuild=True /p:configuration=release /p:TargetProfile=Cloud /p:PublishDir=%SYSTEM_DEFAULTWORKINGDIRECTORY%/Debug/publish'

# 3. Copy the configuration and package files to the local path on the agent where any artifacts locate.

- task: CopyFiles@2
  inputs:
    SourceFolder: 'Debug/publish'
    Contents: '**'
    TargetFolder: '$(Build.ArtifactStagingDirectory)'

# 4. Copy the definition file to the local path on the agent where any artifacts locate.

- task: CopyFiles@2
  inputs:
    SourceFolder: 'Project'
    Contents: '*.csdef'
    TargetFolder: '$(Build.ArtifactStagingDirectory)'
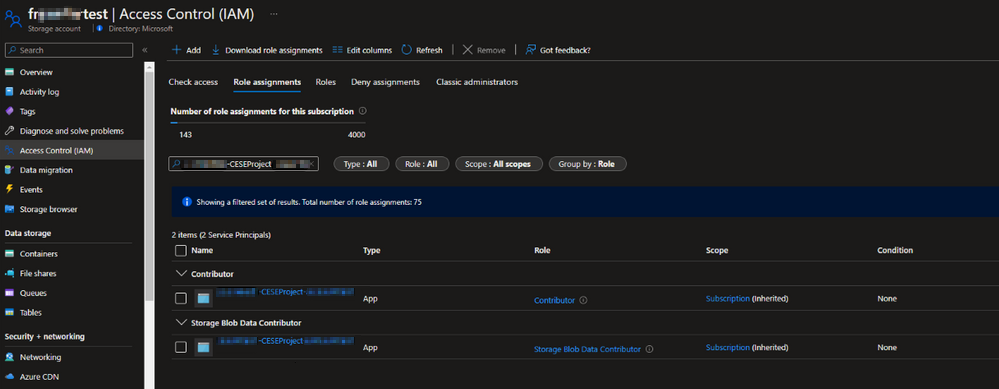
파이프라인 작업 AzureFileCopy@4 사용 - Azure 파일 복사 v4 작업을 사용하여 클라우드 서비스의 구성, 정의 및 패키지 파일을 업로드합니다. 이 작업은 Microsoft Entra ID를 기반으로 인증을 지원합니다. 인증은 서비스 주체 및 관리 ID를 사용하여 수행할 수 있습니다. 권한 기여자 및 Storage Blob 데이터 기여자를 할당하여 서비스 연결에 대한 액세스를 허용할 수 있습니다.
프로젝트 설정에서 서비스 원칙을 찾습니다.
파일 복사의 YAML 버전:
# Upload the cloud service via Azure File Copy
- task: AzureFileCopy@5
  inputs:
    SourcePath: '$(Build.ArtifactsStagingDirectory) /*'        # you can set $(Build.ArtifactsStagingDirectory) as Build part for output of the MSBuild.
    azureSubscription: xxx                                     # the name of service connector
    Destination: 'AzureBlob'
    storage: $(stg_account)                                    # variable stg_account
    ContainerName: $(stg_container)                            # variable stg_container
    BlobPrefix: $(stg_prefix)                                  # variable stg prefix is $[format('{0:yyyyMMddHHmm}', pipeline.startTime)]
    AdditionalArgumentsForBlobCopy: '--recursive'              # recursively copy the files in this directory
파일을 복사하면 복사한 클라우드 서비스 패키지가 스토리지에 표시됩니다.
Azure PowerShell 파이프라인 작업을 사용하여 5분 동안 임시 SAS 토큰을 생성합니다.
# Generate temp SAS token for 5 mins
- task: AzurePowerShell@5                                                     # please make sure the Azure PowerShell contains the module of Az and AzureRm.
  name: GenerateSasToken
  inputs:
    azureSubscription: xxx                                                    # the name of service connector
    ScriptType: 'InlineScript'
    Inline: |
      $account_name = ${env:STG_ACCOUNT}
      $account_key = ${env:STG_KEY}
      $context = New-AzStorageContext -StorageAccountName $account_name -StorageAccountKey $account_key
      $sas = New-AzStorageAccountSASToken -Service Blob -ResourceType Service,Container,Object -Permission "rl" -ExpiryTime (Get-Date).AddMinutes(5) -Context $context
      $cspkg = ${env:URL_CSPKG} + $sas
      $cscfg = ${env:URL_CSCFG} + $sas
      Write-Host ("##vso[task.setvariable variable=cspkg]$cspkg")             # output $cspkg in PowerShell to global variable cspkg
      Write-Host ("##vso[task.setvariable variable=cscfg]$cscfg")             # output $cscfg in PowerShell to global variable cscfg
    azurePowerShellVersion: 'LatestVersion'
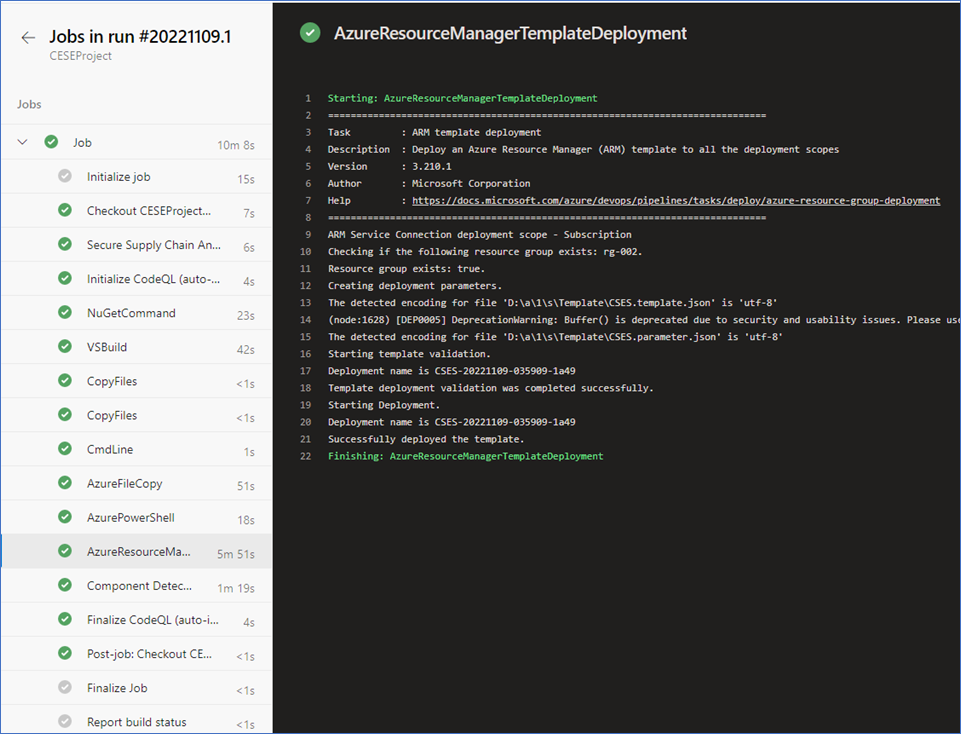
ARM 템플릿 파이프라인 작업을 사용하여 Cloud Services(추가 지원) 배포를 배포합니다. 샘플 템플릿을 얻으려면 101-cses-multirole-rdp를 참조 하세요.
#Azure Resource Manager template deployment
- task: AzureResourceManagerTemplateDeployment@3
  inputs:
    deploymentScope: 'Resource Group'                                           # resource group level deployment
    azureResourceManagerConnection: xxx                                         # the name of service connector
    subscriptionId: xxx                                                         # subscription id of the service connector
    action: 'Create Or Update Resource Group'
    resourceGroupName: 'rg-002'
    location: 'Australia Central'
    templateLocation: 'Linked artifact'
    csmFile: 'Template/CSES.template.json'
    csmParametersFile: 'Template/CSES.parameter.json'
    overrideParameters: '-packageSasUri $(cspkg) -configurationSasUri $(cscfg) -cloudServiceName cses4test002 -deploymentLabel deploy$(stg_prefix)' # overwrite some parameters of template.
    deploymentMode: 'Incremental'
배포가 완료되면 다음 작업 결과와 태그가 있는 클라우드 서비스가 표시됩니다. 코드 및 구성을 변경하여 현재 배포를 업데이트할 수 있습니다.
Azure Portal에서 클라우드 서비스 리소스 그룹에서 배포 결과를 찾을 수 있습니다.
배포 레이블은 정의한 타임스탬프와 동일해야 합니다.
도움을 요청하십시오.
질문이 있거나 도움이 필요한 경우 지원 요청을 생성하거나Azure 커뮤니티 지원에 문의하세요. Azure 피드백 커뮤니티에 제품 피드백을 제출할 수도 있습니다.


