연습 - 배포 스택에 리소스 추가
사용자는 새로운 예금 애플리케이션을 위한 스프린트 3에 있습니다. 최근 예금 팀은 사용 중인 일부 Azure 서비스에 대한 변경 내용을 요청했습니다. 또한 애플리케이션을 지원하는 데 필요한 다른 서비스 만들기를 요청했습니다.
이 연습에서는 Bicep 파일을 참조하는 리소스 그룹으로 범위가 지정된 배포 스택을 만듭니다. 이 파일은 App Service 요금제, 앱 서비스 및 Azure SQL 데이터베이스를 정의합니다. 그런 다음, App Service 요금제의 SKU를 수정하고 배포 스택을 업데이트합니다. 마지막으로, 애플리케이션 모니터링을 지원하기 위해 기존 Log Analytics 작업 영역 및 새 Application Insights 인스턴스를 추가합니다.
프로세스 중에 다음을 수행합니다.
- 초기 아키텍처를 정의하는 Bicep 파일을 만듭니다.
- Bicep 파일을 사용하여 리소스 그룹으로 범위가 지정된 배포 스택을 만듭니다.
- 기존 관리되는 리소스의 속성 수정
- 기존 Log Analytics 작업 영역 및 새 Application Insights 인스턴스를 포함하도록 Bicep 파일을 업데이트합니다.
- 관리되는 리소스를 배포하도록 배포 스택 업데이트
- 배포 스택의 관리되는 리소스의 유효성을 검사합니다.
이 연습에서는 Visual Studio Code용 Bicep 확장을 사용합니다. Visual Studio Code에서 해당 확장을 설치해야 합니다.
Bicep 파일 만들기
첫 번째 단계는 배포 스택과 함께 사용할 리소스를 정의하는 Bicep 파일을 만드는 것입니다.
Visual Studio Code를 엽니다.
main.bicep이라는 새 파일을 만듭니다.
Visual Studio Code에서 Bicep 도구가 로드되도록 빈 파일을 저장합니다.
파일>다른 이름으로 저장을 선택해도 되고 Windows에서 Ctrl+S(macOS는 ⌘+S) 키를 눌러도 됩니다. 파일을 저장한 위치를 기억해 두세요. 예를 들어, 파일을 저장할 templates 폴더를 만들 수 있습니다.
다음 Bicep 코드를 파일에 추가합니다. 곧 템플릿을 배포합니다.
// Parameters
@description('The location for all resources.')
param location string = 'eastus'

@description('The name of the SQL database.')
param sqlDatabaseName string = 'sqldb-${uniqueString(resourceGroup().id)}'

@description('The password of the admin user.')
param sqlServerAdminUserName string

@description('The name of the admin user.')
@secure()
param sqlServerAdminPassword string

@description('The name of the SQL server.')
param sqlServerName string = 'sql-${uniqueString(resourceGroup().id)}'

@description('The name of the web application.')
param webApplicationName string = 'webapp-${uniqueString(resourceGroup().id)}'

// Variables
@description('The name of the app service plan.')
var appServicePlanName = 'plan-deposits'

// Resource - App Service Plan
resource appServicePlan 'Microsoft.Web/serverfarms@2023-12-01' = {
  name: appServicePlanName
  location: location
  sku: {
    name: 'F1'
    capacity: 1
  }
}

// Resource - Web App
resource webApplication 'Microsoft.Web/sites@2023-12-01' = {
  name: webApplicationName
  location: location
  properties: {
    serverFarmId: appServicePlan.id
  }
}

// Resource - SQL Server
resource sqlServer 'Microsoft.Sql/servers@2021-11-01' ={
  name: sqlServerName
  location: location
  properties: {
    administratorLogin: sqlServerAdminUserName
    administratorLoginPassword: sqlServerAdminPassword
  }
}

// Resource - SQL Database
resource sqlServerDatabase 'Microsoft.Sql/servers/databases@2021-11-01' = {
  parent: sqlServer
  name: sqlDatabaseName
  location: location
  sku: {
    name: 'Standard'
    tier: 'Standard'
  }
}
문자열 보간,
uniqueString()함수를 포함하는 식을 사용하여 기본 매개 변수 값을 정의하고 있습니다. 이 템플릿을 배포하는 사용자는 배포 시 값을 지정하여 기본 매개 변수 값을 재정의할 수 있지만 변수 값을 재정의할 수는 없습니다.또한 App Service 요금제 이름에는 변수를 사용하고 있지만 다른 이름에는 매개 변수를 사용합니다. 스토리지 계정 및 App Service 앱에는 전역적으로 고유한 이름이 필요하지만 App Service 요금제 이름은 해당 리소스 그룹 내에서만 고유하면 됩니다. 이러한 차이는 배포가 모두 다른 리소스 그룹으로 배치되는 한 여러 배포에서 동일한 App Service 플랜 이름을 사용할 걱정은 없다는 것을 의미합니다.
변경 내용을 파일에 저장합니다.
배포 스택을 만들고 리소스를 Azure에 배포
Azure에 해당 템플릿을 배포하려면 Visual Studio Code 터미널에서 Azure 계정에 로그인해야 합니다. Azure CLI 도구를 설치했는지 확인합니다.
터미널 메뉴에서 새 터미널을 선택합니다. 터미널 창은 일반적으로 화면의 아래쪽 절반에서 열립니다.
터미널 창 오른쪽에 bash가 표시되면 올바른 셸이 이미 열려 있다는 의미입니다. 또는 오른쪽에 bash 셸 아이콘이 표시되면 선택하여 셸을 시작할 수 있습니다.

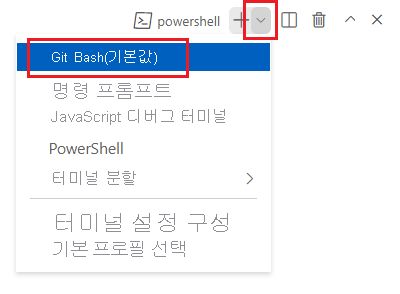
bash 이외의 셸이 나타나면 셸 드롭다운 화살표를 선택한 다음 Git Bash를 선택합니다.

터미널에서 템플릿을 저장한 디렉터리로 이동합니다. 예를 들어, templates 폴더에 템플릿을 저장한 경우 다음 명령을 사용할 수 있습니다.
cd templates
Bicep 설치
다음 명령을 실행하여 최신 버전의 Bicep이 있는지 확인합니다.
az bicep install && az bicep upgrade
Azure CLI를 사용하여 Azure에 로그인
Visual Studio Code 터미널에서 다음 명령을 실행하여 Azure에 로그인합니다.
az login열리는 브라우저에서 Azure 계정에 로그인합니다.
Visual Studio Code 터미널에는 이 계정과 연결된 구독 목록이 표시됩니다.
목록에서 이 연습에 사용할 구독을 찾습니다.
로그인에서 목록을 누락한 경우 다음 조각을 사용하여 구독을 다시 나열할 수 있습니다.
az account list --output table이 세션에서 실행하는 모든 Azure CLI 명령에 대한 기본 구독을 설정합니다.
az account set --subscription "Your Subscription Name or ID"
리소스 그룹 만들기
배포 스택 및 관리되는 리소스에 대한 리소스 그룹을 만들어야 합니다. 리소스 그룹을 만들려면 Visual Studio Code의 터미널에서 다음 명령을 실행합니다.
az group create \
    --name rg-depositsApplication \
    --location eastus
Azure에 이 템플릿을 배포하려면 Visual Studio Code 터미널에서 Azure 계정에 로그인합니다. Azure PowerShell을 설치했는지 확인합니다.
터미널 메뉴에서 새 터미널을 선택합니다. 터미널 창은 일반적으로 화면의 아래쪽 절반에서 열립니다.
터미널 창 오른쪽에 pwsh 또는powershell이 표시될 경우 올바른 셸이 이미 열려 있다는 의미입니다. 또는 오른쪽에 PowerShell 셸 아이콘이 표시되면 선택하여 셸을 시작할 수 있습니다.

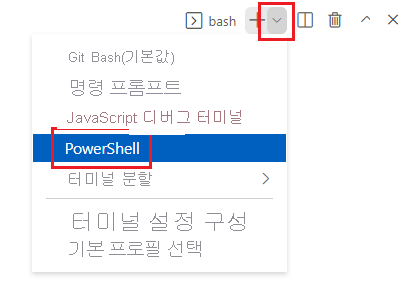
pwsh 또는 powershell 이외의 셸이 나타나면 셸 드롭다운 화살표를 선택한 다음 PowerShell을 선택합니다.

터미널에서 템플릿을 저장한 디렉터리로 이동합니다. 예를 들어, templates 폴더에 템플릿을 저장한 경우 다음 명령을 사용할 수 있습니다.
Set-Location -Path templates
Bicep CLI 설치
Azure PowerShell에서 Bicep을 사용하려면 Bicep CLI를 설치합니다.
Azure PowerShell을 사용하여 Azure에 로그인
Visual Studio Code 터미널에서 다음 명령을 실행하여 Azure에 로그인합니다.
Connect-AzAccount열리는 브라우저에서 Azure 계정에 로그인합니다.
다음 명령을 실행하여 이 연습에 사용할 구독의 ID를 가져옵니다.
Get-AzSubscription구독 ID는 두 번째 열입니다. 두 번째 열을 복사합니다. aaaa0a0a-bb1b-cc2c-dd3d-eeeeee4e4e4e와 비슷하게 보입니다.
이 세션에서 실행하는 모든 Azure PowerShell 명령에 대한 기본 구독을 설정합니다.
Set-AzContext -SubscriptionId {Your subscription ID}
리소스 그룹 만들기
배포 스택 및 관리되는 리소스에 대한 리소스 그룹을 만들어야 합니다. 리소스 그룹을 만들려면 Visual Studio Code의 터미널에서 다음 명령을 실행합니다.
New-AzResourceGroup `
    -Name rg-depositsApplication `
    -Location eastus
배포 스택 만들기
다음으로, 최근에 만들어진 리소스 그룹으로 범위가 지정된 배포 스택을 만들어야 합니다. 배포 스택을 만들려면 Visual Studio Code의 터미널에서 다음 명령을 실행합니다.
배포 스택을 만들려면 Visual Studio Code의 터미널에서 다음 명령을 실행합니다.
az stack group create \ --name stack-deposits \ --resource-group rg-depositsApplication \ --template-file ./main.bicep \ --action-on-unmanage detachAll \ --deny-settings-mode nonesqlServerAdminUserName에 대한 값을 입력하라는 메시지가 표시됩니다. SQL Server 관리자의 이름을 만든 다음 'Enter'를 누르세요.
sqlServerAdminPassword에 대한 값을 입력하라는 메시지가 표시됩니다. SQL Server 관리자를 위한 복잡한 비밀번호를 만든 다음 'Enter'를 누르세요.
다음 작업으로 이동하기 전에 업데이트 작업이 완료되기를 기다립니다.
배포 스택을 만들려면 Visual Studio Code의 터미널에서 다음 명령을 실행합니다.
New-AzResourceGroupDeploymentStack ` -Name stack-deposits ` -ResourceGroupName rg-depositsApplication ` -TemplateFile ./main.bicep ` -ActionOnUnmanage DetachAll ` -DenySettingsMode NonesqlServerAdminUserName에 대한 값을 입력하라는 메시지가 표시됩니다. SQL Server 관리자의 이름을 만든 다음 'Enter'를 누르세요.
sqlServerAdminPassword에 대한 값을 입력하라는 메시지가 표시됩니다. SQL Server 관리자를 위한 복잡한 비밀번호를 만든 다음 'Enter'를 누르세요.
다음 작업으로 이동하기 전에 업데이트 작업이 완료되기를 기다리세요.
기존 Log Analytics 작업 영역 및 새 Application Insights 인스턴스를 추가하도록 Bicep 파일을 수정합니다.
Visual Studio Code에서 main.bicep 파일을 엽니다.
강조 표시된 코드를 파일의 매개 변수 섹션에 추가합니다.
// Variables
@description('The name of the Application Insights instance.')
var applicationInsightsName = 'appinsights-deposits'

@description('The name of the app service plan.')
var appServicePlanName = 'plan-deposits'

@description('The name of the Log Analytics Workspace.')
var logAnalyticsWorkspaceName = 'log-deposits'
이 파일의 맨 아래에 다음 코드를 추가합니다.
// Resource - Log Analytics Workspace
resource logAnalyticsWorkspace 'Microsoft.OperationalInsights/workspaces@2023-09-01' = {
  name: logAnalyticsWorkspaceName
  location: location
  properties: {
    retentionInDays: 30
    sku: {
      name: 'PerGB2018'
    }
  }
}

// Resource - Application Insights
resource applicationInsights 'Microsoft.Insights/components@2020-02-02' = {
  name: applicationInsightsName
  location: location
  kind: 'web'
  properties: {
    Application_Type: 'web'
    WorkspaceResourceId: logAnalyticsWorkspace.id
  }
}
변경 내용을 파일에 저장합니다.
App Service 요금제 및 앱 서비스를 수정하도록 Bicep 파일 수정
Visual Studio Code에서 main.bicep 파일을 엽니다.
App Service 요금제의 sku 이름을
F1에서S1(으)로 변경합니다.// Resource - App Service Plan resource appServicePlan 'Microsoft.Web/serverfarms@2023-12-01' = { name: appServicePlanName location: location sku: { name: 'S1' capacity: 1 } }Application Insights 인스턴스에서 연결에 강조 표시된 코드를 추가합니다.
// Resource - Web App
resource webApplication 'Microsoft.Web/sites@2023-12-01' = {
  name: webApplicationName
  location: location
  properties: {
    serverFarmId: appServicePlan.id
    siteConfig: {
      appSettings: [
        {
          name: 'APPINSIGHTS_INSTRUMENTATIONKEY'
          value: applicationInsights.properties.InstrumentationKey
        }
      ]
    }
  }
}
변경 내용을 파일에 저장합니다.
배포 스택 업데이트
Bicep 파일을 수정하여 Bicep 파일의 리소스에 대한 변경 내용이 구현되도록 배포 스택을 업데이트하려고 합니다.
배포 스택을 업데이트하려면 Visual Studio Code의 터미널에서 다음 명령을 실행합니다.
az stack group create \
    --name stack-deposits \
    --resource-group rg-depositsApplication \
    --template-file ./main.bicep \
    --action-on-unmanage detachAll \
    --deny-settings-mode none
현재 구독에 스택이 이미 존재한다는 메시지가 표시됩니다. 관리되지 않는 작업 매개 변수의 값이 변경되면 경고가 새 값을 알려 줍니다.
y을(를) 누른 다음 'Enter'를 누릅니다.
sqlServerAdminUserName에 대한 값을 입력하라는 메시지가 표시됩니다. SQL Server 관리자의 이름을 만든 다음 'Enter'를 누르세요.
sqlServerAdminPassword에 대한 값을 입력하라는 메시지가 표시됩니다. SQL Server 관리자를 위한 복잡한 비밀번호를 만든 다음 'Enter'를 누르세요.
다음 작업으로 이동하기 전에 업데이트 작업이 완료되기를 기다립니다.
Bicep 파일을 수정하면 App Service 요금제에 대한 변경 내용이 구현되도록 배포 스택을 업데이트하려고 합니다.
배포 스택을 업데이트하려면 Visual Studio Code의 터미널에서 다음 명령을 실행합니다.
Set-AzResourceGroupDeploymentStack ` -Name stack-deposits ` -ResourceGroupName rg-depositsApplication ` -TemplateFile ./main.bicep ` -ActionOnUnmanage DetachAll ` -DenySettingsMode nonesqlServerAdminUserName에 대한 값을 입력하라는 메시지가 표시됩니다. SQL Server 관리자의 이름을 만든 다음 'Enter'를 누르세요.
sqlServerAdminPassword에 대한 값을 입력하라는 메시지가 표시됩니다. SQL Server 관리자를 위한 복잡한 비밀번호를 만든 다음 'Enter'를 누르세요.
다음 작업으로 이동하기 전에 업데이트 작업이 완료되기를 기다리세요.
배포 스택 및 관리되는 리소스에 대한 업데이트 확인
업데이트가 완료되면 App Service 요금제의 sku가 업데이트되고 배포 스택이 기존 Log Analytics 작업 영역 및 새 Application Insights 인스턴스를 관리하고 있는지 확인하려고 합니다.
App Service 요금제의 구성을 보려면 Visual Studio Code의 터미널에서 다음 명령을 실행합니다.
az appservice plan show \
    --name plan-deposits
    --resource-group rg-depositsApplication
출력의 sku 섹션을 확인합니다. 이제 App Service 요금제가 S1 sku에 있습니다. 다음 출력과 유사해야 합니다.
"sku": {
    "capacity": 1,
    "family": "S",
    "name": "S1",
    "size": "S1",
    "tier": "Standard"
},
배포 스택의 구성을 보려면 Visual Studio Code의 터미널에서 다음 명령을 실행합니다.
az stack group show \
    --resource-group rg-depositsApplication \
    --name stack-deposits
출력의 리소스 섹션을 확인합니다. 이제 기존 Log Analytics 작업 영역과 관리되는 리소스로 나열된 새 Application Insights 인스턴스가 표시됩니다. 결과는 다음 출력과 유사하게 표시됩니다.
"resources": [
  {
    "denyStatus": "none",
    "id": "/subscriptions/./resourceGroups/rg-depositsApplication/././servers/sql-brpdm7iotbwjm",
    "resourceGroup": "rg-depositsApplication",
    "status": "managed"
  },
  {
    "denyStatus": "none",
    "id": "/subscriptions/./resourceGroups/rg-depositsApplication/././servers/sql-brpdm7iotbwjm/databases/sqldb-brpdm7iotbwjm",
    "resourceGroup": "rg-depositsApplication",
    "status": "managed"
  },
  {
    "denyStatus": "none",
    "id": "/subscriptions/./resourceGroups/rg-depositsApplication/././serverfarms/plan-deposits",
    "resourceGroup": "rg-depositsApplication",
    "status": "managed"
  },
  {
    "denyStatus": "none",
    "id": "/subscriptions/./resourceGroups/rg-depositsApplication/././sites/webapp-brpdm7iotbwjm",
    "resourceGroup": "rg-depositsApplication",
    "status": "managed"
  },
  {
    "denyStatus": "none",
    "id": "/subscriptions/./resourceGroups/rg-depositsApplication/././components/appinsights-deposits",
    "resourceGroup": "rg-depositsApplication",
    "status": "managed"
  },
  {
    "denyStatus": "none",
    "id": "/subscriptions/./resourceGroups/rg-depositsApplication/././workspaces/log-deposits",
    "resourceGroup": "rg-depositsApplication",
    "status": "managed"
  }
],
App Service 요금제의 구성을 보려면 Visual Studio Code의 터미널에서 다음 명령을 실행합니다.
$plan = Get-AzAppServicePlan `
    -ResourceGroupName rg-depositsApplication `
    -Name plan-deposits
$sku = $plan.Sku
$sku
출력을 확인합니다. 이제 App Service 요금제가 S1 sku에 있습니다. 다음과 유사하게 나타납니다.
Name         : S1
Tier         : Standard
Size         : S1
Family       : S
Capacity     : 1
배포 스택의 구성을 보려면 Visual Studio Code의 터미널에서 다음 명령을 실행합니다.
Get-AzResourceGroupDeploymentStack `
    -ResourceGroupName rg-depositsApplication `
    -Name stack-deposits
출력의 리소스 섹션을 확인합니다. 이제 기존 Log Analytics 작업 영역과 관리되는 리소스로 나열된 새 Application Insights 인스턴스가 표시됩니다. 결과는 다음 출력과 유사하게 표시됩니다.
Resources                     : /subscriptions/./resourceGroups/rg-depositsApplication/././servers/                        sql-brpdm7iotbwjm
                                /subscriptions/./resourceGroups/rg-depositsApplication/././servers/sql-brpdm7iotbwjm/databases/sqldb-brpdm7iotbwjm
                                /subscriptions/./resourceGroups/rg-depositsApplication/././serverfarms/plan-deposits
                                /subscriptions/./resourceGroups/rg-depositsApplication/././sites/webapp-brpdm7iotbwjm
                                /subscriptions/./resourceGroups/rg-depositsApplication/././components/appinsights-deposits
                                /subscriptions/./resourceGroups/rg-depositsApplication/././workspaces/log-deposits