Azure Cosmos DB for MongoDB를 사용하여 계정, 데이터베이스, 컬렉션 만들기
Azure Cosmos DB는 완전 관리형 PaaS(platform-as-a-service)입니다. 이 서비스를 사용하려면 먼저 구독에서 Azure Cosmos DB 계정을 만들어야 합니다. 계정이 만들어지면 데이터베이스, 컬렉션 및 문서를 추가할 수 있습니다.

다양한 Azure Cosmos DB for MongoDB 모델 요소를 만드는 몇 가지 방법을 살펴보겠습니다.
Azure Portal을 사용하여 Azure Cosmos DB for MongoDB에 대한 계정, 데이터베이스, 컨테이너 만들기
Azure Cosmos DB 계정 및 해당 요소를 만드는 한 가지 방법은 Azure Portal을 사용하는 것입니다. 이 예제에서는 Azure Portal을 사용하여 Azure Cosmos DB 계정을 만들고 Azure Cosmos DB for MongoDB를 사용하겠습니다. 그런 다음 데이터베이스와 컬렉션을 추가할 것입니다. 이 예제에서는 이후 모듈에서 자세히 다룰 고급 설정을 작성하는 것은 생각하지 않고 이 예제에서는 기본 사항 탭을 검토해 보겠습니다. 계정 및 해당 요소를 만들어 보겠습니다.
Azure Cosmos DB for MongoDB 계정 만들기
Azure Portal에서 + 리소스 만들기를 선택하고, Azure Cosmos DB 및 만들기를 선택합니다.
Azure Cosmos DB for MongoDB를 선택합니다.
다음 매개 변수를 입력합니다.
- 구독 - 자신의 현재 Azure 구독.
- 리소스 그룹 - Azure Cosmos DB 계정을 만들 새로운 또는 기존 Azure 리소스 그룹입니다.
- 계정 이름 - Azure Cosmos DB 계정의 고유한 이름입니다. 이 이름은 Azure에서 고유해야 합니다. 계정 URI는 고유한 계정 이름에 mongo.cosmos.azure.com이 추가되었습니다.
- 위치 - Azure Cosmos DB 계정을 호스트할 지리적 위치입니다. 일반적으로 사용자 또는 애플리케이션과 가까운 위치를 선택해야 합니다.
- 용량 모드 - 이전 단원에서 설명한 대로 계정에서 프로비저닝된 처리량 또는 서버리스를 사용하도록 선택할 수 있습니다. 이 예제에서는 프로비저닝된 처리량을 선택합니다.
- 무료 계층 할인 적용 - 이 예제에서는 적용 안 함에서 적용을 선택합니다.
- 총 계정 처리량 제한 - 이 예제에서는 선택 취소된 상태로 둡니다.
- 버전 - 4.0을 선택합니다.
참고
지원되는 기능을 더 잘 활용하려면 가능한 경우 항상 버전 3.6 이상을 사용하는 것이 좋습니다.
검토 + 만들기를 선택하고 유효성 검사가 성공하면 만들기를 선택합니다.
참고
Azure Cosmos DB 계정을 만드는 데 몇 분 정도 걸릴 수 있습니다.

Azure Cosmos DB for MongoDB에 대한 데이터베이스 및 컨테이너 만들기
Azure Portal에서 데이터베이스 및 컨테이너를 만드는 것은 간단합니다. 먼저 데이터베이스를 만들어 보겠습니다.
Azure Cosmos DB for MongoDB 계정 왼쪽 메뉴에서 Data Explorer를 선택합니다.
새 컬렉션 아이콘의 오른쪽에 있는 풀다운을 선택하고 새 데이터베이스를 선택합니다.
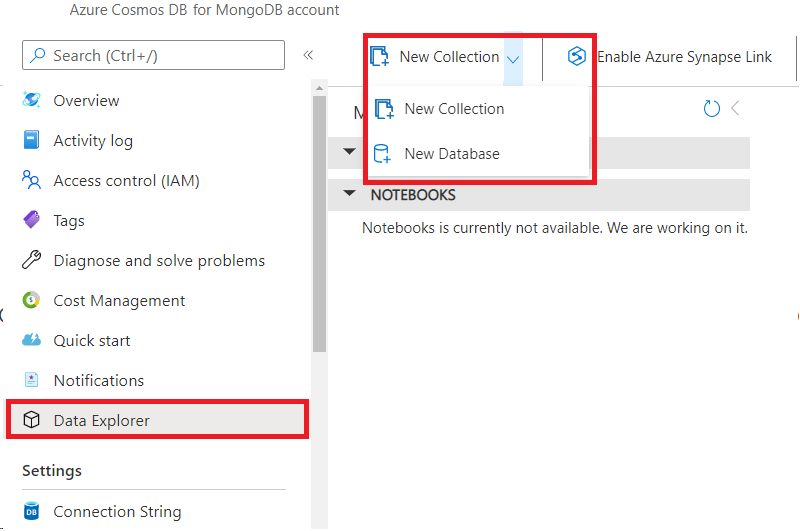
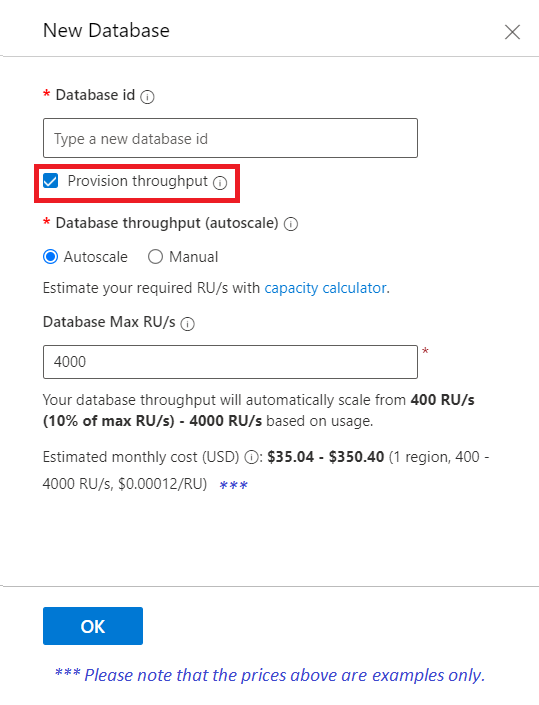
데이터베이스 ID 텍스트 상자에서 데이터베이스에 새 이름을 지정합니다.
새 데이터베이스 대화 상자에서 프로비저닝된 처리량을 정의할 수 있지만 대부분의 경우 프로비저닝된 처리량은 컨테이너 수준에서 선택합니다. 처리량 프로비저닝 확인란의 선택을 취소하고 이 예제에서는 확인을 선택해 보겠습니다.
이제 MONGO API 섹션에서 새 데이터베이스를 확인합니다. 이제 새 컬렉션을 만들 시간입니다.
새 컬렉션 아이콘을 선택합니다.
새 컬렉션 대화 상자에서 다음 매개 변수를 입력합니다.
- 데이터베이스 이름 - 여기에 새로 만들기 또는 기존 항목 사용이라는 두 가지 옵션이 있습니다. 이 옵션을 사용하면 새 컬렉션을 만들 때 새 데이터베이스를 만들 수 있습니다. 이전 단계에서 새 데이터베이스를 이미 만들었으므로 기존 데이터베이스 사용을 선택하고 풀다운 옵션에서 데이터베이스 이름을 선택합니다.
- 컬렉션 ID - 이 매개 변수는 컬렉션에 지정한 이름입니다.
-
분할 - 일반적으로 분할됨을 선택합니다. 이 옵션을 사용하면 Azure Cosmos DB가 분할 키에 따라 여러 테넌트에 분할된 컨테이너를 만들 수 있습니다. 큰 컨테이너를 사용하면 Azure Cosmos DB는 여러 물리적 노드에 테넌트 분산을 수행하여 높은 수준의 규모를 달성합니다.
디자인 모듈에서 분할에 대해 자세히 설명하겠습니다.
분할됨을 선택합니다.
- 분할 키 - 분할됨을 선택하려면 분할 키를 추가해야 합니다. 이 키는 분할 전략을 정의하는 파티션 키입니다. 예를 들어 IoT(사물 인터넷) 컬렉션에서는 선택한 분할 전략에 따라 /deviceid 또는 /region이 될 수 있습니다. 디자인 모듈에서 분할 전략에 대해 자세히 설명하겠습니다.
- 이 컬렉션에 대한 전용 처리량 프로비전 확인란 - 일반적으로 컬렉션의 처리량 프로비저닝은 자동 크기 조정 또는 수동 둘 중에 하나입니다. 이 설정을 사용하면 개별 컬렉션의 비용을 더 잘 제어할 수 있습니다. 디자인 모듈에서 처리량을 자세히 설명하겠습니다. 지금은 확인란을 선택하고 자동 스케일링을 선택합니다.
- 컬렉션 처리량 또는 컬렉션 최대 RU/s - 수동 또는 자동 크기 조정 중 무엇을 선택했는지에 따라 컬렉션 처리량 또는 컬렉션 최대 RU/s, 즉 처리량 모드를 각각 입력해야 합니다. 주요 차이점은 수동 모드에서는 사용 여부에 관계없이 선택한 RU/s의 금액을 청구한다는 것입니다. 자동 크기 조정은 선택한 최대 RU/s까지 사용한 만큼만 요금을 청구합니다. 두 경우 모두 처리량이 선택한 값에 도달하면 컬렉션에서 제한을 시작합니다. 이 예제에서는 미리 정의된 값을 그대로 둡니다.
- 분석 저장소 - Azure Cosmos DB 분석 저장소는 이러한 단원의 범위를 벗어납니다. 해당 항목에 대한 자세한 내용은 Azure Cosmos DB 분석 저장소 문서를 검토하세요.
- 고급/인덱싱 - 디자인 모듈에서 인덱스에 대해 자세히 설명하겠습니다. 확인란을 선택 취소된 상태로 둡니다.


이제 데이터베이스와 연결할 하나의 컬렉션이 생겼습니다. 다음 단원에서는 Azure Cosmos DB for MongoDB 계정에 연결하는 방법을 자세히 살펴보겠습니다. 그 전에 Azure Cosmos DB for MongoDB 데이터베이스 및 컬렉션을 만드는 다른 방법을 검토해 보겠습니다.
Azure Cosmos DB for MongoDB에 대한 데이터베이스 및 컬렉션 만들기 또는 연결
MongoDB 드라이버로 Java, Python, Node.js, .NET 또는 기타 프로그래밍 언어를 사용하여 Azure Cosmos DB for MongoDB 계정을 만들거나 연결할 수 있어야 합니다. 다양한 언어 중 일부를 사용하여 이러한 요소를 만드는 데 사용할 수 있는 몇 가지 함수를 소개해 보겠습니다. 이 모듈의 시작 부분에서 개발자는 익숙한 MongoDB 드라이버, SDK 및 도구를 계속 사용하여 Azure Cosmos DB에 연결하고 앱을 만들 수 있다고 설명했습니다. 이러한 드라이버와 해당 속성 및 메서드를 사용하여 Azure Cosmos DB for MongoDB 계정에 대한 액세스 및 작업을 프로그래밍합니다.
Azure Cosmos DB for MongoDB에 대한 데이터베이스 만들기 또는 연결
좋아하는 개발 도구를 사용하여 Azure Cosmos DB for MongoDB 애플리케이션을 만들 수 있습니다. 각 프로그래밍 언어에 MongoDB 드라이버를 사용하여 데이터베이스와 컬렉션을 만듭니다. Azure Cosmos DB for MongoDB 계정에 연결하고 제품 데이터베이스에 연결하는 코드를 검토해 보겠습니다.
Node.js
import { DefaultAzureCredential, ClientSecretCredential } from "@azure/identity";
const { MongoClient, ObjectId } = require('mongodb');
import axios from "axios";

async function main() {
  // Environment variables
  const endpoint = process.env.AZURE_COSMOS_RESOURCEENDPOINT;
  const listConnectionStringUrl = process.env.AZURE_COSMOS_LISTCONNECTIONSTRINGURL;
  const scope = process.env.AZURE_COSMOS_SCOPE;

  // Uncomment the corresponding lines for the authentication type you want to use.
  // For system-assigned managed identity.
  // const credential = new DefaultAzureCredential();

  // For user-assigned managed identity.
  // const clientId = process.env.AZURE_COSMOS_CLIENTID;
  // const credential = new DefaultAzureCredential({
  //     managedIdentityClientId: clientId
  // });

  // For service principal.
  // const tenantId = process.env.AZURE_COSMOS_TENANTID;
  // const clientId = process.env.AZURE_COSMOS_CLIENTID;
  // const clientSecret = process.env.AZURE_COSMOS_CLIENTSECRET;
  // const credential = new ClientSecretCredential(tenantId, clientId, clientSecret);

  // Acquire the access token
  const accessToken = await credential.getToken(scope);

  // Get the connection string
  const config = {
    method: 'post',
    url: listConnectionStringUrl,
    headers: {
        'Authorization': 'Bearer ${accessToken.token}'
    }
  };
  const response = await axios(config);
  const keysDict = response.data;
  const connectionString = keysDict['connectionStrings'][0]['connectionString'];

  // Connect to Azure Cosmos DB for MongoDB
  const client = new MongoClient(connectionString);

  try {
    // Open the connection
    await client.connect();

    // Connect to the database "products"
    const ProductDatabase = client.db('products');

    // Add code to connect to a collection and add an entry here
  } catch (err) {
    console.error("An error occurred:", err);
  } finally {
    // Close the connection
    await client.close();
  }
}

main().catch((err) => console.error("Unhandled error:", err));
Java
package com.fabrikam;

import com.mongodb.MongoClient;
import com.mongodb.MongoClientURI;
import com.mongodb.client.MongoCollection;
import com.mongodb.client.MongoDatabase;
import com.mongodb.client.model.Filters;
import javax.net.ssl.*;
import java.net.InetSocketAddress;
import com.azure.identity.*;
import com.azure.core.credential.*;
import java.net.http.*;
import java.net.URI;

public class App {
  public static void main(String[] args) {
    // Environment variables
    String endpoint = System.getenv("AZURE_COSMOS_RESOURCEENDPOINT");
    String listConnectionStringUrl = System.getenv("AZURE_COSMOS_LISTCONNECTIONSTRINGURL");
    String scope = System.getenv("AZURE_COSMOS_SCOPE");

    // Uncomment the corresponding lines for the authentication type you want to use.
    // For system-assigned managed identity.
    // DefaultAzureCredential defaultCredential = new DefaultAzureCredentialBuilder().build();

    // For user-assigned managed identity.
    // DefaultAzureCredential defaultCredential = new DefaultAzureCredentialBuilder()
    //     .managedIdentityClientId(System.getenv("AZURE_COSMOS_CLIENTID"))
    //     .build();

    // For service principal.
    // ClientSecretCredential defaultCredential = new ClientSecretCredentialBuilder()
    //     .clientId(System.getenv("AZURE_COSMOS_CLIENTID"))
    //     .clientSecret(System.getenv("AZURE_COSMOS_CLIENTSECRET"))
    //     .tenantId(System.getenv("AZURE_COSMOS_TENANTID"))
    //     .build();

    MongoClient mongoClient = null;

    try {
      // Acquire the access token
      AccessToken accessToken = defaultCredential
          .getToken(new TokenRequestContext().addScopes(scope))
          .block();
      String token = accessToken.getToken();

      // Retrieve the connection string
      HttpClient client = HttpClient.newBuilder().build();
      HttpRequest request = HttpRequest.newBuilder()
          .uri(new URI(listConnectionStringUrl))
          .header("Authorization", "Bearer " + token)
          .POST(HttpRequest.BodyPublishers.noBody())
          .build();
      HttpResponse<String> response = client.send(request, HttpResponse.BodyHandlers.ofString());

      JSONParser parser = new JSONParser();
      JSONObject responseBody = parser.parse(response.body());
      List<Map<String, String>> connectionStrings = responseBody.get("connectionStrings");
      String connectionString = connectionStrings.get(0).get("connectionString");

      // Connect to Azure Cosmos DB for MongoDB
      MongoClientURI uri = new MongoClientURI(connectionString);
      mongoClient = new MongoClient(uri);

      // Connect to the database
      MongoDatabase ProductDatabase = mongoClient.getDatabase("products");

      // Add code to connect to a collection and add an entry here

    } catch (Exception e) {
      e.printStackTrace();
    } finally {
      if (mongoClient != null) {
        mongoClient.close();
      }
    }
  }
}
Python
import os
import pymongo
import requests
from azure.identity import ManagedIdentityCredential, ClientSecretCredential

# Environment variables
endpoint = os.getenv('AZURE_COSMOS_RESOURCEENDPOINT')
listConnectionStringUrl = os.getenv('AZURE_COSMOS_LISTCONNECTIONSTRINGURL')
scope = os.getenv('AZURE_COSMOS_SCOPE')

# Uncomment the following lines corresponding to the authentication type you want to use.
# For system-assigned managed identity
# cred = ManagedIdentityCredential()

# For user-assigned managed identity
# managed_identity_client_id = os.getenv('AZURE_COSMOS_CLIENTID')
# cred = ManagedIdentityCredential(client_id=managed_identity_client_id)

# For service principal
# tenant_id = os.getenv('AZURE_COSMOS_TENANTID')
# client_id = os.getenv('AZURE_COSMOS_CLIENTID')
# client_secret = os.getenv('AZURE_COSMOS_CLIENTSECRET')
# cred = ClientSecretCredential(tenant_id=tenant_id, client_id=client_id, client_secret=client_secret)

# Get the connection string
session = requests.Session()
token = cred.get_token(scope)
response = session.post(listConnectionStringUrl, headers={"Authorization": "Bearer {}".format(token.token)})
keys_dict = response.json()
conn_str = keys_dict["connectionStrings"][0]["connectionString"]

# Connect to Azure Cosmos DB for MongoDB
client = pymongo.MongoClient(conn_str)

# To connect to the database, use the connection variable ("client" in this case), and the database name
ProductDatabase = client["products"]

# Add code to connect to a collection and add an entry here
C#
using MongoDB.Driver;
using Azure.Identity;
using Azure.Core;
using System;
using System.Net.Http;
using System.Text.Json;
using System.Collections.Generic;
using System.Threading.Tasks;

public class Products
{
  public int ProductId { get; set; }
  public string name { get; set; }
}

class test
{
  public static async Task Main(string[] args)
  {
      // Environment variables
      var endpoint = Environment.GetEnvironmentVariable("AZURE_COSMOS_RESOURCEENDPOINT");
      var listConnectionStringUrl = Environment.GetEnvironmentVariable("AZURE_COSMOS_LISTCONNECTIONSTRINGURL");
      var scope = Environment.GetEnvironmentVariable("AZURE_COSMOS_SCOPE");

      // Uncomment the corresponding lines for the authentication type you want to use.
      // For system-assigned identity.
      // var tokenProvider = new DefaultAzureCredential();

      // For user-assigned identity.
      // var tokenProvider = new DefaultAzureCredential(
      //     new DefaultAzureCredentialOptions
      //     {
      //         ManagedIdentityClientId = Environment.GetEnvironmentVariable("AZURE_COSMOS_CLIENTID")
      //     });

      // For service principal.
      // var tenantId = Environment.GetEnvironmentVariable("AZURE_COSMOS_TENANTID");
      // var clientId = Environment.GetEnvironmentVariable("AZURE_COSMOS_CLIENTID");
      // var clientSecret = Environment.GetEnvironmentVariable("AZURE_COSMOS_CLIENTSECRET");
      // var tokenProvider = new ClientSecretCredential(tenantId, clientId, clientSecret);

      // Acquire the access token.
      AccessToken accessToken = await tokenProvider.GetTokenAsync(
          new TokenRequestContext(scopes: new[] { scope }));

      // Get the connection string.
      using var httpClient = new HttpClient();
      httpClient.DefaultRequestHeaders.Add("Authorization", $"Bearer {accessToken.Token}");
      var response = await httpClient.PostAsync(listConnectionStringUrl, null);
      response.EnsureSuccessStatusCode();
      var responseBody = await response.Content.ReadAsStringAsync();

      // Parse the connection string.
      var connectionStrings = JsonSerializer.Deserialize<Dictionary<string, List<Dictionary<string, string>>>>(responseBody);
      string connectionString = connectionStrings["connectionStrings"][0]["connectionString"];

      // Initialize the MongoClient with the connection string.
      var mongoClient = new MongoClient(connectionString);

      // Connect to the "products" database.
      var ProductDatabase = mongoClient.GetDatabase("products");

      // Add code to connect to a collection and add an entry here.
  }
}
아주 간단합니다. 드라이버를 사용하여 연결한 후에는 새 데이터베이스를 만들거나 언어에 따라 GetDatabase 또는 유사한 메서드를 사용하여 기존 데이터베이스를 가리켰습니다. 이제 애플리케이션에서 ProductDatabase 변수를 사용하여 원하는 데이터베이스를 참조할 수 있습니다. 컬렉션을 만들거나 컬렉션에 연결하는 것은 새 데이터베이스를 만드는 것만큼 간단합니다.
Azure Cosmos DB for MongoDB에 대한 컬렉션 만들기
컬렉션을 만들거나 기존 컬렉션에 액세스하기 위해 프로그래밍 언어에 따라 get collection 메서드 또는 참조를 사용하겠습니다. 이전 예제에 코드를 추가하여 컬렉션 만들기/연결을 수행하고 해당 컬렉션에 하나의 항목을 추가해 보겠습니다.
Node.js
          // Add code to connect to a collection and add and find an entry here
          var collection = ProductDatabase.collection('documents');
          var insertResult = await collection.insertOne({ ProductId: 1, name: "bread" });

          // return data where ProductId = 1
          const findProduct = await collection.find({ProductId: 1});
          await findProduct.forEach(console.log);
Java
          // Add code to connect to a collection and add and find an entry here
          MongoCollection collection = ProductDatabase.getCollection("products");

          collection.insertOne(new Document()
                      .append("ProductId", 1)
                      .append("name", "bread"));

          // return data where ProductId = 1
          Document findProduct = (Document) collection.find(eq("ProductId", 1)).first();
          System.out.println(findProduct.toJson());
Python
# Add code to connect to a collection and add an entry here
collection = ProductDatabase["products"]
collection.insert_one({ "ProductId": 1, "name": "bread" })
C#
    // Add code to connect to a collection and add an entry here
    var ProductCollection = ProductDatabase.GetCollection<Products>("products");

    Products Product = new Products {ProductId=1,name="bread"};
    ProductCollection.InsertOne (Product);
다음 단원에서 연결 문자열을 정확히 어떻게 만들었는지 살펴보겠습니다.
MongoDB 확장 명령을 사용하여 Azure Cosmos DB의 API for MongoDB에 저장된 데이터 관리
앞에서 설명한 것처럼 Azure Cosmos DB for MongoDB는 Azure Cosmos DB 계정용 MongoDB 서버에서 개체에 액세스하고 개체를 만드는 데 사용한 것과 동일한 드라이버와 코드를 사용할 수 있는 기능을 제공합니다. 그러나 해당 코드를 사용하여 데이터베이스 및 컬렉션을 만들면 기본 Azure Cosmos DB 만들기 매개 변수가 사용됩니다. Azure Cosmos DB 기능을 활용하려면 처리량, 자동 크기 조정, 분할 키 할당 및 인덱스 정의와 같은 데이터베이스 및 컬렉션 생성 매개 변수를 제어할 수 있어야 합니다. Azure Cosmos DB for MongoDB는 확장 명령을 사용하여 이러한 매개 변수를 정의하는 기능을 제공합니다. 이러한 명령을 사용하면 Azure Cosmos DB용으로 데이터베이스 및 컬렉션을 만들거나 수정하는 방법에 대한 보다 정확한 지침을 코딩할 수 있습니다.
Azure Cosmos DB for MongoDB는 다음 요청 유형에 대한 확장 명령을 제공합니다.
- 데이터베이스 만들기
- 데이터베이스 업데이트
- 데이터베이스 가져오기
- 컬렉션 만들기
- 컬렉션 업데이트
- 컬렉션 가져오기
MongoDB 드라이버는 데이터베이스에 대해 명령을 실행하는 함수를 제공합니다. 이 함수를 사용하여 확장 명령을 Azure Cosmos DB로 보내겠습니다. 처리량이 2000RU(요청 단위)이고 DeviceId 분할 키가 있는 IOT 디바이스 컬렉션을 만드는 코드를 살펴보겠습니다.
Node.js
    // create the Devices collection with a throughput of 2000 RUs and with DeviceId as the sharding key
    var result = IOTDatabase.command({customAction: "CreateCollection", collection: "Devices", offerThroughput: 2000, shardKey: "DeviceId"});
Java
      // create the Devices collection with a throughput of 2000 RUs and with DeviceId as the sharding key
      Document DevCollectionDef = new Document();
      DevCollectionDef.append("customAction", "CreateCollection");
      DevCollectionDef.append("collection", "Devices");
      DevCollectionDef.append("offerThroughput", 2000);
      DevCollectionDef.append("shardKey", "DeviceId");

      Document result = IOTDatabase.runCommand(DevCollectionDef);
Python
      # create the Devices collection with a throughput of 2000 RUs and with DeviceId as the sharding key
      IOTDatabase.command({'customAction': "CreateCollection", 'collection': "Devices", 'offerThroughput': 2000, 'shardKey': "DeviceId"})
C#
      // create the Devices collection with a throughput of 1000 RUs and with EmployeeId as the sharding key
      var result = IOTDatabase.RunCommand<BsonDocument>(@"{customAction: ""CreateCollection"", collection: ""Devices"", offerThroughput: 2000, shardKey: ""DeviceId""}");
비슷한 방식으로 컬렉션을 수정하거나 데이터베이스를 만들거나 수정할 수 있습니다. 자세한 내용은 MongoDB 확장 명령을 사용하여 Azure Cosmos DB의 API for MongoDB에 저장된 데이터 관리 문서를 검토하세요.