연습: .NET을 사용하여 Service Bus 큐에서 메시지를 보내고 받습니다.
이 연습에서는 다음 작업을 수행하는 방법을 알아봅니다.
- Azure CLI를 사용하여 Service Bus 네임스페이스 및 큐를 만듭니다.
- 큐에서 해당 메시지를 전송 및 수신하는 .NET 콘솔 애플리케이션을 만듭니다.
사전 요구 사항
- 활성 구독이 있는 Azure 계정. 구독이 아직 없다면 https://azure.com/free에서 평가판을 신청할 수 있습니다.
- 지원되는 플랫폼 중 하나인 Visual Studio Code.
- Visual Studio Code용 C# 확장.
- .NET 8은 연습의 대상 프레임워크입니다.
Azure에 로그인
이 섹션에서는 터미널을 열고 연습의 나머지 부분에서 명령 입력과 고유한 리소스 이름 생성을 좀 더 간단하게 하기 위해 사용할 몇 가지 변수를 만듭니다.
Azure Cloud Shell을 시작하고 Bash 및 환경을 선택합니다.
Azure CLI 명령에 사용되는 변수를 만듭니다.
<myLocation>을 가까운 지역으로 바꿉니다.myLocation=<myLocation> myNameSpaceName=az204svcbus$RANDOM
Azure 리소스 만들기
만들려는 Azure 리소스를 보관할 리소스 그룹을 만듭니다.
az group create --name az204-svcbus-rg --location $myLocationService Bus 메시징 네임스페이스를 만듭니다. 아래 명령은 이전에 만든 변수를 사용하여 네임스페이스를 만듭니다. 이 작업을 완료하는 데 몇 분이 걸립니다.
az servicebus namespace create \
    --resource-group az204-svcbus-rg \
    --name $myNameSpaceName \
    --location $myLocation
Service Bus 큐 만들기
az servicebus queue create --resource-group az204-svcbus-rg \
    --namespace-name $myNameSpaceName \
    --name az204-queue
Service Bus 네임스페이스에 대한 연결 문자열 검색
Azure Portal을 열고 az204-svcbus-rg 리소스 그룹으로 이동합니다.
생성한 az204svcbus 리소스를 선택합니다.
설정 섹션에서 공유 액세스 정책을 선택한 다음, RootManageSharedAccessKey 정책을 선택합니다.
열리는 대화 상자에서 기본 연결 문자열을 복사하여 파일에 저장하거나, 필요에 따라 포털을 열고 키를 복사합니다.
큐에 메시지를 보내는 콘솔 앱 만들기
로컬 터미널을 열고 az204svcbus라는 디렉터리를 만들고 변경한 다음, 명령을 실행하여 Visual Studio Code를 시작합니다.
code .메뉴 모음에서 터미널 > 새 터미널을 선택하여 Visual Studio Code에서 터미널을 열고 다음 명령을 실행하여 콘솔 앱을 만들고 Azure.Messaging.ServiceBus 패키지를 추가합니다.
dotnet new console dotnet add package Azure.Messaging.ServiceBusProgram.cs에서 파일 맨 위의 현재
using문 다음에 다음using문을 추가합니다.using Azure.Messaging.ServiceBus;코드에 다음 변수를 추가하고
connectionString변수를 이전에 가져온 연결 문자열로 설정합니다.// connection string to your Service Bus namespace string connectionString = "<CONNECTION STRING>"; // name of your Service Bus topic string queueName = "az204-queue";방금 추가한 변수 아래에 다음 코드를 추가합니다. 자세한 내용은 코드 주석을 참조하세요.
// the client that owns the connection and can be used to create senders and receivers
ServiceBusClient client;

// the sender used to publish messages to the queue
ServiceBusSender sender;

// Create the clients that we'll use for sending and processing messages.
client = new ServiceBusClient(connectionString);
sender = client.CreateSender(queueName);

// create a batch
using ServiceBusMessageBatch messageBatch = await sender.CreateMessageBatchAsync();

for (int i = 1; i <= 3; i++)
{
    // try adding a message to the batch
    if (!messageBatch.TryAddMessage(new ServiceBusMessage($"Message {i}")))
    {
        // if an exception occurs
        throw new Exception($"Exception {i} has occurred.");
    }
}

try
{
    // Use the producer client to send the batch of messages to the Service Bus queue
    await sender.SendMessagesAsync(messageBatch);
    Console.WriteLine($"A batch of three messages has been published to the queue.");
}
finally
{
    // Calling DisposeAsync on client types is required to ensure that network
    // resources and other unmanaged objects are properly cleaned up.
    await sender.DisposeAsync();
    await client.DisposeAsync();
}

Console.WriteLine("Follow the directions in the exercise to review the results in the Azure portal.");
Console.WriteLine("Press any key to continue");
Console.ReadKey();
파일을 저장하고
dotnet build명령을 실행하여 오류가 없는지 확인합니다.dotnet run명령을 사용하여 프로그램을 실행하고 아래 확인 메시지를 기다립니다. 아무 키나 눌러 프로그램을 종료합니다.A batch of three messages has been published to the queue.
결과 검토
Azure Portal에 로그인하고 Service Bus 네임스페이스로 이동합니다.
탐색 창의 엔터티 섹션에서 큐를 선택한 다음, 목록에서 az204-queue를 선택합니다.
Service Bus 큐 탐색 창에서 Service Bus 탐색기를 선택합니다.
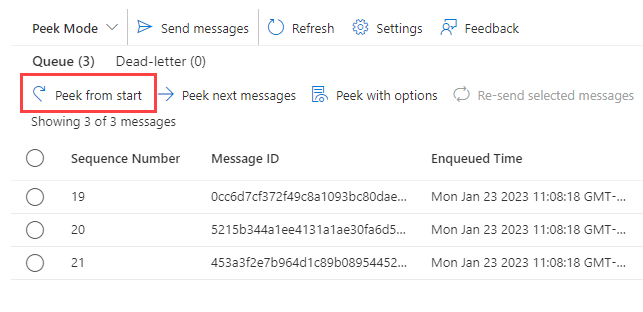
시작에서 피킹을 선택하면 전송된 세 개의 메시지가 표시됩니다.

큐에 메시지를 받도록 프로젝트 업데이트
이 섹션에서는 큐에서 메시지를 받도록 프로그램을 업데이트합니다.
기존 코드 끝에 다음 코드를 추가합니다. 자세한 내용은 코드 주석을 참조하세요.
ServiceBusProcessor processor;
client = new ServiceBusClient(connectionString);

// create a processor that we can use to process the messages
processor = client.CreateProcessor(queueName, new ServiceBusProcessorOptions());

try
{
    // add handler to process messages
    processor.ProcessMessageAsync += MessageHandler;

    // add handler to process any errors
    processor.ProcessErrorAsync += ErrorHandler;

    // start processing
    await processor.StartProcessingAsync();

    Console.WriteLine("Wait for a minute and then press any key to end the processing");
    Console.ReadKey();

    // stop processing
    Console.WriteLine("\nStopping the receiver...");
    await processor.StopProcessingAsync();
    Console.WriteLine("Stopped receiving messages");
}
finally
{
    // Calling DisposeAsync on client types is required to ensure that network
    // resources and other unmanaged objects are properly cleaned up.
    await processor.DisposeAsync();
    await client.DisposeAsync();
}

// handle received messages
async Task MessageHandler(ProcessMessageEventArgs args)
{
    string body = args.Message.Body.ToString();
    Console.WriteLine($"Received: {body}");

    // complete the message. messages is deleted from the queue.
    await args.CompleteMessageAsync(args.Message);
}

// handle any errors when receiving messages
Task ErrorHandler(ProcessErrorEventArgs args)
{
    Console.WriteLine(args.Exception.ToString());
    return Task.CompletedTask;
}
dotnet build명령을 사용하여 오류가 없는지 확인합니다.dotnet run명령을 사용하여 애플리케이션을 실행합니다. 큐에 세 개의 메시지를 더 전송한 다음, 6개의 메시지를 모두 검색합니다. 아무 키나 눌러 수신기와 애플리케이션을 중지합니다.Wait for a minute and then press any key to end the processing Received: Message 1 Received: Message 2 Received: Message 3 Received: Message 1 Received: Message 2 Received: Message 3 Stopping the receiver... Stopped receiving messages참고
애플리케이션에서 메시지를 검색하기 전에 메시지의 두 개 일괄 처리를 전송했으므로 출력에는 세 개의 메시지로 구성된 두 개의 일괄 처리가 표시되어야 합니다.
포털로 돌아가고 시작에서 피킹을 다시 선택합니다. 모든 메시지를 검색했으므로 큐에 메시지가 표시되지 않습니다.
리소스 정리
리소스가 더 이상 필요하지 않은 경우 Azure Cloud Shell에서 az group delete 명령을 사용하여 리소스 그룹을 제거할 수 있습니다.
az group delete --name az204-svcbus-rg --no-wait