연습 - .NET 스토리지 라이브러리를 통해 Batch에서 사용할 리소스 업로드
중요
이 연습을 수행하려면 사용자의 Azure 구독이 필요하며 요금이 발생할 수 있습니다. Azure 구독이 아직 없는 경우 시작하기 전에 체험 계정을 만듭니다.
Azure Storage 라이브러리를 사용하면 Azure Storage 계정의 파일 스토리지를 프로그래밍 방식으로 제어할 수 있습니다.
이 연습에서는 Blob 스토리지에 비디오를 업로드하도록 앱을 강화할 것입니다.
스토리지 계정 연결 정보 추가
Cloud Shell에서 Azure Blob Storage NuGet 패키지를 추가합니다.
dotnet add package Microsoft.Azure.Storage.Blob편집기에서
Program.cs파일을 편집합니다.code Program.cs스토리지 작업에 필요한 라이브러리를 포함하려면 다음 using 문을 Program.cs 맨 위에 추가합니다.
using Microsoft.Azure.Storage.Blob; using Microsoft.Azure.Storage; using System.IO;Microsoft.Azure.Storage.Blob및Microsoft.Azure.Storage는 Azure Storage 계정에 대한 액세스 권한을 앱에 제공합니다.System.IO는 파일을 처리할 수 있도록 파일 시스템에 대한 액세스 권한을 앱에 제공합니다.Program.cs 클래스에 Azure Storage 자격 증명에
Program대한 변수를 추가합니다.// Storage account credentials private const string envVarStorage = "STORAGE_NAME"; private const string envVarStorageKey = "STORAGE_KEY"; private static string storageAccountName; private static string storageAccountKey;
입력 및 출력 컨테이너 만들기
Program.cs 스토리지 계정을 관리하는 코드를 추가하는 다음 업데이트로 바꿉
Main()니다.static async Task Main(string[] args) { // Read the environment variables to allow the app to connect to the Azure Batch and Azure Storage accounts batchAccountUrl = Environment.GetEnvironmentVariable(envVarBatchURI); batchAccountName = Environment.GetEnvironmentVariable(envVarBatchName); batchAccountKey = Environment.GetEnvironmentVariable(envVarKey); storageAccountName = Environment.GetEnvironmentVariable(envVarStorage); storageAccountKey = Environment.GetEnvironmentVariable(envVarStorageKey); // Show the user the accounts they are attaching to Console.WriteLine("BATCH URL: {0}, Name: {1}, Key: {2}", batchAccountUrl, batchAccountName, batchAccountKey); Console.WriteLine("Storage Name: {0}, Key: {1}", storageAccountName, storageAccountKey); // Construct the Storage account connection string string storageConnectionString = String.Format("DefaultEndpointsProtocol=https;AccountName={0};AccountKey={1}", storageAccountName, storageAccountKey); // Retrieve the storage account CloudStorageAccount storageAccount = CloudStorageAccount.Parse(storageConnectionString); // Create the blob client, for use in obtaining references to blob storage containers CloudBlobClient blobClient = storageAccount.CreateCloudBlobClient(); // Use the blob client to create the containers in blob storage const string inputContainerName = "input"; const string outputContainerName = "output"; await CreateContainerIfNotExistAsync(blobClient, inputContainerName); await CreateContainerIfNotExistAsync(blobClient, outputContainerName); // RESOURCE FILE SETUP // Add *.mp4 files into the \<solutiondir>\InputFiles folder. string inputPath = Path.Combine(Environment.CurrentDirectory, "InputFiles"); List<string> inputFilePaths = new List<string>( Directory.GetFileSystemEntries(inputPath, "*.mp4", SearchOption.TopDirectoryOnly)); // Upload data files. // Upload the data files using UploadResourceFilesToContainer(). This data will be // processed by each of the tasks that are executed on the compute nodes within the pool. List<ResourceFile> inputFiles = await UploadFilesToContainerAsync(blobClient, inputContainerName, inputFilePaths); // Obtain a shared access signature that provides write access to the output container to which // the tasks will upload their output. string outputContainerSasUrl = GetContainerSasUrl(blobClient, outputContainerName, SharedAccessBlobPermissions.Write); // The batch client requires a BatchSharedKeyCredentials object to open a connection var sharedKeyCredentials = new BatchSharedKeyCredentials(batchAccountUrl, batchAccountName, batchAccountKey); var batchClient = BatchClient.Open(sharedKeyCredentials); // Create the Batch pool, which contains the compute nodes that execute tasks. await CreateBatchPoolAsync(batchClient, PoolId); }앞의 코드
CloudStorageAccount에서는 앱이 Blob 클라이언트를 만들 수 있도록 개체를 만듭니다. 클라이언트는 스토리지 컨테이너를 만들고, 파일을 업로드하고, 출력 컨테이너에 쓰는 작업에 대한 액세스 권한을 부여하는 데 사용됩니다.
파일의 입력 및 출력에 사용할 스토리지 컨테이너 만들기
다음 메서드
CreateContainerIfNotExistAsync()를 추가하여 지정된 이름의 컨테이너를 만듭니다.private static async Task CreateContainerIfNotExistAsync(CloudBlobClient blobClient, string containerName) { CloudBlobContainer container = blobClient.GetContainerReference(containerName); await container.CreateIfNotExistsAsync(); Console.WriteLine("Creating container [{0}].", containerName); }앞의 코드는 메서드에서
Main만든 것을 사용하여CloudBlobClient컨테이너를 만듭니다.
업로드할 모든 파일 목록 처리
다음 메서드
UploadFilesToContainerAsync()를 추가하여 입력 파일 목록을 컨테이너에 업로드합니다.private static async Task<List<ResourceFile>> UploadFilesToContainerAsync(CloudBlobClient blobClient, string inputContainerName, List<string> filePaths) { List<ResourceFile> resourceFiles = new List<ResourceFile>(); foreach (string filePath in filePaths) { resourceFiles.Add(await UploadResourceFileToContainerAsync(blobClient, inputContainerName, filePath)); } return resourceFiles; }앞의 코드는 생성된 파일 경로 목록을 사용하여 메서드를 호출하여 업로드하고 Batch 작업에서 사용할 생성된 ResourceFile 참조를 저장합니다.
파일 업로드
Azure Storage에 로컬 파일을 업로드하는 메서드를 추가합니다.
private static async Task<ResourceFile> UploadResourceFileToContainerAsync(CloudBlobClient blobClient, string containerName, string filePath)
{
    Console.WriteLine("Uploading file {0} to container [{1}]...", filePath, containerName);

    string blobName = Path.GetFileName(filePath);
    var fileStream = System.IO.File.OpenRead(filePath);

    CloudBlobContainer container = blobClient.GetContainerReference(containerName);
    CloudBlockBlob blobData = container.GetBlockBlobReference(blobName);
    await blobData.UploadFromFileAsync(filePath);

    // Set the expiry time and permissions for the blob shared access signature. In this case, no start time is specified,
    // so the shared access signature becomes valid immediately
    SharedAccessBlobPolicy sasConstraints = new SharedAccessBlobPolicy
    {
        SharedAccessExpiryTime = DateTime.UtcNow.AddHours(2),
        Permissions = SharedAccessBlobPermissions.Read
    };

    // Construct the SAS URL for the blob
    string sasBlobToken = blobData.GetSharedAccessSignature(sasConstraints);
    string blobSasUri = String.Format("{0}{1}", blobData.Uri, sasBlobToken);

    return ResourceFile.FromUrl(blobSasUri, blobName);
}
위의 코드는 파일을 비동기적으로 업로드하는 데 사용합니다
CloudBlobClient. 다음 연습에서 추가된 작업이 사용할 목록에 추가되는 리소스 파일을 빌드합니다.
출력 폴더에 액세스할 수 있도록 설정
태스크가 파일을 쓸 수 있도록 출력 컨테이너에 대한 SAS(공유 액세스 서명) 참조를 만듭니다.
private static string GetContainerSasUrl(CloudBlobClient blobClient, string containerName, SharedAccessBlobPermissions permissions)
{
    // Set the expiry time and permissions for the container access signature. In this case, no start time is specified,
    // so the shared access signature becomes valid immediately. Expiration is in 2 hours.
    SharedAccessBlobPolicy sasConstraints = new SharedAccessBlobPolicy
    {
        SharedAccessExpiryTime = DateTime.UtcNow.AddHours(2),
        Permissions = permissions
    };

    // Generate the shared access signature on the container, setting the constraints directly on the signature
    CloudBlobContainer container = blobClient.GetContainerReference(containerName);
    string sasContainerToken = container.GetSharedAccessSignature(sasConstraints);

    // Return the URL string for the container, including the SAS token
    return String.Format("{0}{1}", container.Uri, sasContainerToken);
}
위의 코드는 변환된 애니메이션 GIF를 Blob Storage에 쓸 수 있도록 작업에 대한 액세스(2시간)가 제한된 SAS URL을 만듭니다.
코드 편집기에서 마우스 오른쪽 단추를 클릭하고 저장을 선택한 다음 마우스 오른쪽 단추를 클릭하고 종료를 선택합니다.
파일 업로드 테스트
Cloud Shell에서 앱 디렉터리에 InputFiles 폴더를 만듭니다.
mkdir InputFilesCloud Shell에서 다음
curl명령을 실행하여 모듈의 GitHub 리포지토리에 있는 애완 동물 비디오 샘플 세트를 로컬 InputFiles 폴더로 복사합니다.curl -L https://github.com/MicrosoftDocs/mslearn-apps-and-batch/raw/master/cutifypets/InputFiles/1.mp4 > ./InputFiles/1.mp4 curl -L https://github.com/MicrosoftDocs/mslearn-apps-and-batch/raw/master/cutifypets/InputFiles/2.mp4 > ./InputFiles/2.mp4 curl -L https://github.com/MicrosoftDocs/mslearn-apps-and-batch/raw/master/cutifypets/InputFiles/3.mp4 > ./InputFiles/3.mp4 curl -L https://github.com/MicrosoftDocs/mslearn-apps-and-batch/raw/master/cutifypets/InputFiles/4.mp4 > ./InputFiles/4.mp4 curl -L https://github.com/MicrosoftDocs/mslearn-apps-and-batch/raw/master/cutifypets/InputFiles/5.mp4 > ./InputFiles/5.mp4 curl -L https://github.com/MicrosoftDocs/mslearn-apps-and-batch/raw/master/cutifypets/InputFiles/6.mp4 > ./InputFiles/6.mp4Azure Storage 자격 증명을 환경 변수에 저장합니다. 두 번째 명령은 이전 연습인 연습 - .NET 클라이언트 라이브러리를 사용하여 배치 계정 액세스의 애플리케이션 설정 연결 세부 정보섹션에서 정의한 ‘RESOURCE_GROUP’ 환경 변수를 사용합니다. 값은 Batch 계정을 만들 때 선택한 리소스 그룹 이름입니다.
export STORAGE_NAME=$(az storage account list --query "[?contains(name,'cuti')].name" --output tsv)
export STORAGE_KEY=$(az storage account keys list --account-name $STORAGE_NAME --query [0].value --output tsv --resource-group $RESOURCE_GROUP)
앱을 빌드하고 실행합니다.
dotnet run프로그램이 실행되고 다음 메시지를 터미널에 기록할 것입니다.
BATCH URL: [your batch url], Name: [your batch account name], Key: [your batch key]
Storage Name: [your storage account name], Key: [your storage key]
Creating container [input].
Creating container [output].
Uploading file ~\cutifypets\InputFiles\3.mp4 to container [input]...
Uploading file ~\cutifypets\InputFiles\2.mp4 to container [input]...
Uploading file ~\cutifypets\InputFiles\4.mp4 to container [input]...
Uploading file ~\cutifypets\InputFiles\1.mp4 to container [input]...
Uploading file ~\cutifypets\InputFiles\5.mp4 to container [input]...
Uploading file ~\cutifypets\InputFiles\6.mp4 to container [input]...
Creating pool [WinFFmpegPool]...
Azure Portal을 사용하여 파일이 업로드되었는지 확인
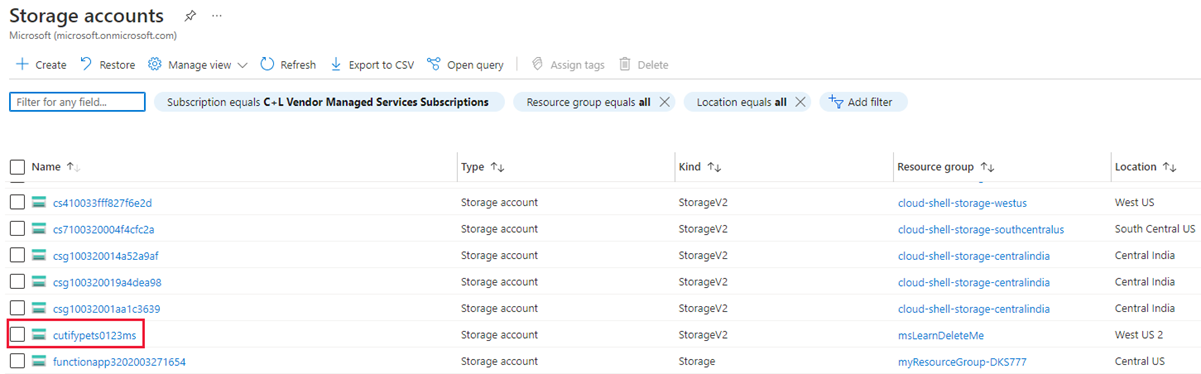
Azure Portal로 돌아갑니다. 왼쪽 메뉴에서 Storage 계정을 선택한 다음, 첫 번째 연습에서 만든 스토리지 계정을 선택합니다.
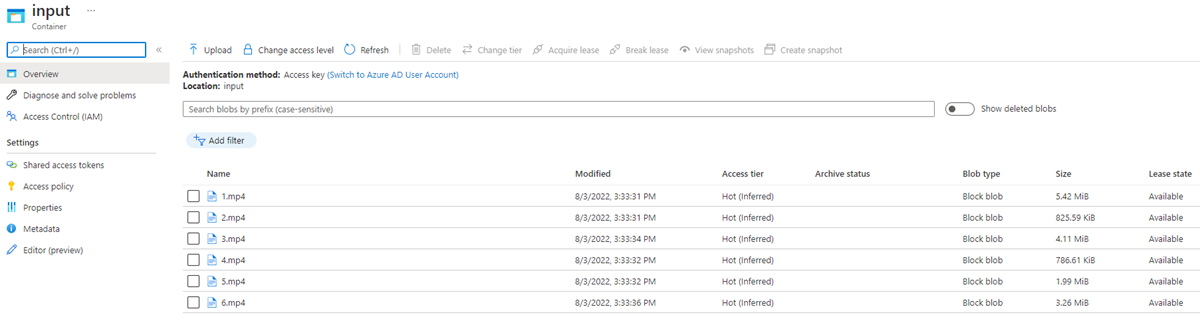
왼쪽 메뉴에서 데이터 스토리지 아래의 컨테이너를 선택한 다음 입력 폴더를 선택합니다.

이 폴더에는 업로드된 비디오가 포함됩니다.