페더레이션 인증 구현
적용 대상: 2013
2013  2016
2016  2019
2019  Subscription Edition
  SharePoint in Microsoft 365
SharePoint Server에서 페더레이션 인증 구현
이 단계별 가이드에서는 AD FS(Active Directory Federation Services)를 사용하여 SharePoint에서 페더레이션 인증을 구성하는 방법을 설명합니다.
페더레이션 인증 개요
페더레이션 인증에서 SharePoint는 신뢰할 수 있는 외부 STS(보안 토큰 서비스)에서 발급한 SAML 토큰을 처리합니다. 로그인을 시도하는 사용자는 해당 STS로 리디렉션됩니다. 이 STS는 사용자를 인증하고 성공적인 인증 시 SAML 토큰을 생성합니다. 그런 다음 SharePoint는 이 토큰을 처리하고 이를 사용하여 자체 토큰을 만들고 사용자에게 사이트에 액세스할 수 있는 권한을 부여합니다.
필수 조건
구성을 수행하려면 다음 리소스가 필요합니다.
- SharePoint 2013 팜 이상.
- AD FS 서명 인증서의 공개 키가 .cer 파일로 내보내진 AD FS 팜 버전 2 이상이 이미 생성되었습니다.
이 문서에서는 다음 값을 사용합니다.
- SharePoint 사이트 URL:
https://spsites.contoso.local/ - AD FS 사이트 URL:
https://adfs.contoso.local/adfs/ls/ - 영역(신뢰 당사자 식별자):
urn:contoso:spsites - ID 클레임 유형:
http://schemas.xmlsoap.org/ws/2005/05/identity/claims/emailaddress - 역할 클레임 유형:
http://schemas.microsoft.com/ws/2008/06/identity/claims/role - Windows 사이트 모음 관리자:
contoso\yvand - 페더레이션된(AD FS) 사이트 모음 관리자의 이메일 값:
yvand@contoso.local
AD FS에서 신뢰 당사자 만들기
이 단계에서는 AD FS에서 신뢰 당사자를 만듭니다. 신뢰 당사자는 SharePoint를 사용하는 데 필요한 구성과 성공적인 인증 시 SAML 토큰에 삽입될 클레임을 정의하는 클레임 규칙을 저장합니다.
AD FS 서버에서 PowerShell을 시작하고 다음 스크립트를 실행합니다.
### STEP 1: Create the relying party
# Name of the Relying Party
$name = "SPSites"
# Unique identifier of the Relying Party (in SharePoint it's referred to as the realm)
$identifier = "urn:contoso:spsites"
# Authority that authenticates users
$identityProvider = "Active Directory"
# SharePoint URL where user is redirected upon successful authentication
$redirectURL = "https://spsites.contoso.local/_trust/default.aspx"
# Allow everyone to use this relying party
$allowEveryoneRule = '=> issue (Type = "http://schemas.microsoft.com/authorization/claims/permit", value = "true");'
# Create the Relying Party
Add-ADFSRelyingPartyTrust -Name $name -Identifier $identifier -ClaimsProviderName $identityProvider -Enabled $true -WSFedEndpoint $redirectURL -IssuanceAuthorizationRules $allowEveryoneRule -Confirm:$false

### STEP 2: Add claim rules to the relying party
# Rule below configured relying party to issue 2 claims in the SAML token: email and role
$claimsRule = @"
@RuleTemplate = "LdapClaims"
@RuleName = "AD"
c:[Type == "http://schemas.microsoft.com/ws/2008/06/identity/claims/windowsaccountname", Issuer == "AD AUTHORITY"]
=> issue(
store = "Active Directory",
types = ("http://schemas.xmlsoap.org/ws/2005/05/identity/claims/emailaddress", "http://schemas.microsoft.com/ws/2008/06/identity/claims/role"),
query = ";mail,tokenGroups(fullDomainQualifiedName);{0}",
param = c.Value);
"@
# Apply the rule to the Relying Party
Set-ADFSRelyingPartyTrust -TargetName $name -IssuanceTransformRules $claimsRule
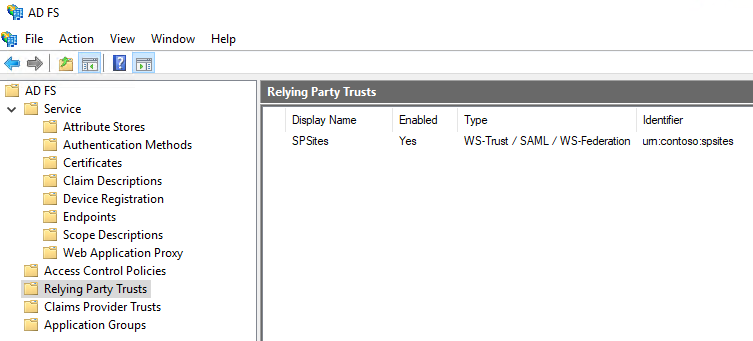
스크립트가 완료되면 AD FS의 신뢰 당사자는 다음과 같이 표시됩니다.
AD FS를 신뢰하도록 SharePoint 구성
이 단계에서는 SharePoint에서 AD FS를 신뢰해야 하는 구성을 저장하는 SPTrustedLoginProvider를 만듭니다. SharePoint 관리 셸을 시작하고 다음 스크립트를 실행하여 만듭니다.
# Define claim types
$email = New-SPClaimTypeMapping "http://schemas.xmlsoap.org/ws/2005/05/identity/claims/emailaddress" -IncomingClaimTypeDisplayName "EmailAddress" -SameAsIncoming
$role = New-SPClaimTypeMapping "http://schemas.microsoft.com/ws/2008/06/identity/claims/role" -IncomingClaimTypeDisplayName "Role" -SameAsIncoming

# Public key of the AD FS signing certificate
$signingCert = New-Object System.Security.Cryptography.X509Certificates.X509Certificate2("C:\Data\Claims\ADFS Signing.cer")
# Unique realm (corresponds to the unique identifier of the AD FS Relying Party)
$realm = "urn:contoso:spsites"
# Set the AD FS URL where users are redirected to authenticate
$signinurl = "https://adfs.contoso.local/adfs/ls/"

# Create a new SPTrustedIdentityTokenIssuer in SharePoint
New-SPTrustedIdentityTokenIssuer -Name "Contoso.local" -Description "Contoso.local" -Realm $realm -ImportTrustCertificate $signingCert -ClaimsMappings $email,$role -SignInUrl $signinurl -IdentifierClaim $email.InputClaimType
중요
New-SPTrustedIdentityTokenIssuer cmdlet과 함께 -UseDefaultConfiguration 옵션을 사용하지 마세요. 이 옵션을 사용하면 내부적으로 사용자의 ID를 설정하는 방식으로 인해 예기치 않은 부작용이 발생합니다.
그런 다음 관련 인증서를 SharePoint 루트 기관 인증서 저장소에 추가해야 합니다. 다음과 같은 두 가지 옵션이 있습니다.
- 인증 기관에서 AD FS 서명 인증서를 발급하는 경우(보안상의 이유로 모범 사례)
발급자 인증서(및 모든 중간자)의 공개 키를 저장소에 추가해야 합니다. SharePoint 관리 셸 을 시작하고 다음 스크립트를 실행하여 추가합니다.
$rootCert = New-Object System.Security.Cryptography.X509Certificates.X509Certificate2("C:\Data\Claims\ADFS Signing issuer.cer")
New-SPTrustedRootAuthority -Name "adfs.contoso.local signing root authority" -Certificate $rootCert
- ADFS 서명 인증서가 자체 서명된 인증서인 경우(보안상의 이유로 권장되지 않음)
ADFS 서명 인증서 자체의 공개 키를 저장소에 추가해야 합니다. SharePoint 관리 셸 을 시작하고 다음 스크립트를 실행하여 추가합니다.
$rootCert = New-Object System.Security.Cryptography.X509Certificates.X509Certificate2("C:\Data\Claims\ADFS Signing.cer")
New-SPTrustedRootAuthority -Name "adfs.contoso.local signing certificate" -Certificate $rootCert
SharePoint 웹 애플리케이션 구성
이 단계에서는 위에서 만든 SPTrustedLoginProvider를 사용하여 SharePoint에서 AD FS 트러스트와 페더레이션되도록 웹 애플리케이션을 구성합니다.
존중해야 할 몇 가지 중요한 규칙이 있습니다.
- SharePoint 웹 애플리케이션의 기본 영역에는 Windows 인증이 활성화되어 있어야 합니다. 검색 크롤러에 필요합니다.
- AD FS 페더레이션을 사용할 SharePoint URL은 HTTPS를 사용하여 구성해야 합니다.
다음과 같은 두 가지 가능한 구성이 있습니다.
새 웹 애플리케이션을 만들고 기본 영역에서 Windows 및 AD FS 인증을 모두 사용하는 경우:
SharePoint 관리 셸을 시작하고 다음 스크립트를 실행합니다.
# This script creates a new web application and sets Windows and AD FS authentication on the Default zone
# URL of the SharePoint site federated with ADFS
$trustedSharePointSiteUrl = "https://spsites.contoso.local/"
$applicationPoolManagedAccount = "Contoso\spapppool"

$winAp = New-SPAuthenticationProvider -UseWindowsIntegratedAuthentication -DisableKerberos:$true
$sptrust = Get-SPTrustedIdentityTokenIssuer "Contoso.local"
$trustedAp = New-SPAuthenticationProvider -TrustedIdentityTokenIssuer $sptrust

New-SPWebApplication -Name "SharePoint - ADFS on contoso.local" -Port 443 -SecureSocketsLayer -URL $trustedSharePointSiteUrl -ApplicationPool "SharePoint - ADFS on contoso.local" -ApplicationPoolAccount (Get-SPManagedAccount $applicationPoolManagedAccount) -AuthenticationProvider $winAp, $trustedAp
SharePoint 중앙 관리 사이트를 엽니다.
시스템 설정에서 대체 액세스 매핑 구성을 선택합니다. 대체 액세스 매핑 컬렉션 상자가 열립니다.
새 웹 애플리케이션을 사용하여 디스플레이를 필터링하고 다음과 같은 항목이 표시되는지 확인합니다.
기존 웹 애플리케이션을 확장하여 새 영역에서 AD FS 인증을 설정하는 경우:
SharePoint 관리 셸을 시작하고 다음 스크립트를 실행합니다.
# This script extends an existing web application to set AD FS authentication on a new zone
# URL of the default zone of the web application
$webAppDefaultZoneUrl = "http://spsites/"
# URL of the SharePoint site federated with ADFS
$trustedSharePointSiteUrl = "https://spsites.contoso.local/"

$sptrust = Get-SPTrustedIdentityTokenIssuer "Contoso.local"
$ap = New-SPAuthenticationProvider -TrustedIdentityTokenIssuer $sptrust
$wa = Get-SPWebApplication $webAppDefaultZoneUrl
New-SPWebApplicationExtension -Name "SharePoint - ADFS on contoso.local" -Identity $wa -SecureSocketsLayer -Zone Intranet -Url $trustedSharePointSiteUrl -AuthenticationProvider $ap
SharePoint 중앙 관리 사이트를 엽니다.
시스템 설정에서 대체 액세스 매핑 구성을 선택합니다. 대체 액세스 매핑 컬렉션 상자가 열립니다.
확장된 웹 애플리케이션을 사용하여 디스플레이를 필터링하고 다음과 같이 표시되는지 확인합니다.
IIS에서 HTTPS 인증서 설정
SharePoint URL은 HTTPS 프로토콜()https://spsites.contoso.local/을 사용하므로 해당 IIS(인터넷 정보 서비스) 사이트에서 인증서를 설정해야 합니다.
사이트 인증서 생성
참고
인증서를 이미 생성한 경우 이 단계를 건너뛸 수 있습니다.
Windows PowerShell 콘솔을 엽니다.
다음 스크립트를 실행하여 자체 서명된 인증서를 생성하고 컴퓨터의 내 저장소에 추가합니다.
New-SelfSignedCertificate -DnsName "spsites.contoso.local" -CertStoreLocation "cert:\LocalMachine\My"
중요
자체 서명된 인증서는 테스트 목적으로만 적합합니다. 프로덕션 환경에서는 인증 기관에서 발급한 인증서를 대신 사용하는 것이 좋습니다.
인증서 설정
인터넷 정보 서비스 관리자 콘솔을 엽니다.
트리 보기에서 서버를 확장하고 사이트를 확장하고 contoso.local 사이트에서 SharePoint - ADFS 를 선택한 다음 바인딩을 선택합니다.
https 바인딩을 선택한 다음 편집을 선택합니다.
TLS/SSL 인증서 필드에서 spsites.contoso.local 인증서를 선택한 다음 확인을 선택합니다.
사이트 모음 만들기
이 단계에서는 두 명의 관리자가 있는 팀 사이트 모음을 만듭니다. 하나는 Windows 관리자이고 다른 하나는 페더레이션된(AD FS) 관리자입니다.
SharePoint 중앙 관리 사이트를 엽니다.
애플리케이션 관리에서 사이트 모음 만들기를 선택합니다. 사이트 모음 만들기 페이지가 열립니다.
제목, URL을 입력하고 템플릿 팀 사이트를 선택합니다.
기본 사이트 모음 관리자 섹션에서 책 아이콘을 클릭하여 사람 선택 대화 상자를 엽니다.
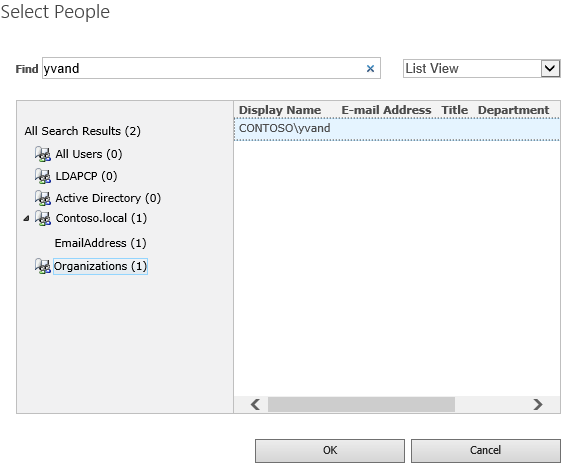
사용자 선택 대화 상자에서 Windows 관리자 계정(예
yvand: )을 입력합니다.왼쪽에서 조직을 클릭하여 목록을 필터링 합니다. 다음과 같은 출력이 표시됩니다.
계정을 선택하고 확인을 클릭합니다.
보조 사이트 모음 관리자 섹션에서 책 아이콘을 클릭하여 사람 선택 대화 상자를 엽니다.
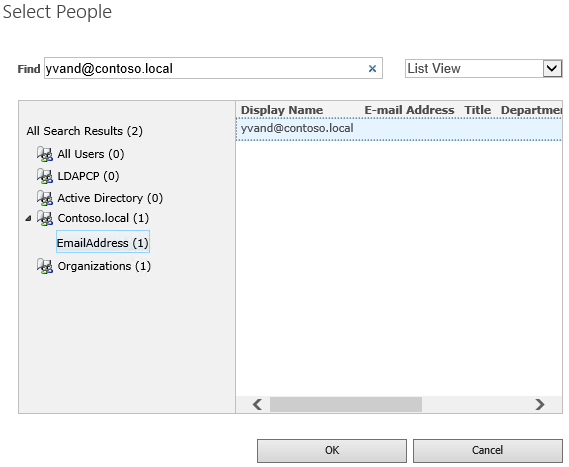
사람 선택 대화 상자에서 AD FS 관리자 계정의 정확한 이메일 값(예
yvand@contoso.local: )을 입력합니다.왼쪽에서 Contoso.local을 클릭하여 목록을 필터링합니다. 다음과 같은 출력이 표시됩니다.
계정을 선택하고 확인을 클릭합니다.
확인을 클릭하여 사이트 모음을 만듭니다.
사이트 모음이 만들어지면 Windows 또는 페더레이션된 사이트 모음 관리자 계정을 사용하여 사이트 모음에 로그인할 수 있어야 합니다.
다음 단계
페더레이션 인증에서 사용자 선택기는 입력의 유효성을 검사하지 않으므로 맞춤법이 잘못되거나 사용자가 실수로 잘못된 클레임 유형을 선택할 수 있습니다. 사용자 지정 클레임 공급자를 사용하여 이 문제를 해결할 수 있습니다. 예를 들어 LDAPCP입니다.
중요
LDAPCP는 Microsoft 제품이 아니며 Microsoft 지원에서 지원되지 않습니다. 온-프레미스 SharePoint 팜에서 LDAPCP를 다운로드, 설치 및 구성하려면 LDAPCP 웹 사이트를 참조하세요.
SharePoint Server 구독 버전에서 네이티브 사용자 선택기는 페더레이션 인증에 사용자 프로필 서비스 애플리케이션을 사용하여 사용자를 검색하고 확인할 수 있습니다. 페더레이션 인증을 사용하도록 사용자 선택기를 구성하는 방법을 알아봅니다.


