5부. 데이터 바인딩에서 MVVM까지
MVVM(Model-View-ViewModel) 아키텍처 패턴은 XAML을 염두에 두고 발명되었습니다. 이 패턴은 세 개의 소프트웨어 계층(보기라고 하는 XAML 사용자 인터페이스) 간에 분리를 적용합니다. 모델이라고 하는 기본 데이터입니다. ViewModel이라고 하는 View와 Model 간의 중간자입니다. View 및 ViewModel은 종종 XAML 파일에 정의된 데이터 바인딩을 통해 연결됩니다. 뷰에 대한 BindingContext는 일반적으로 ViewModel의 인스턴스입니다.
간단한 ViewModel
ViewModels에 대한 소개로, 먼저 프로그램이 없는 프로그램을 살펴보겠습니다.
앞에서 XAML 파일이 다른 어셈블리의 클래스를 참조할 수 있도록 새 XML 네임스페이스 선언을 정의하는 방법을 알아보았습니다. 다음은 네임스페이스에 대한 XML 네임스페이스 선언을 System 정의하는 프로그램입니다.
xmlns:sys="clr-namespace:System;assembly=netstandard"
프로그램은 정적 DateTime.Now 속성에서 현재 날짜와 시간을 가져오고 해당 DateTime 값을 다음의 StackLayout값으로 설정하는 데 BindingContext 사용할 x:Static 수 있습니다.
<StackLayout BindingContext="{x:Static sys:DateTime.Now}" …>
BindingContext 는 특수 속성입니다. 요소를 설정 BindingContext 하면 해당 요소의 모든 자식이 상속합니다. 즉, 모든 자식 StackLayout 이 동일한 BindingContext경우 해당 개체의 속성에 대한 간단한 바인딩을 포함할 수 있습니다.
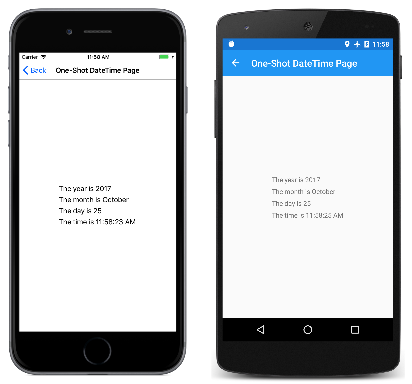
One-Shot DateTime 프로그램에서 두 자식은 해당 값의 속성에 대한 바인딩을 DateTime 포함하지만 다른 두 자식에는 바인딩 경로가 누락된 것 같은 바인딩이 포함되어 있습니다. 즉, 값 자체가 다음을 위해 사용됨을 StringFormat의미 DateTime 합니다.
<ContentPage xmlns="http://xamarin.com/schemas/2014/forms"
             xmlns:x="http://schemas.microsoft.com/winfx/2009/xaml"
             xmlns:sys="clr-namespace:System;assembly=netstandard"
             x:Class="XamlSamples.OneShotDateTimePage"
             Title="One-Shot DateTime Page">

    <StackLayout BindingContext="{x:Static sys:DateTime.Now}"
                 HorizontalOptions="Center"
                 VerticalOptions="Center">

        <Label Text="{Binding Year, StringFormat='The year is {0}'}" />
        <Label Text="{Binding StringFormat='The month is {0:MMMM}'}" />
        <Label Text="{Binding Day, StringFormat='The day is {0}'}" />
        <Label Text="{Binding StringFormat='The time is {0:T}'}" />

    </StackLayout>
</ContentPage>
문제는 페이지가 처음 빌드되면 날짜와 시간이 한 번 설정되고 변경되지 않는다는 것입니다.
XAML 파일은 항상 현재 시간을 표시하는 클록을 표시할 수 있지만 도움이 되는 코드가 필요합니다. MVVM을 고려할 때 Model 및 ViewModel은 코드로 완전히 작성된 클래스입니다. View는 데이터 바인딩을 통해 ViewModel에 정의된 속성을 참조하는 XAML 파일인 경우가 많습니다.
적절한 모델은 ViewModel을 무시하고 적절한 ViewModel은 뷰를 무시합니다. 그러나 프로그래머가 ViewModel에서 노출하는 데이터 형식을 특정 사용자 인터페이스와 연결된 데이터 형식에 맞게 조정하는 경우가 많습니다. 예를 들어 모델에서 8비트 문자 ASCII 문자열이 포함된 데이터베이스에 액세스하는 경우 ViewModel은 사용자 인터페이스에서 유니코드를 단독으로 사용할 수 있도록 해당 문자열 간에 유니코드 문자열로 변환해야 합니다.
MVVM의 간단한 예제(예: 여기에 표시된 예제)에서는 모델이 전혀 없는 경우가 많으며 패턴에는 데이터 바인딩과 연결된 View 및 ViewModel만 포함됩니다.
다음은 1초마다 해당 DateTime 속성을 업데이트하는 단일 DateTime속성만 있는 시계용 ViewModel입니다.
using System;
using System.ComponentModel;
using Xamarin.Forms;

namespace XamlSamples
{
    class ClockViewModel : INotifyPropertyChanged
    {
        DateTime dateTime;

        public event PropertyChangedEventHandler PropertyChanged;

        public ClockViewModel()
        {
            this.DateTime = DateTime.Now;

            Device.StartTimer(TimeSpan.FromSeconds(1), () =>
                {
                    this.DateTime = DateTime.Now;
                    return true;
                });
        }

        public DateTime DateTime
        {
            set
            {
                if (dateTime != value)
                {
                    dateTime = value;

                    if (PropertyChanged != null)
                    {
                        PropertyChanged(this, new PropertyChangedEventArgs("DateTime"));
                    }
                }
            }
            get
            {
                return dateTime;
            }
        }
    }
}
ViewModels는 일반적으로 인터페이스를 INotifyPropertyChanged 구현합니다. 즉, 속성 중 하나가 변경 될 때마다 클래스가 이벤트를 발생 PropertyChanged 합니다. 데이터 바인딩 메커니즘은 Xamarin.Forms 속성이 변경될 때 알림을 받고 대상을 새 값으로 업데이트된 상태로 유지할 수 있도록 처리기를 이 PropertyChanged 이벤트에 연결합니다.
이 ViewModel을 기반으로 하는 시계는 다음과 같이 간단할 수 있습니다.
<ContentPage xmlns="http://xamarin.com/schemas/2014/forms"
             xmlns:x="http://schemas.microsoft.com/winfx/2009/xaml"
             xmlns:local="clr-namespace:XamlSamples;assembly=XamlSamples"
             x:Class="XamlSamples.ClockPage"
             Title="Clock Page">

    <Label Text="{Binding DateTime, StringFormat='{0:T}'}"
           FontSize="Large"
           HorizontalOptions="Center"
           VerticalOptions="Center">
        <Label.BindingContext>
            <local:ClockViewModel />
        </Label.BindingContext>
    </Label>
</ContentPage>
using 속성 요소 태그의 BindingContext Label 설정 방법을 ClockViewModel 확인합니다. 또는 컬렉션에서 ClockViewModel Resources 인스턴스화하고 태그 확장을 통해 StaticResource 설정할 BindingContext 수 있습니다. 또는 코드 숨김 파일이 ViewModel을 인스턴스화할 수 있습니다.
Binding 속성 형식의 Text 속성에 Label 대한 태그 확장입니다DateTime. 다음은 디스플레이입니다.
속성을 마침표로 구분하여 ViewModel 속성의 개별 DateTime 속성에 액세스할 수도 있습니다.
<Label Text="{Binding DateTime.Second, StringFormat='{0}'}" … >
대화형 MVVM
MVVM은 기본 데이터 모델을 기반으로 하는 대화형 보기에 양방향 데이터 바인딩과 함께 사용되는 경우가 많습니다.
값을 값으로 HueSaturation변환하고 Luminosity 그 반대로 변환 Color 하는 클래스 HslViewModel 는 다음과 같습니다.
using System;
using System.ComponentModel;
using Xamarin.Forms;

namespace XamlSamples
{
    public class HslViewModel : INotifyPropertyChanged
    {
        double hue, saturation, luminosity;
        Color color;

        public event PropertyChangedEventHandler PropertyChanged;

        public double Hue
        {
            set
            {
                if (hue != value)
                {
                    hue = value;
                    OnPropertyChanged("Hue");
                    SetNewColor();
                }
            }
            get
            {
                return hue;
            }
        }

        public double Saturation
        {
            set
            {
                if (saturation != value)
                {
                    saturation = value;
                    OnPropertyChanged("Saturation");
                    SetNewColor();
                }
            }
            get
            {
                return saturation;
            }
        }

        public double Luminosity
        {
            set
            {
                if (luminosity != value)
                {
                    luminosity = value;
                    OnPropertyChanged("Luminosity");
                    SetNewColor();
                }
            }
            get
            {
                return luminosity;
            }
        }

        public Color Color
        {
            set
            {
                if (color != value)
                {
                    color = value;
                    OnPropertyChanged("Color");

                    Hue = value.Hue;
                    Saturation = value.Saturation;
                    Luminosity = value.Luminosity;
                }
            }
            get
            {
                return color;
            }
        }

        void SetNewColor()
        {
            Color = Color.FromHsla(Hue, Saturation, Luminosity);
        }

        protected virtual void OnPropertyChanged(string propertyName)
        {
            PropertyChanged?.Invoke(this, new PropertyChangedEventArgs(propertyName));
        }
    }
}
Hue및 SaturationLuminosity 속성을 변경하면 속성이 Color 변경되고 변경되어 Color 다른 세 가지 속성이 변경됩니다. 속성이 변경되지 않는 한 클래스가 이벤트를 호출 PropertyChanged 하지 않는다는 점을 제외하면 무한 루프처럼 보일 수 있습니다. 이렇게 하면 제어할 수 없는 피드백 루프가 종료됩니다.
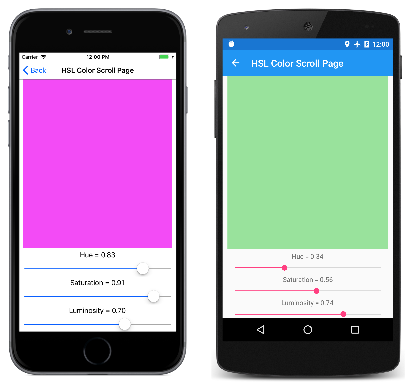
다음 XAML 파일에는 ViewModel의 속성에 Color 바인딩된 속성과 , 및 속성에 바인딩된 HueSaturation3 Slider 개와 Luminosity 3개의 Label 뷰가 포함 BoxView Color 됩니다.
<ContentPage xmlns="http://xamarin.com/schemas/2014/forms"
             xmlns:x="http://schemas.microsoft.com/winfx/2009/xaml"
             xmlns:local="clr-namespace:XamlSamples;assembly=XamlSamples"
             x:Class="XamlSamples.HslColorScrollPage"
             Title="HSL Color Scroll Page">
    <ContentPage.BindingContext>
        <local:HslViewModel Color="Aqua" />
    </ContentPage.BindingContext>

    <StackLayout Padding="10, 0">
        <BoxView Color="{Binding Color}"
                 VerticalOptions="FillAndExpand" />

        <Label Text="{Binding Hue, StringFormat='Hue = {0:F2}'}"
               HorizontalOptions="Center" />

        <Slider Value="{Binding Hue, Mode=TwoWay}" />

        <Label Text="{Binding Saturation, StringFormat='Saturation = {0:F2}'}"
               HorizontalOptions="Center" />

        <Slider Value="{Binding Saturation, Mode=TwoWay}" />

        <Label Text="{Binding Luminosity, StringFormat='Luminosity = {0:F2}'}"
               HorizontalOptions="Center" />

        <Slider Value="{Binding Luminosity, Mode=TwoWay}" />
    </StackLayout>
</ContentPage>
각각 Label 에 대한 바인딩은 기본값 OneWay입니다. 값을 표시하기만 하면 됩니다. 그러나 각각 Slider 에 대한 바인딩은 TwoWay. 이렇게 하면 Slider ViewModel에서 초기화할 수 있습니다. ViewModel이 Color 인스턴스화될 Aqua 때 속성이 설정됩니다. 그러나 변경 내용은 Slider ViewModel에서 속성에 대한 새 값을 설정한 다음 새 색을 계산해야 합니다.
ViewModels를 사용하여 명령
대부분의 경우 MVVM 패턴은 데이터 항목의 조작으로 제한됩니다. ViewModel의 View 병렬 데이터 개체에 있는 사용자 인터페이스 개체입니다.
그러나 보기에 ViewModel에서 다양한 작업을 트리거하는 단추가 포함되어야 하는 경우도 있습니다. 그러나 ViewModel은 ViewModel을 특정 사용자 인터페이스 패러다임과 연결하므로 단추에 대한 처리기를 포함 Clicked 해서는 안 됩니다.
ViewModels가 특정 사용자 인터페이스 개체와 더 독립적이지만 ViewModel 내에서 메서드를 호출할 수 있도록 허용하려면 명령 인터페이스가 존재합니다. 이 명령 인터페이스는 다음 요소에서 지원됩니다.Xamarin.Forms
ButtonMenuItemToolbarItemSearchBarTextCell(또한ImageCell)ListViewTapGestureRecognizer
및 ListView 요소를 제외하고 SearchBar 이러한 요소는 두 가지 속성을 정의합니다.
Command(System.Windows.Input.ICommand형식)CommandParameter(Object형식)
SearchBar 형식의 SearchCommand 속성을 정의하는 동안 ListView 정의 및 SearchCommandParameter 속성ICommand입니다RefreshCommand.
인터페이스는 ICommand 두 가지 메서드와 하나의 이벤트를 정의합니다.
void Execute(object arg)bool CanExecute(object arg)event EventHandler CanExecuteChanged
ViewModel은 형식 ICommand의 속성을 정의할 수 있습니다. 그런 다음 이러한 속성을 Command 각 Button 요소 또는 다른 요소의 속성 또는 이 인터페이스를 구현하는 사용자 지정 뷰에 바인딩할 수 있습니다. 필요에 따라 이 ViewModel 속성에 CommandParameter 바인딩된 개별 Button 개체(또는 기타 요소)를 식별하도록 속성을 설정할 수 있습니다. 내부적으로 Button 사용자가 메서드를 Execute 탭할 때마다 메서드를 Button호출하여 메서드CommandParameter에 Execute 전달합니다.
이 CanExecute 메서드와 CanExecuteChanged 이벤트는 탭이 현재 유효하지 않을 수 있는 Button 경우에 사용되며, 이 경우 Button 자체적으로 사용하지 않도록 설정해야 합니다. Button 속성이 Command 처음 설정되고 이벤트가 발생할 때마다 CanExecuteChanged 호출 CanExecute 됩니다. 반환 falseButton 되는 경우 CanExecute 자체를 사용하지 않도록 설정하고 호출을 생성 Execute 하지 않습니다.
ViewModels Xamarin.Forms 에 명령을 추가하는 데 도움이 되도록 다음을 구현 ICommandCommand 하는 두 개의 클래스를 정의합니다. 여기서 Command<T> 인수 Execute CanExecute의 형식은 다음과 T 같습니다. 이러한 두 클래스는 여러 생성자와 ChangeCanExecute ViewModel이 개체가 강제로 이벤트를 발생하도록 호출할 Command 수 있는 메서드를 CanExecuteChanged 정의합니다.
다음은 전화 번호를 입력하기 위한 간단한 키패드용 ViewModel입니다. Execute 및 CanExecute 메서드는 생성자에서 바로 람다 함수로 정의됩니다.
using System;
using System.ComponentModel;
using System.Windows.Input;
using Xamarin.Forms;

namespace XamlSamples
{
    class KeypadViewModel : INotifyPropertyChanged
    {
        string inputString = "";
        string displayText = "";
        char[] specialChars = { '*', '#' };

        public event PropertyChangedEventHandler PropertyChanged;

        // Constructor
        public KeypadViewModel()
        {
            AddCharCommand = new Command<string>((key) =>
                {
                    // Add the key to the input string.
                    InputString += key;
                });

            DeleteCharCommand = new Command(() =>
                {
                    // Strip a character from the input string.
                    InputString = InputString.Substring(0, InputString.Length - 1);
                },
                () =>
                {
                    // Return true if there's something to delete.
                    return InputString.Length > 0;
                });
        }

        // Public properties
        public string InputString
        {
            protected set
            {
                if (inputString != value)
                {
                    inputString = value;
                    OnPropertyChanged("InputString");
                    DisplayText = FormatText(inputString);

                    // Perhaps the delete button must be enabled/disabled.
                    ((Command)DeleteCharCommand).ChangeCanExecute();
                }
            }

            get { return inputString; }
        }

        public string DisplayText
        {
            protected set
            {
                if (displayText != value)
                {
                    displayText = value;
                    OnPropertyChanged("DisplayText");
                }
            }
            get { return displayText; }
        }

        // ICommand implementations
        public ICommand AddCharCommand { protected set; get; }

        public ICommand DeleteCharCommand { protected set; get; }

        string FormatText(string str)
        {
            bool hasNonNumbers = str.IndexOfAny(specialChars) != -1;
            string formatted = str;

            if (hasNonNumbers || str.Length < 4 || str.Length > 10)
            {
            }
            else if (str.Length < 8)
            {
                formatted = String.Format("{0}-{1}",
                                          str.Substring(0, 3),
                                          str.Substring(3));
            }
            else
            {
                formatted = String.Format("({0}) {1}-{2}",
                                          str.Substring(0, 3),
                                          str.Substring(3, 3),
                                          str.Substring(6));
            }
            return formatted;
        }

        protected void OnPropertyChanged(string propertyName)
        {
            PropertyChanged?.Invoke(this, new PropertyChangedEventArgs(propertyName));
        }
    }
}
이 ViewModel은 속성이 AddCharCommand 여러 단추(또는 명령 인터페이스가 있는 다른 단추)의 속성에 바인딩 Command 되어 있다고 가정합니다. 각 단추는 각각에 의해 CommandParameter식별됩니다. 이러한 단추는 속성에 InputString 문자를 추가한 다음 속성의 전화 번호로 형식이 DisplayText 지정됩니다.
라는 DeleteCharCommand형식 ICommand 의 두 번째 속성도 있습니다. 이 단추는 백 간격 단추에 바인딩되지만 삭제할 문자가 없으면 단추를 사용하지 않도록 설정해야 합니다.
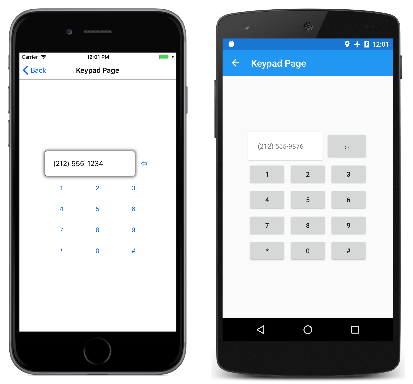
다음 키패드는 시각적으로 정교하지 않습니다. 대신 명령 인터페이스의 사용을 보다 명확하게 설명하기 위해 태그가 최소값으로 감소되었습니다.
<ContentPage xmlns="http://xamarin.com/schemas/2014/forms"
xmlns:x="http://schemas.microsoft.com/winfx/2009/xaml"
xmlns:local="clr-namespace:XamlSamples;assembly=XamlSamples"
x:Class="XamlSamples.KeypadPage"
Title="Keypad Page">
<Grid HorizontalOptions="Center"
VerticalOptions="Center">
<Grid.BindingContext>
<local:KeypadViewModel />
</Grid.BindingContext>
<Grid.RowDefinitions>
<RowDefinition Height="Auto" />
<RowDefinition Height="Auto" />
<RowDefinition Height="Auto" />
<RowDefinition Height="Auto" />
<RowDefinition Height="Auto" />
</Grid.RowDefinitions>
<Grid.ColumnDefinitions>
<ColumnDefinition Width="80" />
<ColumnDefinition Width="80" />
<ColumnDefinition Width="80" />
</Grid.ColumnDefinitions>
<!-- Internal Grid for top row of items -->
<Grid Grid.Row="0" Grid.Column="0" Grid.ColumnSpan="3">
<Grid.ColumnDefinitions>
<ColumnDefinition Width="*" />
<ColumnDefinition Width="Auto" />
</Grid.ColumnDefinitions>
<Frame Grid.Column="0"
OutlineColor="Accent">
<Label Text="{Binding DisplayText}" />
</Frame>
<Button Text="⇦"
Command="{Binding DeleteCharCommand}"
Grid.Column="1"
BorderWidth="0" />
</Grid>
<Button Text="1"
Command="{Binding AddCharCommand}"
CommandParameter="1"
Grid.Row="1" Grid.Column="0" />
<Button Text="2"
Command="{Binding AddCharCommand}"
CommandParameter="2"
Grid.Row="1" Grid.Column="1" />
<Button Text="3"
Command="{Binding AddCharCommand}"
CommandParameter="3"
Grid.Row="1" Grid.Column="2" />
<Button Text="4"
Command="{Binding AddCharCommand}"
CommandParameter="4"
Grid.Row="2" Grid.Column="0" />
<Button Text="5"
Command="{Binding AddCharCommand}"
CommandParameter="5"
Grid.Row="2" Grid.Column="1" />
<Button Text="6"
Command="{Binding AddCharCommand}"
CommandParameter="6"
Grid.Row="2" Grid.Column="2" />
<Button Text="7"
Command="{Binding AddCharCommand}"
CommandParameter="7"
Grid.Row="3" Grid.Column="0" />
<Button Text="8"
Command="{Binding AddCharCommand}"
CommandParameter="8"
Grid.Row="3" Grid.Column="1" />
<Button Text="9"
Command="{Binding AddCharCommand}"
CommandParameter="9"
Grid.Row="3" Grid.Column="2" />
<Button Text="*"
Command="{Binding AddCharCommand}"
CommandParameter="*"
Grid.Row="4" Grid.Column="0" />
<Button Text="0"
Command="{Binding AddCharCommand}"
CommandParameter="0"
Grid.Row="4" Grid.Column="1" />
<Button Text="#"
Command="{Binding AddCharCommand}"
CommandParameter="#"
Grid.Row="4" Grid.Column="2" />
</Grid>
</ContentPage>
Command 이 태그에 나타나는 첫 번째 Button 속성은 바인딩DeleteCharCommand됩니다. 나머지는 얼굴에 나타나는 문자와 CommandParameter 동일한 값을 사용하여 바인딩 AddCharCommand 됩니다Button. 작동 중인 프로그램은 다음과 같습니다.
비동기 메서드 호출
명령은 비동기 메서드를 호출할 수도 있습니다. 이 작업은 메서드를 async await 지정할 Execute 때 키워드(keyword) 사용하여 수행됩니다.
DownloadCommand = new Command (async () => await DownloadAsync ());
이는 메서드가 DownloadAsync a Task 이며 대기해야 임을 나타냅니다.
async Task DownloadAsync ()
{
    await Task.Run (() => Download ());
}

void Download ()
{
    ...
}
탐색 메뉴 구현
이 문서 시리즈의 모든 소스 코드를 포함하는 샘플 프로그램은 홈페이지에 ViewModel을 사용합니다. 이 ViewModel은 명명된 TypeTitle세 개의 속성이 있는 짧은 클래스의 정의이며 Description 각 샘플 페이지의 형식, 제목 및 간단한 설명을 포함합니다. 또한 ViewModel은 프로그램의 모든 페이지의 컬렉션인 정 All 적 속성을 정의합니다.
public class PageDataViewModel
{
    public PageDataViewModel(Type type, string title, string description)
    {
        Type = type;
        Title = title;
        Description = description;
    }

    public Type Type { private set; get; }

    public string Title { private set; get; }

    public string Description { private set; get; }

    static PageDataViewModel()
    {
        All = new List<PageDataViewModel>
        {
            // Part 1. Getting Started with XAML
            new PageDataViewModel(typeof(HelloXamlPage), "Hello, XAML",
                                  "Display a Label with many properties set"),

            new PageDataViewModel(typeof(XamlPlusCodePage), "XAML + Code",
                                  "Interact with a Slider and Button"),

            // Part 2. Essential XAML Syntax
            new PageDataViewModel(typeof(GridDemoPage), "Grid Demo",
                                  "Explore XAML syntax with the Grid"),

            new PageDataViewModel(typeof(AbsoluteDemoPage), "Absolute Demo",
                                  "Explore XAML syntax with AbsoluteLayout"),

            // Part 3. XAML Markup Extensions
            new PageDataViewModel(typeof(SharedResourcesPage), "Shared Resources",
                                  "Using resource dictionaries to share resources"),

            new PageDataViewModel(typeof(StaticConstantsPage), "Static Constants",
                                  "Using the x:Static markup extensions"),

            new PageDataViewModel(typeof(RelativeLayoutPage), "Relative Layout",
                                  "Explore XAML markup extensions"),

            // Part 4. Data Binding Basics
            new PageDataViewModel(typeof(SliderBindingsPage), "Slider Bindings",
                                  "Bind properties of two views on the page"),

            new PageDataViewModel(typeof(SliderTransformsPage), "Slider Transforms",
                                  "Use Sliders with reverse bindings"),

            new PageDataViewModel(typeof(ListViewDemoPage), "ListView Demo",
                                  "Use a ListView with data bindings"),

            // Part 5. From Data Bindings to MVVM
            new PageDataViewModel(typeof(OneShotDateTimePage), "One-Shot DateTime",
                                  "Obtain the current DateTime and display it"),

            new PageDataViewModel(typeof(ClockPage), "Clock",
                                  "Dynamically display the current time"),

            new PageDataViewModel(typeof(HslColorScrollPage), "HSL Color Scroll",
                                  "Use a view model to select HSL colors"),

            new PageDataViewModel(typeof(KeypadPage), "Keypad",
                                  "Use a view model for numeric keypad logic")
        };
    }

    public static IList<PageDataViewModel> All { private set; get; }
}
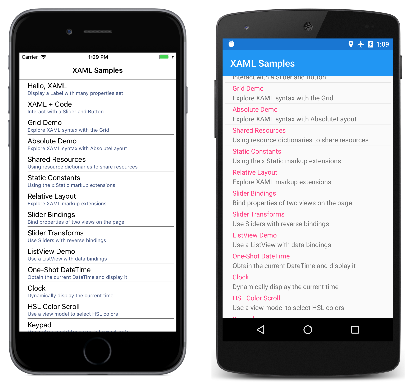
XAML MainPage 파일은 해당 ItemsSource 속성이 해당 All 속성으로 설정되고 각 페이지의 속성 및 Description 표시 Title 를 위한 속성이 포함된 TextCell 속성을 정의 ListBox 합니다.
<ContentPage xmlns="http://xamarin.com/schemas/2014/forms"
             xmlns:x="http://schemas.microsoft.com/winfx/2009/xaml"
             xmlns:local="clr-namespace:XamlSamples"
             x:Class="XamlSamples.MainPage"
             Padding="5, 0"
             Title="XAML Samples">

    <ListView ItemsSource="{x:Static local:PageDataViewModel.All}"
              ItemSelected="OnListViewItemSelected">
        <ListView.ItemTemplate>
            <DataTemplate>
                <TextCell Text="{Binding Title}"
                          Detail="{Binding Description}" />
            </DataTemplate>
        </ListView.ItemTemplate>
    </ListView>
</ContentPage>
페이지는 스크롤 가능한 목록에 표시됩니다.
코드 숨김 파일의 처리기는 사용자가 항목을 선택할 때 트리거됩니다. 처리기는 뒤로 null 의 ListBox 속성을 설정한 SelectedItem 다음 선택한 페이지를 인스턴스화하고 해당 페이지로 이동합니다.
private async void OnListViewItemSelected(object sender, SelectedItemChangedEventArgs args)
{
    (sender as ListView).SelectedItem = null;

    if (args.SelectedItem != null)
    {
        PageDataViewModel pageData = args.SelectedItem as PageDataViewModel;
        Page page = (Page)Activator.CreateInstance(pageData.Type);
        await Navigation.PushAsync(page);
    }
}
동영상
Xamarin Evolve 2016: MVVM Made Simple with Xamarin.Forms and Prism
요약
XAML은 특히 데이터 바인딩 및 MVVM을 사용하는 경우 애플리케이션에서 Xamarin.Forms 사용자 인터페이스를 정의하기 위한 강력한 도구입니다. 그 결과 코드의 모든 배경 지원을 통해 사용자 인터페이스의 클린, 우아하고 도구 가능한 표현이 생성됩니다.


