Xamarin.Forms 애플리케이션에서 탐색 수행
이 빠른 시작에서 다음과 같은 작업을 수행하는 방법을 알아봅니다.
- Xamarin.Forms Shell 애플리케이션에 페이지를 추가합니다.
- 페이지 간 탐색을 수행합니다.
- 데이터 바인딩을 사용하여 사용자 인터페이스 요소와 데이터 원본 간 데이터 동기화를 수행합니다.
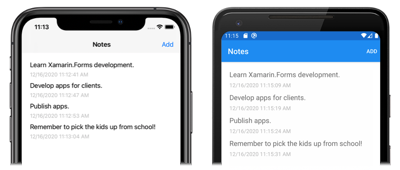
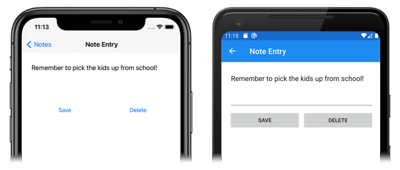
이 빠른 시작에서는 단일 노트 저장이 가능한 플랫폼 간 Xamarin.Forms Shell 애플리케이션을 여러 노트 저장이 가능한 애플리케이션으로 전환하는 방법을 안내합니다. 최종 애플리케이션은 다음과 같습니다.
필수 조건
이 빠른 시작을 시도하기 전에 이전 빠른 시작을 성공적으로 완료해야 합니다.
Visual Studio를 사용하여 앱 업데이트
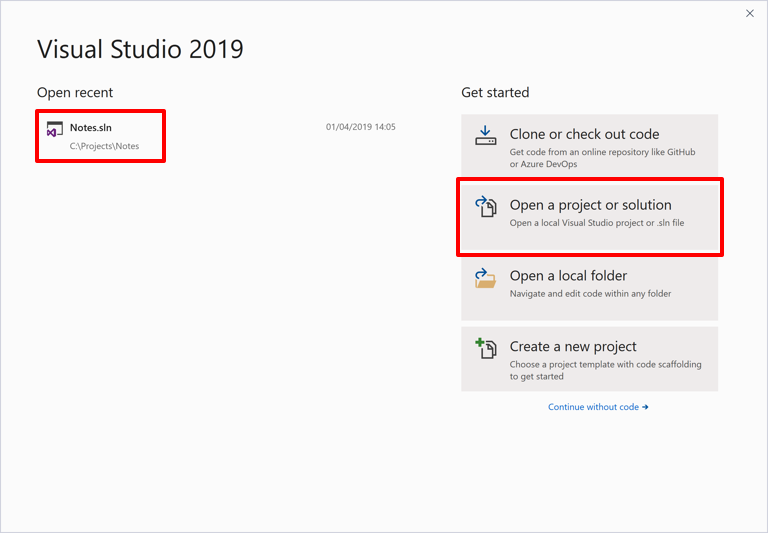
Visual Studio를 시작합니다. 시작 창에서 최근의 프로젝트/솔루션 목록 가운데 Notes 솔루션을 클릭하거나 프로젝트 또는 솔루션 열기를 클릭하고 프로젝트/솔루션 열기 대화 상자에서 Notes 프로젝트에 대한 솔루션 파일을 선택합니다.
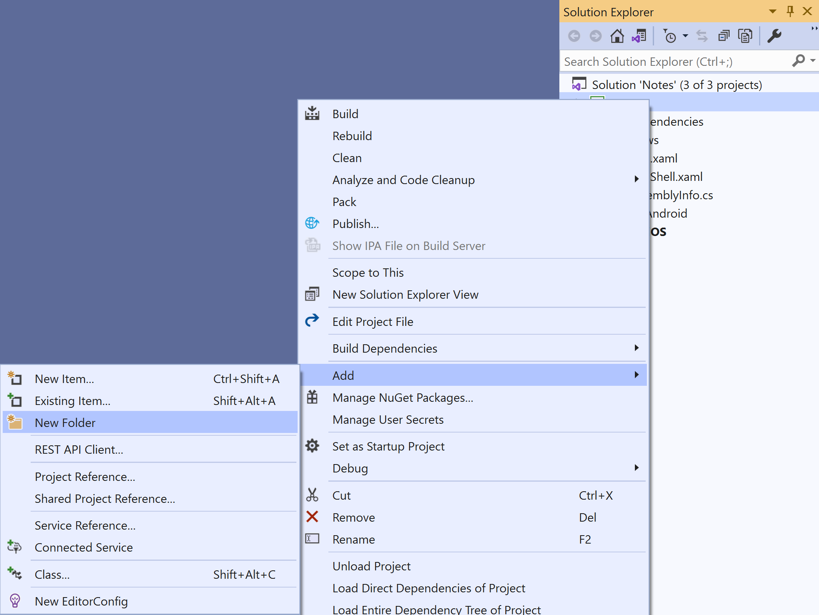
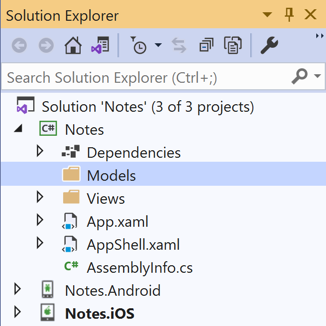
솔루션 탐색기에서 Notes 프로젝트를 마우스 오른쪽 단추로 클릭하고 추가 > 새 폴더를 선택합니다.
솔루션 탐색기에서 새 폴더의 이름을 Models로 지정합니다.
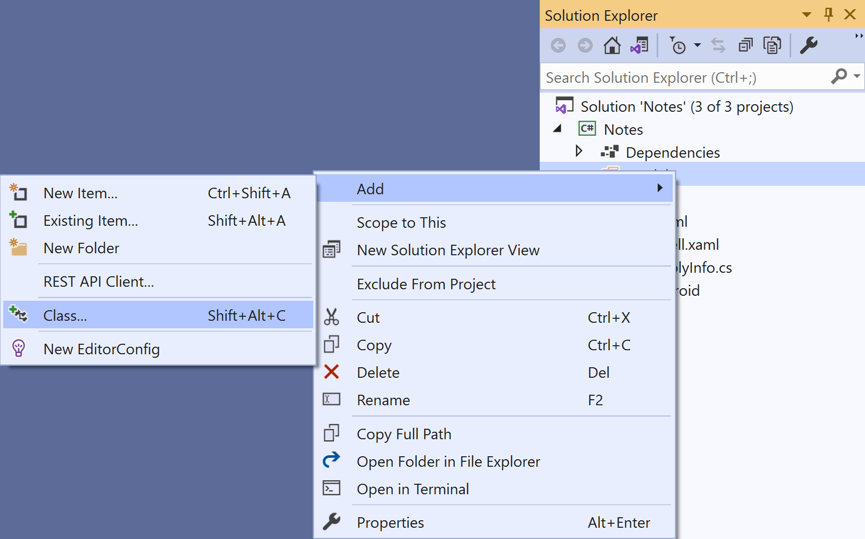
솔루션 탐색기에서 Models 폴더를 마우스 오른쪽 단추로 클릭하고 추가 > 클래스...를 선택합니다.
새 항목 추가 대화 상자에서 Visual C# 항목 > 클래스를 선택하고 새 파일의 이름을 Note로 지정한 다음 추가 단추를 클릭합니다.
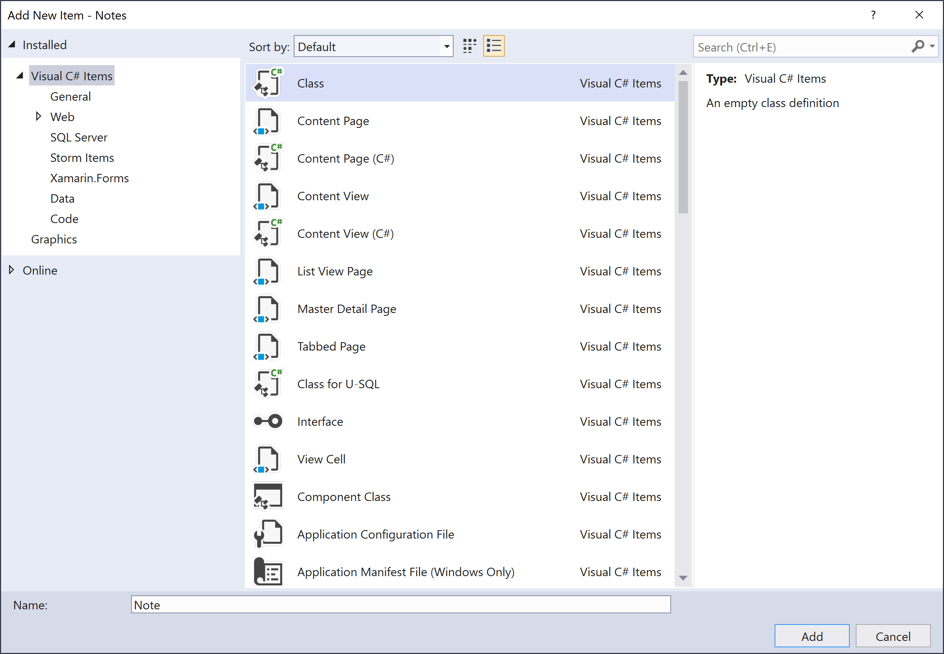
그러면 Notes 프로젝트의 Models 폴더에 Note라는 클래스가 추가됩니다.
Note.cs에서 템플릿 코드를 모두 제거하고 다음 코드로 바꿉니다.
using System;

namespace Notes.Models
{
    public class Note
    {
        public string Filename { get; set; }
        public string Text { get; set; }
        public DateTime Date { get; set; }
    }
}
이 클래스는 애플리케이션의 각 노트에 대한 데이터를 저장하는
Note모델을 정의합니다.CTRL+S를 눌러 변경 내용을 Note.cs에 저장합니다.
솔루션 탐색기의 Notes 프로젝트에서 Views 폴더를 선택하여 마우스 오른쪽 단추를 클릭하고 추가 > 새 항목...을 선택합니다. 새 항목 추가 대화 상자에서 Visual C# 항목 >Xamarin.Forms> 콘텐츠 페이지를 선택하고 새 파일의 이름을 NoteEntryPage로 지정한 뒤 추가 단추를 클릭합니다.
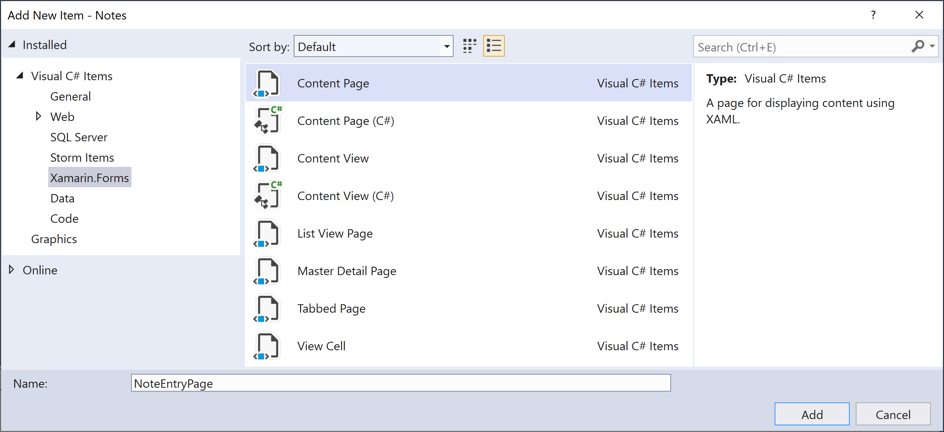
그러면 NoteEntryPage라는 새 페이지가 프로젝트의 Views 폴더에 추가됩니다. 이 페이지는 노트 입력에 사용됩니다.
NoteEntryPage.xaml에서 템플릿 코드를 모두 제거하고 다음 코드로 바꿉니다.
<?xml version="1.0" encoding="UTF-8"?>
<ContentPage xmlns="http://xamarin.com/schemas/2014/forms"
             xmlns:x="http://schemas.microsoft.com/winfx/2009/xaml"
             x:Class="Notes.Views.NoteEntryPage"
             Title="Note Entry">
    <!-- Layout children vertically -->
    <StackLayout Margin="20">
        <Editor Placeholder="Enter your note"
                Text="{Binding Text}"
                HeightRequest="100" />
        <!-- Layout children in two columns -->
        <Grid ColumnDefinitions="*,*">
            <Button Text="Save"
                    Clicked="OnSaveButtonClicked" />
            <Button Grid.Column="1"
                    Text="Delete"
                    Clicked="OnDeleteButtonClicked"/>
        </Grid>
    </StackLayout>
</ContentPage>
이 코드는 텍스트 입력을 위한
Editor와 파일을 저장 또는 삭제하도록 애플리케이션에 지시하는 두 개의Button개체로 구성된 페이지의 사용자 인터페이스를 선언적으로 정의합니다. 두 개의Button인스턴스가Grid에 가로로 배치되고Editor및Grid가StackLayout에 세로로 배치됩니다. 또한Editor는 데이터 바인딩을 사용하여Note모델의Text속성에 바인딩합니다. 데이터 바인딩에 대한 자세한 내용은 Xamarin.Forms 빠른 시작 심층 분석에서 데이터 바인딩을 참조하세요.CTRL+S를 눌러 변경 내용을 NoteEntryPage.xaml에 저장합니다.
NoteEntryPage.xaml.cs에서 템플릿 코드를 모두 제거하고 다음 코드로 바꿉니다.
using System;
using System.IO;
using Notes.Models;
using Xamarin.Forms;

namespace Notes.Views
{
    [QueryProperty(nameof(ItemId), nameof(ItemId))]
    public partial class NoteEntryPage : ContentPage
    {
        public string ItemId
        {
            set
            {
                LoadNote(value);
            }
        }

        public NoteEntryPage()
        {
            InitializeComponent();

            // Set the BindingContext of the page to a new Note.
            BindingContext = new Note();
        }

        void LoadNote(string filename)
        {
            try
            {
                // Retrieve the note and set it as the BindingContext of the page.
                Note note = new Note
                {
                    Filename = filename,
                    Text = File.ReadAllText(filename),
                    Date = File.GetCreationTime(filename)
                };
                BindingContext = note;
            }
            catch (Exception)
            {
                Console.WriteLine("Failed to load note.");
            }
        }

        async void OnSaveButtonClicked(object sender, EventArgs e)
        {
            var note = (Note)BindingContext;

            if (string.IsNullOrWhiteSpace(note.Filename))
            {
                // Save the file.
                var filename = Path.Combine(App.FolderPath, $"{Path.GetRandomFileName()}.notes.txt");
                File.WriteAllText(filename, note.Text);
            }
            else
            {
                // Update the file.
                File.WriteAllText(note.Filename, note.Text);
            }

            // Navigate backwards
            await Shell.Current.GoToAsync("..");
        }

        async void OnDeleteButtonClicked(object sender, EventArgs e)
        {
            var note = (Note)BindingContext;

            // Delete the file.
            if (File.Exists(note.Filename))
            {
                File.Delete(note.Filename);
            }

            // Navigate backwards
            await Shell.Current.GoToAsync("..");
        }
    }
}
이 코드는 페이지의
BindingContext에서 단일 노트를 나타내는Note인스턴스를 저장합니다. 클래스는 탐색하는 동안 쿼리 매개 변수를 통해 페이지에 데이터를 전달할 수 있도록 하는QueryPropertyAttribute로 데코레이트됩니다. 첫 번째 인수QueryPropertyAttribute는 데이터를 받을 속성의 이름을 지정하고 두 번째 인수는 쿼리 매개 변수 ID를 지정합니다. 따라서QueryParameterAttribute위의 코드에서는 속성이ItemId메서드 호출에 지정된 URI에서 쿼리 매개 변수에 전달ItemId된GoToAsync데이터를 받도록 지정합니다. 그런 다음ItemId속성은LoadNote메서드를 호출하여 디바이스의 파일에서Note개체를 만들고, 페이지의BindingContext를Note개체로 설정합니다.저장
Button을 누르면OnSaveButtonClicked이벤트 처리기가 실행되어 이름이 임의로 지정된 새 파일에Editor의 콘텐츠가 저장되며, 노트가 업데이트 중이라면 기존 파일에 저장됩니다. 어느 쪽이든 파일은 애플리케이션의 로컬 애플리케이션 데이터 폴더에 저장됩니다. 그런 다음에는 메서드가 이전 페이지로 다시 이동합니다. 삭제Button을 누르면OnDeleteButtonClicked이벤트 처리기가 실행되어 파일을 삭제하고(있는 경우) 이전 페이지로 다시 이동합니다. 탐색에 대한 자세한 내용은 Xamarin.Forms Shell 빠른 시작 심층 분석에서 탐색을 참조하세요.CTRL+S를 눌러 변경 내용을 NoteEntryPage.xaml.cs에 저장합니다.
Warning
다음 단계에서 수정될 오류로 인해 지금은 애플리케이션이 빌드되지 않습니다.
솔루션 탐색기의 Notes 프로젝트에서 Views 폴더에 있는 NotesPage.xaml을 엽니다.
NotesPage.xaml에서 템플릿 코드를 모두 제거하고 다음 코드로 바꿉니다.
<?xml version="1.0" encoding="UTF-8"?>
<ContentPage xmlns="http://xamarin.com/schemas/2014/forms"
             xmlns:x="http://schemas.microsoft.com/winfx/2009/xaml"
             x:Class="Notes.Views.NotesPage"
             Title="Notes">
    <!-- Add an item to the toolbar -->
    <ContentPage.ToolbarItems>
        <ToolbarItem Text="Add"
                     Clicked="OnAddClicked" />
    </ContentPage.ToolbarItems>

    <!-- Display notes in a list -->
    <CollectionView x:Name="collectionView"
                    Margin="20"
                    SelectionMode="Single"
                    SelectionChanged="OnSelectionChanged">
        <CollectionView.ItemsLayout>
            <LinearItemsLayout Orientation="Vertical"
                               ItemSpacing="10" />
        </CollectionView.ItemsLayout>
        <!-- Define the appearance of each item in the list -->
        <CollectionView.ItemTemplate>
            <DataTemplate>
                <StackLayout>
                    <Label Text="{Binding Text}"
                           FontSize="Medium"/>
                    <Label Text="{Binding Date}"
                           TextColor="Silver"
                           FontSize="Small" />
                </StackLayout>
            </DataTemplate>
        </CollectionView.ItemTemplate>
    </CollectionView>
</ContentPage>
이 코드는
CollectionView와ToolbarItem으로 구성된 페이지에 대한 사용자 인터페이스를 선언적으로 정의합니다.CollectionView는 데이터 바인딩을 사용하여 애플리케이션에서 검색하는 노트를 표시합니다. 노트를 선택하면 노트를 수정할 수 있는NoteEntryPage로 이동합니다. 또는ToolbarItem을 눌러 새 노트를 만들 수도 있습니다. 데이터 바인딩에 대한 자세한 내용은 Xamarin.Forms 빠른 시작 심층 분석에서 데이터 바인딩을 참조하세요.CTRL+S를 눌러 변경 내용을 NotesPage.xaml에 저장합니다.
솔루션 탐색기의 Notes 프로젝트에서 Views 폴더에 있는 NotesPage.xaml을 확장하고 NotesPage.xaml.cs를 엽니다.
NotesPage.xaml.cs에서 템플릿 코드를 모두 제거하고 다음 코드로 바꿉니다.
using System;
using System.Collections.Generic;
using System.IO;
using System.Linq;
using Notes.Models;
using Xamarin.Forms;

namespace Notes.Views
{
    public partial class NotesPage : ContentPage
    {
        public NotesPage()
        {
            InitializeComponent();
        }

        protected override void OnAppearing()
        {
            base.OnAppearing();

            var notes = new List<Note>();

            // Create a Note object from each file.
            var files = Directory.EnumerateFiles(App.FolderPath, "*.notes.txt");
            foreach (var filename in files)
            {
                notes.Add(new Note
                {
                    Filename = filename,
                    Text = File.ReadAllText(filename),
                    Date = File.GetCreationTime(filename)
                });
            }

            // Set the data source for the CollectionView to a
            // sorted collection of notes.
            collectionView.ItemsSource = notes
                .OrderBy(d => d.Date)
                .ToList();
        }

        async void OnAddClicked(object sender, EventArgs e)
        {
            // Navigate to the NoteEntryPage, without passing any data.
            await Shell.Current.GoToAsync(nameof(NoteEntryPage));
        }

        async void OnSelectionChanged(object sender, SelectionChangedEventArgs e)
        {
            if (e.CurrentSelection != null)
            {
                // Navigate to the NoteEntryPage, passing the filename as a query parameter.
                Note note = (Note)e.CurrentSelection.FirstOrDefault();
                await Shell.Current.GoToAsync($"{nameof(NoteEntryPage)}?{nameof(NoteEntryPage.ItemId)}={note.Filename}");
            }
        }
    }
}
이 코드는
NotesPage의 기능을 정의합니다. 페이지가 표시되면OnAppearing메서드가 실행되며, 그러면CollectionView가 로컬 애플리케이션 데이터 폴더에서 검색된 모든 노트로 채워집니다.ToolbarItem을 누르면OnAddClicked이벤트 처리기가 실행됩니다. 이 메서드는NoteEntryPage로 이동합니다.CollectionView의 항목을 선택하면OnSelectionChanged이벤트 처리기가 실행됩니다. 이 메서드는CollectionView의 항목이 선택되고 선택된Note의Filename속성을 페이지에 쿼리 매개 변수로 전달하는 경우NoteEntryPage로 이동합니다. 탐색에 대한 자세한 내용은 Xamarin.Forms 빠른 시작 심층 분석에서 탐색을 참조하세요.CTRL+S를 눌러 변경 내용을 NotesPage.xaml.cs에 저장합니다.
Warning
다음 단계에서 수정될 오류로 인해 지금은 애플리케이션이 빌드되지 않습니다.
솔루션 탐색기의 Notes 프로젝트에서 AppShell.xaml을 확장하고 AppShell.xaml.cs를 엽니다. 그런 다음 기존 코드를 다음 코드로 바꿉니다.
using Notes.Views;
using Xamarin.Forms;

namespace Notes
{
    public partial class AppShell : Shell
    {
        public AppShell()
        {
            InitializeComponent();
            Routing.RegisterRoute(nameof(NoteEntryPage), typeof(NoteEntryPage));
        }
    }
}
이 코드는 Shell 시각적 계층 구조(AppShell.xaml)에 표시되지 않는
NoteEntryPage에 대한 경로를 등록합니다. 그러면GoToAsync메서드로 URI 기반 탐색을 사용하여 이 페이지로 이동할 수 있습니다.CTRL+S를 눌러 변경 내용을 AppShell.xaml.cs에 저장합니다.
솔루션 탐색기의 Notes 프로젝트에서 App.xaml을 확장하고 App.xaml.cs를 엽니다. 그런 다음 기존 코드를 다음 코드로 바꿉니다.
using System;
using System.IO;
using Xamarin.Forms;

namespace Notes
{
    public partial class App : Application
    {
        public static string FolderPath { get; private set; }

        public App()
        {
            InitializeComponent();
            FolderPath = Path.Combine(Environment.GetFolderPath(Environment.SpecialFolder.LocalApplicationData));
            MainPage = new AppShell();
        }

        protected override void OnStart()
        {
        }

        protected override void OnSleep()
        {
        }

        protected override void OnResume()
        {
        }
    }
}
이 코드는
System.IO네임스페이스에 대해 네임스페이스 선언을 추가하고string형식의 정적FolderPath속성에 대해 선언을 추가합니다.FolderPath속성은 노트 데이터가 저장될 디바이스에 경로를 저장하는 데 사용됩니다. 또한 이 코드는App생성자의FolderPath속성을 초기화하고,MainPage속성을 서브클래싱된Shell개체로 초기화합니다.CTRL+S를 눌러 변경 내용을 App.xaml.cs에 저장합니다.
각 플랫폼에서 프로젝트를 빌드하고 실행합니다. 자세한 내용은 빠른 시작 빌드를 참조하세요.
NotesPage에서 추가 단추를 눌러 NoteEntryPage로 이동하고 노트를 입력합니다. 노트를 저장한 후 애플리케이션은 NotesPage로 다시 이동합니다.
다양한 길이의 여러 노트를 입력하여 애플리케이션 동작을 관찰합니다. 애플리케이션을 닫고 다시 시작하여 입력한 노트가 디바이스에 저장되었는지 확인합니다.
Mac용 Visual Studio를 사용하여 앱 업데이트
Mac용 Visual Studio를 시작합니다. 시작 창에서 열기를 클릭하고, 대화 상자에서 Notes 프로젝트에 대한 솔루션 파일을 선택합니다.

Solution Pad에서 Notes 프로젝트를 마우스 오른쪽 단추로 클릭하고 추가 > 새 폴더를 선택합니다.

새 폴더 대화 상자에서 새 폴더의 이름을 Models로 지정합니다.

Solution Pad에서 Models 폴더를 선택하고 마우스 오른쪽 단추로 클릭한 다음 추가 > 새 클래스...를 선택합니다.

새 파일 대화 상자에서 일반 > 빈 클래스를 선택하고, 새 파일의 이름을 Note로 지정하고 새로 만들기 단추를 클릭합니다.

그러면 Notes 프로젝트의 Models 폴더에 Note라는 클래스가 추가됩니다.
Note.cs에서 템플릿 코드를 모두 제거하고 다음 코드로 바꿉니다.
using System;

namespace Notes.Models
{
    public class Note
    {
        public string Filename { get; set; }
        public string Text { get; set; }
        public DateTime Date { get; set; }
    }
}
이 클래스는 애플리케이션의 각 노트에 대한 데이터를 저장하는
Note모델을 정의합니다.파일 > 저장을 선택하거나 ⌘ + S를 눌러 변경 내용을 Note.cs에 저장합니다.
Solution Pad에서 Notes 프로젝트를 선택하여 마우스 오른쪽 단추로 클릭하고 추가 > 새 파일...을 선택합니다. 새 파일 대화 상자에서 Forms > Forms ContentPage XAML을 선택하고, 새 파일의 이름을 NoteEntryPage로 지정하고 새로 만들기 단추를 클릭합니다.

그러면 NoteEntryPage라는 새 페이지가 프로젝트의 Views 폴더에 추가됩니다. 이 페이지는 노트 입력에 사용됩니다.
NoteEntryPage.xaml에서 템플릿 코드를 모두 제거하고 다음 코드로 바꿉니다.
<?xml version="1.0" encoding="UTF-8"?>
<ContentPage xmlns="http://xamarin.com/schemas/2014/forms"
             xmlns:x="http://schemas.microsoft.com/winfx/2009/xaml"
             x:Class="Notes.Views.NoteEntryPage"
             Title="Note Entry">
    <!-- Layout children vertically -->
    <StackLayout Margin="20">
        <Editor Placeholder="Enter your note"
                Text="{Binding Text}"
                HeightRequest="100" />
        <!-- Layout children in two columns -->
        <Grid ColumnDefinitions="*,*">
            <Button Text="Save"
                    Clicked="OnSaveButtonClicked" />
            <Button Grid.Column="1"
                    Text="Delete"
                    Clicked="OnDeleteButtonClicked"/>
        </Grid>
    </StackLayout>
</ContentPage>
이 코드는 텍스트 입력을 위한
Editor와 파일을 저장 또는 삭제하도록 애플리케이션에 지시하는 두 개의Button개체로 구성된 페이지의 사용자 인터페이스를 선언적으로 정의합니다. 두 개의Button인스턴스가Grid에 가로로 배치되고Editor및Grid가StackLayout에 세로로 배치됩니다. 또한Editor는 데이터 바인딩을 사용하여Note모델의Text속성에 바인딩합니다. 데이터 바인딩에 대한 자세한 내용은 Xamarin.Forms 빠른 시작 심층 분석에서 데이터 바인딩을 참조하세요.파일 > 저장을 선택하거나 ⌘ + S를 눌러 변경 내용을 NoteEntryPage.xaml에 저장합니다.
NoteEntryPage.xaml.cs에서 템플릿 코드를 모두 제거하고 다음 코드로 바꿉니다.
using System;
using System.IO;
using Notes.Models;
using Xamarin.Forms;

namespace Notes.Views
{
    [QueryProperty(nameof(ItemId), nameof(ItemId))]
    public partial class NoteEntryPage : ContentPage
    {
        public string ItemId
        {
            set
            {
                LoadNote(value);
            }
        }

        public NoteEntryPage()
        {
            InitializeComponent();

            // Set the BindingContext of the page to a new Note.
            BindingContext = new Note();
        }

        void LoadNote(string filename)
        {
            try
            {
                // Retrieve the note and set it as the BindingContext of the page.
                Note note = new Note
                {
                    Filename = filename,
                    Text = File.ReadAllText(filename),
                    Date = File.GetCreationTime(filename)
                };
                BindingContext = note;
            }
            catch (Exception)
            {
                Console.WriteLine("Failed to load note.");
            }
        }

        async void OnSaveButtonClicked(object sender, EventArgs e)
        {
            var note = (Note)BindingContext;

            if (string.IsNullOrWhiteSpace(note.Filename))
            {
                // Save the file.
                var filename = Path.Combine(App.FolderPath, $"{Path.GetRandomFileName()}.notes.txt");
                File.WriteAllText(filename, note.Text);
            }
            else
            {
                // Update the file.
                File.WriteAllText(note.Filename, note.Text);
            }

            // Navigate backwards
            await Shell.Current.GoToAsync("..");
        }

        async void OnDeleteButtonClicked(object sender, EventArgs e)
        {
            var note = (Note)BindingContext;

            // Delete the file.
            if (File.Exists(note.Filename))
            {
                File.Delete(note.Filename);
            }

            // Navigate backwards
            await Shell.Current.GoToAsync("..");
        }
    }
}
이 코드는 페이지의
BindingContext에서 단일 노트를 나타내는Note인스턴스를 저장합니다. 클래스는 탐색하는 동안 쿼리 매개 변수를 통해 페이지에 데이터를 전달할 수 있도록 하는QueryPropertyAttribute로 데코레이트됩니다. 첫 번째 인수QueryPropertyAttribute는 데이터를 받을 속성의 이름을 지정하고 두 번째 인수는 쿼리 매개 변수 ID를 지정합니다. 따라서QueryParameterAttribute위의 코드에서는 속성이ItemId메서드 호출에 지정된 URI에서 쿼리 매개 변수에 전달ItemId된GoToAsync데이터를 받도록 지정합니다. 그런 다음ItemId속성은LoadNote메서드를 호출하여 디바이스의 파일에서Note개체를 만들고, 페이지의BindingContext를Note개체로 설정합니다.저장
Button을 누르면OnSaveButtonClicked이벤트 처리기가 실행되어 이름이 임의로 지정된 새 파일에Editor의 콘텐츠가 저장되며, 노트가 업데이트 중이라면 기존 파일에 저장됩니다. 어느 쪽이든 파일은 애플리케이션의 로컬 애플리케이션 데이터 폴더에 저장됩니다. 그런 다음에는 메서드가 이전 페이지로 다시 이동합니다. 삭제Button을 누르면OnDeleteButtonClicked이벤트 처리기가 실행되어 파일을 삭제하고(있는 경우) 이전 페이지로 다시 이동합니다. 탐색에 대한 자세한 내용은 Xamarin.Forms Shell 빠른 시작 심층 분석에서 탐색을 참조하세요.파일 > 저장을 선택하거나 ⌘ + S를 눌러 변경 내용을 NoteEntryPage.xaml.cs에 저장합니다.
Warning
다음 단계에서 수정될 오류로 인해 지금은 애플리케이션이 빌드되지 않습니다.
Solution Pad의 Notes 프로젝트에서 Views 폴더에 있는 NotesPage.xaml을 엽니다.
NotesPage.xaml에서 템플릿 코드를 모두 제거하고 다음 코드로 바꿉니다.
<?xml version="1.0" encoding="UTF-8"?>
<ContentPage xmlns="http://xamarin.com/schemas/2014/forms"
             xmlns:x="http://schemas.microsoft.com/winfx/2009/xaml"
             x:Class="Notes.Views.NotesPage"
             Title="Notes">
    <!-- Add an item to the toolbar -->
    <ContentPage.ToolbarItems>
        <ToolbarItem Text="Add"
                     Clicked="OnAddClicked" />
    </ContentPage.ToolbarItems>

    <!-- Display notes in a list -->
    <CollectionView x:Name="collectionView"
                    Margin="20"
                    SelectionMode="Single"
                    SelectionChanged="OnSelectionChanged">
        <CollectionView.ItemsLayout>
            <LinearItemsLayout Orientation="Vertical"
                               ItemSpacing="10" />
        </CollectionView.ItemsLayout>
        <!-- Define the appearance of each item in the list -->
        <CollectionView.ItemTemplate>
            <DataTemplate>
                <StackLayout>
                    <Label Text="{Binding Text}"
                           FontSize="Medium"/>
                    <Label Text="{Binding Date}"
                           TextColor="Silver"
                           FontSize="Small" />
                </StackLayout>
            </DataTemplate>
        </CollectionView.ItemTemplate>
    </CollectionView>
</ContentPage>
이 코드는
CollectionView와ToolbarItem으로 구성된 페이지에 대한 사용자 인터페이스를 선언적으로 정의합니다.CollectionView는 데이터 바인딩을 사용하여 애플리케이션에서 검색하는 노트를 표시합니다. 노트를 선택하면 노트를 수정할 수 있는NoteEntryPage로 이동합니다. 또는ToolbarItem을 눌러 새 노트를 만들 수도 있습니다. 데이터 바인딩에 대한 자세한 내용은 Xamarin.Forms 빠른 시작 심층 분석에서 데이터 바인딩을 참조하세요.파일 > 저장을 선택하거나 ⌘ + S를 눌러 변경 내용을 NotesPage.xaml에 저장합니다.
Solution Pad의 Notes 프로젝트에서 Views 폴더에 있는 NotesPage.xaml을 확장하고 NotesPage.xaml.cs를 엽니다.
NotesPage.xaml.cs에서 템플릿 코드를 모두 제거하고 다음 코드로 바꿉니다.
using System;
using System.Collections.Generic;
using System.IO;
using System.Linq;
using Notes.Models;
using Xamarin.Forms;

namespace Notes.Views
{
    public partial class NotesPage : ContentPage
    {
        public NotesPage()
        {
            InitializeComponent();
        }

        protected override void OnAppearing()
        {
            base.OnAppearing();

            var notes = new List<Note>();

            // Create a Note object from each file.
            var files = Directory.EnumerateFiles(App.FolderPath, "*.notes.txt");
            foreach (var filename in files)
            {
                notes.Add(new Note
                {
                    Filename = filename,
                    Text = File.ReadAllText(filename),
                    Date = File.GetCreationTime(filename)
                });
            }

            // Set the data source for the CollectionView to a
            // sorted collection of notes.
            collectionView.ItemsSource = notes
                .OrderBy(d => d.Date)
                .ToList();
        }

        async void OnAddClicked(object sender, EventArgs e)
        {
            // Navigate to the NoteEntryPage, without passing any data.
            await Shell.Current.GoToAsync(nameof(NoteEntryPage));
        }

        async void OnSelectionChanged(object sender, SelectionChangedEventArgs e)
        {
            if (e.CurrentSelection != null)
            {
                // Navigate to the NoteEntryPage, passing the filename as a query parameter.
                Note note = (Note)e.CurrentSelection.FirstOrDefault();
                await Shell.Current.GoToAsync($"{nameof(NoteEntryPage)}?{nameof(NoteEntryPage.ItemId)}={note.Filename}");
            }
        }
    }
}
이 코드는
NotesPage의 기능을 정의합니다. 페이지가 표시되면OnAppearing메서드가 실행되며, 그러면CollectionView가 로컬 애플리케이션 데이터 폴더에서 검색된 모든 노트로 채워집니다.ToolbarItem을 누르면OnAddClicked이벤트 처리기가 실행됩니다. 이 메서드는NoteEntryPage로 이동합니다.CollectionView의 항목을 선택하면OnSelectionChanged이벤트 처리기가 실행됩니다. 이 메서드는CollectionView의 항목이 선택되고 선택된Note의Filename속성을 페이지에 쿼리 매개 변수로 전달하는 경우NoteEntryPage로 이동합니다. 탐색에 대한 자세한 내용은 Xamarin.Forms 빠른 시작 심층 분석에서 탐색을 참조하세요.파일 > 저장을 선택하거나 ⌘ + S를 눌러 변경 내용을 NotesPage.xaml.cs에 저장합니다.
Warning
다음 단계에서 수정될 오류로 인해 지금은 애플리케이션이 빌드되지 않습니다.
Solution Pad의 Notes 프로젝트에서 AppShell.xaml을 확장하고 AppShell.xaml.cs를 엽니다. 그런 다음 기존 코드를 다음 코드로 바꿉니다.
using Notes.Views;
using Xamarin.Forms;

namespace Notes
{
    public partial class AppShell : Shell
    {
        public AppShell()
        {
            InitializeComponent();
            Routing.RegisterRoute(nameof(NoteEntryPage), typeof(NoteEntryPage));
        }
    }
}
이 코드는 Shell 시각적 계층 구조에 표시되지 않는
NoteEntryPage에 대한 경로를 등록합니다. 그러면GoToAsync메서드로 URI 기반 탐색을 사용하여 이 페이지로 이동할 수 있습니다.파일 > 저장을 선택하거나 ⌘ + S를 눌러 변경 내용을 AppShell.xaml.cs에 저장합니다.
Solution Pad의 Notes 프로젝트에서 App.xaml을 확장하고 App.xaml.cs를 엽니다. 그런 다음 기존 코드를 다음 코드로 바꿉니다.
using System;
using System.IO;
using Xamarin.Forms;

namespace Notes
{
    public partial class App : Application
    {
        public static string FolderPath { get; private set; }

        public App()
        {
            InitializeComponent();
            FolderPath = Path.Combine(Environment.GetFolderPath(Environment.SpecialFolder.LocalApplicationData));
            MainPage = new AppShell();
        }

        protected override void OnStart()
        {
        }

        protected override void OnSleep()
        {
        }

        protected override void OnResume()
        {
        }
    }
}
이 코드는
System.IO네임스페이스에 대해 네임스페이스 선언을 추가하고string형식의 정적FolderPath속성에 대해 선언을 추가합니다.FolderPath속성은 노트 데이터가 저장될 디바이스에 경로를 저장하는 데 사용됩니다. 또한 이 코드는App생성자의FolderPath속성을 초기화하고,MainPage속성을 서브클래싱된Shell개체로 초기화합니다.파일 > 저장을 선택하거나 ⌘ + S를 눌러 변경 내용을 App.xaml.cs에 저장합니다.
각 플랫폼에서 프로젝트를 빌드하고 실행합니다. 자세한 내용은 빠른 시작 빌드를 참조하세요.
NotesPage에서 추가 단추를 눌러 NoteEntryPage로 이동하고 노트를 입력합니다. 노트를 저장한 후 애플리케이션은 NotesPage로 다시 이동합니다.
다양한 길이의 여러 노트를 입력하여 애플리케이션 동작을 관찰합니다. 애플리케이션을 닫고 다시 시작하여 입력한 노트가 디바이스에 저장되었는지 확인합니다.
다음 단계
이 빠른 시작에서는 다음과 같은 방법을 배웠습니다.
- Xamarin.Forms Shell 애플리케이션에 페이지를 추가합니다.
- 페이지 간 탐색을 수행합니다.
- 데이터 바인딩을 사용하여 사용자 인터페이스 요소와 데이터 원본 간 데이터 동기화를 수행합니다.
다음 빠른 시작으로 진행하여 로컬 SQLite.NET 데이터베이스에 데이터를 저장할 수 있도록 애플리케이션을 수정하세요.
