Step 6: Use the Polls Django Web Project template
Applies to: ![]() Visual Studio
Visual Studio ![]() Visual Studio for Mac
Visual Studio for Mac
Note
This article applies to Visual Studio 2017. If you're looking for the latest Visual Studio documentation, see Visual Studio documentation. We recommend upgrading to the latest version of Visual Studio. Download it here
Previous step: Authenticate users in Django
Having understood Visual Studio's "Django Web Project" template, you can now look at the third Django template, "Polls Django Web Project." The Polls Django Web Project template builds on the same code base and demonstrates working with a database.
In this step, you learn how to:
- Create a project from the template and initialize the database (step 6-1)
- Understand data models (step 6-2)
- Apply migrations (step 6-3)
- Understand the views and page templates created by the project template (step 6-4)
- Create a custom administration interface (step 6-5)
A project created using this template is similar to what you get by following the Writing your first Django app tutorial in the Django docs. The web app consists of a public site that lets people view polls and vote in them. To manage polls, you also have a custom administrative interface. The interface uses the same authentication system as the "Django Web Project" template. It also makes use of the database by implementing Django models as explored in the following sections.
Step 6-1: Create the project and initialize the database
In Visual Studio, go to Solution Explorer, right-click the LearningDjango solution created earlier in this tutorial. Select Add > New Project. (If you want to use a new solution, select File > New > Project instead.)
In the New Project dialog, search for and select the Polls Django Web Project template. Call the project as "DjangoPolls," and select OK.
Like the other project templates in Visual Studio, the "Polls Django Web Project" template includes a requirements.txt file. Visual Studio prompts for the location to install the dependencies. When prompted, choose the option, Install into a virtual environment, and in the Add Virtual Environment dialog select Create to accept the defaults.
When Python finishes setting up the virtual environment, follow the instructions in the displayed readme.html. The instructions will help you to initialize the database and create a Django super user (that's an administrator). The steps are to first right-click the DjangoPolls project in Solution Explorer, select the Python > Django Migrate command. Then, right-click the project again, select the Python > Django Create Superuser command, and follow the prompts. (If you try to create a super user first, you'll see an error because the database hasn't been initialized.)
Set the DjangoPolls project as default for the Visual Studio solution by right-clicking the project in Solution Explorer and selecting Set as Startup Project. The startup project, which is shown in bold, is what will run when you start the debugger.
Select Debug > Start Debugging (F5) or use the Web Server button on the toolbar to run the server.

The app created by the template has three pages, Home, About, and Contact, which you'll navigate between using the top navigation bar. Examine the different parts of the app for few minutes. (The About and Contact pages are similar to the "Django Web Project" and aren't discussed further.)
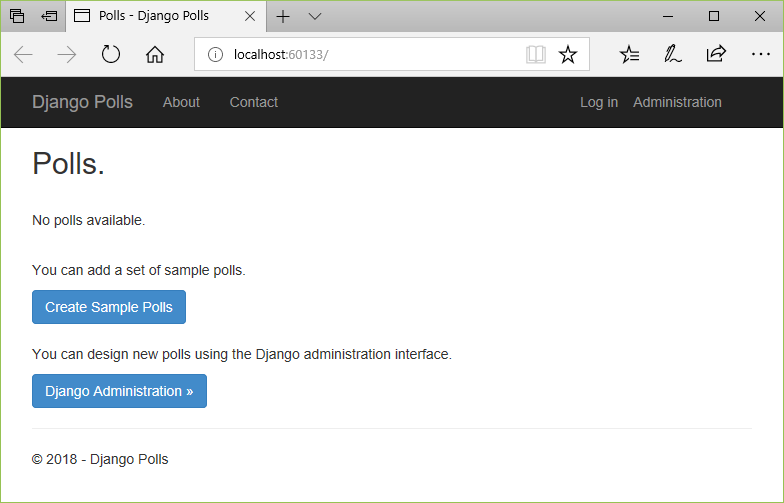
Also, select the Administration link in the navigation bar. The Administration link displays a log in screen to demonstrate that the administrative interface is authorized only to authenticated administrators. Use the super user credentials and you're routed to the "/admin" page. The page is enabled by default when using the project template.
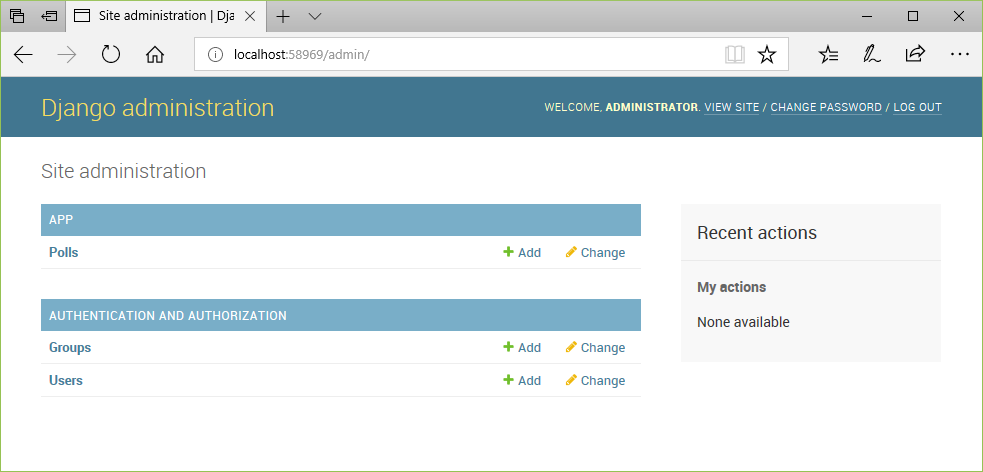
You can leave the app running for the sections that follow.
If you want to stop the app and commit changes to source control, first open the Changes page in Team Explorer. Right-click the folder for the virtual environment (probably env), and select Ignore these local items.
Examine the project contents
The project created from the "Polls Django Web Project" template should be familiar to the other project templates in Visual Studio. The other steps in this article summarize the significant changes and additions, namely data models and other views.
Question: What does the Django Migrate command do?
Answer: The Django Migrate command specifically runs the manage.py migrate command, which runs any scripts in the app/migrations folder that haven't been run previously. In this case, the command runs the 0001_initial.py script in that folder to set up the necessary schema in the database.
The migration script itself is created by the manage.py makemigrations command. The migration script scans the app's models.py file, compares it to the current state of the database, and then generates the necessary scripts to migrate the database schema to match the current models. This feature of Django is powerful as you update and modify your models over time. By generating and running migrations, you keep the models and the database in sync with little difficulty.
Later in this article, you'll work with a migration in step 6-3.
Step 6-2: Understand data models
The models for the app, named Poll and Choice, are defined in app/models.py. Each model is a Python class that derives from django.db.models.Model. To define fields in the model and map them to the database columns, models use methods of the models class like CharField and IntegerField.
from django.db import models
from django.db.models import Sum

class Poll(models.Model):
    """A poll object for use in the application views and repository."""
    text = models.CharField(max_length=200)
    pub_date = models.DateTimeField('date published')

    def total_votes(self):
        """Calculates the total number of votes for this poll."""
        return self.choice_set.aggregate(Sum('votes'))['votes__sum']

    def __unicode__(self):
        """Returns a string representation of a poll."""
        return self.text

class Choice(models.Model):
    """A poll choice object for use in the application views and repository."""
    poll = models.ForeignKey(Poll)
    text = models.CharField(max_length=200)
    votes = models.IntegerField(default=0)

    def votes_percentage(self):
        """Calculates the percentage of votes for this choice."""
        total = self.poll.total_votes()
        return self.votes / float(total) * 100 if total > 0 else 0

    def __unicode__(self):
        """Returns a string representation of a choice."""
        return self.text
As you can see, a Poll maintains a description in its text field and a publication date in pub_date. These fields are the only ones that exist for the Poll in the database; the total_votes field is calculated at run time.
A Choice is related to a Poll through the poll field, contains a description in text, and maintains a count for that choice in votes. The votes_percentage field is calculated at run time and isn't found in the database.
The full list of field types is CharField (limited text) TextField (unlimited text), EmailField, URLField, DateTimeField, IntegerField, DecimalField, BooleanField, ForeignKey, and ManyToMany. Each field takes some attributes, like max_length. The blank=True attribute means the field is optional; null=true means that a value is optional. There's also a choices attribute that limits values to values in an array of data value/display value tuples. (See the Model field reference in the Django documentation.)
You can confirm what's stored in the database by examining the db.sqlite3 file in the project. To examine the file, you can use a tool like the SQLite browser. In the database, you see that a foreign key field like poll in the Choice model is stored as poll_id; Django handles the mapping automatically.
In general, working with your database in Django means working exclusively through your models so that Django can manage the underlying database on your behalf.
Seed the database from samples.json
Initially, the database contains no polls. You can use the administrative interface at the "/admin" URL to add polls manually. You can also visit the "/seed" page on the running site to add seed the database with polls defined in the app's samples.json file.
The Django project's urls.py file has an added URL pattern, url(r'^seed$', app.views.seed, name='seed'),. The seed view in app/views.py loads the samples.json file and creates the necessary model objects. Django then automatically creates the matching records in the underlying database.
Note the use of the @login_required decorator to indicate the authorization level for the view.
@login_required
def seed(request):
    """Seeds the database with sample polls."""
    samples_path = path.join(path.dirname(__file__), 'samples.json')
    with open(samples_path, 'r') as samples_file:
        samples_polls = json.load(samples_file)

    for sample_poll in samples_polls:
        poll = Poll()
        poll.text = sample_poll['text']
        poll.pub_date = timezone.now()
        poll.save()

        for sample_choice in sample_poll['choices']:
            choice = Choice()
            choice.poll = poll
            choice.text = sample_choice
            choice.votes = 0
            choice.save()

    return HttpResponseRedirect(reverse('app:home'))
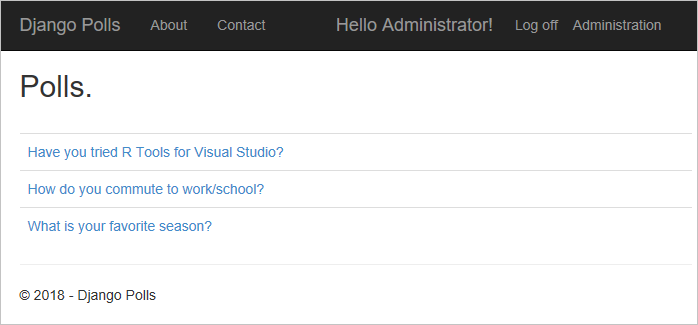
To see the effect, run the app first to see that no polls exist yet. Then visit the "/seed" URL, and when the app returns to the home page you should see that polls have become available. Again, feel free to examine the raw db.sqlite3 file with a tool like the SQLite browser.
Question: Is it possible to initialize the database using the Django administrative utility?
Answer: Yes, you can use the django-admin loaddata command to accomplish the same task as the seeding page in the app. When working on a full web app, you might use a combination of the two methods. Initialize a database from the command line, then convert the seed page here to an API. You can then send any other arbitrary JSON rather than relying on a hard-coded file.
Step 6-3: Use migrations
When you ran the manage.py makemigrations command (using the context menu in the Visual Studio) after creating the project, Django created the app/migrations/0001_initial.py file. This file contains a script that creates the initial database tables.
As you'll inevitably make changes to your models over time, Django makes it easy to keep the underlying database schema up to date with the models. The general workflow is as follows:
- Make changes to the models in your models.py file.
- In Visual Studio, right-click the project in Solution Explorer and select the Python > Django Make Migrations command. As described earlier, this command generates scripts in app/migrations to migrate the database from its current state to the new state.
- To apply the scripts to an actual database, right-click the project again and select Python > Django Migrate.
Django tracks which migrations have been applied to any given database. So, when you run the migrate command, Django applies whichever migrations are needed. If you create a new, empty database, for example, running the migrate command brings the up to date current models by applying every migration script. Similarly, if you make multiple model changes and generate migrations on a development computer, you can then apply the cumulative migrations to your production database by running the migrate command on your production server. Django again applies only those migration scripts that have been generated since the last migration of the production database.
To see the effect of changing a model, try the following steps:
Add an optional author field to the Poll model in app/models.py by adding the following line after the
pub_datefield to add an optionalauthorfield:author = models.CharField(max_length=100, blank=True)Save the file, then right-click the DjangoPolls project in Solution Explorer and select the Python > Django Make Migrations command.
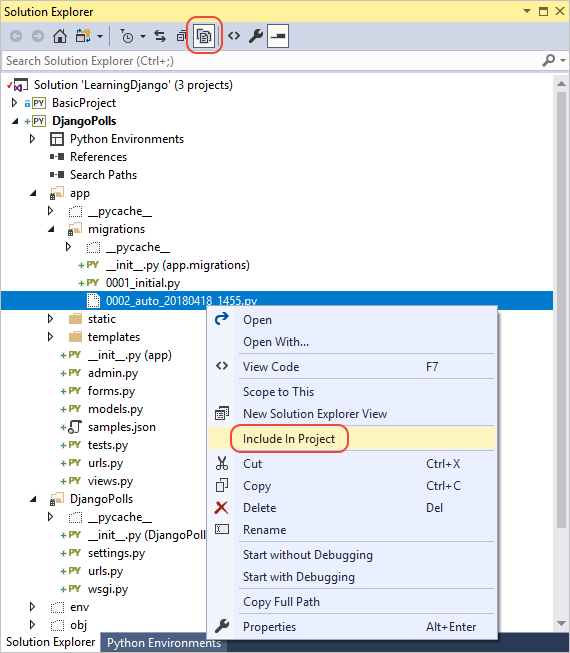
Select the Project > Show All Files command to see the newly generated script in the migrations folder, whose name starts with 002_auto_. Right-click that file and select Include In Project. You can then select Project > Show All Files again to restore the original view. (See the second question below for details on this step.)
If desired, open that file to examine how Django scripts the change from the previous model state to the new state.
Right-click the Visual Studio project again and select Python > Django Migrate to apply the changes to the database.
If desired, open the database in an appropriate viewer to confirm the change.
Overall, Django's migration feature means that you never need to manage your database schema manually. Just make changes to your models, generate the migration scripts, and apply them with the migrate command.
Question: What happens if I forget to run the migrate command after making changes to models?
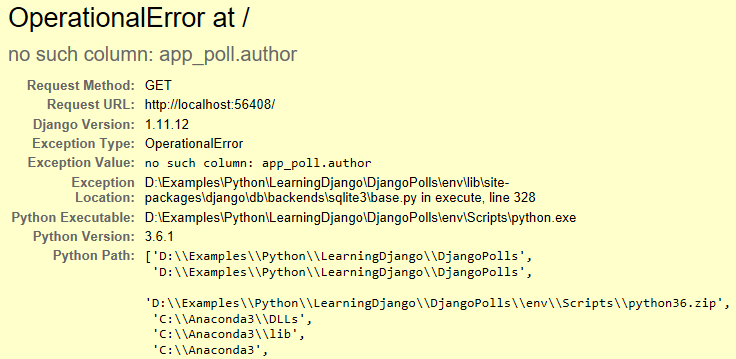
Answer: If the models don't match with what's in the database, Django fails at run time with appropriate exceptions. For example, if you forget to migrate the model change shown in the previous section, you'll see an error no such column: app_poll.author:
Question: Why doesn't Solution Explorer show newly generated scripts after running Django Make Migrations?
Answer: Although newly generated scripts exist in the app/migrations folder and are applied when running the Django Migrate command, they don't appear automatically in Solution Explorer because they've not been added to the Visual Studio project. To make them visible, first select the Project > Show All Files menu command or the toolbar button outlined in the image below. The Show All Files command causes Solution Explorer to show all the files in the project folder, using a dotted outline icon for items that haven't been added to the project itself. Right-click the files you want to add and select Include In Project, which also includes them in source control with your next commit.
Question: Can I see what migrations would be applied before running the migrate command?
Answer: Yes, use the django-admin showmigrations command.
Step 6-4: Understand the views and page templates created by the project template
Most of the views generated by the "Polls Django Web Project" template, such as the views for the About and Contact pages, are similar to views created by the "Django Web Project" template. Polls app is different as its Home page makes use of the models, so does several added pages for voting and viewing poll results.
To begin with, the first line in the Django project's urlpatterns array in urls.py file is a simple routing to an app view. Instead, it pulls in the app's own urls.py file:
from django.conf.urls import url, include
import app.views

urlpatterns = [
    url(r'^', include('app.urls', namespace="app")),
    # ..
]
The app/urls.py file then contains some more interesting routing code (explanatory comments added):
urlpatterns = [
    # Home page routing
    url(r'^$',
        app.views.PollListView.as_view(
            queryset=Poll.objects.order_by('-pub_date')[:5],
            context_object_name='latest_poll_list',
            template_name='app/index.html',),
        name='home'),

    # Routing for a poll page, which use URLs in the form <poll_id>/,
    # where the id number is captured as a group named "pk".
    url(r'^(?P<pk>\d+)/$',
        app.views.PollDetailView.as_view(
            template_name='app/details.html'),
        name='detail'),

    # Routing for <poll_id>/results pages, again using a capture group
    # named pk.
    url(r'^(?P<pk>\d+)/results/$',
        app.views.PollResultsView.as_view(
            template_name='app/results.html'),
        name='results'),

    # Routing for <poll_id>/vote pages, with the capture group named
    # poll_id this time, which becomes an argument passed to the view.
    url(r'^(?P<poll_id>\d+)/vote/$', app.views.vote, name='vote'),
]
If you're not familiar with the complex regular expressions used here, you can paste the expression into regex101.com for an explanation in plain language. (You'll need to escape the forward slashes / by adding a back slash, \ before them; escaping isn't necessary in Python because of the r prefix on the string, meaning "raw".)
In Django, the syntax ?P<name>pattern creates a group named name, which gets passed as arguments to views in the order they appear. In the code shown earlier, PollsDetailView and PollsResultsView receive an argument named pk and app.views.vote receives an argument named poll_id.
You can also see that most of the views aren't direct references to a view function in app/views.py. Instead, most refer to a class in the same file that derives from django.views.generic.ListView or django.views.generic.DetailView. The base classes provide the as_view methods, which take a template_name argument to identify the template. The ListView base class, as used for the Home page, also expects a queryset property containing the data and a context_object_name property with a variable name by which you want to refer to the data in the template. In this case, it's latest_poll_list.
Now you can examine the PollListView for the Home page, which is defined as follows in app/views.py:
class PollListView(ListView):
    """Renders the home page, with a list of all polls."""
    model = Poll

    def get_context_data(self, **kwargs):
        context = super(PollListView, self).get_context_data(**kwargs)
        context['title'] = 'Polls'
        context['year'] = datetime.now().year
        return context
All that's done here, is to identify the model that the view works with (Poll), and overrides the get_context_data method to add title and year values to the context.
The core of the template (templates/app/index.html) is as follows:
{% if latest_poll_list %}
<table class="table table-hover">
    <tbody>
        {% for poll in latest_poll_list %}
        <tr>
            <td>
                <a href="{% url 'app:detail' poll.id %}">{{poll.text}}</a>
            </td>
        </tr>
        {% endfor %}
    </tbody>
</table>
{% else %}
<!-- ... other content omitted ... -->
{% endif %}
In simple terms, the template receives the list of Poll objects in latest_poll_list, and then iterates through that list to create a table row that contains a link to each poll using the poll's text value. In the {% url %} tag, "app:detail" refers to the url pattern in app/urls.py named "detail", using poll.id as an argument. The effect of this is that Django creates a URL using the appropriate pattern and uses that for the link. This bit of future-proofing means that you can change the URL pattern at any time and the generated links automatically updates to match.
The PollDetailView and PollResultsView classes in app/views.py (not shown here) look almost identical to PollListView except that they derive from DetailView instead. Their respective templates, app/templates/details.html and app/templates/results.html then place the appropriate fields from the models within various HTML controls. One unique piece in details.html is that the choices for a poll are contained within an HTML form. When submitted, it does a POST to the /vote URL. As seen earlier, the URL pattern is routed to app.views.vote, which is implemented as follows (note the poll_id argument, which is again a named group in the regular expression used in the routing for this view):
def vote(request, poll_id):
    """Handles voting. Validates input and updates the repository."""
    poll = get_object_or_404(Poll, pk=poll_id)
    try:
        selected_choice = poll.choice_set.get(pk=request.POST['choice'])
    except (KeyError, Choice.DoesNotExist):
        return render(request, 'app/details.html', {
            'title': 'Poll',
            'year': datetime.now().year,
            'poll': poll,
            'error_message': "Please make a selection.",
    })
    else:
        selected_choice.votes += 1
        selected_choice.save()
        return HttpResponseRedirect(reverse('app:results', args=(poll.id,)))
Here, the view doesn't have its own corresponding template like the other pages. Instead, it validates the selected poll, showing a 404 if the poll doesn't exist (just in case someone enters a URL like "vote/1a2b3c"). It then ensures that the voted choice is valid for the poll. If not, the except block just renders the details page again with an error message. If the choice is valid, then the view tallies the vote and redirects to the results page.
Step 6-5: Create a custom administration interface
As shown earlier in step 6-1, the last pieces of the "Polls Django Web Project" template are custom extensions to the default Django administrative interface. The default interface is for user and group management. The Polls project template adds features that allow you to manage polls as well.
First of all, the URL patterns in the Django project's urls.py has url(r'^admin/', include(admin.site.urls)), included by default; the "admin/doc" pattern is also included but commented out.
The app then contains the file admin.py, which Django automatically runs when you visit the administrative interface. Thanks to the inclusion of django.contrib.admin in the INSTALLED_APPS array of settings.py. The code in that file, as provided by the project template, is as follows:
from django.contrib import admin
from app.models import Choice, Poll

class ChoiceInline(admin.TabularInline):
    """Choice objects can be edited inline in the Poll editor."""
    model = Choice
    extra = 3

class PollAdmin(admin.ModelAdmin):
    """Definition of the Poll editor."""
    fieldsets = [
        (None, {'fields': ['text']}),
        ('Date information', {'fields': ['pub_date']}),
    ]
    inlines = [ChoiceInline]
    list_display = ('text', 'pub_date')
    list_filter = ['pub_date']
    search_fields = ['text']
    date_hierarchy = 'pub_date'

admin.site.register(Poll, PollAdmin)
As you can see, the PollAdmin class derives from django.contrib.admin.ModelAdmin and customizes many of its fields using names from the Poll model, which it manages. These fields are described on ModelAdmin options in the Django documentation.
The call to admin.site.register then connects that class to the model (Poll) and includes it on the admin interface. The overall result is shown below:

Next steps
Note
If you've been committing your Visual Studio solution to source control throughout the course of this tutorial, now is a good time to do another commit. Your solution should match the tutorial source code on GitHub: Microsoft/python-sample-vs-learning-django.
You've now explored the "Blank Django Web Project", "Django Web Project", and "Polls Django Web Project" templates in Visual Studio. You've learned all the basics of Django such as using views and templates. You've also explored routing, authentication, and used database models. You should now be able to create a web app of your own with any views and models that you need.
Running a web app on your development computer is just one step in making the app available to your customers. Next steps might include the following tasks:
Customize the 404 page by creating a template named templates/404.html. When present, Django uses this template instead of its default one. For more information, see Error views in the Django documentation.
Write unit tests in tests.py; the Visual Studio project templates provide starting points for these, and more information can be found on Writing your first Django app, part 5 - testing and Testing in Django in the Django documentation.
Change the app from SQLite to a production-level data store such as PostgreSQL, MySQL, and SQL Server (all of which can be hosted on Azure). As described on When to use SQLite (sqlite.org), SQLite works fine for low to medium traffic sites with fewer than 100 K hits/day. However, SQLite isn't recommended for higher volumes. It's also limited to a single computer, so it can't be used in any multi-server scenario such as load-balancing and geo-replication. For information on Django's support for other databases, see Database setup. You can also use the Azure SDK for Python to work with Azure storage services like tables and blobs.
Set up a continuous integration/continuous deployment pipeline on a service like Azure DevOps. In addition to working with source control (via Azure Repos or GitHub, or elsewhere), you can configure an Azure DevOps Project to automatically run your unit tests as a pre-requisite for release. You can also configure the pipeline to deploy to a staging server for more tests before deploying to production. Azure DevOps, furthermore, integrates with monitoring solutions like App Insights and closes the whole cycle with agile planning tools. For more information, see Create a CI/CD pipeline for Python with the Azure DevOps project and also the general Azure DevOps documentation.