Step 6: Name Your Button Controls
Note
This article applies to Visual Studio 2015. If you're looking for the latest Visual Studio documentation, see Visual Studio documentation. We recommend upgrading to the latest version of Visual Studio. Download it here
There's only one PictureBox on your form. When you added it, the IDE automatically named it pictureBox1. There's only one CheckBox, which is named checkBox1. Soon, you will write some code, and that code will refer to the CheckBox and PictureBox. Because there's only one of each of these controls, you will know what it means when you see pictureBox1 or checkBox1 in your code.
Note
In Visual Basic, the default first letter of any control name is initial cap, so the names are PictureBox1, CheckBox1, and so on.
There are four buttons on your form, and the IDE named them button1, button2, button3, and button4. By just looking at their current names, you don't know which button is the Close button and which one is the Show a picture button. That's why giving your button controls more informative names is helpful.
 For a video version of this topic, see Tutorial 1: Create a Picture Viewer in Visual Basic - Video 3 or Tutorial 1: Create a Picture Viewer in C# - Video 3. These videos use an earlier version of Visual Studio, so there are slight differences in some menu commands and other user interface elements. However, the concepts and procedures work similarly in the current version of Visual Studio.
To name your button controls
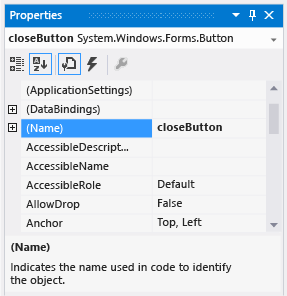
On the form, choose the Close button. (If you still have all the buttons selected, choose the ESC key to cancel the selection.) Scroll in the Properties window until you see the (Name) property. (The (Name) property is near the top when the properties are alphabetical.) Change the name to closeButton, as shown in the following picture.
 Properties window with closeButton name
Note
If you try changing the name of your button to closeButton, with a space between the words close and Button, the IDE displays an error message: "Property value is not valid." Spaces (and a few other characters) are not allowed in control names.
Rename the other three buttons to backgroundButton, clearButton, and showButton. You can verify the names by choosing the control selector drop-down list in the Properties window. The new button names appear.
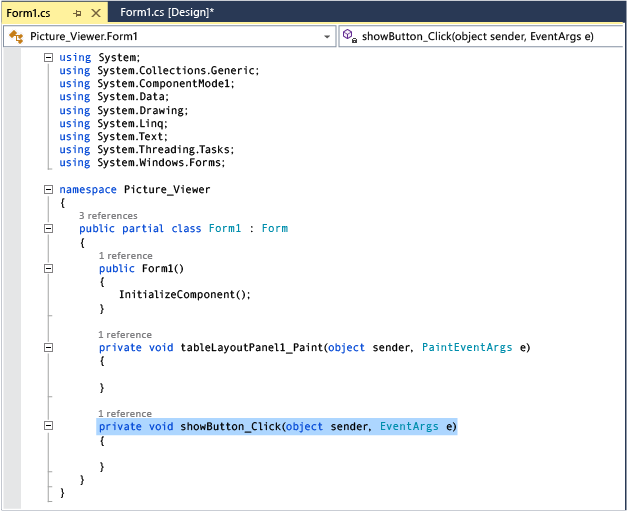
Double-click the Show a picture button on the form. As an alternative, choose the Show a picture button on the form, and then choose the ENTER key. When you do, the IDE opens an additional tab in the main window called Form1.cs (Form1.vb if you're using Visual Basic). This tab shows the code file behind the form, as shown in the following picture.
 Form1.cs tab with Visual C# code
Focus on this part of the code. (Choose the VB tab below if you're using Visual Basic to view the Visual Basic version of the code.)
private void showButton_Click(object sender, EventArgs e)
{
}
Private Sub showButton_Click() Handles showButton.Click End SubYou are looking at code called
showButton_Click(). The IDE added this to the form's code when you opened the code file for the showButton button. At design-time, when you open the code file for a control in a form, code is generated for the control if it doesn't already exist. This code, known as a method, runs when you run your program and choose the control - in this case, the Show a picture button.Note
In this tutorial, the Visual Basic code that's automatically generated has been simplified by removing everything between the parentheses, (). Whenever this occurs, you can remove the same code. Your program will work either way. For the remainder of the tutorials, any automatically generated code is simplified whenever possible.
Choose the Windows Forms Designer tab again (Form1.cs [Design] in Visual C#, Form1.vb [Design] in Visual Basic) and then open the code file for the Clear the picture button to create a method for it in the form's code. Repeat this for the remaining two buttons. Each time, the IDE adds a new method to the form's code file.
To add one more method, open the code file for the CheckBox control in Windows Forms Designer to make the IDE add a
checkBox1_CheckedChanged()method. That method is called whenever the user selects or clears the check box.Note
When working on a program, you often move between the code editor and Windows Forms Designer. The IDE makes it easy to navigate in your project. Use Solution Explorer to open Windows Forms Designer by double-clicking Form1.cs in Visual C# or Form1.vb in Visual Basic, or on the menu bar, choose View, Designer.
The following shows the new code that you see in the code editor.
private void clearButton_Click(object sender, EventArgs e)
{
}

private void backgroundButton_Click(object sender, EventArgs e)
{
}

private void closeButton_Click(object sender, EventArgs e)
{
}

private void checkBox1_CheckedChanged(object sender, EventArgs e)
{
}
Private Sub clearButton_Click() Handles clearButton.Click End Sub Private Sub backgroundButton_Click() Handles backgroundButton.Click End Sub Private Sub closeButton_Click() Handles closeButton.Click End Sub Private Sub CheckBox1_CheckedChanged() Handles CheckBox1.CheckedChanged End SubThe five methods that you added are called event handlers, because your program calls them whenever an event (like a user choosing a button or selecting a box) happens.
When you view the code for a control in the IDE at design time, Visual Studio adds an event handler method for the control if one isn't there. For example, when you double-click a button, the IDE adds an event handler for its Click event (which is called whenever the user chooses the button). When you double-click a check box, the IDE adds an event handler for its CheckedChanged event (which is called whenever the user selects or clears the box).
After you add an event handler for a control, you can return to it at any time from Windows Forms Designer by double-clicking the control, or on the menu bar, choosing View, Code.
Names are important when you build programs, and methods (including event handlers) can have any name that you want. When you add an event handler with the IDE, it creates a name based on the control's name and the event being handled. For example, the Click event for a button named showButton is called the
showButton_Click()event handler method. Also, opening and closing parentheses () are usually added after the method name to indicate that methods are being discussed. If you decide you want to change a code variable name, right-click the variable in the code and then choose Refactor, Rename. All instances of that variable in the code are renamed. See Rename Refactoring (C#) or Refactoring and Rename Dialog Box for more information.
To continue or review
To go to the next tutorial step, see Step 7: Add Dialog Components to Your Form.
To return to the previous tutorial step, see Step 5: Add Controls to Your Form.