Get started with Office 365 Management APIs
When you create an application that needs access to secured services like the Office 365 Management APIs, you need to provide a way to let the service know if your application has rights to access it. The Office 365 Management APIs use Microsoft Entra ID to provide authentication services that you can use to grant rights for your application to access them.
There are four key steps:
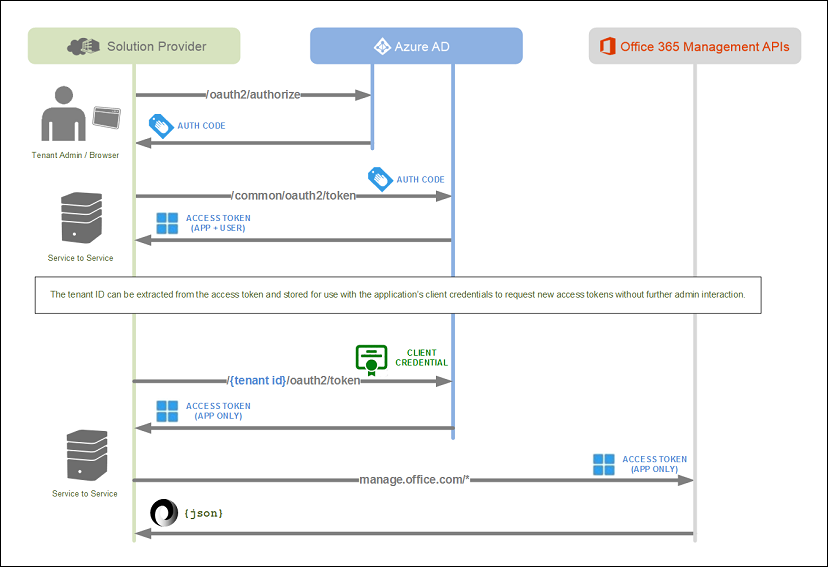
Register your application in Microsoft Entra ID. To allow your application access to the Office 365 Management APIs, you need to register your application in Microsoft Entra ID. This allows you to establish an identity for your application and specify the permission levels it needs to access the APIs.
Get Office 365 tenant admin consent. An Office 365 tenant admin must explicitly grant consent to allow your application to access their tenant data by means of the Office 365 Management APIs. The consent process is a browser-based experience that requires the tenant admin to sign in to the Microsoft Entra consent UI and review the access permissions that your application is requesting, and then either grant or deny the request. After consent is granted, the UI redirects the user back to your application with an authorization code in the URL. Your application makes a service-to-service call to Microsoft Entra ID to exchange this authorization code for an access token, which contains information about both the tenant admin and your application. The tenant ID must be extracted from the access token and stored for future use.
Request access tokens from Microsoft Entra ID. Using your application's credentials as configured in Microsoft Entra ID, your application requests additional access tokens for a consented tenant on an ongoing basis, without the need for further tenant admin interaction. These access tokens are called app-only tokens because they do not include information about the tenant admin.
Call the Office 365 Management APIs. The app-only access tokens are passed to the Office 365 Management APIs to authenticate and authorize your application.
The following diagram shows the sequence of consent and access token requests.
Important
Before you can access data through the Office 365 Management Activity API, you must enable unified audit logging for your Office 365 organization. You do this by turning on the Office 365 audit log. For instructions, see Turn Office 365 audit log search on or off.
Enabling unified audit logging isn't required if you're only using the Office 365 Service Communications API.
Register your application in Microsoft Entra ID
The Office 365 Management APIs use Microsoft Entra ID to provide secure authentication to Office 365 tenant data. To access the Office 365 Management APIs, you need to register your app in Microsoft Entra ID, and as part of the configuration, you'll specify the permission levels your app needs to access the APIs.
Prerequisites
To register your app in Microsoft Entra ID, you need a subscription to Office 365 and a subscription to Azure that has been associated with your Office 365 subscription. You can use trial subscriptions to both Office 365 and Azure to get started. For more details, see Welcome to the Office 365 Developer Program.
Use the Azure Portal to register your application in Microsoft Entra ID
After you have a Microsoft tenant with the proper subscriptions, you can register your application in Microsoft Entra ID.
Sign into the Azure portal, using the credential of your Microsoft tenant that has the subscription to Office 365 you wish to use. You can also access the Azure Portal via a link that appears in the left navigation pane in the Microsoft 365 admin center.
In the left navigation pane, select Microsoft Entra ID (1).
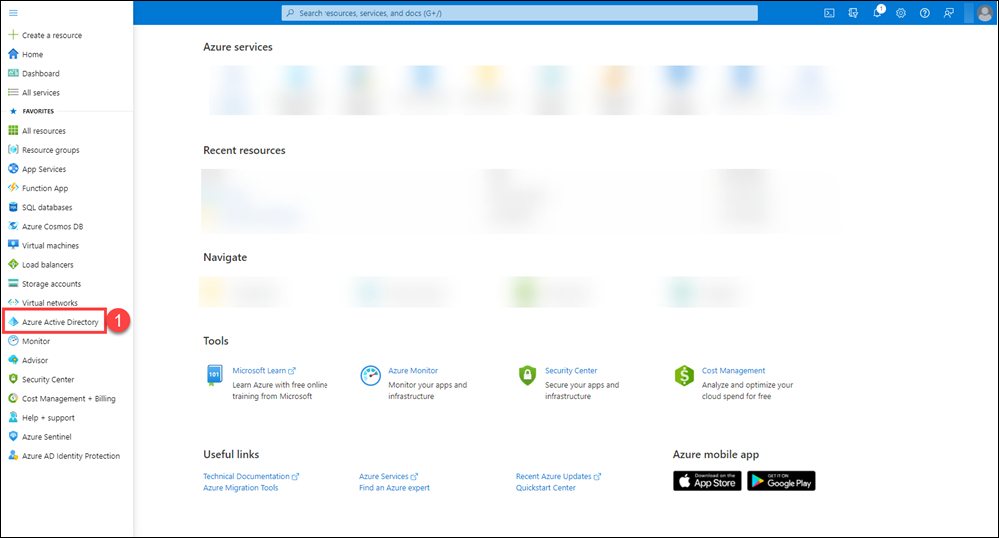
On the Microsoft Entra ID page, select App registrations (2), and then select New registration (3).
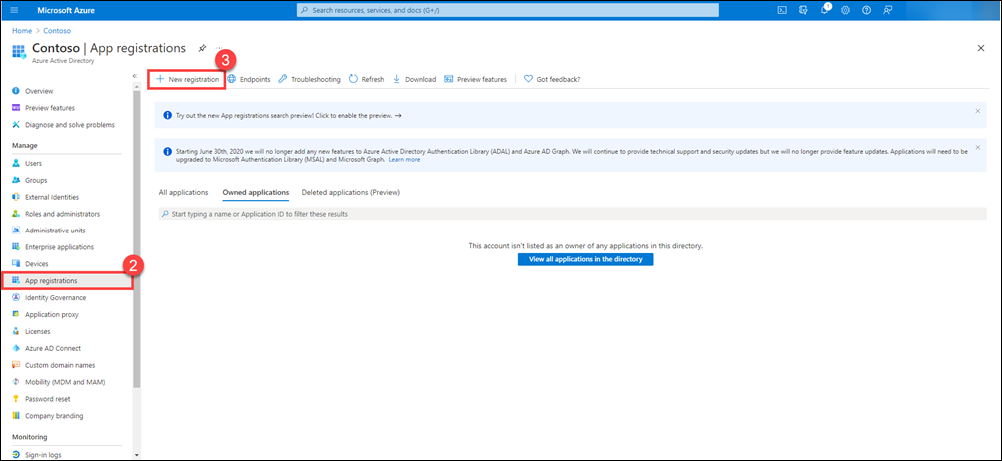
On the App registrations page, select New registration.
A new page appears for you to start the registration of your app.
On the Register an application page, do the following things:
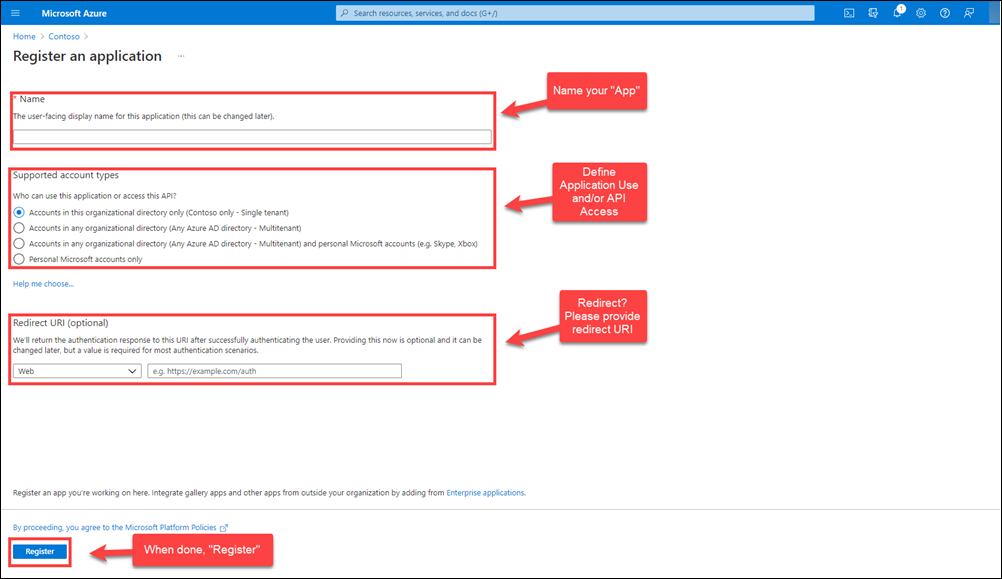
Name your app.
Choose who can use the app and access the API.
Provide a redirect URL for user redirect after authentication, if needed.
Click Register to register the new app.
Configure your application properties in Microsoft Entra ID
Now that your application is registered, there are several important properties you must specify that determine how your application functions within Microsoft Entra ID and how tenant admins will grant consent to allow your application to access their data by using the Office 365 Management APIs.
For more information about Microsoft Entra application configuration in general, see Application Object Properties.
Client ID. This value is automatically generated by Microsoft Entra ID. Your application will use this value when requesting consent from tenant admins and when requesting app-only tokens from Microsoft Entra ID.
Application is multi-tenant. This property must be set to YES to allow tenant admins to grant consent to your app to access their data by using the Office 365 Management APIs. If this property is set to NO, your application will only be able to access your own tenant's data.
Reply URL. This is the URL that a tenant admin will be redirected to after granting consent to allow your application to access their data by using the Office 365 Management APIs. You can configure multiple reply URLs as needed. Azure automatically sets the first one to match the sign-on URL you specified when you created the application, but you can change this value as needed.
Be sure to choose Save after making any changes to these properties.
Generate a new key for your application
Keys, also known as client secrets, are used when exchanging an authorization code for an access token.
On the Microsoft Entra ID page in the Azure portal, select App registrations, and then select your application.
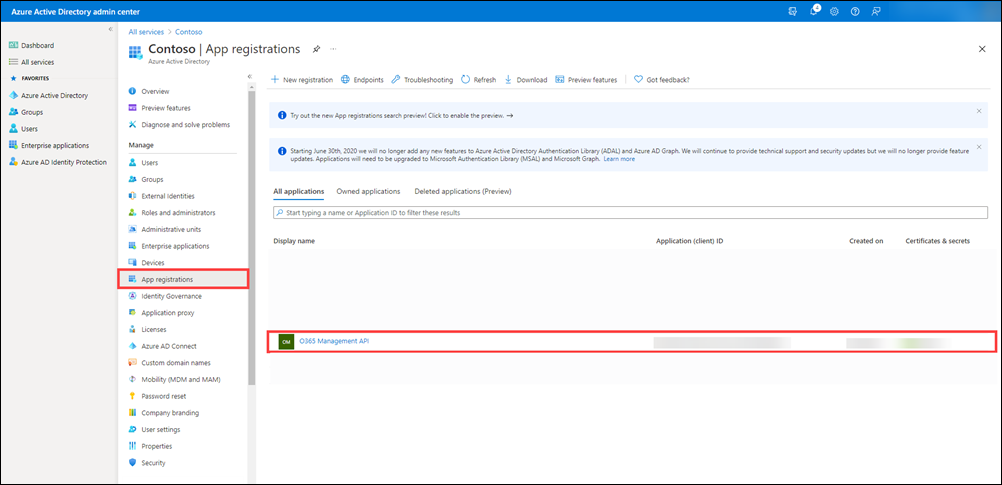
After the page for your app is displayed, select Certificates & secrets (1) in the left pane. On this page, you can upload certificates and create new client secrets (2).
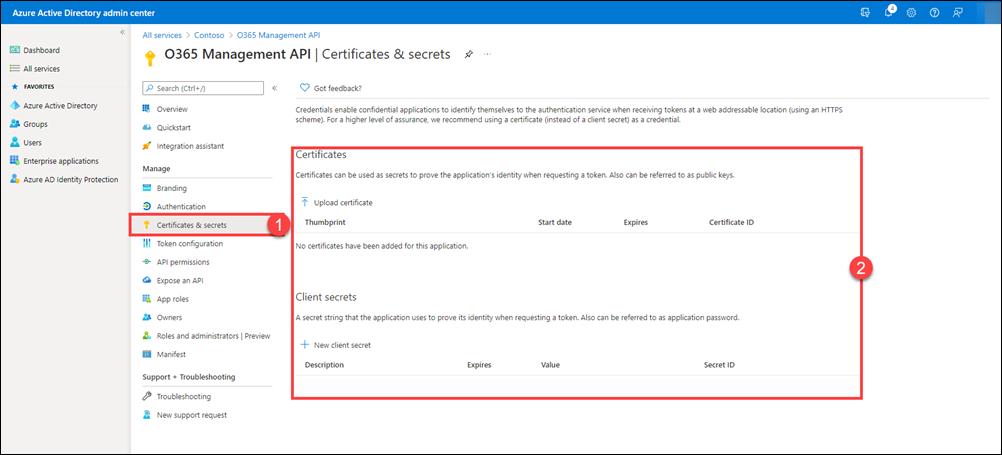
On the Certificates & secrets (1) page, select New client secret (2), type a description and select the duration for your key (3), and then select Add (4).
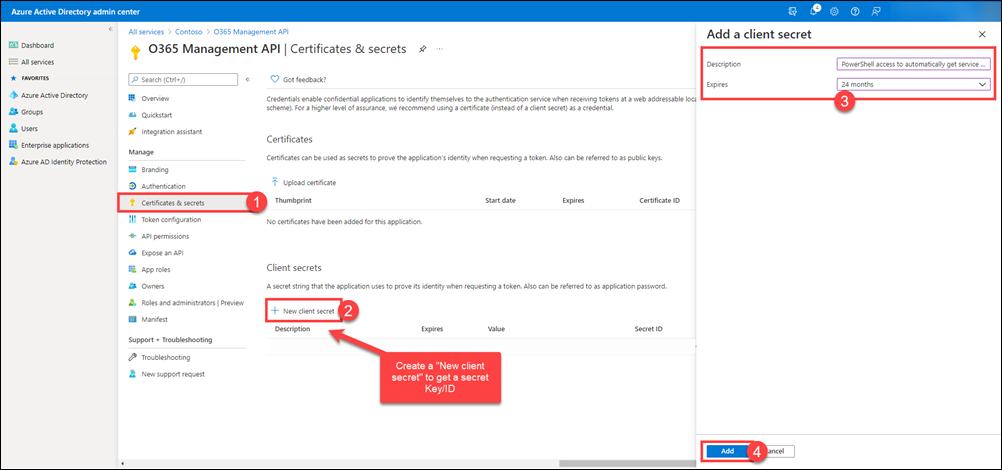
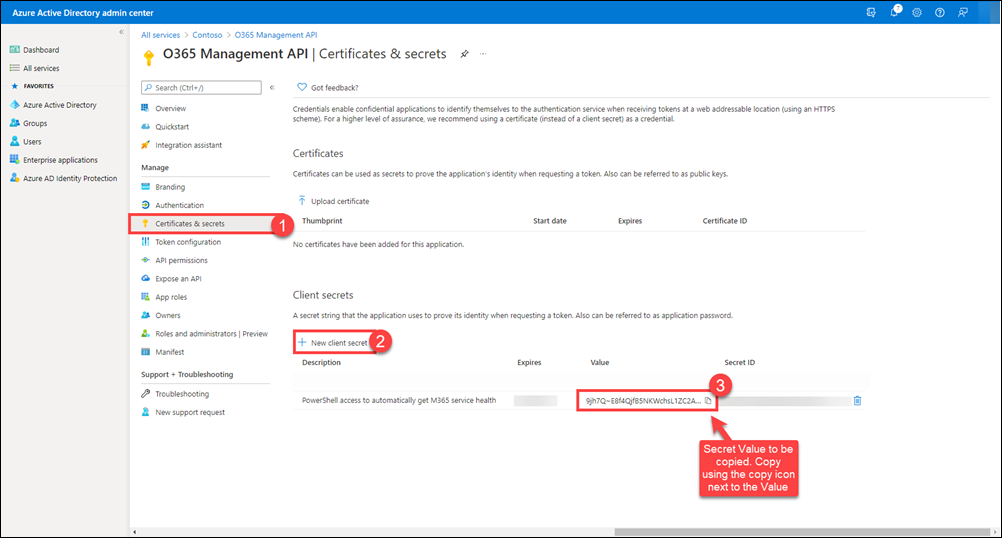
After creating the client secret, the value is displayed under Client secrets (2). Click the clipboard icon (3) to copy the client secret value to the clipboard.
Important
Azure only displays the client secret value at the time you initially generate it. You can't go back to this page and retrieve the client secret value later. Be sure to copy it and save it to a secure location so you can use it later.
Configure an X.509 certificate to enable service-to-service calls
An application that is running in the background, such as a daemon or service, can use client credentials to request app-only access tokens without repeatedly requesting consent from the tenant admin after initial consent is granted.
For more information, see Service to Service Calls Using Client Credentials.
You must configure an X.509 certificate with your application to be used as client credentials when requesting app-only access tokens from Microsoft Entra ID. There are two steps to the process:
Obtain an X.509 certificate. You can use a self-signed certificate or a certificate issued by publicly trusted certificate authority.
Modify your application manifest to include the thumbprint and public key of your certificate.
The following instructions show you how to use the Visual Studio or Windows SDK makecert tool to generate a self-signed certificate and export the public key to a base64-encoded file.
From the command line, run the following:
makecert -r -pe -n "CN=MyCompanyName MyAppName Cert" -b 03/15/2015 -e 03/15/2017 -ss my -len 2048Note
When you are generating the X.509 certificate, make sure the key length is at least 2048. Shorter key lengths are not accepted as valid keys.
Open the Certificates MMC snap-in and connect to your user account.
Find the new certificate in the Personal folder and export the public key to a base64-encoded file (for example,
mycompanyname.cer). Your application will use this certificate to communicate with Microsoft Entra ID, so make sure you retain access to the private key as well.Note
You can use Windows PowerShell to extract the thumbprint and base64-encoded public key. Other platforms provide similar tools to retrieve properties of certificates.
From a Windows PowerShell prompt, enter and run the following:
 $cer = New-Object System.Security.Cryptography.X509Certificates.X509Certificate2
 $cer.Import("mycer.cer")
 $bin = $cer.GetRawCertData()
 $base64Value = [System.Convert]::ToBase64String($bin)
 $bin = $cer.GetCertHash()
 $base64Thumbprint = [System.Convert]::ToBase64String($bin)
 $keyid = [System.Guid]::NewGuid().ToString()
Store the values for
$base64Thumbprint,$base64Value, and$keyidto be used when you update your application manifest in the next set of steps.Using the values extracted from the certificate and the generated key ID, you must now update your application manifest in Microsoft Entra ID.
In the Azure Portal, go to App registrations > All applications, select your application, and then select Manifest in the left pane.
In the top navigation bar on the Manifest page (1), select Download (2).
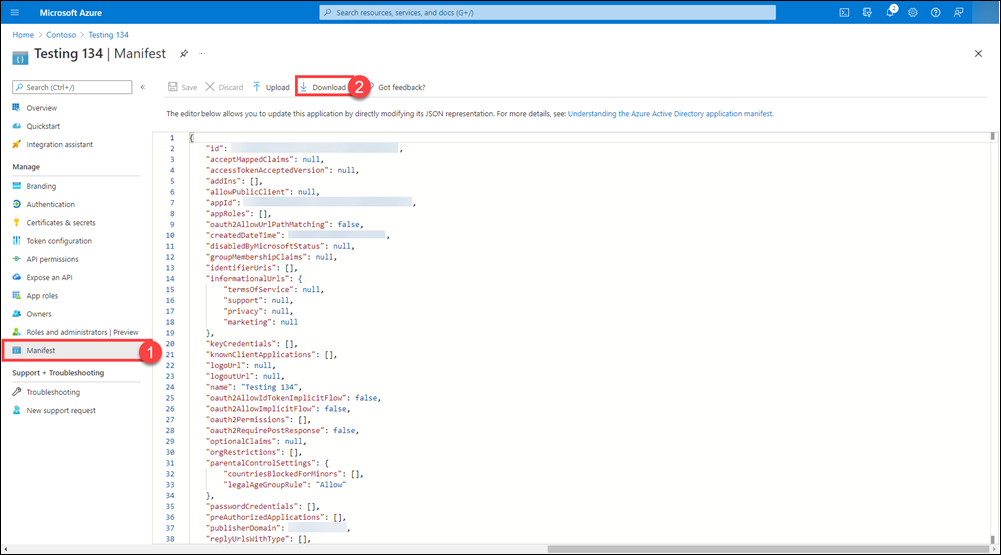
Open the downloaded manifest in an editor and replace the empty keyCredentials property with the following JSON:
   "keyCredentials": [
     {
         "customKeyIdentifier" : "$base64Thumbprint_from_above",
         "keyId": "$keyid_from_above",
         "type": "AsymmetricX509Cert",
         "usage": "Verify",
         "value": "$base64Value_from_above"
     }
 ],
Note
The KeyCredentials property is a collection, making it possible to upload multiple X.509 certificates for rollover scenarios or delete certificates for compromise scenarios.
Save your changes and upload the updated manifest by choosing Manage manifest in the command bar, choosing Upload manifest, browsing to your updated manifest file, and then selecting it.
Specify the permissions your app requires to access the Office 365 Management APIs
Finally, you need to specify exactly what permissions your app requires of the Office 365 Management APIs. To do so, you add access to the Office 365 Management APIs to your app, and then you specify the permission(s) you need.
In the Azure Portal, go to App registrations > All applications, select your application, and then select API Permissions (1) in the left pane. Click Add a permission (2) to display the Request API permission (3) flyout page.
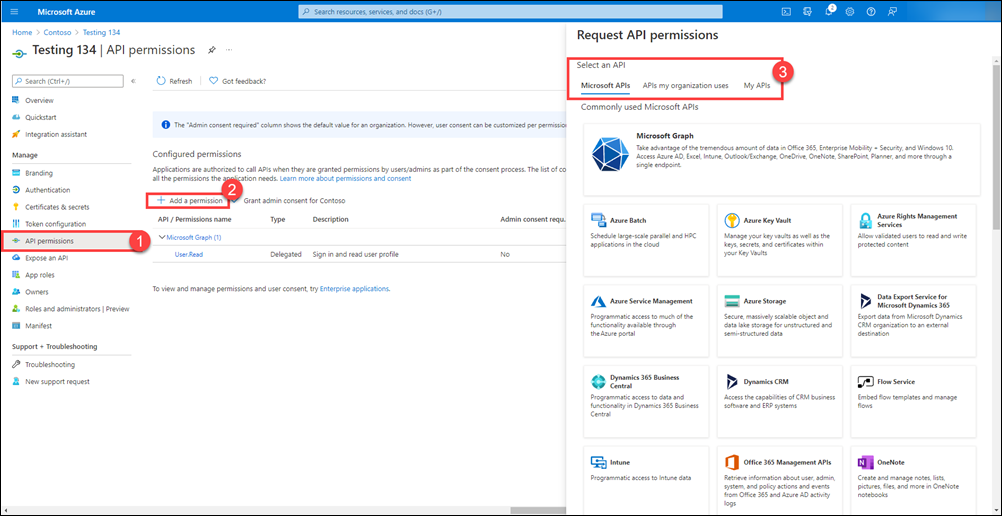
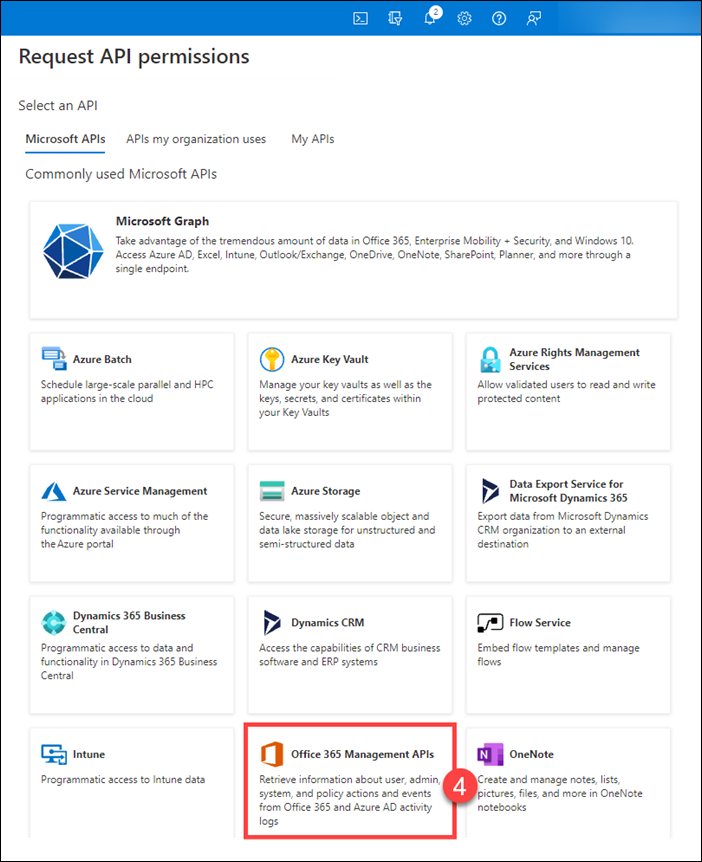
On the Microsoft APIs tab, select Office 365 Management APIs (4).
On the flyout page, select the following types of permissions (3) that your app requires, and then click Add permissions
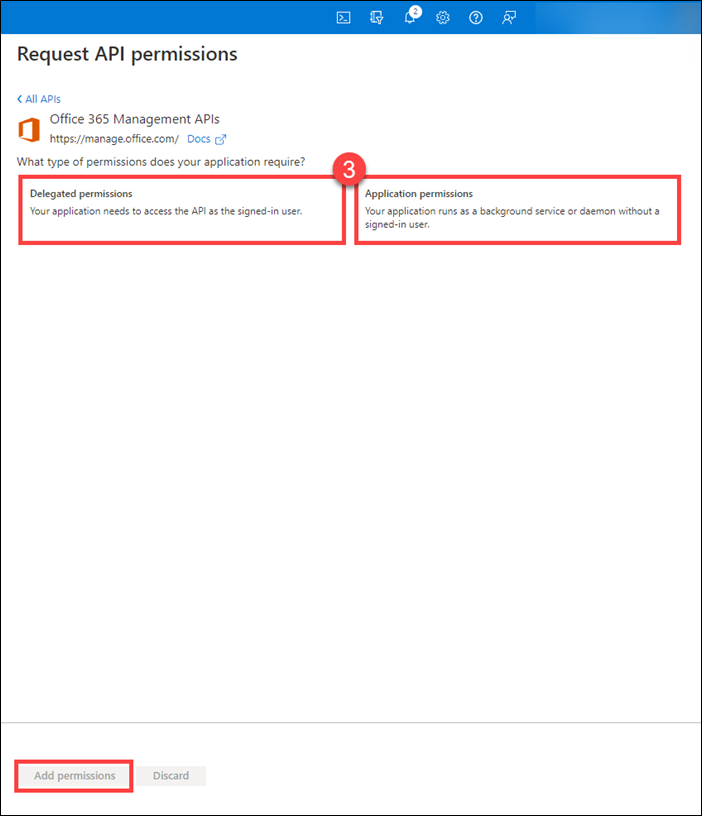
Delegated Permissions. Enables your client app to perform operations on behalf of the signed-in user, such as reading email or modifying the user's profile.
Application Permissions. Permissions that enable the client app to authenticate as itself without user interaction or consent, such as an app used by background services or daemon apps.
Office Management APIs now appear in the list of applications that your app requires permissions for. Under both Application Permissions and Delegated Permissions, if needed, select the permissions your application requires. Refer to the specific API reference for more details about each permission.
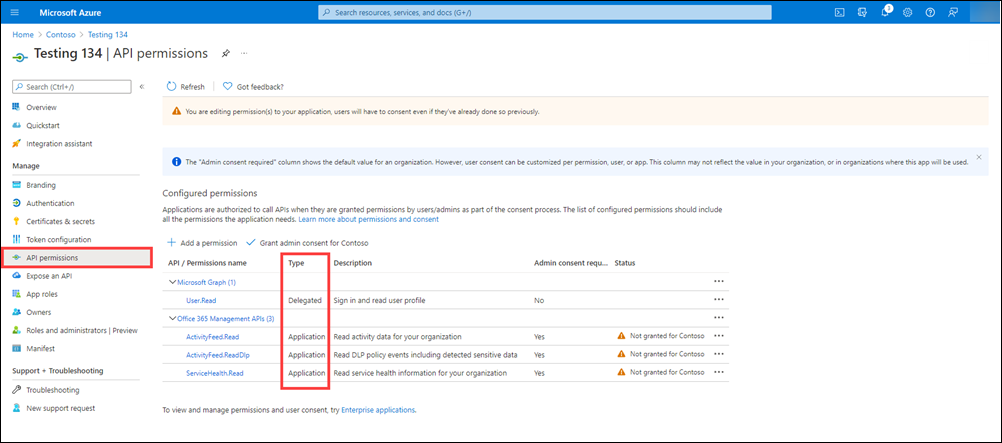
Select Grant admin consent for "tenant name" to consent to the permissions given to your app.
Get Office 365 tenant admin consent
Now that your application is configured with the permissions it needs to use the Office 365 Management APIs, a tenant admin must explicitly grant your application these permissions in order to access their tenant's data by using the APIs. To grant consent, the tenant admin must sign in to Microsoft Entra ID by using the following specially constructed URL, where they can review your application's requested permissions. This step is not required when using the APIs to access data from your own tenant.
https://login.windows.net/common/oauth2/authorize?response_type=code&resource=https%3A%2F%2Fmanage.office.com&client_id={your_client_id}&redirect_uri={your_redirect_url }
The redirect URL must match or be a sub-path under one of the Reply URLs configured for your application in Microsoft Entra ID.
For example:
https://login.windows.net/common/oauth2/authorize?response_type=code&resource=https%3A%2F%2Fmanage.office.com&client_id=2d4d11a2-f814-46a7-890a-274a72a7309e&redirect_uri=http%3A%2F%2Fwww.mycompany.com%2Fmyapp%2F
You can test the consent URL by pasting it into a browser and signing in using the credentials of an Office 365 admin for a tenant other than the tenant that you used to register the application. You will see the request to grant your application permission to use the Office Management APIs.
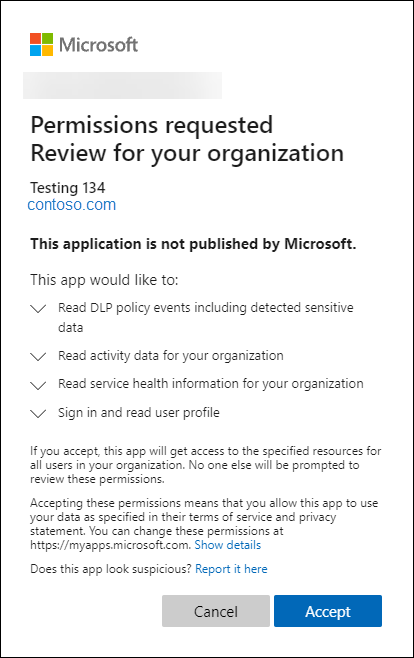
After choosing Accept, you are redirected to the specified page, and there will be a code in the query string.
For example:
http://www.mycompany.com/myapp/?code=AAABAAAAvPM1KaPlrEqdFSB...
Your application uses this authorization code to obtain an access token from Microsoft Entra ID, from which the tenant ID can be extracted. After you have extracted and stored the tenant ID, you can obtain subsequent access tokens without requiring the tenant admin to sign in.
Request access tokens from Microsoft Entra ID
There are two methods for requesting access tokens from Microsoft Entra ID:
The Authorization Code Grant Flow involves a tenant admin granting explicit consent, which returns an authorization code to your application. Your application then exchanges the authorization code for an access token. This method is required to obtain the initial consent that your application needs to access the tenant data by using the API, and this first access token is needed in order to obtain and store the tenant ID.
The Client Credentials Grant Flow allows your application to request subsequent access tokens as old ones expire, without requiring the tenant admin to sign in and explicitly grant consent. This method must be used for applications that run continuously in the background calling the APIs once the initial tenant admin consent has been granted.
Request an access token using the authorization code
After a tenant admin grants consent, your application receives an authorization code as a query string parameter when Microsoft Entra ID redirects the tenant admin to your designated URL.
http://www.mycompany.com/myapp/?code=AAABAAAAvPM1KaPlrEqdFSB...
Your application makes an HTTP REST POST to Microsoft Entra ID to exchange the authorization code for an access token. Because the tenant ID is not yet known, the POST will be to the "common" endpoint, which does not have the tenant ID embedded in the URL:
https://login.windows.net/common/oauth2/token
The body of the POST contains the following:
resource=https%3A%2F%2Fmanage.office.com&client_id=a6099727-6b7b-482c-b509-1df309acc563 &redirect_uri= http%3A%2F%2Fwww.mycompany.com%2Fmyapp%2F &client_secret={your_client_key}&grant_type=authorization_code&code= AAABAAAAvPM1KaPlrEqdFSB...
Sample request
POST https://login.windows.net/common/oauth2/token HTTP/1.1
Content-Type: application/x-www-form-urlencoded
Host: login.windows.net
Content-Length: 944

resource=https%3A%2F%2Fmanage.office.com&client_id=a6099727-6b7b-482c-b509-1df309acc563 &redirect_uri= http%3A%2F%2Fwww.mycompany.com%2Fmyapp%2F &client_secret={your_client_key}&grant_type=authorization_code&code=AAABAAAAvPM1KaPlrEqdFSB...
The body of the response will include several properties, including the access token.
Sample response
HTTP/1.1 200 OK
Content-Type: application/json; charset=utf-8
Content-Length: 3265

{"expires_in":"3599","token_type":"Bearer","scope":"ActivityFeed.Read ActivityReports.Read ServiceHealth.Read","expires_on":"1438290275","not_before":"1438286375","resource":"https://manage.office.com","access_token":"eyJ0eX...","refresh_token":"AAABAAA...","id_token":"eyJ0eXAi..."}
The access token that is returned is a JWT token that includes information about both the admin that granted consent and the application requesting access. The following shows an example of an un-encoded token. Your application must extract the tenant ID "tid" from this token and store it so that it can be used to request additional access tokens as they expire, without further admin interaction.
Sample token
{
  "aud": "https://manage.office.com",
  "iss": "https://sts.windows.net/41463f53-8812-40f4-890f-865bf6e35190/",
  "iat": 1427246416,
  "nbf": 1427246416,
  "exp": 1427250316,
  "ver": "1.0",
  "tid": "41463f53-8812-40f4-890f-865bf6e35190",
  "amr": [
    "pwd"
  ],
  "oid": "1cef1fdb-ff52-48c4-8e4e-dfb5ea83d357",
  "upn": "admin@contoso.onmicrosoft.com",
  "puid": "1003BFFD8EC47CA6",
  "sub": "7XpD5OWAXM1OWmKiVKh1FOkKXV4N3OSRol6mz1pxxhU",
  "given_name": "John",
  "family_name": "Doe",
  "name": "Contoso, Inc.",
  "unique_name": "admin@contoso.onmicrosoft.com",
  "appid": "a6099727-6b7b-482c-b509-1df309acc563",
  "appidacr": "1",
  "scp": "ActivityFeed.Read ServiceHealth.Read",
  "acr": "1"
}
Request an access token by using client credentials
After the tenant ID is known, your application can make service-to-service calls to Microsoft Entra ID to request additional access tokens as they expire. These tokens include information only about the requesting application and not about the admin that originally granted consent. Service-to-service calls require that your application use an X.509 certificate to create client assertion in the form of a base64-encoded, SHA256 signed JWT bearer token.
When you are developing your application in .NET, you can use the Microsoft Authentication Library (MSAL) to create client assertions. Other development platforms should have similar libraries.
An un-encoded JWT token consists of a header and payload that have the following properties.
HEADER:

{
  "alg": "RS256",
  "x5t": "{thumbprint of your X.509 certificate used to sign the token",
}

PAYLOAD:

{
  "aud": "https://login.windows.net/{tenantid}/oauth2/token",
  "iss": "{your app client ID}",
  "sub": "{your app client ID}",
  "jti": "{random GUID}",
  "nbf": "{epoch time, before which the token is not valid}",
  "exp": "{epoch time, after which the token is not valid}"
}
Sample JWT token
HEADER:

{
  "alg": "RS256",
  "x5t": "YyfshJC3rPQ-kpGo5dUaiY5t3iU",
}

PAYLOAD:

{
  "aud": "https://login.windows.net/41463f53-8812-40f4-890f-865bf6e35190/oauth2/token",
  "iss": "a6099727-6b7b-482c-b509-1df309acc563",
  "sub": "a6099727-6b7b-482c-b509-1df309acc563",
  "jti": "0ce254c4-81b1-4a2e-8436-9a8c3b49dfb9",
  "nbf": 1427248048,
  "exp": 1427248648,
}
The client assertion is then passed to Microsoft Entra ID as part of a service-to-service call to request an access token. When using client credentials to request an access token, use an HTTP POST to a tenant-specific endpoint, where the previously extracted and stored tenant ID is embedded in the URL.
https://login.windows.net/{tenantid}/oauth2/token
The body of the POST contains the following:
resource=https%3A%2F%2Fmanage.office.com&client_id={your_app_client_id}&grant_type=client_credentials&client_assertion_type=urn%3Aietf%3Aparams%3Aoauth%3Aclient-assertion-type%3Ajwt-bearer&client_assertion={encoded_signed_JWT_token}
Sample request
POST https://login.windows.net/41463f53-8812-40f4-890f-865bf6e35190/oauth2/token HTTP/1.1
Content-Type: application/x-www-form-urlencoded
Host: login.windows.net
Content-Length: 994

resource=https%3A%2F%2Fmanage.office.com&client_id= a6099727-6b7b-482c-b509-1df309acc563&grant_type=client_credentials &client_assertion_type=urn%3Aietf%3Aparams%3Aoauth%3Aclient-assertion-type%3Ajwt-bearer&client_assertion=eyJhbGciOiJSUzI1NiIsIng1dCI6Ill5ZnNoSkMzclBRLWtwR281ZFVhaVk1dDNpVSJ9.eyJhdWQiOiJodHRwczpcL1wvbG9naW4ud2luZG93cy5uZXRcLzQxNDYzZjUzLTg4MTItNDBmNC04OTBmLTg2NWJmNmUzNTE5MFwvb2F1dGgyXC90b2tlbiIsImV4cCI6MTQyNzI0ODY0OCwiaXNzIjoiYTYwOTk3MjctNmI3Yi00ODJjLWI1MDktMWRmMzA5YWNjNTYzIiwianRpIjoiMGNlMjU0YzQtODFiMS00YTJlLTg0MzYtOWE4YzNiNDlkZmI5IiwibmJmIjoxNDI3MjQ4MDQ4LCJzdWIiOiJhNjA5OTcyNy02YjdiLTQ4MmMtYjUwOS0xZGYzMDlhY2M1NjMifQ.vfDrmCjiXgoj2JrTkwyOpr-NOeQTzlXQcGlKGNpLLe0oh4Zvjdcim5C7E0UbI3Z2yb9uKQdx9G7GeqS-gVc9kNV_XSSNP4wEQj3iYNKpf_JD2ikUVIWBkOg41BiTuknRJAYOMjiuBE2a6Wyk-vPCs_JMd7Sr-N3LiNZ-TjluuVzWHfok_HWz_wH8AzdoMF3S0HtrjNd9Ld5eI7MVMt4OTpRfh-Syofi7Ow0HN07nKT5FYeC_ThBpGiIoODnMQQtDA2tM7D3D6OlLQRgLfI8ir73PVXWL7V7Zj2RcOiooIeXx38dvuSwYreJYtdphmrDBZ2ehqtduzUZhaHL1iDvLlw
The response will be the same as before, but the token will not have the same properties, because it does not contain properties of the admin that granted consent.
Sample response
HTTP/1.1 200 OK
Content-Type: application/json; charset=utf-8
Content-Length: 1276

{"token_type":"Bearer","expires_in":"3599","expires_on":"1431659094","not_before":"1431655194","resource":"https://manage.office.com","access_token":"eyJ0eXAiOiJKV1QiL..."}
Sample access token
{
  "aud": "https://manage.office.com",
  "iss": "https://sts.windows.net/41463f53-8812-40f4-890f-865bf6e35190/",
  "iat": 1431655194,
  "nbf": 1431655194,
  "exp": 1431659094,
  "ver": "1.0",
  "tid": "41463f53-8812-40f4-890f-865bf6e35190",
  "roles": [
    "ServiceHealth.Read",
    "ActivityFeed.Read"
  ],
  "oid": "67cb0334-e242-4783-8028-0f39132fb5ad",
  "sub": "67cb0334-e242-4783-8028-0f39132fb5ad",
  "idp": "https://sts.windows.net/41463f53-8812-40f4-890f-865bf6e35190/",
  "appid": "a6099727-6b7b-482c-b509-1df309acc563",
  "appidacr": "1"
}
Build your app
Now that you've registered your app in Microsoft Entra ID and configured it with the necessary permissions, you're ready to build your app. The following are some of the key aspects to consider when designing and building your app.
The consent experience. To obtain consent from your customers, you must direct them in a browser to the Microsoft Entra website, using the specially constructed URL described previously, and you must have a website to which Microsoft Entra ID will redirect the admin once they grant consent. This website must extract the authorization code from the URL and use it to request an access token from which it can obtain the tenant ID.
Store the tenant ID in your system. This will be needed when requesting access tokens from Microsoft Entra ID and when calling the Office Management APIs.
Manage access tokens. You'll need a component that requests and manages access tokens as needed. If your app calls the APIs periodically, it can request tokens on demand, or if it calls the APIs continuously to retrieve data, it can request tokens at regular intervals (for example, every 45 minutes).
Implement a webhook listener. As needed by the particular API you are using.
Data retrieval and storage. You'll need a component that retrieves data for each tenant, either by using continuous polling or in response to webhook notifications, depending on the particular API you are using.