Configure Manufacturing data solutions resource using Azure portal
Important
Some or all of this functionality is available as part of a preview release. The content and the functionality are subject to change.
This section provides information on what changes or updates are needed after deploying Manufacturing data solutions in the designated tenant.
Assign permission in Fabric to the identity of the ingestion application
Manufacturing data solutions contains an Azure Function App resource that ingests both streaming and batch data. This Azure Function is located in the resource group MDS-{your-deployment-name}-MRG-{UniqueID}.
For ingesting streaming data, you can use a connection string to the Fabric Event Hubs namespace.
For ingesting batch data, you can use the service principal (Managed Identity) of the Function App. This identity needs to have permission to Fabric.
To assign permission, follow these steps:
Download the file fn-auth-lakehouse.ps1 to your local system. This file can be used for ingesting data.
Start PowerShell as an administrator.
Run the command
Set-ExecutionPolicy -Scope Process -ExecutionPolicy Bypass. This command ensures the script can be run in this process only.Navigate to the folder where you downloaded the file.
Run the script with the correct arguments.
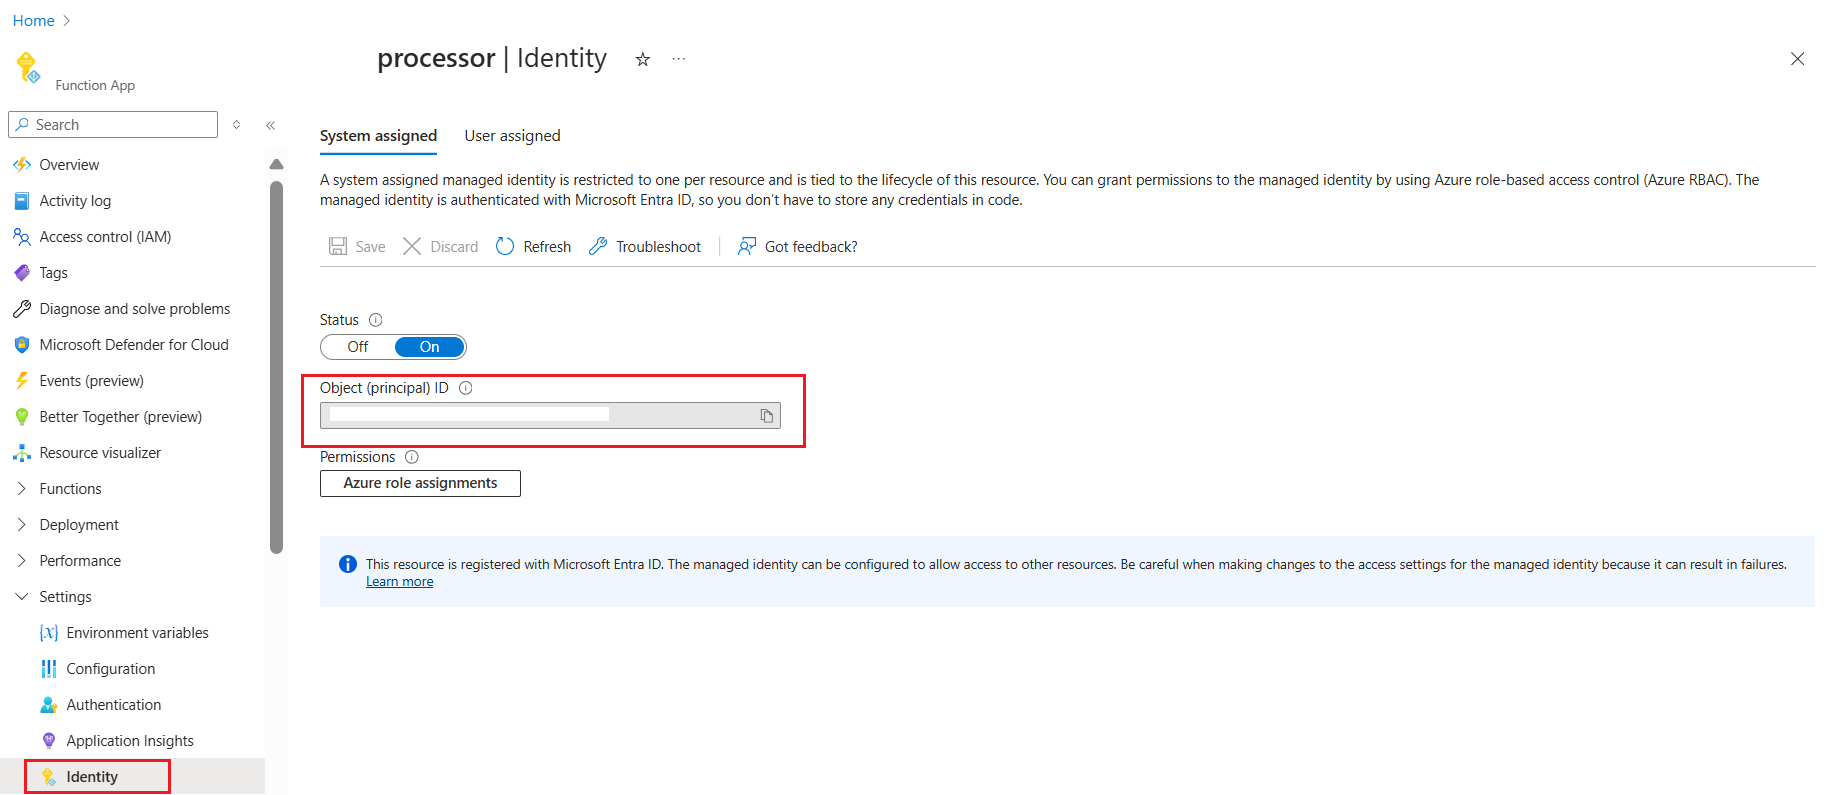
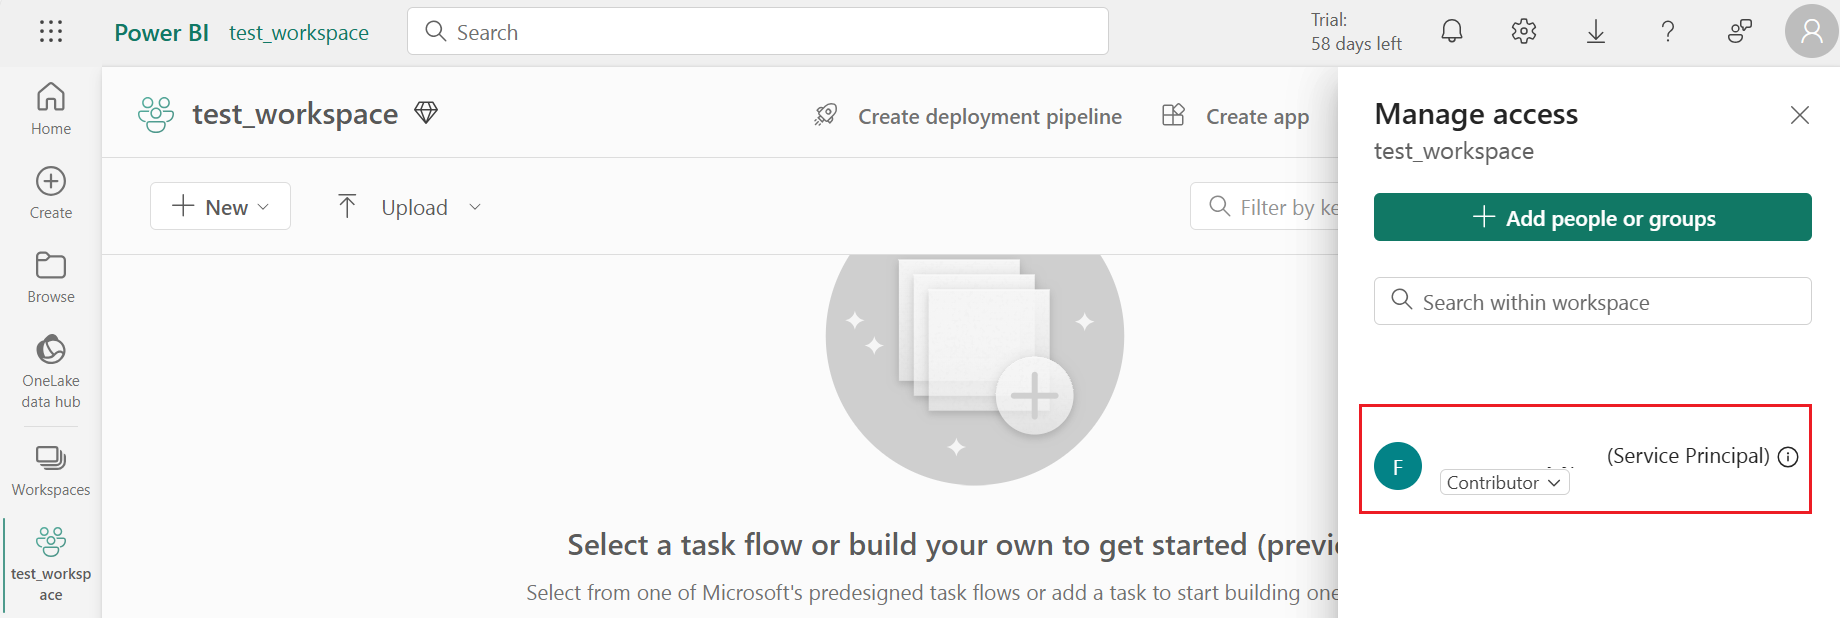
.\fn-auth-lakehouse.ps1 -FunctionAppIdentity "<FunctionAppObjectId>" -WorkspaceName "<OneLakeWorkspace>" -TenantId <TenantId>For example.\fn-auth-lakehouse.ps1 -FunctionAppIdentity "00001111-aaaa-2222-bbbb-3333cccc4444" -WorkspaceName "mdscontoso" -TenantId "aaaabbbb-0000-cccc-1111-dddd2222eeee"TheFunctionAppObjectIdcan be found by navigating to the Manufacturing data solutions resource group in Azure, searching for the Function App with a name resemblingfn-mci4m-xxxxxxxx-processor, opening this Function App, and moving to theIdentityblade. TheObject IDshould be visible on this page.After the script runs, a connection between the Onelake workspace and the Function App is created. Now under Manage access in Onelake workspace, you can find the Function App.
Note
Service principals, like managed identities, can only be added when both Microsoft Fabric and Microsoft Azure are located within the same tenant and use the same Entra ID.
Update Manufacturing data solutions resource using Azure portal
After your deployment is complete, you can update the properties of your deployment like version, SKU, copilot configuration, managed identity, and Fabric configuration.
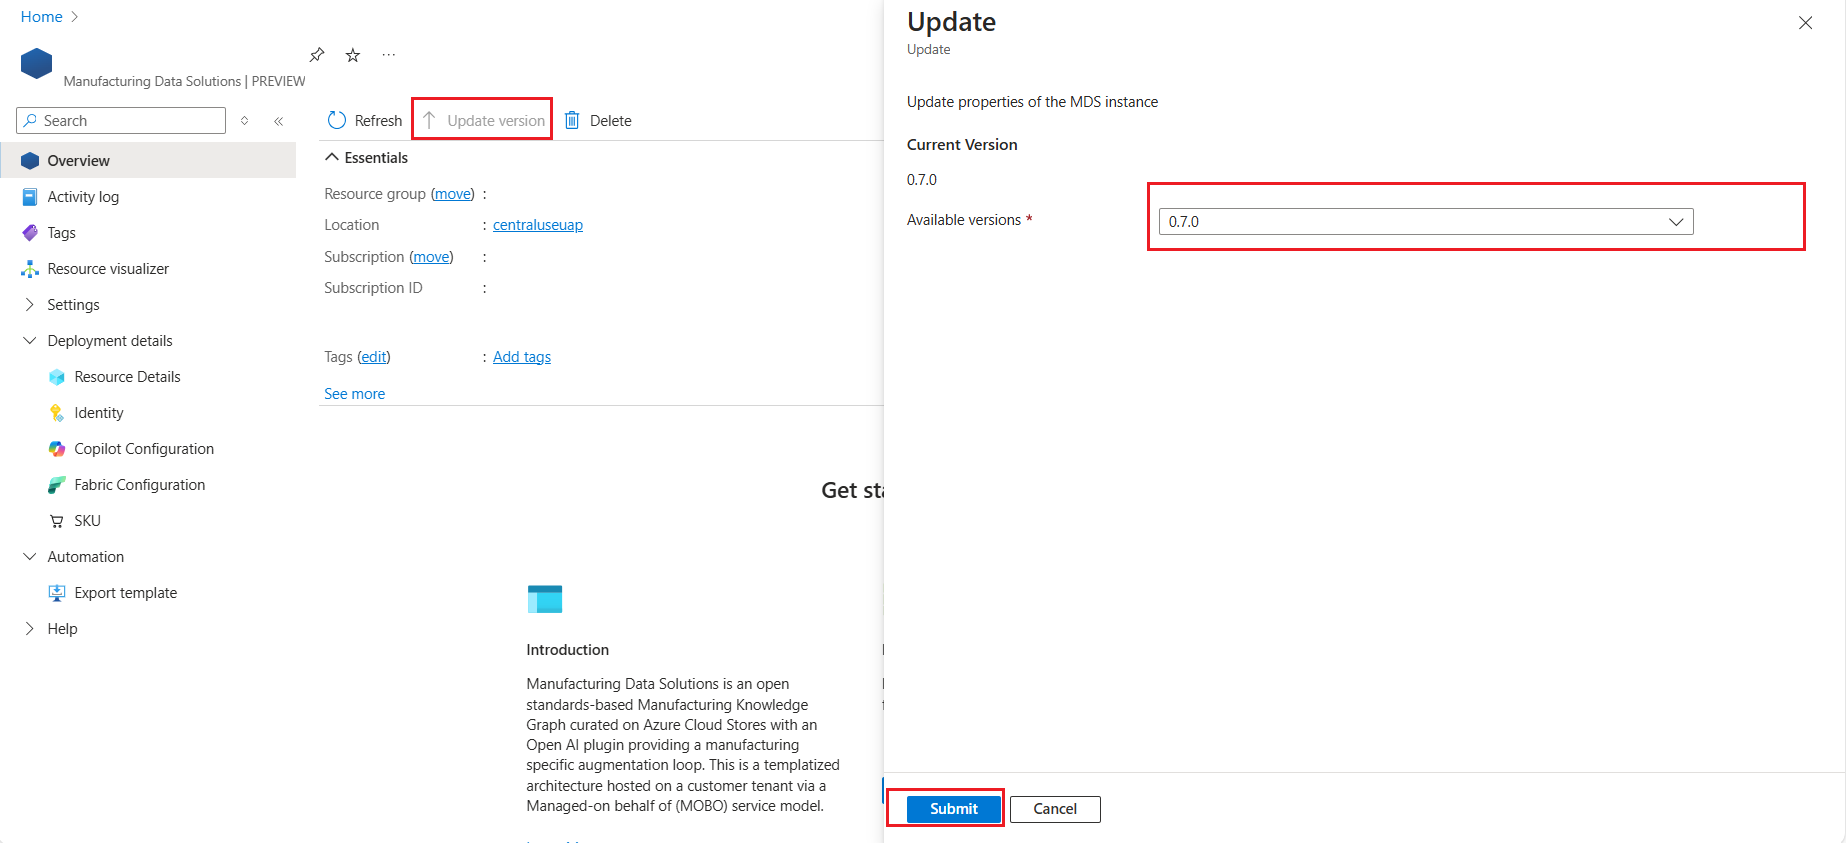
Version update
Choose the version you want and select Submit to update your Manufacturing data solutions resource.
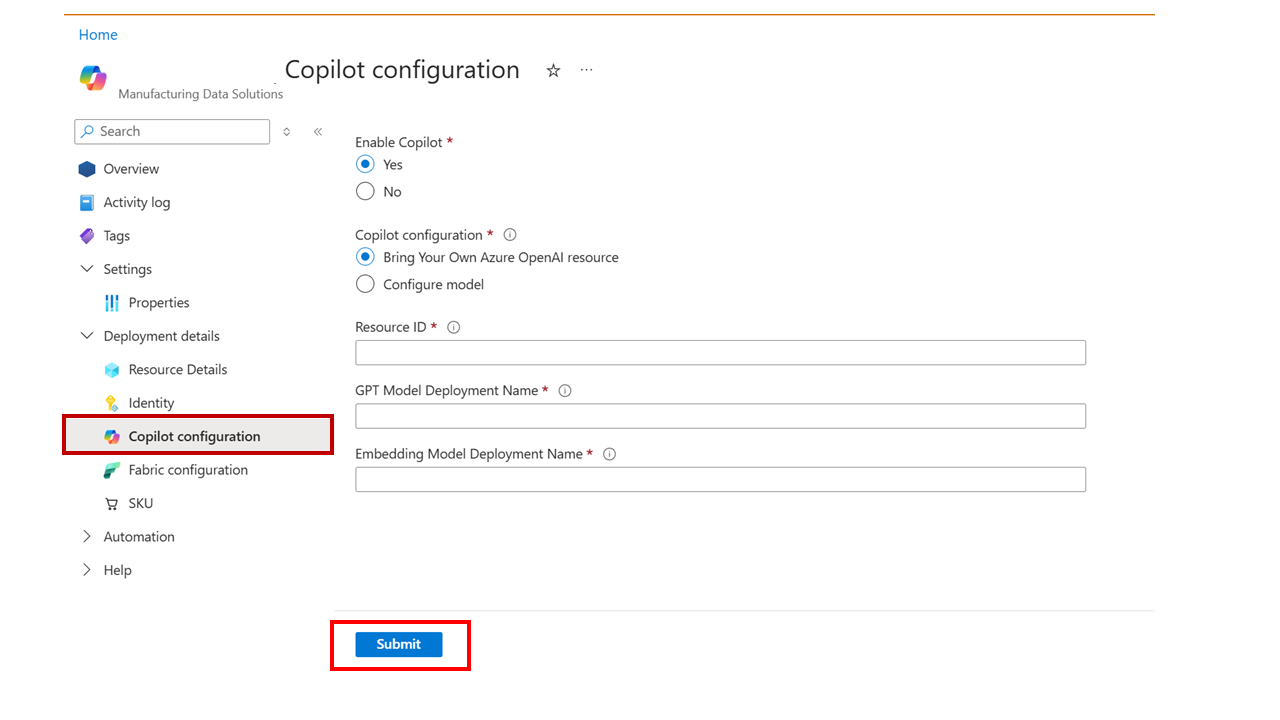
Agent configuration
You can switch between your own Azure OpenAI resource or Manufacturing data solutions managed Azure OpenAI deployment. You can also configure GPT Model name, GPT Model version, and GPT Model capacity for the GPT model. For the embeddings model, only model capacity can be changed.
Note
If you previously switched from Manufacturing data solutions managed Azure OpenAI to your own Azure OpenAI resource and want to switch back to Manufacturing data solutions managed Azure OpenAI within 48 hours, then purge the previous solution deployed OpenAI instance.
Managed Identity
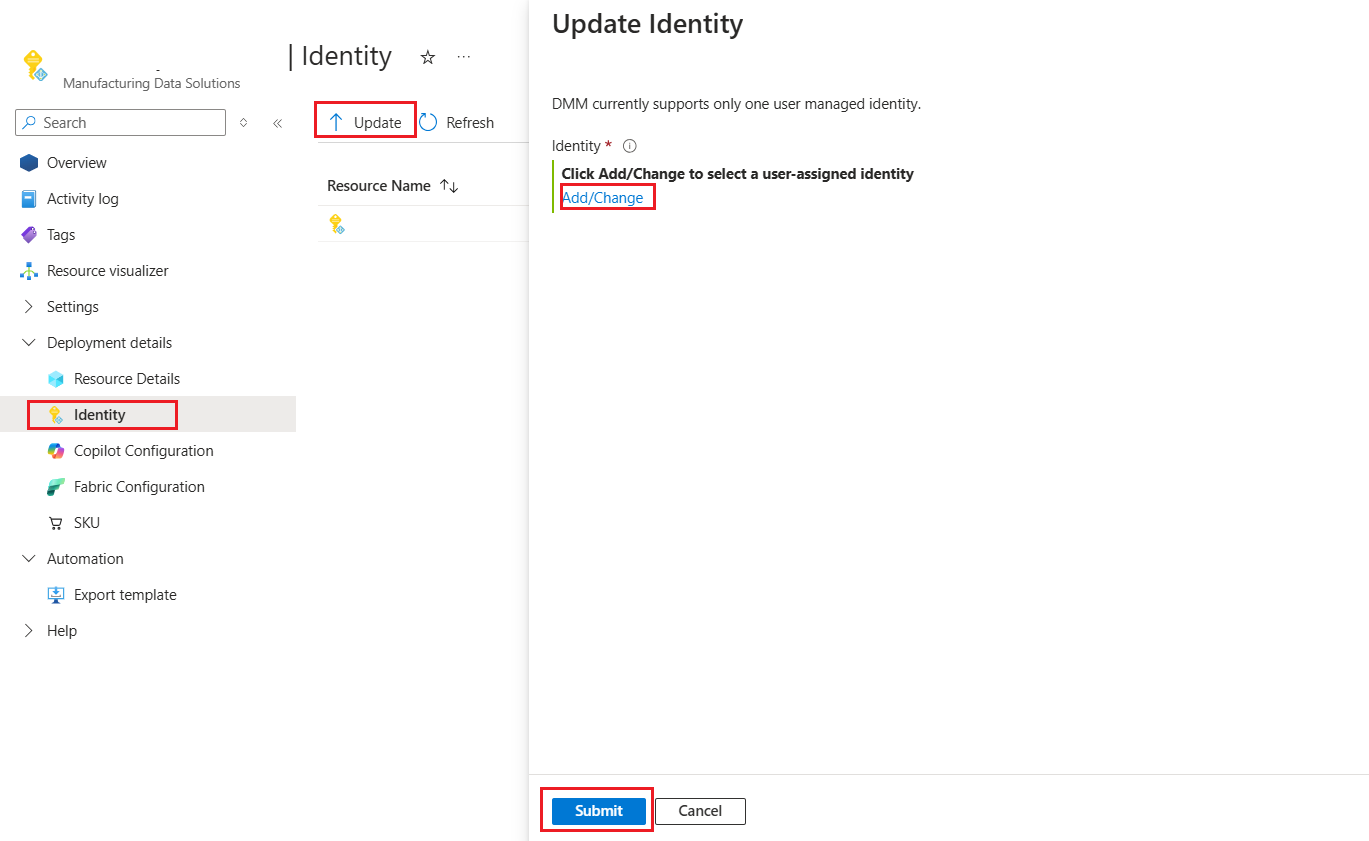
You can add or change the current managed identity if necessary.
Fabric configuration
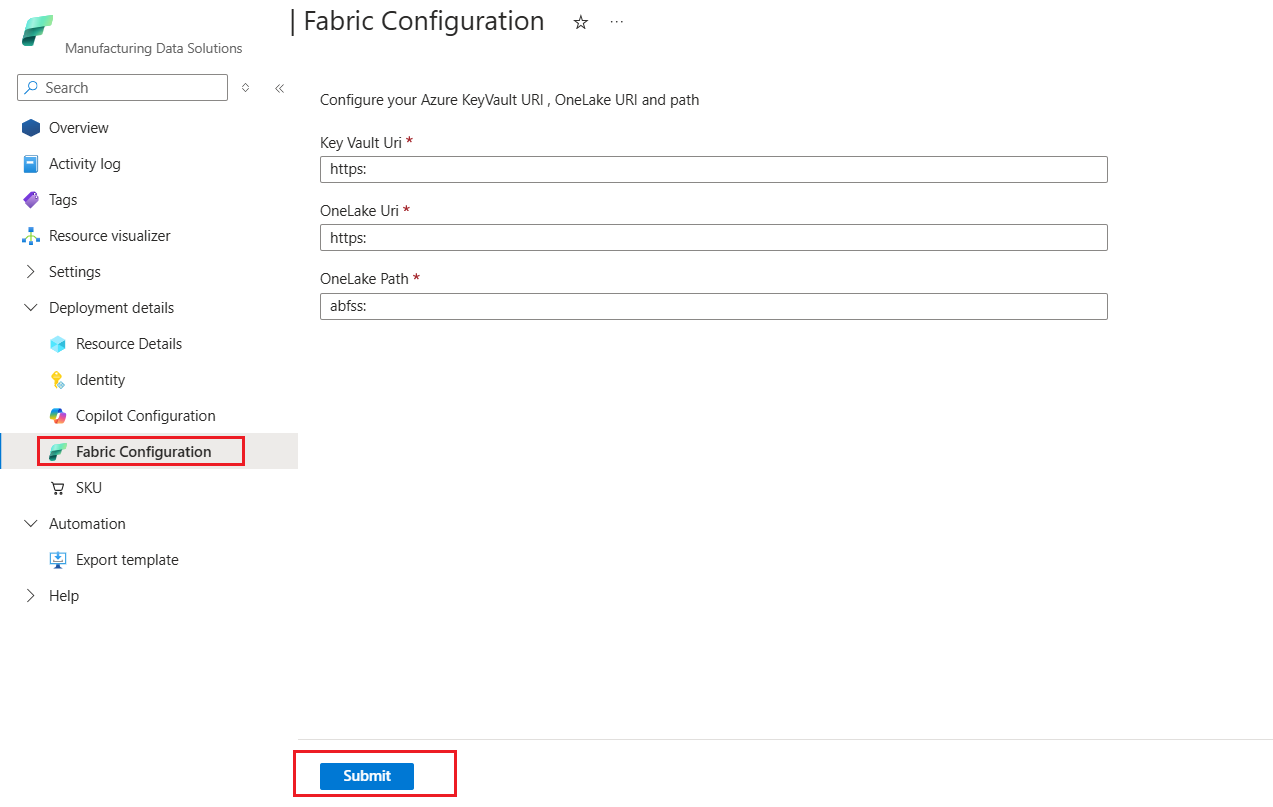
You can update both OneLake and Key Vault configurations.
SKU
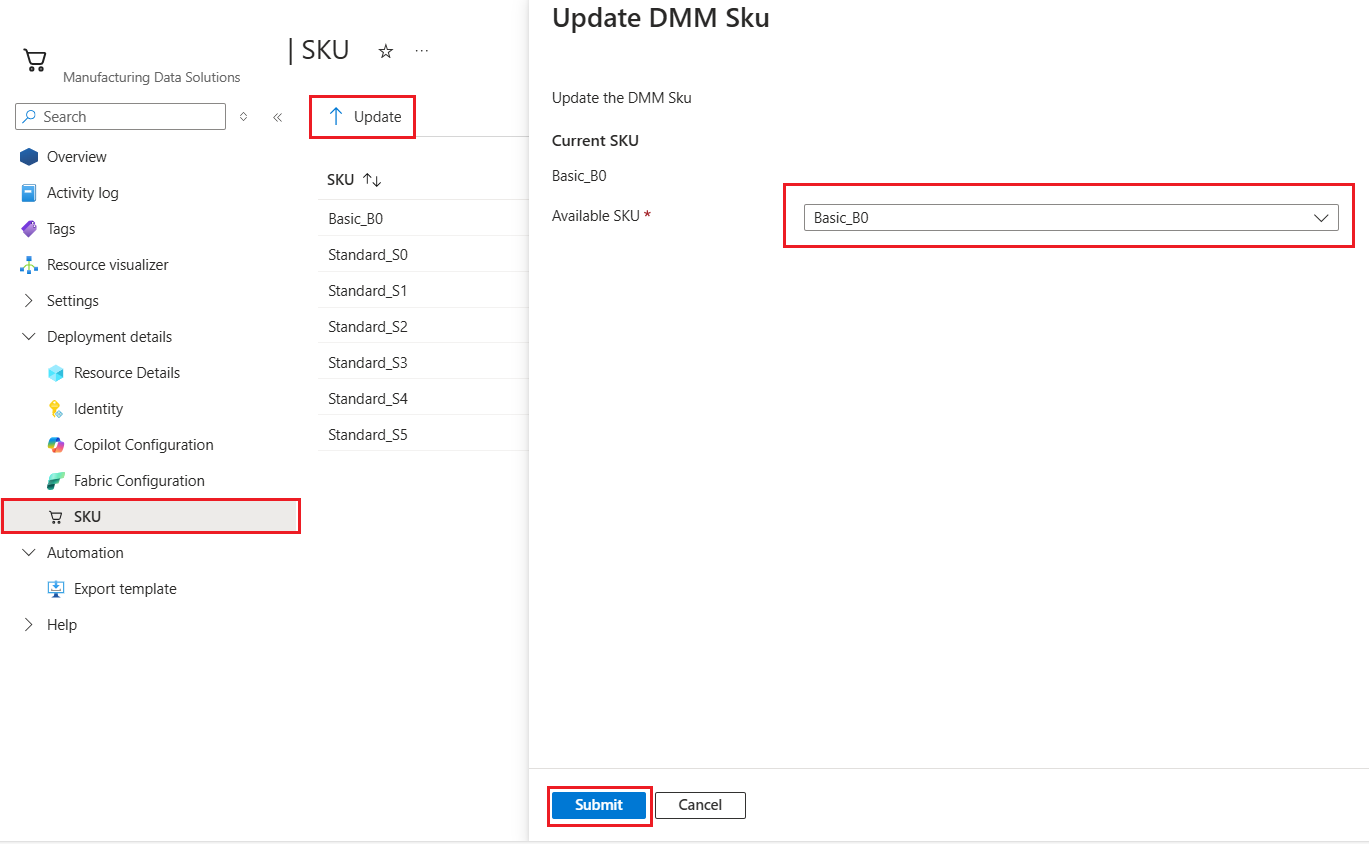
In the Manufacturing data solutions Deployment details, select SKU > Update, and then select the desired SKU.
Deny Assignment Settings
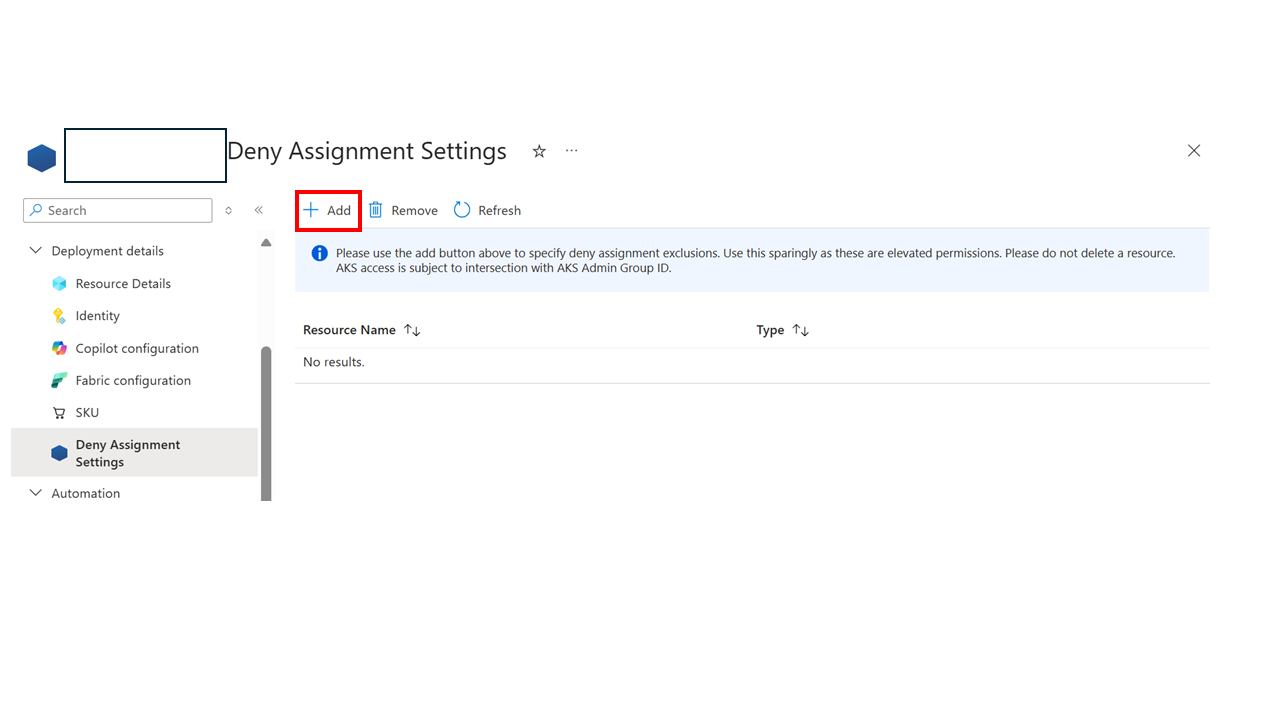
Use this setting only in critical situations when unblocking is needed, such as for S360 issues or vulnerability management, and additional access is required for underlying resources like AKS. Use this setting sparingly as it grants elevated permissions. Don't delete a resource. AKS access is subject to intersection with the AKS Admin Group ID. It's recommended to contact support before using this setting.
To use this setting, in Deployment details, select Deny Assignment Settings and select Add. Then, specify a Group Object ID. Deny assignments don't apply to this group.
Assign manufacturing user roles
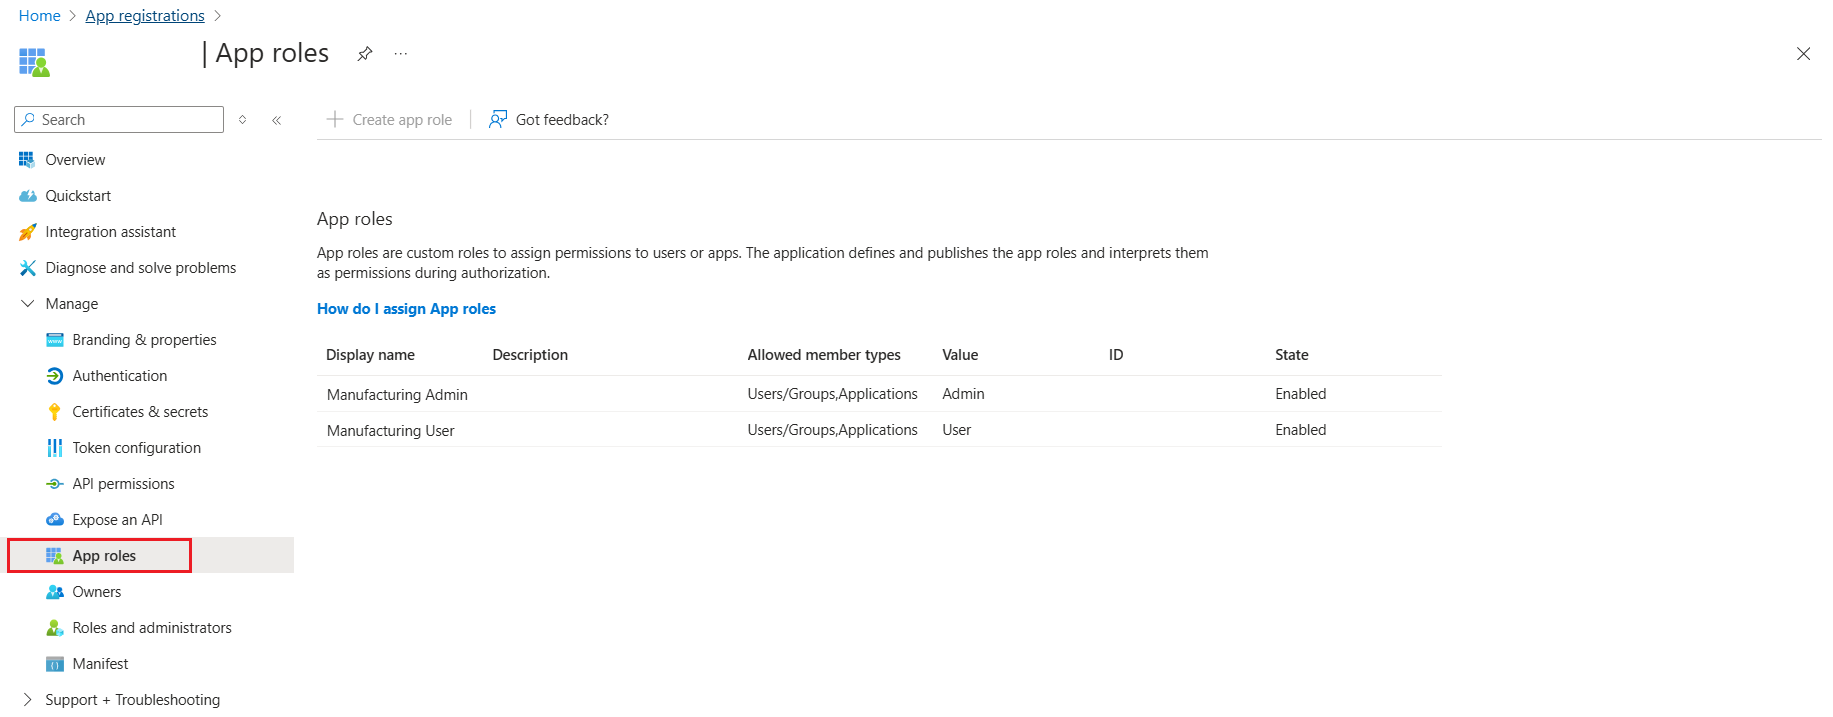
There are two roles available on Manufacturing data solutions:
| Manufacturing role | Description |
|---|---|
| Manufacturing Admin | This role is required to perform management operations, like creating custom entities, mappings, adding custom instructions, and so on. |
| Manufacturing User | This role is primarily used to query for data by using the Consumption API or Copilot API. |
Details on which endpoints require what roles can be found in the [OpenAPI specificationsfor the version deployed]. App roles reside in App Registration.
You need to assign certain roles to all testers and users of the sample apps.
Go to Microsoft Entra ID > App Registrations.
Select the app registration with your chosen app name.
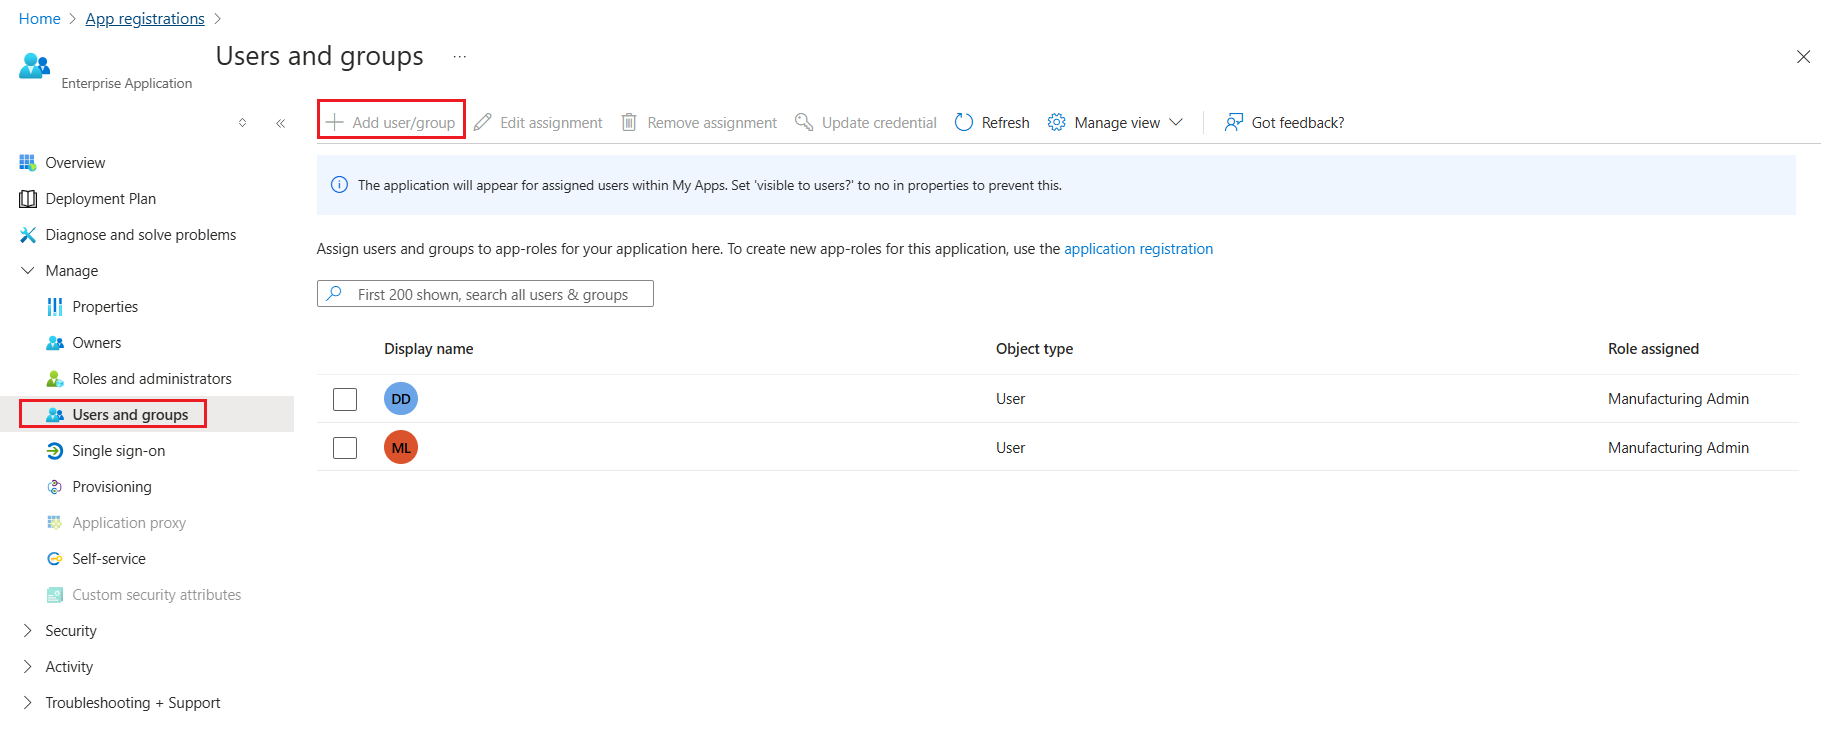
Select Go to Enterprise Application.
Select Assign users and groups.
Select Add user/group and then select the user and assign the desired role.
Run a health check
It's best to call the Health Check API to validate the success of both the deployment and user role configurations. The Health Check API returns the health of Manufacturing data solutions and whether it's ready to process requests. You need to have the Manufacturing Admin role for validating the authentication.
Generate an authentication token
You need a valid authentication token in the request header when calling a Manufacturing data solutions API. Here are two examples of how to generate this token:
Connect-AzAccount -Tenant YOUR_TENANT_ID
$ACCESS_TOKEN = (Get-AzAccessToken -ResourceUrl "api://{Entra Application Id}").Token
Since Manufacturing data solutions service uses the Managed-On Behalf Of (MOBO) model, when you create a Manufacturing data solutions resource, all the needed resources by Manufacturing data solutions service are created in your subscription.
Get the Manufacturing data solutions Service URL
You need the Manufacturing data solutions Service URL when constructing the URL for Manufacturing data solutions API calls. You can get it from Service URL from the screenshot given:
Run GET https://{serviceUrl}/mds/service/health, making sure to pass in the authentication token in the header.
Note
You can use any API tool to run the GET Request.
| Name | Required | Description |
|---|---|---|
| Authorization | True | The bearer token used to authenticate the request |
| User-Agent | True | Short string to identify the client. For more details, refer User Agent. |
Here are two examples of how to make this call:
Invoke-RestMethod -Uri "https://{serviceUrl}/mds/service/health" -Method Get -Headers @{ Authorization = "Bearer $ACCESS_TOKEN" }
The response codes should be one of the given values:
| Code | Name | Description |
|---|---|---|
| 200 | OK | Successful request |
| 401 | Unauthorized | Unable to authenticate the request |
| 403 | Forbidden | Insufficient role access: (for example, you don't have the right role or you aren't added to the registration) |
Upload sample data (optional)
Manufacturing data solutions initially contains no data. To upload the Bakery Shop sample dataset, follow these steps:
Download and extract files transformed.zip.
Navigate to the Power BI portal
Select your Fabric workspace and your Fabric Lakehouse.
Select the Files folder, and subfolder if you specified one during the deployment.
Select ... > Upload > Upload files.
Select all the CSV files in the top-level folder and then Upload.
Select Open > Upload folder.
Select the mapping folder and then Upload.
Note
It takes about 5 minutes after loading for the data to be ready for querying.
