유니버설 Windows 플랫폼을 사용한 PlayFab 인증 설정
이 자습서는 UWP(유니버설 Windows 플랫폼)를 사용한 PlayFab 인증 절차를 안내합니다.
Important
이 절차는 모든 엔터티를 획득하고 Windows Hello 및 PlayFab을 통해 인증을 수행하는 방법에 대한 매우 기본적인 소개를 제공합니다. 보다 정교한 Windows Hello 및 PlayFab 인증의 예를 보려면 [UWPExample project](https://github.com/PlayFab/UWPExample)를 고려해 보세요.
요구 사항
- MSDN "설정 시작" 가이드에 따라 UWP 개발을 위한 Windows 및 Visual Studio를 준비합니다.
- PlayFab 타이틀이 있어야 합니다.
- 로그인 기본 사항 및 모범 사례에 대해 잘 알고 있어야 합니다.
참고 항목
Windows 10 운영 체제를 사용하고 확인된 Microsoft 계정으로 로그인하며 PIN과 같은 액세스 인터페이스를 구성하는 것이 매우 중요합니다. 이러한 요구 사항이 충족되지 않으면 유용한 해명 없이 앱이 실패할 것입니다.
Visual Studio 프로젝트 준비
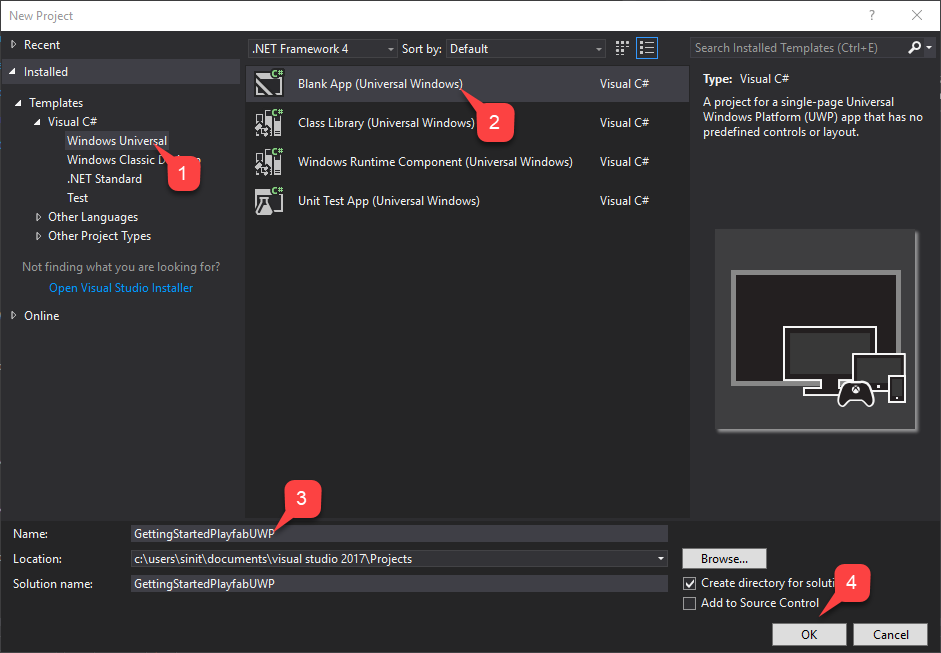
Visual Studio를 시작하고 새 프로젝트를 만듭니다.
- 템플릿에서 Windows 유니버설을 선택합니다.
- 그런 다음 빈 앱(유니버설 Windows) 유형을 선택합니다.
- 이름을 GettingStartedPlayfabUWP로 지정합니다.
- 확인 버튼을 선택하여 제출합니다.
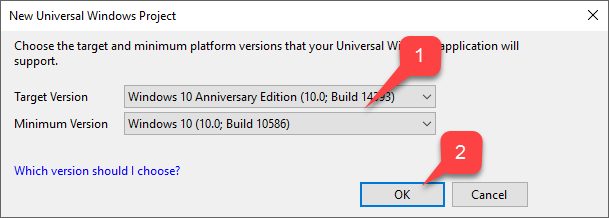
- 프로젝트와 일치하는 대상 버전 및 최소 버전을 선택합니다.
- 시작 단추를 선택합니다.
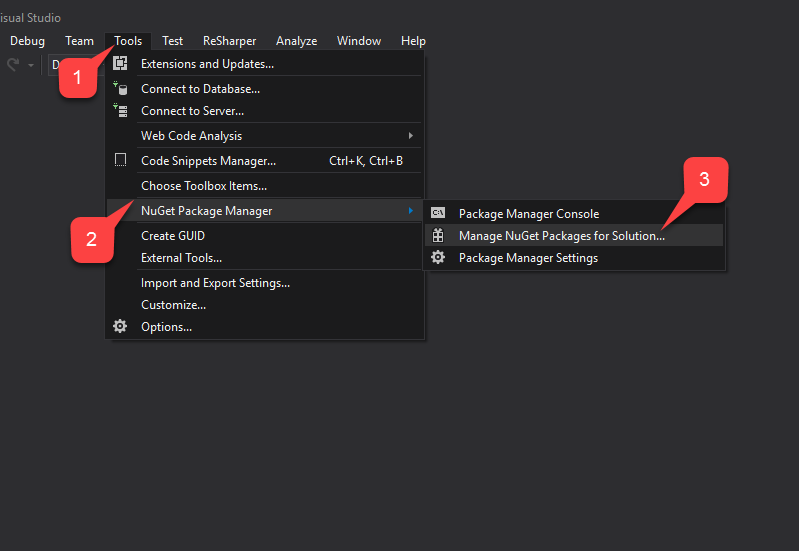
프로젝트가 만들어지면 NuGet 패키지 관리자를 사용하여 PlayFab SDK를 추가합니다.
- 먼저, 도구 탭을 선택합니다.
- 드롭다운 메뉴에서 NuGet 패키지 관리자를 선택합니다.
- 그런 다음 솔루션용 NuGet 패키지 관리를 선택합니다.
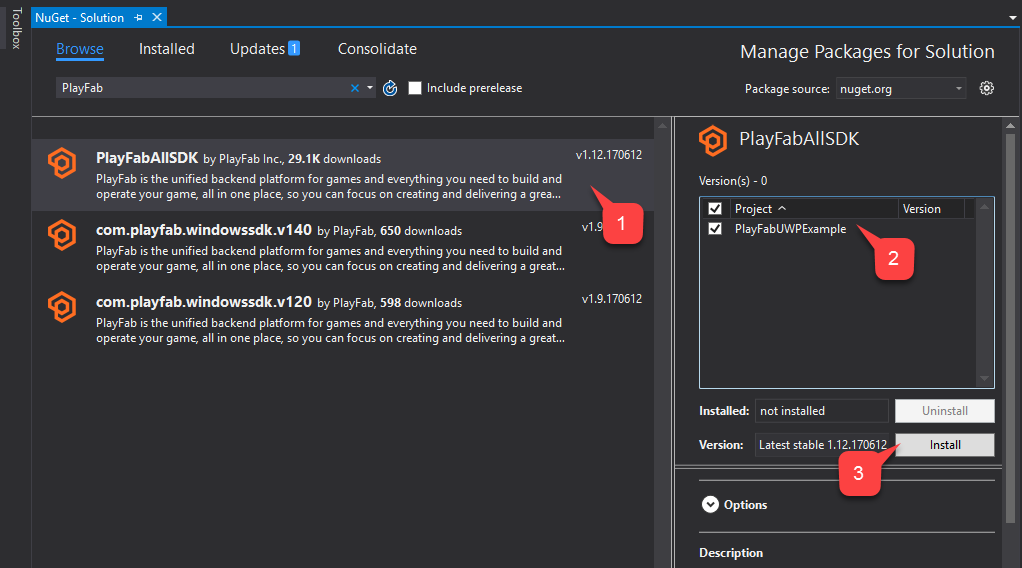
NuGet 관리자 창에서:
- 찾아보기를 선택하고 PlayFabAllSDK 패키지를 선택합니다.
- 대상 프로젝트를 선택합니다.
- 그런 다음 설치 버튼을 선택합니다.
작업이 끝나면 기본 프로젝트 설정이 완료됩니다. 다음 섹션에서는 프로젝트 생성 시 자동으로 생성되어야 하는 2개의 클래스를 수정합니다.
- App
- MainPage
구현
App.xaml.cs
이 클래스는 적절한 타이틀 ID를 설정하여 PlayFab SDK를 설정합니다. 타이틀 ID를 자신의 것으로 교체해야 합니다.
using System;
using Windows.ApplicationModel;
using Windows.ApplicationModel.Activation;
using Windows.UI.Xaml;
using Windows.UI.Xaml.Controls;
using Windows.UI.Xaml.Navigation;

namespace GettingStartedPlayfabUWP
{
    // This class is generated upon project creation.
    // While template on it's own contains a lot of xml comments, we are only interested in lines 17 and 27
    sealed partial class App : Application
    {

        // Replace PLAYFAB_TITLE_ID with your own
        public const string PlayfabTitleId = "PLAYFAB_TITLE_ID";

        /// <summary>
        /// Initializes the singleton application object. This is the first line of authored code
        /// executed, and as such is the logical equivalent of main() or WinMain().
        /// </summary>
        public App()
        {

            // This is the only line of functional code we need to add to this class.
            PlayFab.PlayFabSettings.TitleId = PlayfabTitleId;

            this.InitializeComponent();
            this.Suspending += OnSuspending;
        }

        /// <summary>
        /// Invoked when the application is launched normally by the end user. Other entry points
        /// will be used such as when the application is launched to open a specific file.
        /// </summary>
        /// <param name="e">Details about the launch request and process.</param>
        protected override void OnLaunched(LaunchActivatedEventArgs e)
        {
            Frame rootFrame = Window.Current.Content as Frame;

            // Do not repeat app initialization when the Window already has content,
            // just ensure that the window is active
            if (rootFrame == null)
            {
                // Create a Frame to act as the navigation context and navigate to the first page
                rootFrame = new Frame();

                rootFrame.NavigationFailed += OnNavigationFailed;

                if (e.PreviousExecutionState == ApplicationExecutionState.Terminated)
                {
                    //TODO: Load state from previously suspended application
                }

                // Place the frame in the current Window
                Window.Current.Content = rootFrame;
            }

            if (e.PrelaunchActivated == false)
            {
                if (rootFrame.Content == null)
                {
                    // When the navigation stack isn't restored navigate to the first page,
                    // configuring the new page by passing required information as a navigation
                    // parameter
                    rootFrame.Navigate(typeof(MainPage), e.Arguments);
                }
                // Ensure the current window is active
                Window.Current.Activate();
            }
        }

        /// <summary>
        /// Invoked when Navigation to a certain page fails
        /// </summary>
        /// <param name="sender">The Frame which failed navigation</param>
        /// <param name="e">Details about the navigation failure</param>
        void OnNavigationFailed(object sender, NavigationFailedEventArgs e)
        {
            throw new Exception("Failed to load Page " + e.SourcePageType.FullName);
        }

        /// <summary>
        /// Invoked when application execution is being suspended. Application state is saved
        /// without knowing whether the application will be terminated or resumed with the contents
        /// of memory still intact.
        /// </summary>
        /// <param name="sender">The source of the suspend request.</param>
        /// <param name="e">Details about the suspend request.</param>
        private void OnSuspending(object sender, SuspendingEventArgs e)
        {
            var deferral = e.SuspendingOperation.GetDeferral();
            //TODO: Save application state and stop any background activity
            deferral.Complete();
        }
    }
}
MainPage.xaml
이 파일에는 메인 페이지의 레이아웃이 포함되어 있습니다. 버튼 2개와 세로 방향 표에 결합된 텍스트 입력이 있는 매우 사소한 레이아웃입니다.
버튼은 특정 메서드에 바인딩되어 있으며 텍스트 상자는 UsernameInput을 통해 액세스할 수 있습니다.
<Page
    x:Class="GettingStartedPlayfabUWP.MainPage"
    xmlns="http://schemas.microsoft.com/winfx/2006/xaml/presentation"
    xmlns:x="http://schemas.microsoft.com/winfx/2006/xaml"
    xmlns:local="using:GettingStartedPlayfabUWP"
    xmlns:d="http://schemas.microsoft.com/expression/blend/2008"
    xmlns:mc="http://schemas.openxmlformats.org/markup-compatibility/2006"
    mc:Ignorable="d">

    <Grid Background="{ThemeResource ApplicationPageBackgroundThemeBrush}">
        <StackPanel Margin="0,10,10,0">
            <TextBox x:Name="UsernameInput" TextWrapping="Wrap" Text="" PlaceholderText="Username..."/>
            <Button x:Name="RegisterButton" Content="Register With Hello" HorizontalAlignment="Stretch" VerticalAlignment="Stretch" Click="RegisterRequest"/>
            <Button x:Name="LoginButton" Content="Sign In With Hello" HorizontalAlignment="Stretch" VerticalAlignment="Stretch" Click="LogInRequest"/>
        </StackPanel>
    </Grid>
</Page>
MainPage.xaml.cs
메인 페이지의 기능적 클래스이며 예제의 핵심입니다. 코드 주석을 참조하고 PlayFab+Hello 등록 및 로그인 과정을 안내하기 위해 설계된 여러 가지 방법을 검토해 보세요.
코드 학습을 시작하는 가장 쉬운 방법은 해당 버튼에 의해 트리거되는 메서드를 검토하는 것입니다.
- RegisterRequest
- LogInRequest.
using System;
using System.Linq;
using System.Threading.Tasks;
using Windows.Foundation;
using Windows.Networking.Connectivity;
using Windows.Security.Credentials;
using Windows.Security.Cryptography;
using Windows.Security.Cryptography.Core;
using Windows.Storage.Streams;
using Windows.UI.Popups;
using Windows.UI.Xaml;
using Windows.UI.Xaml.Controls;
using PlayFab;
using PlayFab.ClientModels;


namespace GettingStartedPlayfabUWP
{
    public sealed partial class MainPage : Page
    {
        // Shortcut to get current value of UsernameInput
        public string Username => UsernameInput.Text;

        public MainPage()
        {
            this.InitializeComponent();
        }

        /// <summary>
        /// This method is invoked when you select the Register button
        /// This method illustrates the flow for Registration process.
        /// We operate on 2 entities:
        /// - User Credentials of type KeyCredential
        /// - Public Key of type String
        /// We first check if user with this id already has Credentials. If so, we redirect to login procedure.
        /// Then we create new User Credentials. Check CreateKeyCredential for implementation details
        /// Then we get Base64 encoded Public Key using the new User Credentials. Check GetPublicKeyBase64 for implementation details
        /// Then we execute RegisterWithHello api call call. Check CallPlayFabRegisterWithHello for implementation details
        /// </summary>
        private async void RegisterRequest(object sender, RoutedEventArgs e)
        {
            // Check if the user already exists and if so log them in.
            KeyCredentialRetrievalResult retrieveResult = await KeyCredentialManager.OpenAsync(Username);
            if (retrieveResult.Status == KeyCredentialStatus.Success)
            {
                // Redirect to login procedure
                LogInRequest(sender, e);
                return;
            }

            // Create a new KeyCredential for the user on the device.
            var credential = await CreateKeyCredential(Username);
            if (credential == null) return;

            var publicKey = await GetPublicKeyBase64(credential);
            if (string.IsNullOrEmpty(publicKey)) return;
            // Include the name of the current device for the benefit of the user.
            // The server could support a Web interface that shows the user all the devices they
            // have signed in from and revoke access from devices they have lost.

            var registerResponse = await CallPlayFabRegisterWithHello(publicKey, Username);

            await ShowMessage("Registered and signed in with Session Ticket " + registerResponse.Result.SessionTicket);
        }

        //
        /// <summary>
        /// This method is invoked when you select the Log In button
        /// This method shows entities flow during the sign in process.
        /// We have 4 different entities:
        /// - User Credentials of type KeyCredential
        /// - Public Key Hint of type String
        /// - Challenge of type String
        /// - SignedChallenge of type String
        ///
        /// We first acquire the User Credentials. We do it based on Username. Check GetUserCredentials method for implementation details
        /// Next, we get Public Key Hint based on those credentials. Check GetPublicKeyHint for implementation details.
        /// Next we request a Challenge from PlayFab. Check GetPlayFabHelloChallenge for implementation details
        /// Next we sign the Challenge using User Credentials, so we obtain Signed Challenge. Check GetPlayFabHelloChallenge for implementation details
        /// Finally we use Signed Challenge and Public Key Hint to log into PlayFab. Check CallPlayFabLoginWithHello for implementation details
        /// </summary>
        private async void LogInRequest(object sender, RoutedEventArgs e)
        {
            // Get credentials based on current Username.
            var credentials = await GetUserCredentials(Username);
            if (credentials == null) return;

            // Credentials will give us Public Key. We use it to construct Public Key Hint, which is first important entity for PlayFab+UWP authentication.
            var publicKeyHint = GetPublicKeyHintBase64(credentials);
            if (string.IsNullOrEmpty(publicKeyHint)) return;

            // Get PlayFab Challenge to sign for Windows Hello.
            var challenge = await GetPlayFabHelloChallenge(publicKeyHint);
            if (string.IsNullOrEmpty(challenge)) return;

            // Request user to sign the challenge.
            var signedChallenge = await RequestUserSignChallenge(credentials, challenge);
            if (string.IsNullOrEmpty(signedChallenge)) return;

            // Send the signature back to the server to confirm our identity.
            // The publicKeyHint tells the server which public key to use to verify the signature.
            var result = await CallPlayFabLoginWithHello(publicKeyHint, signedChallenge);
            if (result == null) return;

            // Report the result.
            await ShowMessage("Signed in with Session Ticket " + result.Result.SessionTicket);
        }

        public async Task<string> GetPublicKeyBase64(KeyCredential userCredential)
        {

            IBuffer publicKey = userCredential.RetrievePublicKey();

            if (publicKey == null)
            {
                await ShowMessage("Failed to get public key for credential");
                return null;
            }

            return CryptographicBuffer.EncodeToBase64String(publicKey);
        }

        public string GetPublicKeyHintBase64(KeyCredential userCredential)
        {
            HashAlgorithmProvider hashProvider = HashAlgorithmProvider.OpenAlgorithm(HashAlgorithmNames.Sha256);
            var publicKey = userCredential.RetrievePublicKey();
            IBuffer publicKeyHash = hashProvider.HashData(publicKey);
            return CryptographicBuffer.EncodeToBase64String(publicKeyHash);
        }

        public async Task<KeyCredential> GetUserCredentials(string userId)
        {
            // Open credential based on our Username and make sure it is successful
            KeyCredentialRetrievalResult retrieveResult = await KeyCredentialManager.OpenAsync(userId);

            if (retrieveResult.Status != KeyCredentialStatus.Success)
            {
                await ShowMessage("Error: Unable to open credentials! " + retrieveResult.Status);
                return null;
            }

            return retrieveResult.Credential;
        }

        public async Task<string> GetPlayFabHelloChallenge(string publicKeyHint)
        {
            // Request challenge from PlayFab and make sure response has no errors
            var challengeResponse = await PlayFab.PlayFabClientAPI.GetWindowsHelloChallengeAsync(new GetWindowsHelloChallengeRequest
            {
                PublicKeyHint = publicKeyHint,
                TitleId = PlayFab.PlayFabSettings.TitleId
            });

            if (challengeResponse.Error != null)
            {
                await ShowMessage($"Error during getting challenge: {challengeResponse.Error.Error}");
                return null;
            }

            return challengeResponse.Result.Challenge;

        }

        public async Task<string> RequestUserSignChallenge(KeyCredential credentials, string challenge)
        {
            IBuffer challengeBuffer = CryptographicBuffer.DecodeFromBase64String(challenge);
            KeyCredentialOperationResult opResult = await credentials.RequestSignAsync(challengeBuffer);

            if (opResult.Status != KeyCredentialStatus.Success)
            {
                await ShowMessage("Failed sign the challenge string: " + opResult.Status);
                return null;
            }

            return CryptographicBuffer.EncodeToBase64String(opResult.Result);
        }

        public async Task<PlayFabResult<LoginResult>> CallPlayFabLoginWithHello(string publicKeyHint, string signedChallenge)
        {
            var loginResponse = await PlayFab.PlayFabClientAPI.LoginWithWindowsHelloAsync(new LoginWithWindowsHelloRequest
            {
                ChallengeSignature = signedChallenge,
                PublicKeyHint = publicKeyHint
            });

            if (loginResponse.Error != null)
            {
                await ShowMessage($"Failed to log in: {loginResponse.Error.Error}");
                return null;
            }

            return loginResponse;
        }

        public IAsyncOperation<IUICommand> ShowMessage(string messageString)
        {
            MessageDialog message = new MessageDialog($"{messageString}");
            return message.ShowAsync();
        }

        public async Task<PlayFabResult<LoginResult>> CallPlayFabRegisterWithHello(string publicKey, string username)
        {
            var hostNames = NetworkInformation.GetHostNames();
            var localName = hostNames.FirstOrDefault(name => name.DisplayName.Contains(".local"));
            string computerName = localName.DisplayName.Replace(".local", "");

            var registerResult = await PlayFab.PlayFabClientAPI.RegisterWithWindowsHelloAsync(new RegisterWithWindowsHelloRequest
            {
                DeviceName = computerName,
                PublicKey = publicKey,
                UserName = username
            });

            if (registerResult.Error != null)
            {
                await ShowMessage(registerResult.Error.GenerateErrorReport());
                return null;
            }

            return registerResult;
        }

        public async Task<KeyCredential> CreateKeyCredential(string username)
        {
            KeyCredentialRetrievalResult keyCreationResult = await KeyCredentialManager.RequestCreateAsync(username, KeyCredentialCreationOption.ReplaceExisting);
            if (keyCreationResult.Status != KeyCredentialStatus.Success)
            {
                // User has authenticated with Windows Hello and the key credential is created.
                await ShowMessage("Failed to create key credential: " + keyCreationResult.Status);
                return null;
            }

            return keyCreationResult.Credential;
        }

    }


}
테스트
응용 프로그램을 실행하려면:
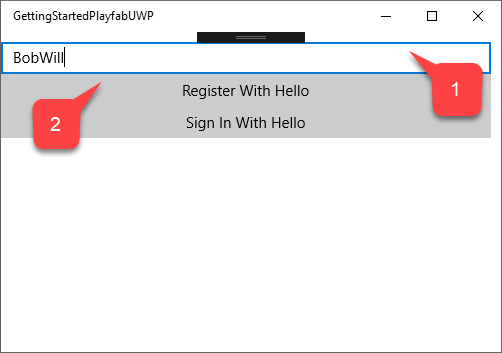
- 사용자 이름을 입력합니다.
- Hello로 등록 버튼을 선택합니다.
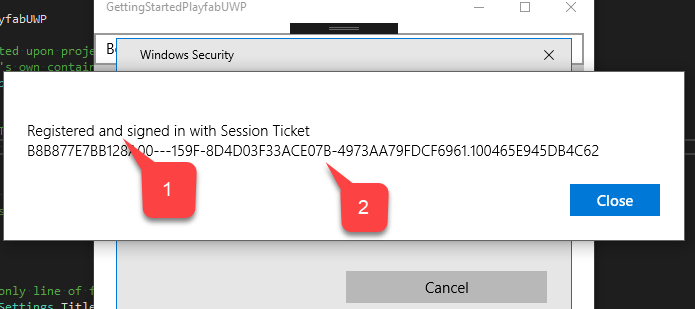
Windows가 인증을 위해 제공하는 지시를 따릅니다.
- 신원이 확인되면 계정이 등록되고 로그인됨을 알리는 확인 메시지가 표시됩니다.
- 세션 티켓이 함께 표시됩니다.
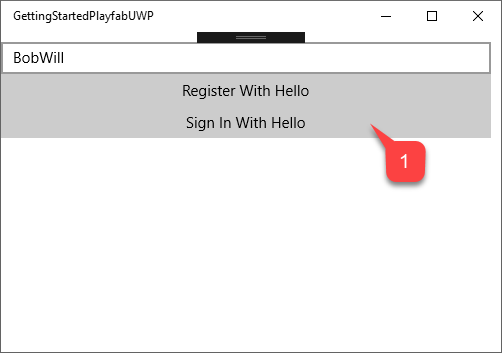
- Hello로 로그인 버튼을 선택합니다.
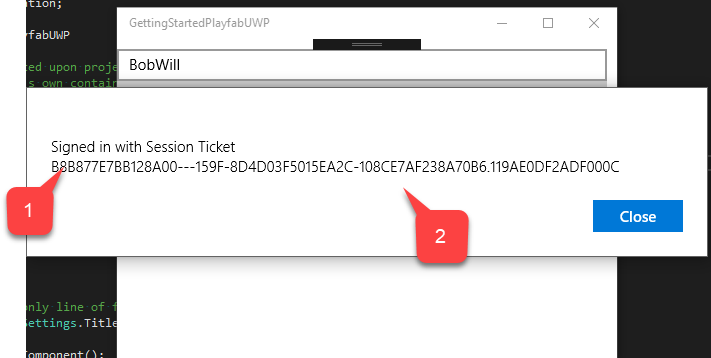
Windows가 인증을 위해 제공하는 지시를 따릅니다.
- ID가 확인되면 계정이 로그인되었음을 알리는 확인 메시지가 표시됩니다.
- 세션 티켓이 함께 표시됩니다.
이 시점에서 PlayFab이 UWP 응용 프로그램에 성공적으로 통합됩니다.