Submit a VAT return to the Altinn web service
When you successfully obtained an access token for Altinn, your Microsoft Dynamics 365 Finance environment is ready to interoperate with the Altinn web service to submit VAT returns.
The processing for a VAT return that is submitted to Altinn consists of many steps. For a full description of the submission process, see the API page.
Electronic messaging (EM) functionality is used to support the process of generating a VAT return and submitting it directly to Altinn from Finance. When you import a package of data entities that includes a predefined EM setup into your legal entity, all the actions that are required to submit VAT returns to Altinn are imported. The following illustration shows a simplified schema of the EM processing that is delivered with the NO VAT return – Altinn setup file.
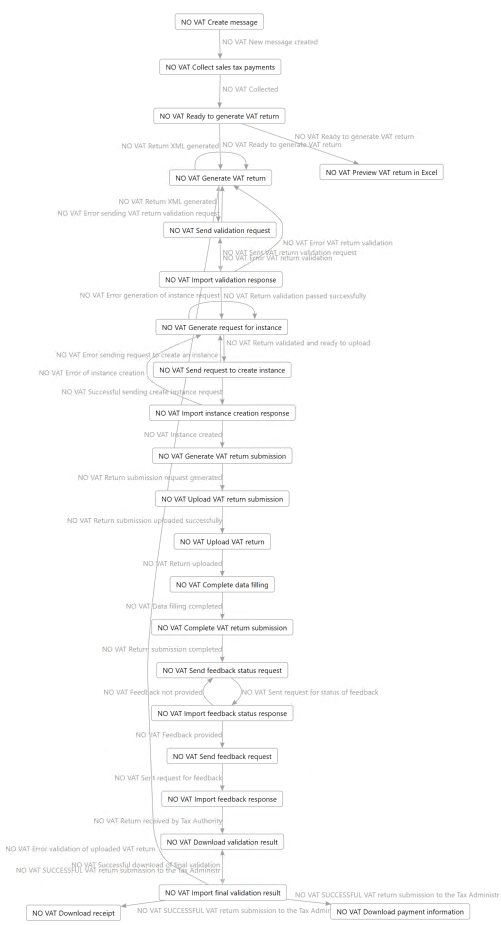
Not all the relationships between the actions defined in NO VAT return processing are included into the diagram.
To simplify the process of submitting VAT returns, most of actions are aggregated into inseparable sequences. When the first action in a sequence is initiated, the system automatically runs all the actions in that sequence. Therefore, the process is significantly simplified, and the required steps are reduced to the following list:
- Create a message.
- Collect sales tax payments.
- Mark the message as ready to generate the VAT return.
- Preview the VAT return in Microsoft Excel.
- Generate the VAT return.
- Validate the VAT return in the Tax Administration web service.
- Submit the VAT return.
- Download attachments.
Create a message
Follow these steps to perform the NO VAT Create message action.
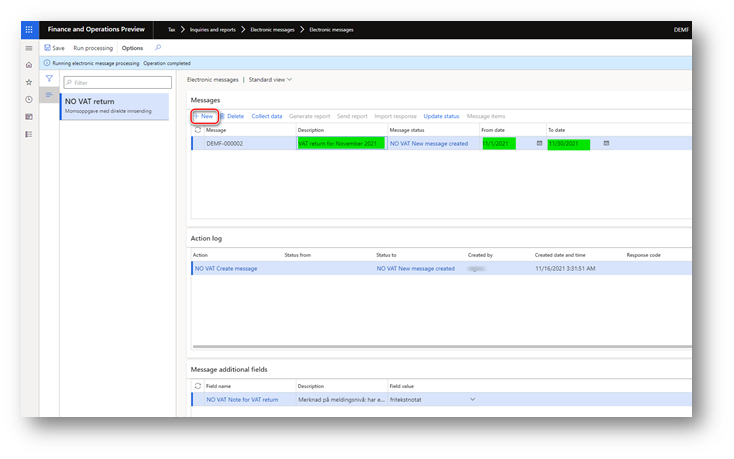
Go to Tax > Inquiries and reports > Electronic messages > Electronic messages, and select the NO VAT return EM processing in the list on the left.
On the Messages FastTab, select New.
The NO VAT Create message action is predefined in the Run processing dialog box.
Select OK. The new electronic message is created.
In the From date and To date fields for the message, define the period that you want to submit the VAT return for.
Optional: In the Description field, enter a description. This text won't be included on the report.
Collect sales tax payments
Follow these steps to perform the NO VAT Collect sales tax payments action.
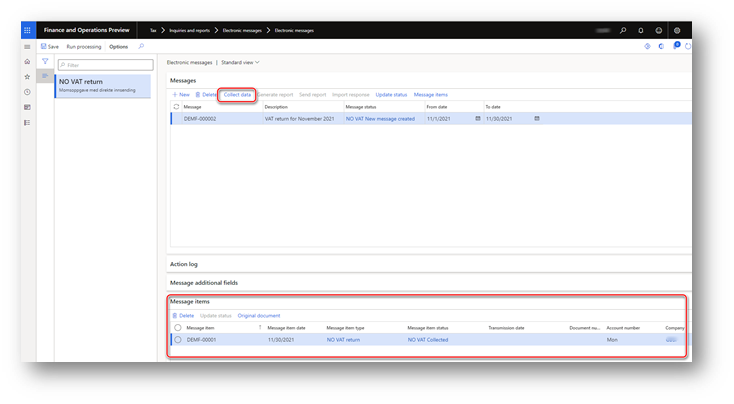
Go to Tax > Inquiries and reports > Electronic messages > Electronic messages page, and select the message that was created in the NO VAT return EM processing.
On the Messages FastTab, select Collect data.
The NO VAT Collect sales tax payments action is predefined in the Run processing dialog box.
Select OK.
The sales tax payment lines are posted during the period that was specified for the message that is listed on the Message items FastTab in relation to the selected message.
According to the XML Schema Definition (XSD) schema for VAT returns, a VAT return can include either a note that uses a value from an enumerated list of values or a free-text note that is limited to 4,000 characters.
Follow these steps to add a note that uses a value from an enumerated list.
- On the Messages FastTab, select the electronic message to specify a note for.
- On the Message additional fields FastTab, select the NO VAT Note for VAT return additional field.
- In the Field value column, select a value in the lookup field.
Follow these steps to add a free-text note that is limited to 4,000 characters.
- On the Messages FastTab, select the electronic message to specify a note for.
- On the Message additional fields FastTab, select the NO VAT Note for VAT return additional field.
- In the Field value column, select fritekstnotat in the lookup field.
- Select Attachments, and then, on the Action Pane, select New > Note.
- In the Note field, enter your note. This note will be included on the VAT return in XML format when it's generated.
Follow these steps to include a payment ID, or KID number, in your digital VAT return. This KID number can be used only when the <fastsattMerverdiavgift> value (the total value-added tax [VAT] for the reporting period) is negative.
- On the Messages FastTab, select the electronic message to specify the KID number for.
- On the Message additional fields FastTab, select the NO VAT Payment ID additional field.
- In the Field value column, specify the KID number.
Mark the message as ready to generate the VAT return
Follow these steps to perform the NO VAT Ready to generate VAT return action.
Go to Tax > Inquiries and reports > Electronic messages > Electronic messages, and select the message that was created in the NO VAT return EM processing.
On the Messages FastTab, select Update status.
The NO VAT Ready to generate VAT return action and the NO VAT Ready to generate VAT return status are predefined in the Run processing dialog box.
Select OK. The status of the message is updated to NO VAT Ready to generate VAT return, and the Generate report button becomes available.
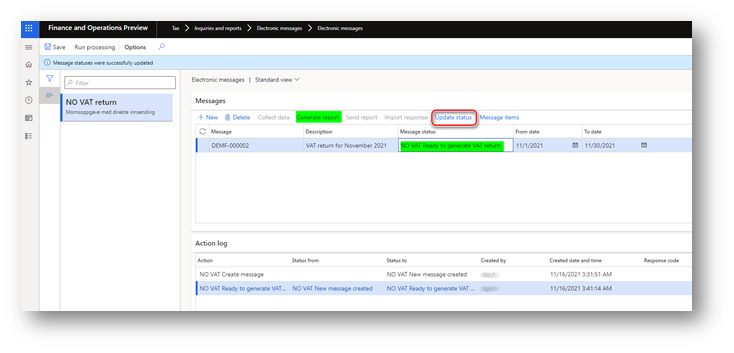
To continue to collect data for the report, select Update status, and change the status of the message back to NO VAT New message created.
Preview the VAT return in Microsoft Excel
Follow these steps to perform the NO VAT Preview VAT return in Excel action.
- Go to Tax > Inquiries and reports > Electronic messages > Electronic messages, and select the message that was created in the NO VAT return EM processing.
- On the Message tab, select Generate report.
- In the Run processing dialog box, select NO VAT Preview VAT return in Excel.
- For reporting periods that contain a large volume of tax transactions, we recommend that you run the report in batch mode. On the Run in the background FastTab, select the Batch processing checkbox. Then set the Task description field and other parameters for the batch.
- Select OK. A new file is attached to the message, but the status of the message isn't changed.
- Select Attachments, and then select VAT return preview.xls.
- On the Action Pane, select Open to preview the VAT return in Excel format.
Generate the VAT return
Follow these steps to perform the NO VAT Generate VAT return action.
Go to Tax > Inquiries and reports > Electronic messages > Electronic messages, and select the message that was created in the NO VAT return EM processing.
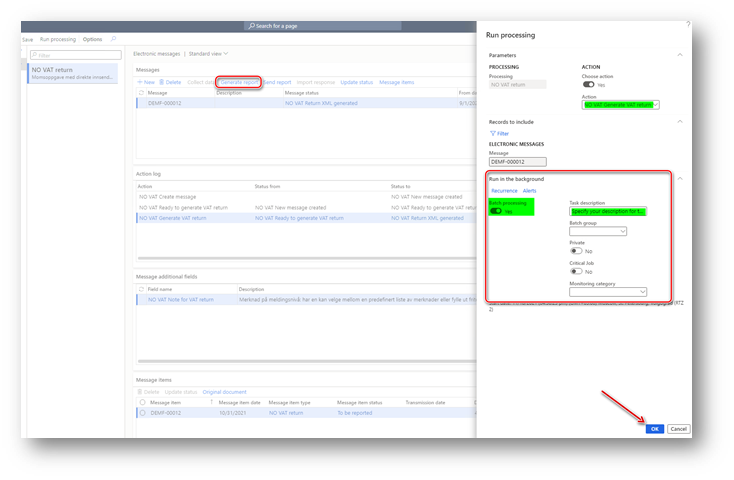
On the Messages FastTab, select Generate report.
In the Run processing dialog box, select NO VAT Generate VAT return.
For reporting periods that contain a large volume of tax transactions, we recommend that you run the report in batch mode. On the Run in the background FastTab, select the Batch processing checkbox. Then set the Task description field and other parameters for the batch.
Select OK.
The status of the message is updated to NO VAT Return XML generated, and a new
mvamelding.xmlfile is attached to the message.Select Attachments, and then select mvamelding.xml.
On the Action Pane, select Open to preview the VAT return in XML format.
Validate the VAT return in the Tax Administration web service
This step consists of the NO VAT Validation sequence, which includes the following actions:
- NO VAT Send validation request – This action transfers the
mvamelding.xmlfile to the Tax Administration API, receives thevalideringsresultat.xmlfile that contains the results of the business validation that is performed on themvamelding.xmlfile, and attaches thevalideringsresultat.xmlfile to the electronic message. - NO VAT Import validation response – This action parses information from the
valideringsresultat.xmlfile and updates the status of the electronic message. If the business validation that the Tax Administration performs is passed, this action updates the status to NO VAT Return validation passed successfully. If errors are identified during the business validation, this action updates the status to NO VAT Error VAT return validation, applies an Extensible Stylesheet Language Transformations (XSLT) transformation to thevalideringsresultat.xmlfile, and attaches the transformed file to the action log for the record. You can then review it further as thevalideringsresultat_transformed.htmlfile attached to the action log for the NO VAT Import validation response action. - NO VAT Generate request for instance – This action prepares a request for the next step in the process, Submit the VAT return.
Follow these steps to validate the VAT return in the Tax Administration web service.
Go to Tax > Inquiries and reports > Electronic messages > Electronic messages, and select the message that was created in the NO VAT return EM processing.
On the Messages FastTab, select Send report.
The NO VAT Send validation request action is predefined in the Run processing dialog box.
Select OK.
The system automatically runs the NO VAT Send validation request, NO VAT Import validation response, and NO VAT Generate request for instance actions one at a time. If the business validation that the Tax Administration performs is passed, the status of the electronic message is updated to NO VAT Return validation passed successfully. If errors are identified during the business validation, the status is updated to NO VAT Error VAT return validation.
To review the information about any errors that were identified during the business validation that the Tax Administration performs, on the Action log FastTab, select the line for NO VAT Import validation response.
Select Attachments, and then select the attached HTML file.
On the Action Pane, select Open. The file is opened in a browser window, and you can review the content in a table. After you apply corrections, you can go back to the Generate the VAT return step to regenerate the XML file.
Submit the VAT return
When your mvamelding.xml file has been successfully validated by the Tax Administration, the electronic message has a status of NO VAT Return validation passed successfully, and you can submit the mvamelding.xml file to Altinn.
The process of submitting a VAT return includes the following actions:
- NO VAT Send request to create instance – This action sends a request to the Altinn3-App API to create an instance for further VAT return submission. It then receives the response and attaches it to the electronic message.
- NO VAT Import instance creation response – This action imports the required information from the response to the system for further submission.
- NO VAT Generate VAT return submission – This action creates a special
konvolutt.xmltechnical file that must be sent to the Altinn3-App API before themvamelding.xmlfile. - NO VAT Upload VAT return submission – This action sends the
konvolutt.xmltechnical file to the Altinn3-App API. - NO VAT Upload VAT return – This action sends the
mvamelding.xmlfile to the Altinn3-App API. - NO VAT Complete data filling – This action sends a request to complete the transfer of the VAT return to the Altinn3-App API.
- NO VAT Complete VAT return submission – This action sends a request to complete the submission process to the Altinn3-App API.
- NO VAT Send feedback status request – This action requests the status of the validation process for the submitted VAT return.
- NO VAT Import feedback status response – This action imports the validation status for the VAT return into the system.
- NO VAT Send feedback request – This action requests the validation results for the submitted VAT return.
- NO VAT Import feedback response – This action imports the required information from the response that contains the validation results for the VAT return.
- NO VAT Download validation result – This action downloads the validation details for the VAT return.
- NO VAT Import final validation result – This action imports information about the validation details for the VAT return into the system and updates the status of the electronic message. If no errors were identified in the submitted VAT return, the status is updated to NO VAT SUCCESSFUL VAT return submission to the Tax Administr. If errors were identified in the submitted VAT return, the status is updated to NO VAT Error validation of uploaded VAT return.
Follow these steps to submit the VAT return.
Go to Tax > Inquiries and reports > Electronic messages > Electronic messages, and select the message that was created in the NO VAT return EM processing.
On the Messages FastTab, select Send report.
The NO VAT Send request to create instance action is predefined in the Run processing dialog box.
Select OK.
The system runs all the actions in the previous list one at a time. It might take several minutes for feedback about the VAT return to be ready on the Tax Administration side. In this case, Submit VAT return is stopped, and the status is updated to NO VAT Feedback not provided status. Wait five to ten minutes, and then, on the Message FastTab, select Send report again.
The NO VAT Send feedback status request action is predefined in the Run processing dialog box.
Select OK. The VAT return submission is complete when the electronic message has a status of NO VAT SUCCESSFUL VAT return submission to the Tax Administr.
Download attachments
After a VAT return is successfully submitted, you can download the payment information in XML format and the receipt in PDF format.
- Go to Tax > Inquiries and reports > Electronic messages > Electronic messages, and select the message that was created in the NO VAT return EM processing.
- On the Messages FastTab, select Send report.
- In the Run processing dialog box, select NO VAT Download receipt or NO VAT Download payment information.
- Select OK. The
betalingsinformasjon.xml("NO VAT Download payment information") orkvittering.pdf("NO VAT Download receipt") file is attached to the electronic message. - Select Attachments, and then select betalingsinformasjon.xml or kvittering.pdf.
- On the Action Pane, select Open.