데이터 바인딩 기본 사항
.NET 다중 플랫폼 앱 UI(.NET MAUI) 데이터 바인딩을 사용하면 두 개체의 속성을 연결하여 한 개체의 변경으로 인해 다른 개체가 변경되도록 할 수 있습니다. 이 도구는 매우 유용한 도구이며, 데이터 바인딩을 코드에서 완전히 정의할 수 있지만 XAML은 바로 가기와 편의를 제공합니다.
데이터 바인딩
데이터 바인딩은 원본 및 대상이라는 두 개체의 속성을 연결합니다. 코드에서는 다음 두 단계가 필요합니다.
BindingContext대상 개체의 속성을 원본 개체로 설정해야 합니다.- 개체의
SetBinding속성을 원본 개체의Binding속성에 바인딩하려면 대상 개체에서 메서드(클래스와 함께 자주 사용됨)를 호출해야 합니다.
대상 속성은 바인딩 가능한 속성이어야 합니다. 즉, 대상 개체에서 파생 BindableObject되어야 합니다. 와 같은 Text속성Label은 바인딩 가능한 속성TextProperty과 연결됩니다.
XAML에서는 태그 확장이 호출과 Binding 클래스를 대신 SetBinding 한다는 Binding 점을 제외하고 코드에 필요한 동일한 두 단계를 수행해야 합니다. 그러나 XAML에서 데이터 바인딩을 정의하는 경우 대상 개체를 설정하는 방법에는 여러 가지가 BindingContext 있습니다. 경우에 따라 코드 숨김 파일에서 설정되고, 경우에 따라 확장 프로그램 StaticResource 또는 태그 확장을 사용하며 x:Static , 때로는 속성 요소 태그의 BindingContext 콘텐츠로 설정되기도 합니다.
보기-보기 바인딩
데이터 바인딩을 정의하여 동일한 페이지에서 두 뷰의 속성을 연결할 수 있습니다. 이 경우 태그 확장을 사용하여 대상 개체를 x:Reference 설정합니다BindingContext.
다음 예제에는 Slider 값에 의해 Slider 회전되는 뷰와 Label 값을 표시하는 다른 뷰가 포함됩니다Slider.
<ContentPage xmlns="http://schemas.microsoft.com/dotnet/2021/maui"
             xmlns:x="http://schemas.microsoft.com/winfx/2009/xaml"
             x:Class="XamlSamples.SliderBindingsPage"
             Title="Slider Bindings Page">
    <StackLayout>
        <Label Text="ROTATION"
               BindingContext="{x:Reference slider}"
               Rotation="{Binding Path=Value}"
               FontAttributes="Bold"
               FontSize="18"
               HorizontalOptions="Center"
               VerticalOptions="Center" />
        <Slider x:Name="slider"
                Maximum="360"
                VerticalOptions="Center" />
        <Label BindingContext="{x:Reference slider}"
               Text="{Binding Value, StringFormat='The angle is {0:F0} degrees'}"
               FontAttributes="Bold"
               FontSize="18"
               HorizontalOptions="Center"
               VerticalOptions="Center" />
    </StackLayout>
</ContentPage>
태그 Slider 확장을 사용하여 x:Reference 두 Label 뷰에서 참조하는 특성을 포함합니다x:Name. 바인딩 확장은 x:Reference 이 경우 slider참조된 요소의 이름으로 설정하도록 명명 Name 된 속성을 정의합니다. 그러나 ReferenceExtension 태그 확장을 정의하는 x:Reference 클래스는 명시적으로 필요하지 않음을 의미하는 특성Name도 정의 ContentProperty 합니다.
태그 확장 자체에는 Binding 클래스와 Binding 같은 여러 속성이 BindingBase 있을 수 있습니다. for Binding 는 ContentProperty Path태그 확장의 첫 번째 항목 Binding 인 경우 태그 확장의 "Path=" 부분을 생략할 수 있습니다.
두 번째 Binding 태그 확장은 속성을 설정합니다 StringFormat . .NET MAUI에서 바인딩은 암시적 형식 변환을 수행하지 않으며 문자열이 아닌 개체를 문자열로 표시해야 하는 경우 형식 변환기를 제공하거나 사용해야 StringFormat합니다.
Important
서식 문자열은 작은따옴표로 묶어야 합니다.
바인딩 모드
단일 보기에는 여러 속성에 대한 데이터 바인딩이 있을 수 있습니다. 그러나 각 뷰에는 하나의 BindingContext데이터 바인딩만 있을 수 있으므로 해당 뷰의 여러 데이터 바인딩은 동일한 개체의 모든 참조 속성을 참조해야 합니다.
이 문제 및 기타 문제에 대한 해결 방법은 열거형의 멤버로 설정된 속성과 BindingMode 관련이 Mode 있습니다.
DefaultOneWay— 값이 원본에서 대상으로 전송됩니다.OneWayToSource— 값이 대상에서 원본으로 전송됩니다.TwoWay— 값은 원본과 대상 간에 두 가지 방법으로 전송됩니다.OneTime— 데이터가 원본에서 대상으로 바뀌지만 변경되는BindingContext경우에만
다음 예제에서는 바인딩 모드와 TwoWay 바인딩 모드를 OneWayToSource 일반적으로 사용하는 방법을 보여 줍니다.
<ContentPage xmlns="http://schemas.microsoft.com/dotnet/2021/maui"
             xmlns:x="http://schemas.microsoft.com/winfx/2009/xaml"
             x:Class="XamlSamples.SliderTransformsPage"
             Padding="5"
             Title="Slider Transforms Page">
    <Grid>
        <Grid.RowDefinitions>
            <RowDefinition Height="*" />
            <RowDefinition Height="Auto" />
            <RowDefinition Height="Auto" />
            <RowDefinition Height="Auto" />
            <RowDefinition Height="Auto" />
        </Grid.RowDefinitions>
        <Grid.ColumnDefinitions>
            <ColumnDefinition Width="*" />
            <ColumnDefinition Width="Auto" />
        </Grid.ColumnDefinitions>

        <!-- Scaled and rotated Label -->
        <Label x:Name="label"
               Text="TEXT"
               HorizontalOptions="Center"
               VerticalOptions="CenterAndExpand" />

        <!-- Slider and identifying Label for Scale -->
        <Slider x:Name="scaleSlider"
                BindingContext="{x:Reference label}"
                Grid.Row="1" Grid.Column="0"
                Maximum="10"
                Value="{Binding Scale, Mode=TwoWay}" />
        <Label BindingContext="{x:Reference scaleSlider}"
               Text="{Binding Value, StringFormat='Scale = {0:F1}'}"
               Grid.Row="1" Grid.Column="1"
               VerticalTextAlignment="Center" />

        <!-- Slider and identifying Label for Rotation -->
        <Slider x:Name="rotationSlider"
                BindingContext="{x:Reference label}"
                Grid.Row="2" Grid.Column="0"
                Maximum="360"
                Value="{Binding Rotation, Mode=OneWayToSource}" />
        <Label BindingContext="{x:Reference rotationSlider}"
               Text="{Binding Value, StringFormat='Rotation = {0:F0}'}"
               Grid.Row="2" Grid.Column="1"
               VerticalTextAlignment="Center" />

        <!-- Slider and identifying Label for RotationX -->
        <Slider x:Name="rotationXSlider"
                BindingContext="{x:Reference label}"
                Grid.Row="3" Grid.Column="0"
                Maximum="360"
                Value="{Binding RotationX, Mode=OneWayToSource}" />
        <Label BindingContext="{x:Reference rotationXSlider}"
               Text="{Binding Value, StringFormat='RotationX = {0:F0}'}"
               Grid.Row="3" Grid.Column="1"
               VerticalTextAlignment="Center" />

        <!-- Slider and identifying Label for RotationY -->
        <Slider x:Name="rotationYSlider"
                BindingContext="{x:Reference label}"
                Grid.Row="4" Grid.Column="0"
                Maximum="360"
                Value="{Binding RotationY, Mode=OneWayToSource}" />
        <Label BindingContext="{x:Reference rotationYSlider}"
               Text="{Binding Value, StringFormat='RotationY = {0:F0}'}"
               Grid.Row="4" Grid.Column="1"
               VerticalTextAlignment="Center" />
    </Grid>
</ContentPage>
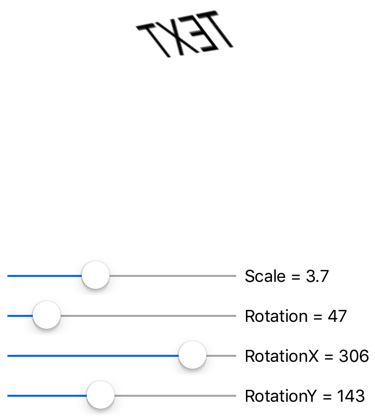
이 예제에서는 4개의 Slider 뷰가 해당 뷰의 Scale, Rotate및 RotateXRotateY 속성을 제어하기 위한 것입니다Label. 처음에는 각각에 의해 설정되기 때문에 이러한 네 가지 속성이 Label 데이터 바인딩 대상이어야 하는 Slider것처럼 보입니다. 그러나 해당 Label 개체는 BindingContext 하나의 개체일 수 있으며 4개의 서로 다른 슬라이더가 있습니다. 따라서 BindingContext 4개의 슬라이더 각각이 슬라이더로 Label설정되고 바인딩은 슬라이더의 속성에 Value 설정됩니다. 및 모드를 OneWayToSource 사용하여 이러한 Value 속성은 소스 속성(즉, ScaleRotateXRotateRotateY 및 의 속성)을 Label설정할 수 있습니다.TwoWay
세 Slider 개의 뷰에 대한 바인딩은 OneWayToSource값이 명명label된 해당 속성의 BindingContextLabel 변경이 발생한다는 Slider 것을 의미합니다. 이러한 세 Slider 가지 보기로 인해 다음과 같은 속성이 변경RotateRotateX됩니다 RotateY Label.

그러나 속성에 대한 바인딩은 Scale .입니다 TwoWay. 이는 속성의 Scale 기본값이 1이고 바인딩 Slider 을 TwoWay 사용하면 초기 값이 0이 아닌 1로 설정되기 때문입니다. 해당 바인딩인 OneWayToSource경우 속성은 Scale 처음에 기본값에서 Slider 0으로 설정됩니다. 표시되지 Label 않습니다.
참고 항목
클래스에는 VisualElement ScaleX 각각 x축과 ScaleY y축의 VisualElement 배율을 조정하는 속성과 속성도 있습니다.
바인딩 및 컬렉션
ListView 는 ItemsSource 형식 IEnumerable의 속성을 정의하고 해당 컬렉션의 항목을 표시합니다. 이러한 항목은 모든 형식의 개체일 수 있습니다. 기본적으로 ListView 각 항목의 ToString 메서드를 사용하여 해당 항목을 표시합니다. 경우에 따라 이는 원하는 것일 뿐이지만 대부분의 경우 ToString 개체의 정규화된 클래스 이름만 반환합니다.
그러나 파생 클래스를 ListView 포함하는 템플릿을 사용하여 컬렉션의 항목을 원하는 방식으로 표시할 수 있습니다Cell. 템플릿은 모든 항목에 ListView대해 복제되며 템플릿에 설정된 데이터 바인딩은 개별 클론으로 전송됩니다. 클래스를 사용하여 항목에 대한 사용자 지정 셀을 ViewCell 만들 수 있습니다.
ListView 는 클래스의 도움을 받아 .NET MAUI에서 사용할 수 있는 모든 명명된 색 목록을 NamedColor 표시할 수 있습니다.
using System.Reflection;
using System.Text;

namespace XamlSamples
{
    public class NamedColor
    {
        public string Name { get; private set; }
        public string FriendlyName { get; private set; }
        public Color Color { get; private set; }

        // Expose the Color fields as properties
        public float Red => Color.Red;
        public float Green => Color.Green;
        public float Blue => Color.Blue;

        public static IEnumerable<NamedColor> All { get; private set; }

        static NamedColor()
        {
            List<NamedColor> all = new List<NamedColor>();
            StringBuilder stringBuilder = new StringBuilder();

            // Loop through the public static fields of the Color structure.
            foreach (FieldInfo fieldInfo in typeof(Colors).GetRuntimeFields())
            {
                if (fieldInfo.IsPublic &&
                    fieldInfo.IsStatic &&
                    fieldInfo.FieldType == typeof(Color))
                {
                    // Convert the name to a friendly name.
                    string name = fieldInfo.Name;
                    stringBuilder.Clear();
                    int index = 0;

                    foreach (char ch in name)
                    {
                        if (index != 0 && Char.IsUpper(ch))
                        {
                            stringBuilder.Append(' ');
                        }
                        stringBuilder.Append(ch);
                        index++;
                    }

                    // Instantiate a NamedColor object.
                    NamedColor namedColor = new NamedColor
                    {
                        Name = name,
                        FriendlyName = stringBuilder.ToString(),
                        Color = (Color)fieldInfo.GetValue(null)
                    };

                    // Add it to the collection.
                    all.Add(namedColor);
                }
            }
            all.TrimExcess();
            All = all;
        }
    }
}
각 NamedColor 개체에는 Name FriendlyName 형식의 속성, Color 형식stringColor의 속성 및 Red속성이 Green있습니다Blue. 또한 NamedColor 정적 생성자는 클래스의 형식 Colors Color 필드에 해당하는 개체가 포함된 NamedColor 컬렉션을 만들고 IEnumerable<NamedColor> 해당 공용 정적 All 속성에 할당합니다.
태그 확장을 사용하여 x:Static 정적 NamedColor.All 속성을 ItemsSource a ListView 로 설정할 수 있습니다.
<ContentPage xmlns="http://schemas.microsoft.com/dotnet/2021/maui"
             xmlns:x="http://schemas.microsoft.com/winfx/2009/xaml"
             xmlns:local="clr-namespace:XamlSamples;assembly=XamlSamples"
             x:Class="XamlSamples.ListViewDemoPage"
             Title="ListView Demo Page">
    <ListView ItemsSource="{x:Static local:NamedColor.All}" />
</ContentPage>
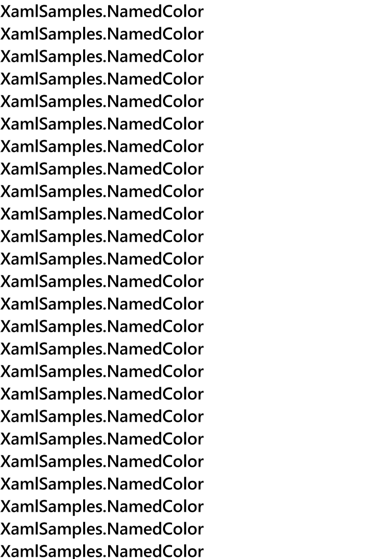
결과는 항목이 다음과 같은 형식 XamlSamples.NamedColor임을 설정합니다.

항목에 대한 템플릿을 정의하려면 항목을 ItemTemplate 참조ViewCell하는 템플릿으로 DataTemplate 설정해야 합니다. ViewCell 각 항목을 표시하려면 하나 이상의 보기 레이아웃을 정의해야 합니다.
<ListView ItemsSource="{x:Static local:NamedColor.All}">
    <ListView.ItemTemplate>
        <DataTemplate>
            <ViewCell>
                <Label Text="{Binding FriendlyName}" />
            </ViewCell>
        </DataTemplate>
    </ListView.ItemTemplate>
</ListView>
참고 항목
셀과 셀의 자식에 대한 바인딩 소스는 ListView.ItemsSource 컬렉션입니다.
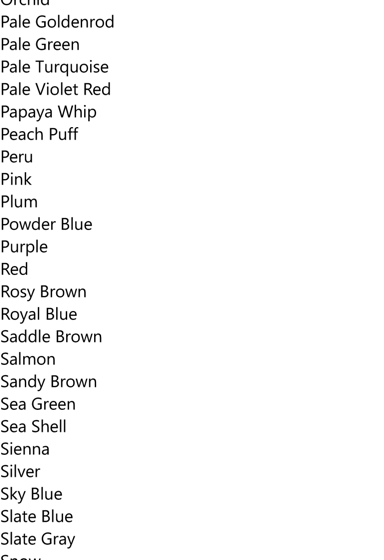
이 예제에서는 요소가 . Label 의 속성으로 View 설정됩니다 ViewCell. 속성이 ViewCell.View .의 ViewCell콘텐츠 속성이므로 태그가 필요하지 View 않습니다. 이 XAML은 각 NamedColor 개체의 FriendlyName 속성을 표시합니다.

항목 템플릿을 확장하여 자세한 정보와 실제 색을 표시할 수 있습니다.
<ContentPage xmlns="http://schemas.microsoft.com/dotnet/2021/maui"
             xmlns:x="http://schemas.microsoft.com/winfx/2009/xaml"
             xmlns:local="clr-namespace:XamlSamples"
             x:Class="XamlSamples.ListViewDemoPage"
             Title="ListView Demo Page">
    <ContentPage.Resources>
        <x:Double x:Key="boxSize">50</x:Double>
        <x:Int32 x:Key="rowHeight">60</x:Int32>
        <local:FloatToIntConverter x:Key="intConverter" />
    </ContentPage.Resources>

    <ListView ItemsSource="{x:Static local:NamedColor.All}"
              RowHeight="{StaticResource rowHeight}">
        <ListView.ItemTemplate>
            <DataTemplate>
                <ViewCell>
                    <StackLayout Padding="5, 5, 0, 5"
                                 Orientation="Horizontal"
                                 Spacing="15">
                        <BoxView WidthRequest="{StaticResource boxSize}"
                                 HeightRequest="{StaticResource boxSize}"
                                 Color="{Binding Color}" />
                        <StackLayout Padding="5, 0, 0, 0"
                                     VerticalOptions="Center">
                            <Label Text="{Binding FriendlyName}"
                                   FontAttributes="Bold"
                                   FontSize="14" />
                            <StackLayout Orientation="Horizontal"
                                         Spacing="0">
                                <Label Text="{Binding Red,
                                                      Converter={StaticResource intConverter},
                                                      ConverterParameter=255,
                                                      StringFormat='R={0:X2}'}" />
                                <Label Text="{Binding Green,
                                                      Converter={StaticResource intConverter},
                                                      ConverterParameter=255,
                                                      StringFormat=', G={0:X2}'}" />
                                <Label Text="{Binding Blue,
                                                      Converter={StaticResource intConverter},
                                                      ConverterParameter=255,
                                                      StringFormat=', B={0:X2}'}" />
                            </StackLayout>
                        </StackLayout>
                    </StackLayout>
                </ViewCell>
            </DataTemplate>
        </ListView.ItemTemplate>
    </ListView>
</ContentPage>
바인딩 값 변환기
이전 XAML 예제에서는 각 XAML의 개별 RedGreen및 속성을 표시합니다Blue.NamedColor 이러한 속성은 형식 float 이며 범위는 0에서 1까지입니다. 16진수 값을 표시하려는 경우 단순히 "X2" 서식 지정 사양과 함께 사용할 StringFormat 수 없습니다. 정수에 대해서만 작동하며, 값은 float 255를 곱해야 합니다.
이 문제는 바인딩 변환기라고도 하는 값 변환기를 사용하여 해결할 수 있습니다. 인터페이스를 구현 IValueConverter 하는 클래스입니다. 즉, 두 개의 메서드가 명명 Convert 되고 ConvertBack. Convert 값이 원본에서 대상으로 전송될 때 메서드가 호출됩니다. 대상 ConvertBack 에서 원본 OneWayToSource TwoWay 또는 바인딩으로 전송하기 위해 메서드가 호출됩니다.
using System.Globalization;

namespace XamlSamples
{
    public class FloatToIntConverter : IValueConverter
    {
        public object Convert(object value, Type targetType, object parameter, CultureInfo culture)
        {
            float multiplier;

            if (!float.TryParse(parameter as string, out multiplier))
                multiplier = 1;

            return (int)Math.Round(multiplier * (float)value);
        }

        public object ConvertBack(object value, Type targetType, object parameter, CultureInfo culture)
        {
            float divider;

            if (!float.TryParse(parameter as string, out divider))
                divider = 1;

            return ((float)(int)value) / divider;
        }
    }
}
참고 항목
바인딩은 ConvertBack 원본에서 대상으로 가는 한 가지 방법일 뿐이므로 이 예제에서는 메서드가 역할을 하지 않습니다.
바인딩은 속성을 사용하여 바인딩 변환기를 참조합니다 Converter . 바인딩 변환기는 속성으로 지정된 매개 변수를 수락할 ConverterParameter 수도 있습니다. 다양한 기능을 위해 승수를 지정하는 방법입니다. 바인딩 변환기는 변환기 매개 변수에서 유효한 float 값을 확인합니다.
변환기는 페이지의 리소스 사전에서 인스턴스화되므로 여러 바인딩 간에 공유할 수 있습니다.
<local:FloatToIntConverter x:Key="intConverter" />
세 개의 데이터 바인딩은 이 단일 인스턴스를 참조합니다.
<Label Text="{Binding Red,
                      Converter={StaticResource intConverter},
                      ConverterParameter=255,
                      StringFormat='R={0:X2}'}" />
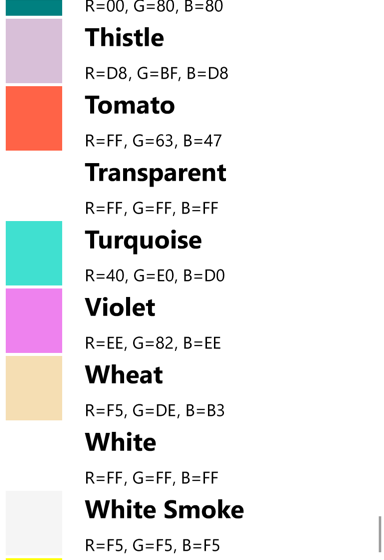
항목 템플릿은 색, 이름 및 RGB 값을 dsplays합니다.

ListView 기본 데이터에서 동적으로 발생하는 변경 내용을 처리할 수 있지만 특정 단계를 수행하는 경우에만 처리할 수 있습니다. 런타임 동안 변경 내용의 속성에 ItemsSource 할당된 항목의 ListView 컬렉션인 경우 이러한 항목에 대한 클래스를 ObservableCollection<T> 사용합니다. ObservableCollection<T> 는 인터페이스를 INotifyCollectionChanged 구현하고 ListView 이벤트에 대한 처리기를 설치합니다 CollectionChanged .
런타임 중에 항목 자체의 속성이 변경되는 경우 컬렉션의 항목은 인터페이스를 INotifyPropertyChanged 구현하고 이벤트를 사용하여 속성 값의 변경 내용을 신호로 표시 PropertyChanged 해야 합니다.
다음 단계
데이터 바인딩은 페이지 내의 두 개체 간 또는 시각적 개체와 기본 데이터 간에 속성을 연결하는 강력한 메커니즘을 제공합니다. 그러나 애플리케이션이 데이터 원본 작업을 시작하면 인기 있는 앱 아키텍처 패턴이 유용한 패러다임으로 등장하기 시작합니다.
.NET MAUI
 샘플 찾아보기