DrawingGroup.Transform 속성
정의
중요
일부 정보는 릴리스되기 전에 상당 부분 수정될 수 있는 시험판 제품과 관련이 있습니다. Microsoft는 여기에 제공된 정보에 대해 어떠한 명시적이거나 묵시적인 보증도 하지 않습니다.
이 Transform에 적용된 DrawingGroup을 가져오거나 설정합니다.
public:
 property System::Windows::Media::Transform ^ Transform { System::Windows::Media::Transform ^ get(); void set(System::Windows::Media::Transform ^ value); };
public System.Windows.Media.Transform Transform { get; set; }member this.Transform : System.Windows.Media.Transform with get, setPublic Property Transform As Transform속성 값
이 DrawingGroup에 적용할 변환입니다. 기본값은 null입니다.
예제
적용 하는 방법을 보여 주는이 예제는 Transform 에 Drawing합니다. 변환할를 Drawing 개체에 추가 DrawingGroup 설정를 Transform 의 속성을 DrawingGroup 개체.
합니다 DrawingGroup 클래스의 유일한 형식인 Drawing 변환을 지 원하는 개체입니다. 단일에 여러 변환을 적용 하려면 DrawingGroup를 사용 하 여를 TransformGroup입니다.
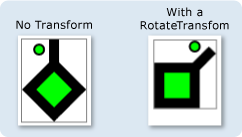
다음 예에서는 DrawingGroup 여러 결합 GeometryDrawing 개체를 사용 하 여 변환 합니다는 RotateTransform합니다.
그림과 합니다 DrawingGroup 전과 후의 RotateTransform 적용 됩니다.

using System;
using System.Windows;
using System.Windows.Controls;
using System.Windows.Media;
using System.Windows.Media.Animation;
using System.Windows.Shapes;

namespace SDKSample
{
    public class TransformExample : Page
    {

        public TransformExample()
        {

            //
            // Create a GeometryDrawing.
            //

            // Define the drawing's contents.
            PathFigure pLineFigure = new PathFigure();
            pLineFigure.StartPoint = new Point(25, 25);
            PolyLineSegment pLineSegment = new PolyLineSegment();
            pLineSegment.Points.Add(new Point(0, 50));
            pLineSegment.Points.Add(new Point(25, 75));
            pLineSegment.Points.Add(new Point(50, 50));
            pLineSegment.Points.Add(new Point(25, 25));
            pLineSegment.Points.Add(new Point(25, 0));
            pLineFigure.Segments.Add(pLineSegment);
            PathGeometry pGeometry = new PathGeometry();
            pGeometry.Figures.Add(pLineFigure);

            GeometryDrawing drawing1 = new GeometryDrawing(
                    Brushes.Lime,
                    new Pen(Brushes.Black, 10),
                    pGeometry
                );

            //
            // Create another GeometryDrawing.
            //
            GeometryDrawing drawing2 = new GeometryDrawing(
                    Brushes.Lime,
                    new Pen(Brushes.Black, 2),
                    new EllipseGeometry(new Point(10, 10), 5, 5)
                );

            // Create the DrawingGroup and add the
            // geometry drawings.
            DrawingGroup aDrawingGroup = new DrawingGroup();
            aDrawingGroup.Children.Add(drawing1);
            aDrawingGroup.Children.Add(drawing2);

            //
            // Create a RotateTransform and apply it to the
            // drawing group.
            //
            RotateTransform rotation = new RotateTransform(
                45, // Angle
                50, // CenterX
                75  // CenterY
                );
            aDrawingGroup.Transform = rotation;

            // Use an Image control and a DrawingImage to
            // display the drawing.
            DrawingImage aDrawingImage = new DrawingImage(aDrawingGroup);

            // Freeze the DrawingImage for performance benefits.
            aDrawingImage.Freeze();

            Image anImage = new Image();
            anImage.Source = aDrawingImage;
            anImage.Stretch = Stretch.None;
            anImage.HorizontalAlignment = HorizontalAlignment.Left;

            // Create a border around the images and add it to the
            // page.
            Border imageBorder = new Border();
            imageBorder.BorderBrush = Brushes.Gray;
            imageBorder.BorderThickness = new Thickness(1);
            imageBorder.VerticalAlignment = VerticalAlignment.Top;
            imageBorder.HorizontalAlignment = HorizontalAlignment.Left;
            imageBorder.Margin = new Thickness(20);
            imageBorder.Child = anImage;

            this.Background = Brushes.White;
            this.Margin = new Thickness(20);
            this.Content = imageBorder;
        }
    }
}
<Page
  xmlns="http://schemas.microsoft.com/winfx/2006/xaml/presentation"
  xmlns:x="http://schemas.microsoft.com/winfx/2006/xaml"
  xmlns:PresentationOptions="http://schemas.microsoft.com/winfx/2006/xaml/presentation/options"
  xmlns:mc="http://schemas.openxmlformats.org/markup-compatibility/2006"
  mc:Ignorable="PresentationOptions"
  Background="White" Margin="20">

  <Border BorderBrush="Gray" BorderThickness="1"
    HorizontalAlignment="Left" VerticalAlignment="Top"
    Margin="20">
    <Image Stretch="None" HorizontalAlignment="Left">
      <Image.Source>
        <DrawingImage PresentationOptions:Freeze="True">
          <DrawingImage.Drawing>

            <!-- A drawing group with a RotateTransform. -->
            <DrawingGroup>
              <GeometryDrawing Brush="Lime" Geometry="M 25,25 L 0,50 25,75 50,50 25,25 25,0">
                <GeometryDrawing.Pen>
                  <Pen Thickness="10" Brush="Black" />
                </GeometryDrawing.Pen>
              </GeometryDrawing>
              <GeometryDrawing Brush="Lime">
                <GeometryDrawing.Geometry>
                  <EllipseGeometry Center="10,10" RadiusX="5" RadiusY="5" />
                </GeometryDrawing.Geometry>
                <GeometryDrawing.Pen>
                  <Pen Thickness="2" Brush="Black" />
                </GeometryDrawing.Pen>
              </GeometryDrawing>

              <!-- Rotate the drawing 45 degrees about (50,75). -->
              <DrawingGroup.Transform>
                <RotateTransform CenterX="50" CenterY="75" Angle="45" />
              </DrawingGroup.Transform>

            </DrawingGroup>
          </DrawingImage.Drawing>
        </DrawingImage>
      </Image.Source>
    </Image>
  </Border>


</Page>
설명
단일에 여러 변환을 적용 하려면 DrawingGroup를 사용 하 여를 TransformGroup입니다.
DrawingGroup 작업이 아래 순서 대로 적용 됩니다.
종속성 속성 정보
| 식별자 필드 | TransformProperty |
메타 데이터 속성 설정 true |
없음 |