Microsoft Defender XDR Defender for Identity VPN 통합
Microsoft Defender for Identity IP 주소 및 연결이 시작된 위치와 같이 Defender for Identity 센서에 전달된 RADIUS 회계 이벤트를 수신 대기하여 VPN 솔루션과 통합할 수 있습니다. VPN 회계 데이터는 컴퓨터가 네트워크에 연결하는 위치 및 비정상적인 VPN 연결에 대한 추가 검색과 같은 사용자 활동에 대한 자세한 정보를 제공하여 조사에 도움이 될 수 있습니다.
Defender for Identity의 VPN 통합은 표준 RADIUS Accounting(RFC 2866)을 기반으로 하며 다음 VPN 공급업체를 지원합니다.
- Microsoft
- F5
- Check Point
- Cisco ASA
VPN 통합은 FIPS(Federal Information Processing Standards)를 준수하는 환경에서 지원되지 않습니다.
Defender for Identity의 VPN 통합은 기본 UPN과 대체 사용자 계정 이름을 모두 지원합니다. 위치에 대한 resolve 외부 IP 주소에 대한 호출은 익명이며 통화에서 개인 식별자가 전송되지 않습니다.
필수 구성 요소
시작하기 전에 다음이 있는지 확인합니다.
Microsoft Defender XDR 설정 영역에 액세스합니다. 자세한 내용은 Microsoft Defender for Identity 역할 그룹을 참조하세요.
VPN 시스템에서 RADIUS를 구성하는 기능입니다.
이 문서에서는 Microsoft 라우팅 및 RRAS(원격 액세스 서버)를 사용하여 VPN 솔루션에서 회계 정보를 수집하도록 Microsoft Defender for Identity 구성하는 방법에 대한 예제를 제공합니다. 타사 VPN 솔루션을 사용하는 경우 RADIUS Accounting을 사용하도록 설정하는 방법에 대한 지침은 해당 설명서를 참조하세요.
참고
VPN 통합을 구성할 때 Defender for Identity 센서는 Microsoft Defender for Identity 센서라는 미리 프로비전된 Windows 방화벽 정책을 사용하도록 설정합니다. 이 정책은 포트 UDP 1813에서 들어오는 RADIUS 회계를 허용합니다.
VPN 시스템에서 RADIUS 계정 구성
이 절차에서는 VPN 시스템을 Defender for Identity와 통합하기 위해 RRAS 서버에서 RADIUS 회계를 구성하는 방법을 설명합니다. 시스템의 지침이 다를 수 있습니다.
RRAS 서버에서:
라우팅 및 원격 액세스 콘솔을 엽니다.
서버 이름을 마우스 오른쪽 단추로 클릭하고 속성을 선택합니다.
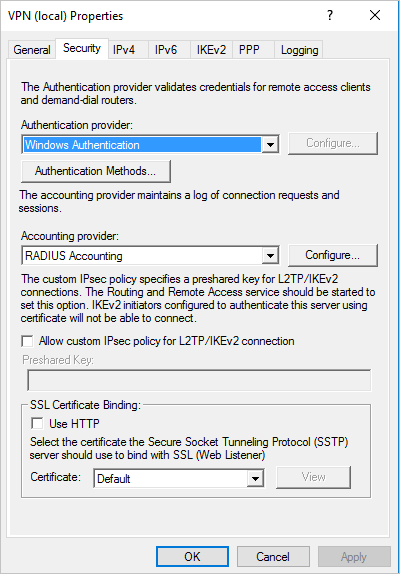
보안 탭의 회계 공급자에서 RADIUS 회계 구성을> 선택합니다. 예시:

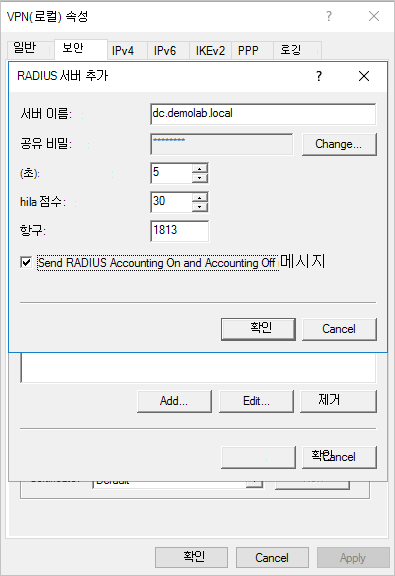
RADIUS 서버 추가 대화 상자에서 네트워크 연결이 있는 가장 가까운 Defender for Identity 센서의 서버 이름을 입력합니다. 고가용성을 위해 더 많은 Defender for Identity 센서를 RADIUS 서버로 추가할 수 있습니다.
포트에서 의
1813기본값이 구성되어 있는지 확인합니다.변경을 선택하고 영숫자 문자의 새 공유 비밀 문자열을 입력합니다. Defender for Identity에서 VPN 통합을 구성할 때 나중에 필요하므로 새 공유 비밀 문자열을 기록해 둡니다.
RADIUS 계정 보내기 켜기 및 계정 끄기 확인란을 선택하고 열려 있는 모든 대화 상자에서 확인을 선택합니다. 예시:

Defender for Identity에서 VPN 구성
이 절차에서는 Microsoft Defender XDR Defender for Identity의 VPN 통합을 구성하는 방법을 설명합니다.
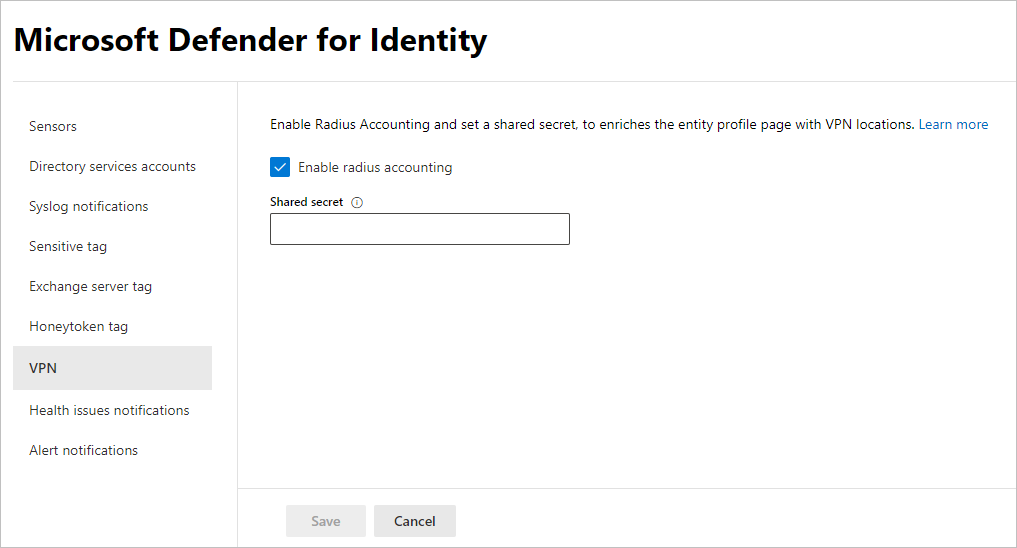
Microsoft Defender XDR 로그인하고 설정> IDVPN을> 선택합니다.
반경 회계 사용을 선택하고 RRAS VPN 서버에서 이전에 구성한 공유 비밀을 입력합니다. 예시:

저장을 선택하여 계속합니다.
선택을 저장한 후 Defender for Identity 센서는 RADIUS 회계 이벤트에 대한 포트 1813에서 수신 대기를 시작하고 VPN 설정이 완료됩니다.
Defender for Identity 센서가 VPN 이벤트를 수신하고 처리를 위해 Defender for Identity 클라우드 서비스로 보내면 엔터티 프로필은 액세스된 고유한 VPN 위치를 나타내고 프로필 활동은 위치를 나타냅니다.
관련 콘텐츠
자세한 내용은 이벤트 컬렉션 구성을 참조하세요.