데이터 버퍼에 대한 포인터 얻기(C++/CX)
Windows 런타임에서 Windows::Storage::Streams::IBuffer 인터페이스는 데이터 버퍼에 액세스할 수 있는 언어 중립적인 스트림 기반 방법을 제공합니다. C++에서는 robuffer.h에 정의되어 있는 Windows 런타임 라이브러리 IBufferByteAccess 인터페이스를 사용하여 내부 바이트 배열에 대한 원시 포인터를 가져올 수 있습니다. 이 방법을 사용하여 데이터의 불필요한 복사본을 만들지 않고 바이트 배열을 내부에서 수정할 수 있습니다.
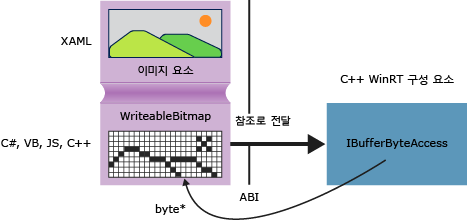
다음 다이어그램에서는 원본이 Windows::UI::Xaml::Media::Imaging WriteableBitmap인 XAML 이미지 요소를 보여 줍니다. 임의의 언어로 작성된 클라이언트 앱은 WriteableBitmap 에 대한 참조를 C++ 코드에 전달할 수 있으며, 그러면 C++는 내부 버퍼에서 가져올 참조를 사용할 수 있습니다. C++로 작성된 유니버설 Windows 플랫폼 앱에서는 다음 예제의 함수를 Windows 런타임 구성 요소에 패키징하지 않고 소스 코드에서 직접 사용할 수 있습니다.

GetPointerToPixelData
다음 메서드는 Windows::Storage::Streams::IBuffer 를 받아들이고 내부 바이트 배열에 대한 원시 포인터를 반환합니다. 함수를 호출하려면 WriteableBitmap::PixelBuffer 속성을 전달합니다.
#include <wrl.h>
#include <robuffer.h>
using namespace Windows::Storage::Streams;
using namespace Microsoft::WRL;
typedef uint8 byte;
// Retrieves the raw pixel data from the provided IBuffer object.
// Warning: The lifetime of the returned buffer is controlled by
// the lifetime of the buffer object that's passed to this method.
// When the buffer has been released, the pointer becomes invalid
// and must not be used.
byte* Class1::GetPointerToPixelData(IBuffer^ pixelBuffer, unsigned int *length)
{
    if (length != nullptr)
    {
        *length = pixelBuffer ->Length;
    }
    // Query the IBufferByteAccess interface.
    ComPtr<IBufferByteAccess> bufferByteAccess;
    reinterpret_cast<IInspectable*>( pixelBuffer)->QueryInterface(IID_PPV_ARGS(&bufferByteAccess));

    // Retrieve the buffer data.
    byte* pixels = nullptr;
    bufferByteAccess->Buffer(&pixels);
    return pixels;
}
완성된 예시
다음 단계에서는 C++ Windows 런타임 구성 요소 DLL에 전달하는 WriteableBitmap C# 유니버설 Windows 플랫폼 앱을 만드는 방법을 보여 줍니다. C++ 코드는 픽셀 버퍼에 대한 포인터를 가져오고 이미지에 대한 간단한 내부 수정을 수행합니다. 또는 C# 대신 Visual Basic, JavaScript 또는 C++에서 클라이언트 앱을 만들 수 있습니다. C++를 사용하는 경우에는 구성 요소 DLL이 필요하지 않습니다. MainPage 클래스 또는 정의한 다른 클래스에 이 메서드를 직접 추가하면 됩니다.
클라이언트 만들기
빈 앱 프로젝트 템플릿을 사용하여 C# 유니버설 Windows 플랫폼 앱을 만듭니다.
MainPage.xaml에서
이 XAML을 사용하여
Grid요소를 바꿉니다.<Grid Background="{StaticResource ApplicationPageBackgroundThemeBrush}"> <StackPanel HorizontalAlignment="Left" Margin="176,110,0,0" VerticalAlignment="Top" Width="932"> <Image x:Name="Pic"/> <Button Content="Process Image" HorizontalAlignment="Stretch" VerticalAlignment="Stretch" Height="47" Click="Button_Click_1"/> </StackPanel> </Grid>
MainPage.xaml.cs에서
이 네임스페이스 선언을 추가합니다.
using Windows.Storage; using Windows.Storage.FileProperties; using Windows.UI.Xaml.Media.Imaging; using Windows.Storage.Streams; using Windows.Storage.Pickers;WriteableBitmap멤버 변수를MainPage클래스에 추가하고 이름을m_bm으로 지정합니다.private WriteableBitmap m_bm;다음 코드를 사용하여
OnNavigatedTo메서드 스텁을 바꿉니다. 그러면 앱이 시작될 때 파일 선택기가 열립니다.async키워드가 함수 시그니처에 추가됩니다.async protected override void OnNavigatedTo(NavigationEventArgs e) { FileOpenPicker openPicker = new FileOpenPicker(); openPicker.ViewMode = PickerViewMode.Thumbnail; openPicker.SuggestedStartLocation = PickerLocationId.PicturesLibrary; openPicker.FileTypeFilter.Add(".jpg"); openPicker.FileTypeFilter.Add(".jpeg"); openPicker.FileTypeFilter.Add(".png"); StorageFile file = await openPicker.PickSingleFileAsync(); if (file != null) { // Get the size of the image for the WriteableBitmap constructor. ImageProperties props = await file.Properties.GetImagePropertiesAsync(); m_bm = new WriteableBitmap((int)props.Height, (int)props.Width); m_bm.SetSource(await file.OpenReadAsync()); Pic.Source = m_bm; } else { // Handle error... } }단추 클릭에 대한 이벤트 처리기를 추가합니다.
ImageManipCPP네임스페이스 참조는 아직 만들어지지 않았으므로 편집 창에서 해당 참조 아래에 물결선이 표시될 수 있습니다.async private void Button_Click_1(object sender, RoutedEventArgs e) { ImageManipCPP.Class1 obj = new ImageManipCPP.Class1(); await obj.Negativize(m_bm); Pic.Source = m_bm; }
C++ 구성 요소 만들기
기존 솔루션에 새 C++ Windows 런타임 구성 요소를 추가하고 이름을 지정합니다
ImageManipCPP. 솔루션 탐색기 에서 해당 프로젝트를 마우스 오른쪽 단추로 클릭하고 추가, 참조를 선택하여 C# 프로젝트에 해당 구성 요소에 대한 참조를 추가합니다.Class1.h에서
이
typedef를 두 번째 줄,#pragma once바로 뒤에 추가합니다.typedef uint8 byte;WebHostHidden특성을Class1선언의 시작 부분 바로 위에 추가합니다.[Windows::Foundation::Metadata::WebHostHidden]이 공용 메서드 시그니처를
Class1에 추가합니다.Windows::Foundation::IAsyncAction^ Negativize(Windows::UI::Xaml::Media::Imaging::WriteableBitmap^ bm);이전 코드 조각에 표시된
GetPointerToPixelData메서드의 시그니처를 추가합니다. 이 메서드가 전용 메서드인지 확인합니다.
Class1.cpp에서
이러한
#include지시문 및 네임스페이스 선언을 추가합니다.#include <ppltasks.h> #include <wrl.h> #include <robuffer.h> using namespace Windows::Storage; using namespace Windows::UI::Xaml::Media::Imaging; using namespace Windows::Storage::Streams; using namespace Microsoft::WRL;이전 코드 조각의
GetPointerToPixelData구현을 추가합니다.Negativize구현을 추가합니다. 이 메서드는 각 RGB 값(픽셀 단위)을 반전시켜 네거티브 필름과 비슷한 효과를 만듭니다. 이미지가 클 경우 이 작업을 완료하는 데 시간이 오래 걸릴 수 있으므로 메서드를 비동기적으로 만듭니다.IAsyncAction^ Class1::Negativize(WriteableBitmap^ bm) { unsigned int length; byte* sourcePixels = GetPointerToPixelData(bm->PixelBuffer, &length); const unsigned int width = bm->PixelWidth; const unsigned int height = bm->PixelHeight; return create_async([this, width, height, sourcePixels] { byte* temp = sourcePixels; for(unsigned int k = 0; k < height; k++) { for (unsigned int i = 0; i < (width * 4); i += 4) { int pos = k * (width * 4) + (i); temp[pos] = ~temp[pos]; temp[pos + 1] = ~temp[pos + 1] / 3; temp[pos + 2] = ~temp[pos + 2] / 2; temp[pos + 3] = ~temp[pos + 3]; } } }); }참고 항목
AMP 또는 병렬 패턴 라이브러리를 사용하여 병렬화하면 이 메서드가 빨리 실행될 수 있습니다.
그림 폴더에 그림이 하나 이상 있는지 확인한 다음 F5 키를 눌러 프로그램을 컴파일하고 실행합니다.