ASP.NET을 사용하여 푸시 알림에 현재 사용자 등록
개요
이 항목에서는 ASP.NET Web API에서 등록을 수행할 때 Azure Notification Hubs를 통해 푸시 알림 등록을 요청하는 방법을 보여 줍니다. 이 항목은 Notification Hubs를 통해 사용자에게 알림자습서를 확장합니다. 이미 해당 자습서의 필수 단계를 완료하여 인증된 모바일 서비스를 만든 상태여야 합니다. 사용자 알림 시나리오에 대한 자세한 내용은 Notification Hubs를 통해 사용자에게 알림을 참조하세요.
앱 업데이트
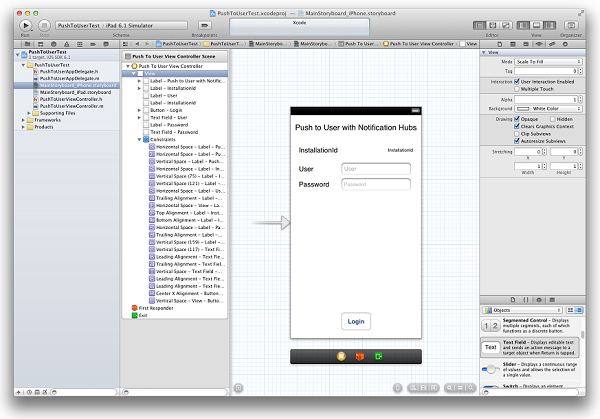
MainStoryboard_iPhone.storyboard의 개체 라이브러리에서 다음 구성 요소를 추가합니다.
레이블: "Push to User with Notification Hubs"
레이블: "InstallationId"
레이블: "User"
텍스트 필드: "User"
레이블: "Password"
텍스트 필드: "Password"
단추: "Login"
이때 스토리보드가 다음과 같이 표시됩니다.

단말기 편집기에서 모든 전환된 컨트롤에 대한 콘센트를 만든 다음 호출하고, 텍스트 필드를 뷰 컨트롤러(대리자)에 연결하고, 로그인 단추에 대한 동작을 만듭니다.

이제 BreakingNewsViewController.h 파일에 다음 코드가 포함되어 있습니다.
@property (weak, nonatomic) IBOutlet UILabel *installationId; @property (weak, nonatomic) IBOutlet UITextField *User; @property (weak, nonatomic) IBOutlet UITextField *Password; - (IBAction)login:(id)sender;DeviceInfo라는 클래스를 만들고, 다음 코드를 DeviceInfo.h 파일의 인터페이스 섹션에 복사합니다.@property (readonly, nonatomic) NSString* installationId; @property (nonatomic) NSData* deviceToken;다음 코드를 DeviceInfo.m 파일의 구현 섹션에 복사합니다.
@synthesize installationId = _installationId;

- (id)init {
    if (!(self = [super init]))
        return nil;

    NSUserDefaults *defaults = [NSUserDefaults standardUserDefaults];
    _installationId = [defaults stringForKey:@"PushToUserInstallationId"];
    if(!_installationId) {
        CFUUIDRef newUUID = CFUUIDCreate(kCFAllocatorDefault);
        _installationId = (__bridge_transfer NSString *)CFUUIDCreateString(kCFAllocatorDefault, newUUID);
        CFRelease(newUUID);

        //store the install ID so we don't generate a new one next time
        [defaults setObject:_installationId forKey:@"PushToUserInstallationId"];
        [defaults synchronize];
    }

    return self;
}

- (NSString*)getDeviceTokenInHex {
    const unsigned *tokenBytes = [[self deviceToken] bytes];
    NSString *hexToken = [NSString stringWithFormat:@"%08X%08X%08X%08X%08X%08X%08X%08X",
                            ntohl(tokenBytes[0]), ntohl(tokenBytes[1]), ntohl(tokenBytes[2]),
                            ntohl(tokenBytes[3]), ntohl(tokenBytes[4]), ntohl(tokenBytes[5]),
                            ntohl(tokenBytes[6]), ntohl(tokenBytes[7])];
    return hexToken;
}
PushToUserAppDelegate.h에서 다음 속성 단일 항목을 추가합니다.
@property (strong, nonatomic) DeviceInfo* deviceInfo;PushToUserAppDelegate.m의
didFinishLaunchingWithOptions메서드에 다음 코드를 추가합니다.self.deviceInfo = [[DeviceInfo alloc] init]; [[UIApplication sharedApplication] registerForRemoteNotificationTypes: UIRemoteNotificationTypeAlert | UIRemoteNotificationTypeBadge | UIRemoteNotificationTypeSound];첫 번째 줄은
DeviceInfo싱글톤을 초기화합니다. 두 번째 행은 푸시 알림 등록을 시작합니다. 이는 Notification Hubs 시작 자습서를 이미 완료한 경우 이미 존재합니다.PushToUserAppDelegate.m의 AppDelegate에
didRegisterForRemoteNotificationsWithDeviceToken메서드를 구현하고, 다음 코드를 추가합니다.self.deviceInfo.deviceToken = deviceToken;이 코드는 요청에 대한 디바이스 토큰을 설정합니다.
참고 항목
이때 이 메서드에 다른 코드가 있어서는 안 됩니다. Azure Notification Hubs를 사용하여 iOS 앱에 푸시 알림 보내기 자습서를 완료할 때 추가된
registerNativeWithDeviceToken메서드에 대한 호출이 이미 있는 경우 해당 호출을 주석으로 처리하거나 제거해야 합니다.PushToUserAppDelegate.m파일에서 다음 처리기 메서드를 추가합니다.* (void) application:(UIApplication *) application didReceiveRemoteNotification:(NSDictionary *)userInfo { NSLog(@"%@", userInfo); UIAlertView *alert = [[UIAlertView alloc] initWithTitle:@"Notification" message: [userInfo objectForKey:@"inAppMessage"] delegate:nil cancelButtonTitle: @"OK" otherButtonTitles:nil, nil]; [alert show]; }이 메서드는 앱이 실행되고 있는 동안 알림을 받으면 UI에 경고를 표시합니다.
PushToUserViewController.m파일을 열고, 다음 구현에서 키보드를 반환합니다.- (BOOL)textFieldShouldReturn:(UITextField *)theTextField { if (theTextField == self.User || theTextField == self.Password) { [theTextField resignFirstResponder]; } return YES; }PushToUserViewController.m파일의viewDidLoad메서드에서installationId레이블을 다음과 같이 초기화합니다.DeviceInfo* deviceInfo = [(PushToUserAppDelegate*)[[UIApplication sharedApplication]delegate] deviceInfo]; Self.installationId.text = deviceInfo.installationId;PushToUserViewController.m의 인터페이스에 다음 속성을 추가합니다.@property (readonly) NSOperationQueue* downloadQueue; - (NSString*)base64forData:(NSData*)theData;그 후에 다음 구현을 추가합니다.
- (NSOperationQueue *)downloadQueue {
    if (!_downloadQueue) {
        _downloadQueue = [[NSOperationQueue alloc] init];
        _downloadQueue.name = @"Download Queue";
        _downloadQueue.maxConcurrentOperationCount = 1;
    }
    return _downloadQueue;
}

// base64 encoding
- (NSString*)base64forData:(NSData*)theData
{
    const uint8_t* input = (const uint8_t*)[theData bytes];
    NSInteger length = [theData length];

    static char table[] = "ABCDEFGHIJKLMNOPQRSTUVWXYZabcdefghijklmnopqrstuvwxyz0123456789+/=";

    NSMutableData* data = [NSMutableData dataWithLength:((length + 2) / 3) * 4];
    uint8_t* output = (uint8_t*)data.mutableBytes;

    NSInteger i;
    for (i=0; i < length; i += 3) {
        NSInteger value = 0;
        NSInteger j;
        for (j = i; j < (i + 3); j++) {
            value <<= 8;

            if (j < length) {
                value |= (0xFF & input[j]);
            }
        }

        NSInteger theIndex = (i / 3) * 4;
        output[theIndex + 0] =                    table[(value >> 18) & 0x3F];
        output[theIndex + 1] =                    table[(value >> 12) & 0x3F];
        output[theIndex + 2] = (i + 1) < length ? table[(value >> 6)  & 0x3F] : '=';
        output[theIndex + 3] = (i + 2) < length ? table[(value >> 0)  & 0x3F] : '=';
    }

    return [[NSString alloc] initWithData:data encoding:NSASCIIStringEncoding];
}
XCode로 만든
login처리기 메서드에 다음 코드를 복사합니다.DeviceInfo* deviceInfo = [(PushToUserAppDelegate*)[[UIApplication sharedApplication]delegate] deviceInfo]; // build JSON NSString* json = [NSString stringWithFormat:@"{\"platform\":\"ios\", \"instId\":\"%@\", \"deviceToken\":\"%@\"}", deviceInfo.installationId, [deviceInfo getDeviceTokenInHex]]; // build auth string NSString* authString = [NSString stringWithFormat:@"%@:%@", self.User.text, self.Password.text]; NSMutableURLRequest* request = [NSMutableURLRequest requestWithURL:[NSURL URLWithString:@"http://nhnotifyuser.azurewebsites.net/api/register"]]; [request setHTTPMethod:@"POST"]; [request setHTTPBody:[json dataUsingEncoding:NSUTF8StringEncoding]]; [request addValue:[@([json lengthOfBytesUsingEncoding:NSUTF8StringEncoding]) description] forHTTPHeaderField:@"Content-Length"]; [request addValue:@"application/json" forHTTPHeaderField:@"Content-Type"]; [request addValue:[NSString stringWithFormat:@"Basic %@",[self base64forData:[authString dataUsingEncoding:NSUTF8StringEncoding]]] forHTTPHeaderField:@"Authorization"]; // connect with POST [NSURLConnection sendAsynchronousRequest:request queue:[self downloadQueue] completionHandler:^(NSURLResponse* response, NSData* data, NSError* error) { // add UIAlert depending on response. if (error != nil) { NSHTTPURLResponse* httpResponse = (NSHTTPURLResponse*)response; if ([httpResponse statusCode] == 200) { UIAlertView *alert = [[UIAlertView alloc] initWithTitle:@"Back-end registration" message:@"Registration successful" delegate:nil cancelButtonTitle: @"OK" otherButtonTitles:nil, nil]; [alert show]; } else { NSLog(@"status: %ld", (long)[httpResponse statusCode]); } } else { NSLog(@"error: %@", error); } }];이 메서드는 푸시 알림에 대한 설치 ID와 채널을 모두 가져온 다음, Notification Hubs에서 등록을 만드는 인증된 웹 API 메서드에 디바이스 유형과 함께 보냅니다. 이 웹 API는 Notification Hubs를 통해 사용자에게 알림에서 정의했습니다.
클라이언트 앱이 업데이트되었으므로 Notification Hubs를 통해 사용자에게 알림 으로 돌아가서 Notification Hubs를 사용하여 알림을 보내도록 모바일 서비스를 업데이트합니다.