Azure 서비스에서 관리 ID를 사용하여 NoSQL용 Azure Cosmos DB에 연결하는 방법
적용 대상: NoSQL
개요, 개념, 준비, 역할 기반 액세스 제어, 네트워크 및 참조 순서대로 이러한 위치를 포함하는 배포 가이드 시퀀스의 다이어그램 현재 '준비' 위치가 강조 표시되어 있습니다.
이 문서에서는 Azure Cosmos DB for NoSQL에 연결되는 배포된 애플리케이션과 함께 사용할 관리 ID를 만드는 데 필요한 단계를 검토합니다.
관리 ID는 Microsoft Entra 인증을 지원하는 서비스에 연결할 때 애플리케이션이 사용할 수 있는 Microsoft Entra ID의 여러 유형의 ID 리소스 중 하나입니다. 관리 ID는 키와 같은 기존 리소스 소유 자격 증명 대신 사용할 수 있습니다. Azure에서 관리 ID는 많은 양의 인증 코드를 작성하지 않고도 애플리케이션이 Azure 서비스에 인증하기 위한 Microsoft Entra 토큰을 얻을 수 있는 방법을 제공합니다.
Microsoft Entra를 사용하여 다음을 포함하지만 이에 국한되지 않는 Azure 서비스에 인증할 수 있습니다.
- Azure SQL
- Azure AI
- Azure Cosmos DB
- Azure Storage
- Azure Event Hubs
- Azure Container Registry
관리 ID를 사용하면 다음을 포함하지만 이에 국한되지 않는 다른 Azure 서비스에서 Azure 서비스에 인증하는 보안 주체를 나타낼 수 있습니다.
- Azure Kubernetes Service
- Azure Container Apps
- Azure Virtual Machines
- Azure 기능
- Azure App Service
- Azure Spring Apps
- Azure Service Fabric
관리 ID를 사용하면 다양한 Azure 서비스가 서로 연결할 수 있는 여러 보안 시나리오를 사용할 수 있습니다. 일부 사례:
- Azure Spring Apps에서 Azure SQL 계정에 연결하고 쿼리할 애플리케이션에 대한 시스템이 할당한 관리 ID 만들기
- Azure Kubernetes Service 및 Azure Functions에서 단일 사용자 할당 관리 ID를 사용하여 Azure AI 계정에 대한 요청 발급
- Azure Cosmos DB 계정에 대한 관리 ID를 사용하여 Azure Key Vault에 키 저장
자세한 내용은 Azure 리소스에 대한 ID 관리를 참조하세요.
필수 조건
- 활성 구독이 있는 Azure 계정. 체험 계정을 만듭니다.
Azure Cloud Shell에서 Bash 환경을 사용합니다. 자세한 내용은 Azure Cloud Shell의 Bash에 대한 빠른 시작을 참조하세요.
CLI 참조 명령을 로컬에서 실행하려면 Azure CLI를 설치합니다. Windows 또는 macOS에서 실행 중인 경우 Docker 컨테이너에서 Azure CLI를 실행하는 것이 좋습니다. 자세한 내용은 Docker 컨테이너에서 Azure CLI를 실행하는 방법을 참조하세요.
로컬 설치를 사용하는 경우 az login 명령을 사용하여 Azure CLI에 로그인합니다. 인증 프로세스를 완료하려면 터미널에 표시되는 단계를 수행합니다. 다른 로그인 옵션은 Azure CLI를 사용하여 로그인을 참조하세요.
메시지가 표시되면 처음 사용할 때 Azure CLI 확장을 설치합니다. 확장에 대한 자세한 내용은 Azure CLI에서 확장 사용을 참조하세요.
az version을 실행하여 설치된 버전과 종속 라이브러리를 찾습니다. 최신 버전으로 업그레이드하려면 az upgrade를 실행합니다.
- Azure PowerShell을 로컬로 사용하도록 선택하는 경우:
- 최신 버전의 Az PowerShell 모듈을 설치합니다.
- Connect-AzAccount cmdlet을 사용하여 Azure 계정에 로그인합니다.
- Azure Cloud Shell을 사용하도록 선택하는 경우:
- 자세한 내용은 Azure Cloud Shell 개요를 참조하세요.
시스템이 할당한 관리 ID를 사용하여 Azure 서비스 만들기
시스템이 할당한 관리 ID를 사용하여 새로운 Azure 서비스 만들기 이 섹션에서는 Azure Container Instances 리소스를 만듭니다.
az container create을(를) 사용하여 새 컨테이너 인스턴스를 만듭니다.assign-identity매개 변수를 사용하여 시스템이 할당한 관리 ID를 사용하도록 계정을 구성합니다.az container create \ --resource-group "<name-of-existing-resource-group>" \ --name "<name-of-new-container>" \ --image mcr.microsoft.com/dotnet/samples:aspnetapp-chiseled \ --cpu 1 \ --memory 2 \ --assign-identityaz container show및 JMESPath 쿼리를 사용하여 시스템이 할당한 관리 ID에 대한 세부 정보를 가져옵니다.az container show \ --resource-group "<name-of-existing-resource-group>" \ --name "<name-of-existing-container>" \ --query "identity"명령의 출력을 검토합니다. ID 및 테넌트에 대한 고유 식별자를 포함해야 합니다.
{
  "principalId": "aaaaaaaa-bbbb-cccc-1111-222222222222",
  "tenantId": "aaaabbbb-0000-cccc-1111-dddd2222eeee",
  "type": "SystemAssigned",
  "userAssignedIdentities": null
}
새 Bicep 파일을 만들어 새 컨테이너 인스턴스를 정의합니다. container-instance.bicep 파일의 이름을 지정합니다. 컨테이너 인스턴스에 대해 다음 속성을 설정합니다.
값 nameinstanceName이름의 매개 변수 사용location리소스 그룹의 위치로 설정 identity.typeSystemAssignedproperties.osTypeLinuxproperties.containers[0].nameaspnet-sampleproperties.containers[0].properties.imagemcr.microsoft.com/dotnet/samples:aspnetapp-chiseledproperties.containers[0].properties.resources.requests.cpu1properties.containers[0].properties.resources.requests.memoryInGB2metadata description = 'Create Azure Container Instance resource with system-assigned managed identity.' @description('Name of the Azure Container Instances resource.') param instanceName string resource instance 'Microsoft.ContainerInstance/containerGroups@2023-05-01' = { name: instanceName location: resourceGroup().location identity: { type: 'SystemAssigned' } properties: { osType: 'Linux' containers: [ { name: 'aspnet-sample' properties: { image: 'mcr.microsoft.com/dotnet/samples:aspnetapp-chiseled' resources: { requests: { cpu: 1 memoryInGB: 2 } } } } ] } } output systemAssignedIdentity object = instance.identitycontainer-instance.
bicepparam라는 새 Bicep 매개 변수 파일을 만듭니다. 이 매개 변수 파일에서instanceName매개 변수를 사용하여 컨테이너 인스턴스의 고유한 이름을 만듭니다.using './container-instance.bicep' param instanceName = '<name-of-new-container-instance>'az deployment group create을(를) 사용하여 Bicep 템플릿을 배포합니다. Bicep 템플릿, 매개 변수 파일 및 Azure 리소스 그룹의 이름을 지정합니다.az deployment group create \ --resource-group "<name-of-existing-resource-group>" \ --parameters "container-instance.bicepparam" \ --template-file "container-instance.bicep"배포의 출력을 검토합니다. 출력에는
properties.outputs.systemAssignedIdentity.value속성의 컨테이너 인스턴스에서 ID 개체가 포함됩니다.{ "principalId": "aaaaaaaa-bbbb-cccc-1111-222222222222", "tenantId": "aaaabbbb-0000-cccc-1111-dddd2222eeee", "type": "SystemAssigned" }
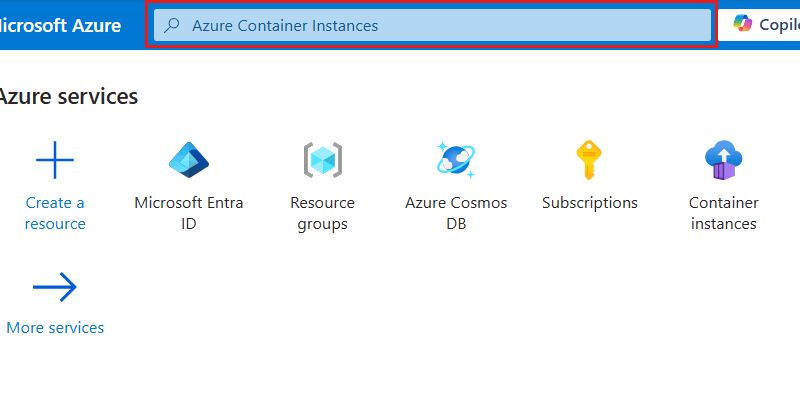
Azure Portal에 로그인합니다(https://portal.azure.com).
전역 검색 창에 Azure Container Instances를 입력합니다.
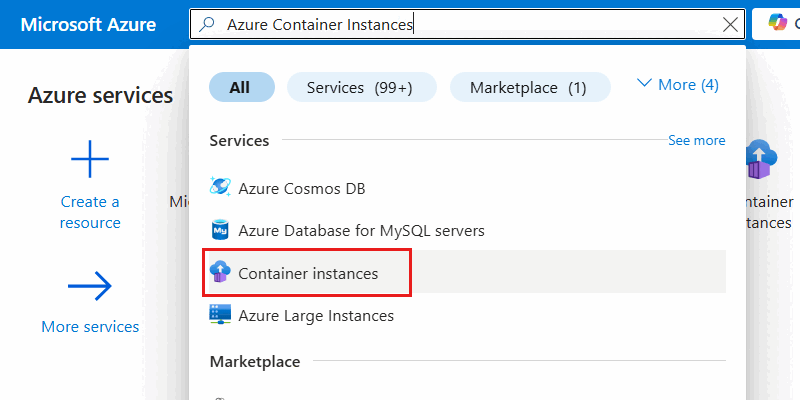
서비스 내에서 Container Instances를 선택합니다.
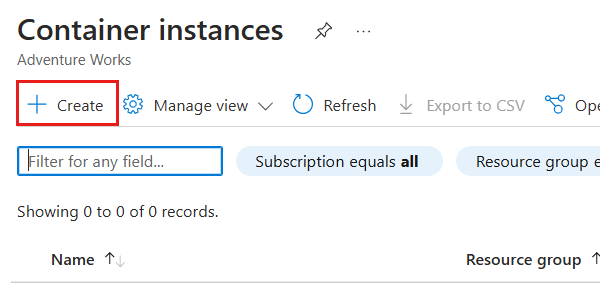
Container instances 창에서 만들기를 선택합니다.
기본 창에서 다음 옵션을 구성한 다음 검토 + 만들기를 선택합니다.
값 구독 Azure 구독 선택 리소스 그룹 새 리소스 그룹을 만들거나 기존 리소스 그룹을 선택합니다. 컨테이너 이름 전역적으로 고유한 이름 입력 지역 구독에 대해 지원되는 Azure 지역 선택 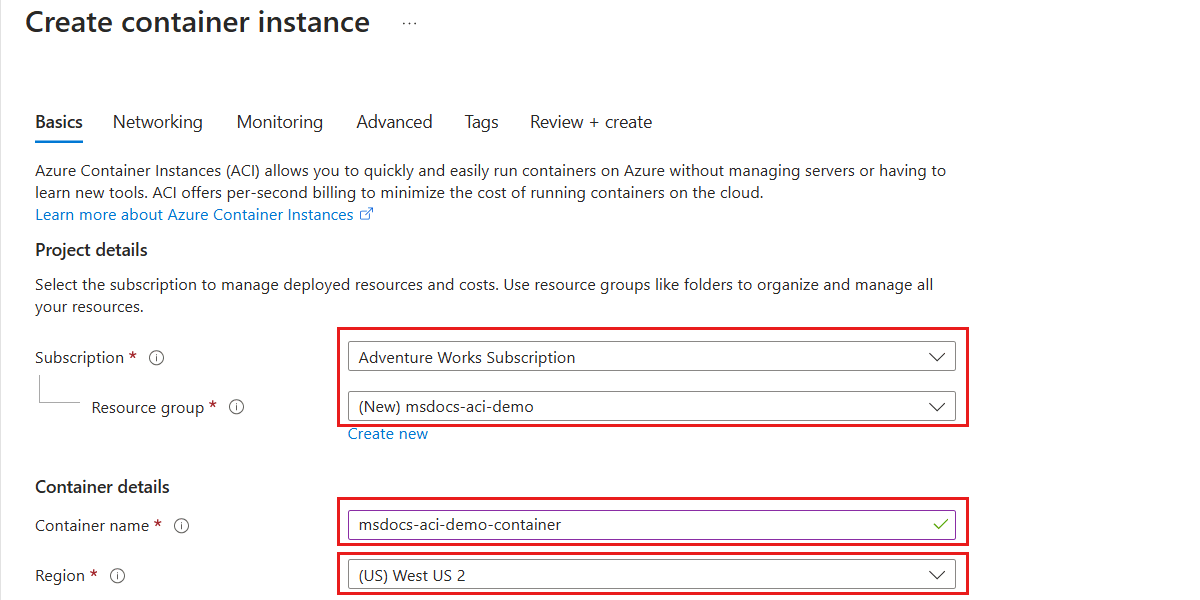
팁
지정하지 않은 옵션은 기본값으로 그대로 둘 수 있습니다.
검토 + 만들기 창에서 계정 유효성 검사가 성공적으로 완료될 때까지 기다린 다음 만들기를 선택합니다.
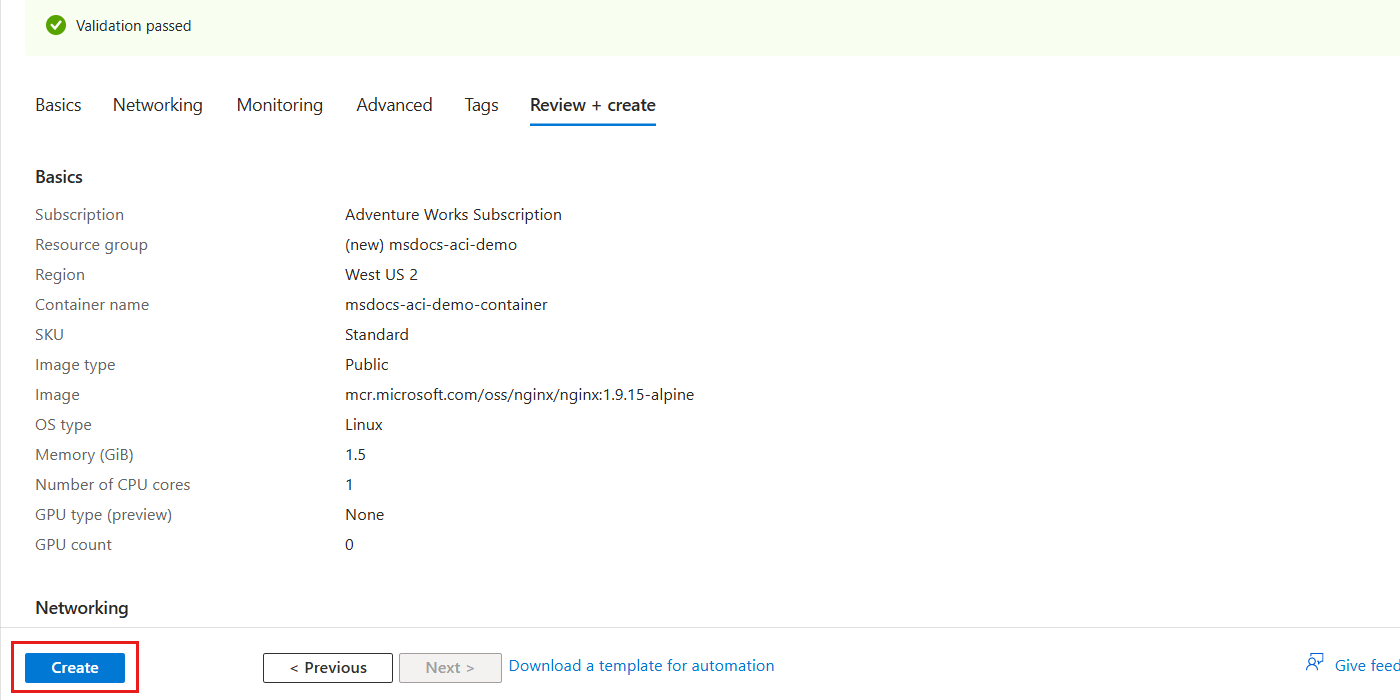
포털이 자동으로 배포 창으로 이동합니다. 배포가 완료될 때가지 기다립니다.
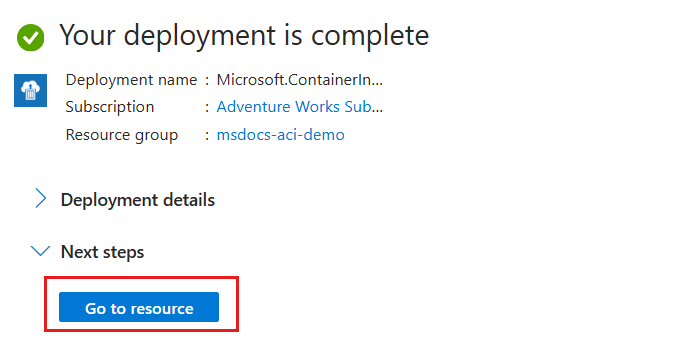
배포가 완료되면 리소스로 이동을 선택하여 새 Azure Container Instances 리소스로 이동합니다.
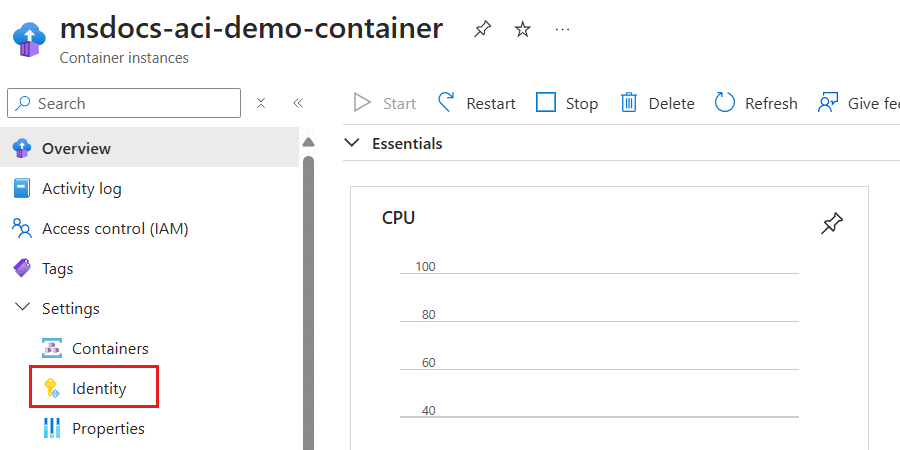
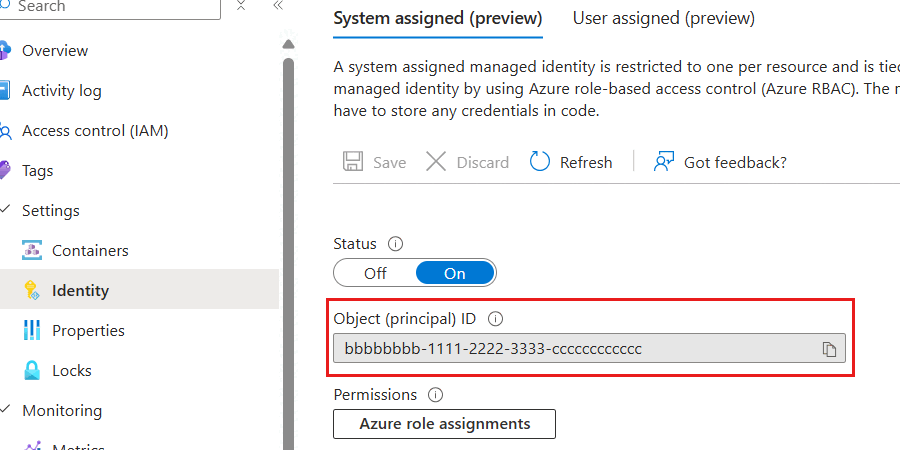
새 컨테이너 인스턴스의 창 내에서 서비스 메뉴의 설정 섹션 내에서 ID를 선택합니다.
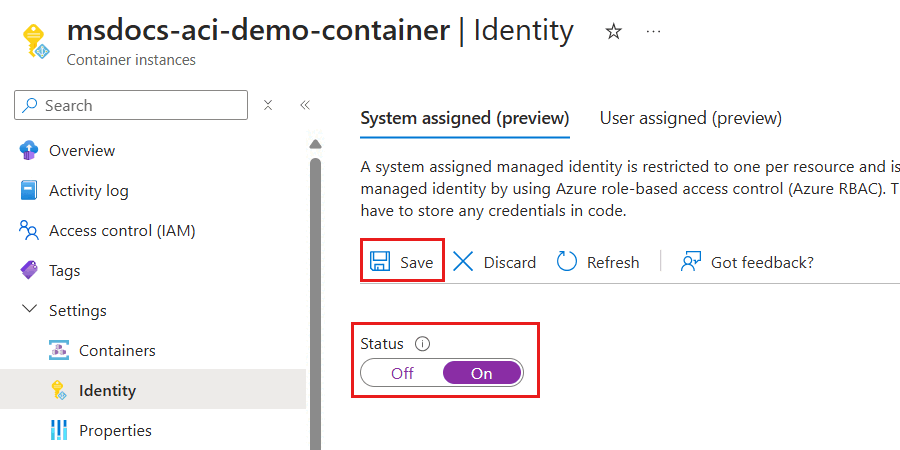
ID 창에서 상태 옵션을 켜기로 설정하여 시스템이 할당한 관리 ID를 사용하도록 설정합니다. 그런 다음 저장을 선택하고 프롬프트를 해결하여 변경 내용을 적용합니다.
시스템이 할당한 관리 ID가 준비되면 개체(보안 주체) ID 속성의 값을 검토합니다. 이 속성의 값은 ID의 고유한 식별자입니다.
팁
이 예제 스크린샷에서 시스템이 할당한 관리 ID의 고유 식별자는
bbbbbbbb-1111-2222-3333-cccccccccccc입니다.
New-AzContainerInstanceObject을(를) 이용하여 컨테이너를 나타내는 개체를 만들고$container(이)라는 변수에 저장합니다. 그런 다음, 해당 컨테이너 개체를 사용하여New-AzContainerGroup(으)로 새 컨테이너 인스턴스를 만듭니다.IdentityType매개 변수를SystemAssigned(으)로 설정하여 시스템이 할당한 관리 ID를 사용하도록 계정을 구성합니다.$parameters = @{ Name = "aspnet-sample" Image = "mcr.microsoft.com/dotnet/samples:aspnetapp-chiseled" RequestCpu = 1 RequestMemoryInGb = 2 } $container = New-AzContainerInstanceObject @parameters $parameters = @{ ResourceGroupName = "<name-of-existing-resource-group>" Name = "<name-of-new-container>" Container = $container OsType = "Linux" Location = "<azure-region>" IdentityType = "SystemAssigned" } New-AzContainerGroup @parametersGet-AzContainerGroup및Format-List을(를) 사용해Identity속성만 선택하여 시스템이 할당한 관리 ID에 대한 세부 정보를 가져옵니다.$parameters = @{ ResourceGroupName = "<name-of-existing-resource-group>" Name = "<name-of-existing-container>" } Get-AzContainerGroup @parameters | Format-List Identity명령의 출력을 검토합니다. ID 및 테넌트에 대한 고유 식별자를 포함해야 합니다.
Identity : {
             "principalId": "aaaaaaaa-bbbb-cccc-1111-222222222222",
             "tenantId": "aaaabbbb-0000-cccc-1111-dddd2222eeee",
             "type": "SystemAssigned"
           }
사용자 할당 관리 ID 만들기
이식 가능한 방식으로 하나 이상의 Azure 서비스와 함께 사용할 수 있는 사용자가 할당한 관리 ID를 만듭니다.
az identity create를 사용하여 Azure 리소스 그룹에서 새로 사용자가 할당한 관리 ID를 만듭니다.az identity create \ --resource-group "<name-of-existing-resource-group>" \ --name "<name-of-new-managed-identity>"az identity list을 사용하여 리소스 그룹의 사용자가 할당한 관리 ID 목록을 가져옵니다.az identity list \ --resource-group "<name-of-existing-resource-group>"명령의 출력을 검토합니다. 이 정규화된 리소스 식별자를 사용하여 사용자가 할당한 관리 ID를 Azure 리소스에 할당하기 때문에
id필드 값을 기록합니다.{ "clientId": "11112222-bbbb-3333-cccc-4444dddd5555", "id": "/subscriptions/aaaa0a0a-bb1b-cc2c-dd3d-eeeeee4e4e4e/resourcegroups/msdocs-identity-example/providers/Microsoft.ManagedIdentity/userAssignedIdentities/msdocs-identity-example-user-assigned", "location": "<azure-location>", "name": "msdocs-identity-example-user-assigned", "principalId": "cccccccc-dddd-eeee-3333-444444444444", "resourceGroup": "msdocs-identity-example", "systemData": null, "tags": {}, "tenantId": "aaaabbbb-0000-cccc-1111-dddd2222eeee", "type": "Microsoft.ManagedIdentity/userAssignedIdentities" }참고 항목
예를 들어
id값은/subscriptions/aaaa0a0a-bb1b-cc2c-dd3d-eeeeee4e4e4e/resourcegroups/msdocs-identity-example/providers/Microsoft.ManagedIdentity/userAssignedIdentities/msdocs-identity-example-user-assigned입니다. 이 예제에서는 가상 데이터를 사용하며 식별자는 이 예제와 다릅니다.
Bicep 파일을 만들어 사용자가 할당한 관리 ID를 정의하고 파일 이름을 user-assigned-managed-identity.bicep으로 지정합니다. 다음과 같은 최소 속성을 설정합니다.
값 nameidentityName(이)라는 선택적 매개 변수를 사용하고 고유한 기본값을 생성합니다.location리소스 그룹의 위치로 설정 metadata description = 'Create a user-assigned managed identity.' param identityName string = uniqueString(subscription().id, resourceGroup().id) resource identity 'Microsoft.ManagedIdentity/userAssignedIdentities@2023-01-31' = { name: identityName location: resourceGroup().location } output id string = identity.id output name string = identity.nameaz deployment group create을(를) 사용하여 Bicep 템플릿을 배포합니다. Bicep 템플릿 및 Azure 리소스 그룹의 이름을 지정합니다.az deployment group create \ --resource-group "<name-of-existing-resource-group>" \ --template-file "user-assigned-managed-identity.bicep"배포의 출력을 검토합니다. 출력에는
properties.outputs.name.value속성에 있는 관리 ID의 고유 식별자가 포함됩니다. 이 값은 이 가이드의 뒷부분에서 새 Azure 리소스를 만들 때 사용하는 데 필요하기 때문에 기록합니다.{ "type": "String", "value": "msdocs-identity-example-user-assigned" }참고 항목
이 예시에서는
name.value은(는)msdocs-identity-example-user-assigned입니다. 이 예제에서는 가상 데이터를 사용하며 식별자는 이 예제와 다릅니다.
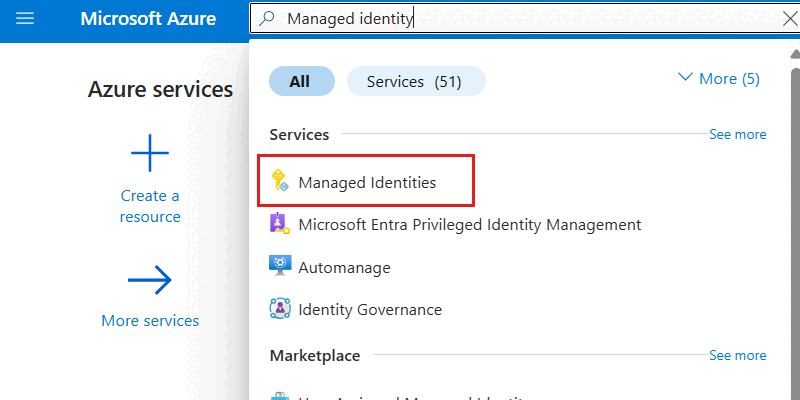
전역 검색 창에 관리 ID를 입력합니다.
서비스에서 관리 ID를 선택합니다.
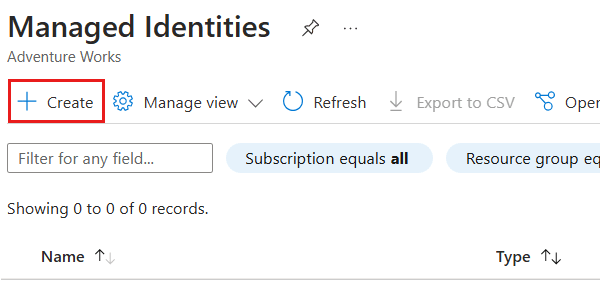
Container instances 창에서 만들기를 선택합니다.
기본 창에서 다음 옵션을 구성한 다음 검토 + 만들기를 선택합니다.
값 구독 Azure 구독 선택 리소스 그룹 새 리소스 그룹을 만들거나 기존 리소스 그룹을 선택합니다. 지역 구독에 대해 지원되는 Azure 지역 선택 이름 전역적으로 고유한 이름 입력 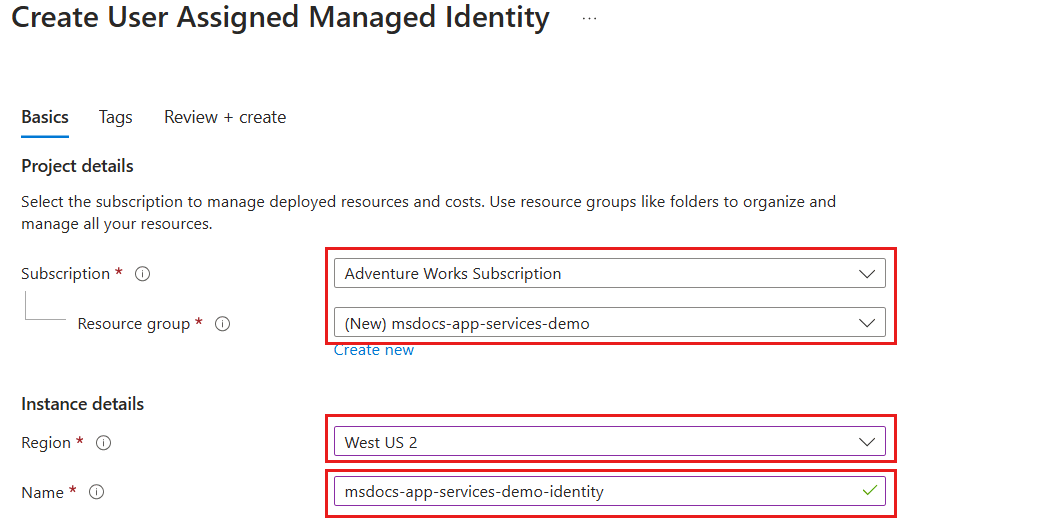
검토 + 만들기 창에서 계정 유효성 검사가 성공적으로 완료될 때까지 기다린 다음 만들기를 선택합니다.
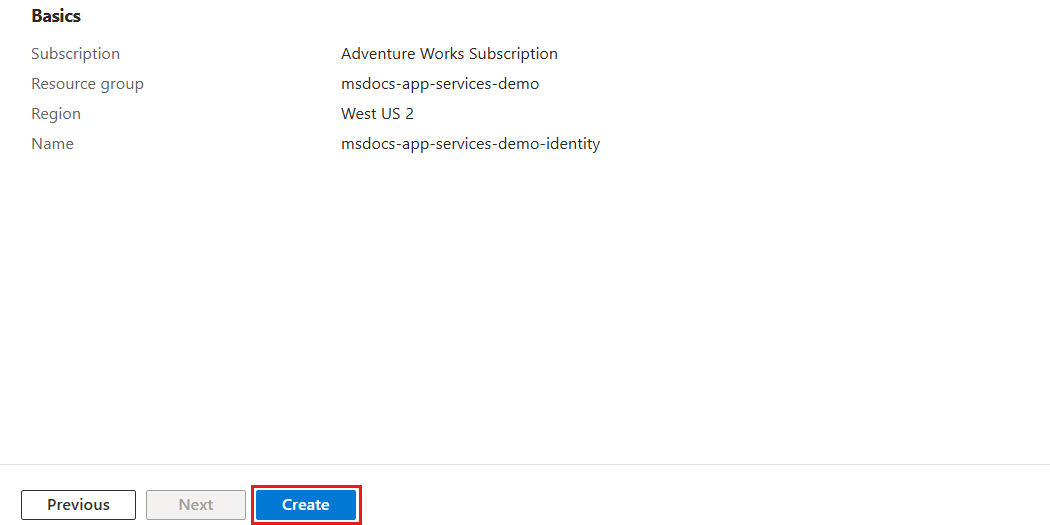
포털이 자동으로 배포 창으로 이동합니다. 배포가 완료될 때가지 기다립니다.
관리 ID 배포가 완료되기를 기다립니다.
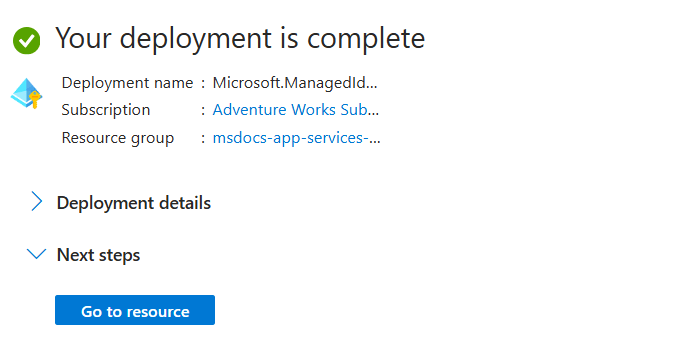
Azure 리소스 그룹에서
New-AzUserAssignedIdentity을(를) 사용하여 새로 사용자가 할당한 관리 ID를 만듭니다.$parameters = @{ ResourceGroupName = "<name-of-existing-resource-group>" Name = "<name-of-new-managed-identity>" Location = "<azure-region>" } New-AzUserAssignedIdentity @parametersGet-AzUserAssignedIdentity을(를) 사용하여 리소스 그룹에서 사용자가 할당한 관리 ID 목록을 가져옵니다.$parameters = @{ ResourceGroupName = "<name-of-existing-resource-group>" } Get-AzUserAssignedIdentity @parameters | Format-List Name, Id명령의 출력을 검토합니다. 이 정규화된 리소스 식별자를 사용하여 사용자가 할당한 관리 ID를 Azure 리소스에 할당하기 때문에
Id필드 값을 기록합니다.Name : msdocs-identity-example-user-assigned Id : /subscriptions/aaaa0a0a-bb1b-cc2c-dd3d-eeeeee4e4e4e/resourcegroups/msdocs-identity-example/providers/Microsoft.ManagedIdentity/userAssignedIdentities/msdocs-identity-example-user-assigned참고 항목
예를 들어
Id값은/subscriptions/aaaa0a0a-bb1b-cc2c-dd3d-eeeeee4e4e4e/resourcegroups/msdocs-identity-example/providers/Microsoft.ManagedIdentity/userAssignedIdentities/msdocs-identity-example-user-assigned입니다. 이 예제에서는 가상 데이터를 사용하며 식별자는 이 예제와 다릅니다.
사용자가 할당한 관리 ID로 Azure SQL 데이터베이스 서버 만들기
이전에 만든 사용자가 할당한 관리 ID를 새 Azure 호스트 서비스에 할당합니다. 이 섹션에서는 Azure App Services 웹앱 리소스를 만듭니다.
az appservice plan create을(를) 사용하여 새 앱 서비스 계획을 만듭니다.az appservice plan create \ --resource-group "<name-of-existing-resource-group>" \ --name "<name-of-new-plan>"az webapp create을(를) 사용하여 사용자가 할당한 관리 ID를 새 웹앱에 할당합니다. 이 가이드의 앞부분에 기록된id필드를ssign-identity매개 변수 값으로 사용합니다.az webapp create \ --resource-group "<name-of-existing-resource-group>" \ --name "<name-of-existing-web-app>" \ --plan "<name-of-existing-plan>" \ --assign-identity "<resource-id-recorded-earlier>"az webapp show및 JMESPath 쿼리를 사용하여 이 계정에 할당된 모든 ID 및 에 대한 세부 정보를 가져옵니다.az webapp show \ --resource-group "<name-of-existing-resource-group>" \ --name "<name-of-existing-account>" \ --query "identity"명령의 출력을 검토합니다. 사용자 할당 관리 ID를 모두 포함해야 합니다.
{
  "principalId": null,
  "tenantId": null,
  "type": "UserAssigned",
  "userAssignedIdentities": {
    "/subscriptions/aaaa0a0a-bb1b-cc2c-dd3d-eeeeee4e4e4e/resourcegroups/msdocs-identity-example/providers/Microsoft.ManagedIdentity/userAssignedIdentities/msdocs-identity-example-user-assigned": {
      "clientId": "11112222-bbbb-3333-cccc-4444dddd5555",
      "principalId": "cccccccc-dddd-eeee-3333-444444444444"
    }
  }
}
app-service-web-app.bicep이라는 또 다른 Bicep 파일을 만들고 Azure App Service 계획 및 웹앱을 정의합니다. 이러한 리소스에 대해 다음 속성을 설정합니다.
리소스 값 name기존 관리 ID identityName이름의 매개 변수 사용nameApp Service 플랜 planName이름의 매개 변수 사용locationApp Service 플랜 리소스 그룹의 위치로 설정 name웹 앱 webAppName이름의 매개 변수 사용location웹 앱 리소스 그룹의 위치로 설정 identity.typeUserAssignedidentity.userAssignedIdentities.{identity.id}{}properties.serverFarmIdplan.idmetadata description = 'Creates an Azure App Service plan and web app with a user-assigned managed identity.' @description('The name of the app service plan.') param planName string @description('The name of the web app.') param webAppName string @description('The name of the user-assigned managed identity.') param identityName string resource identity 'Microsoft.ManagedIdentity/userAssignedIdentities@2023-01-31' existing = { name: identityName } resource plan 'Microsoft.Web/serverfarms@2023-12-01' = { name: planName location: resourceGroup().location } resource webApp 'Microsoft.Web/sites@2023-12-01' = { name: webAppName location: resourceGroup().location identity: { type: 'UserAssigned' userAssignedIdentities: { '${identity.id}': {} } } properties: { serverFarmId: plan.id } } output userAssignedIdentity object = webApp.identityapp-service-web-app
bicepparam이라는 Bicep 매개 변수 파일을 만듭니다. 이 매개 변수 파일에서 웹앱에 대한 고유한 이름을 만들고 각각planName및webAppName매개 변수를 사용하여 계획합니다. 그런 다음 사용자가 할당한 관리 ID의 이름을identityName매개 변수 값으로 제공합니다.using './app-service-web-app.bicep' param planName = '<name-of-new-app-service-plan>' param webAppName = '<name-of-new-web-app>' param identityName = '<name-of-existing-managed-identity>'az deployment group create을(를) 사용하여 Bicep 템플릿을 배포합니다. Bicep 템플릿, 매개 변수 파일 및 Azure 리소스 그룹의 이름을 지정합니다.az deployment group create \ --resource-group "<name-of-existing-resource-group>" \ --parameters "app-service-web-app.bicepparam" \ --template-file "app-service-web-app.bicep"배포의 출력을 검토합니다. 출력에는
properties.outputs.userAssignedIdentity.value속성의 컨테이너 인스턴스에서 ID 개체가 포함됩니다.{ "type": "UserAssigned", "userAssignedIdentities": { "/subscriptions/aaaa0a0a-bb1b-cc2c-dd3d-eeeeee4e4e4e/resourcegroups/msdocs-identity-example/providers/Microsoft.ManagedIdentity/userAssignedIdentities/msdocs-identity-example-user-assigned": { "clientId": "11112222-bbbb-3333-cccc-4444dddd5555", "principalId": "cccccccc-dddd-eeee-3333-444444444444" } } }
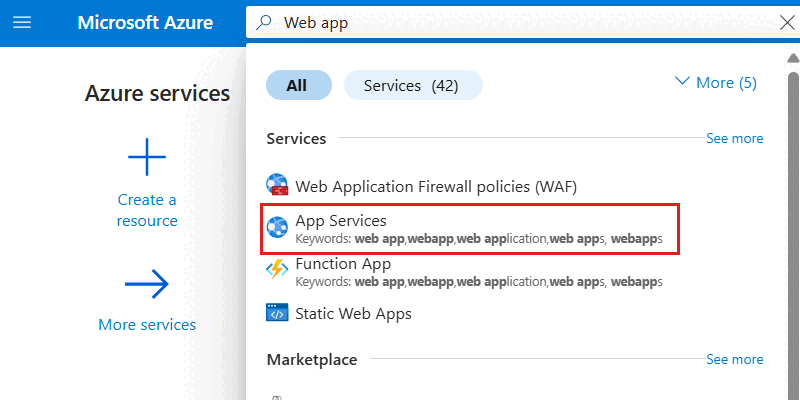
전역 검색 창에 웹앱을 입력합니다.
서비스 내에서 App Services를 선택합니다.
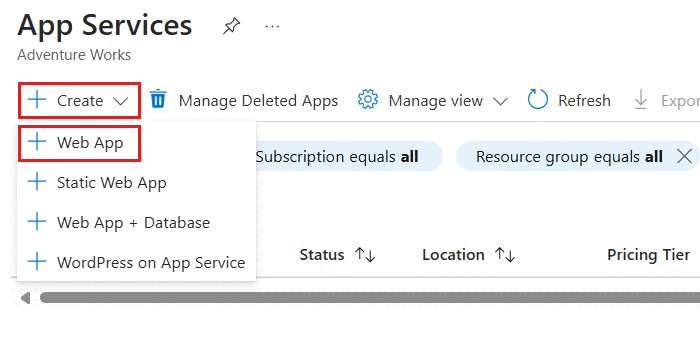
App Services 창에서 만들기를 선택한 다음 웹앱을 선택합니다.
기본 창에서 다음 옵션을 구성한 다음 검토 + 만들기를 선택합니다.
값 구독 Azure 구독 선택 리소스 그룹 새 리소스 그룹을 만들거나 기존 리소스 그룹을 선택합니다. 이름 전역적으로 고유한 이름 입력 계획 새 계획을 만들거나 기존 계획을 선택하기 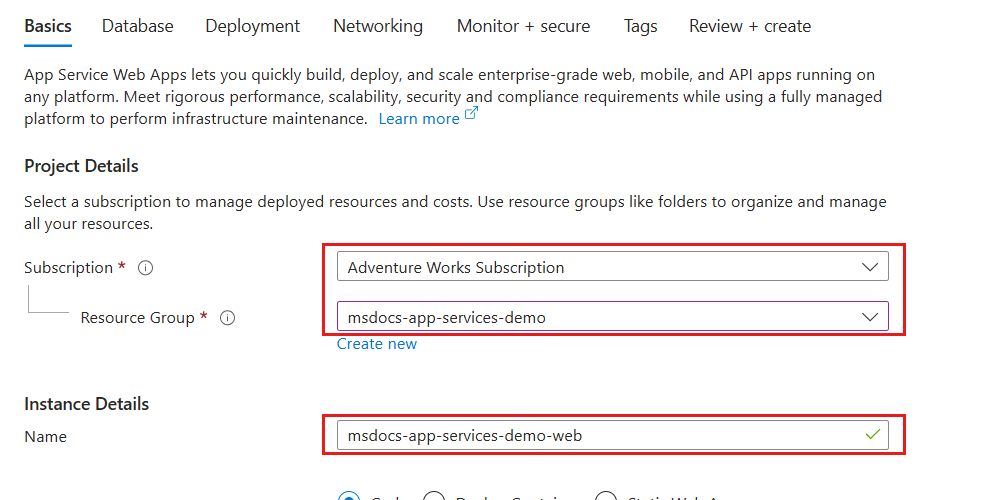
검토 + 만들기 창에서 계정 유효성 검사가 성공적으로 완료될 때까지 기다린 다음 만들기를 선택합니다.
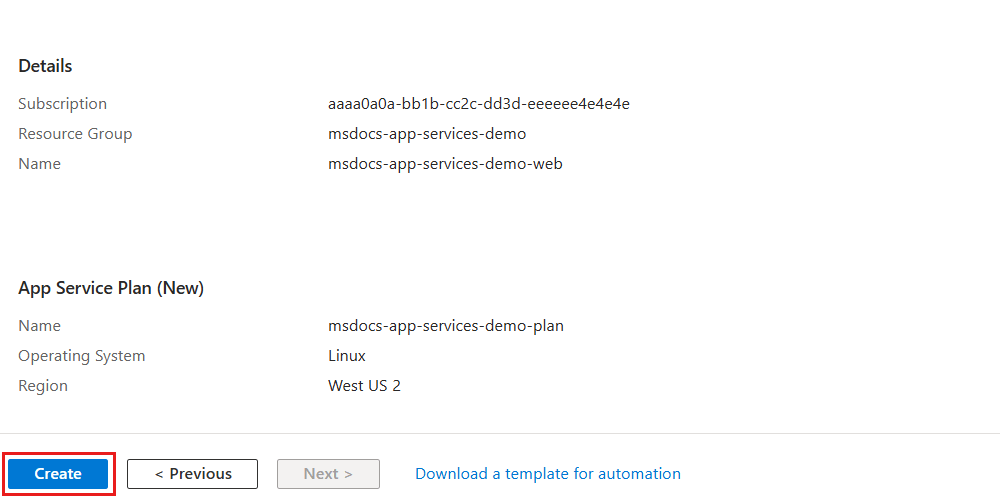
포털이 자동으로 배포 창으로 이동합니다. 배포가 완료될 때가지 기다립니다.
배포가 완료되면 리소스로 이동을 선택하여 새 Azure Container Instances 리소스로 이동합니다.
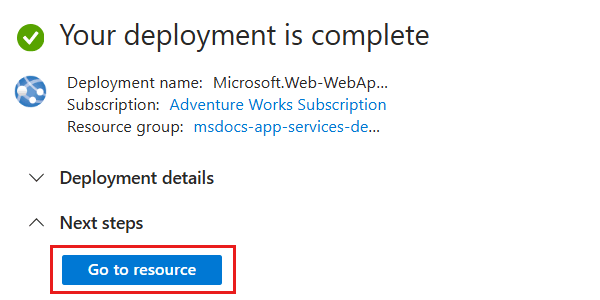
새 컨테이너 인스턴스의 창 내에서 서비스 메뉴의 설정 섹션 내에서 ID를 선택합니다.
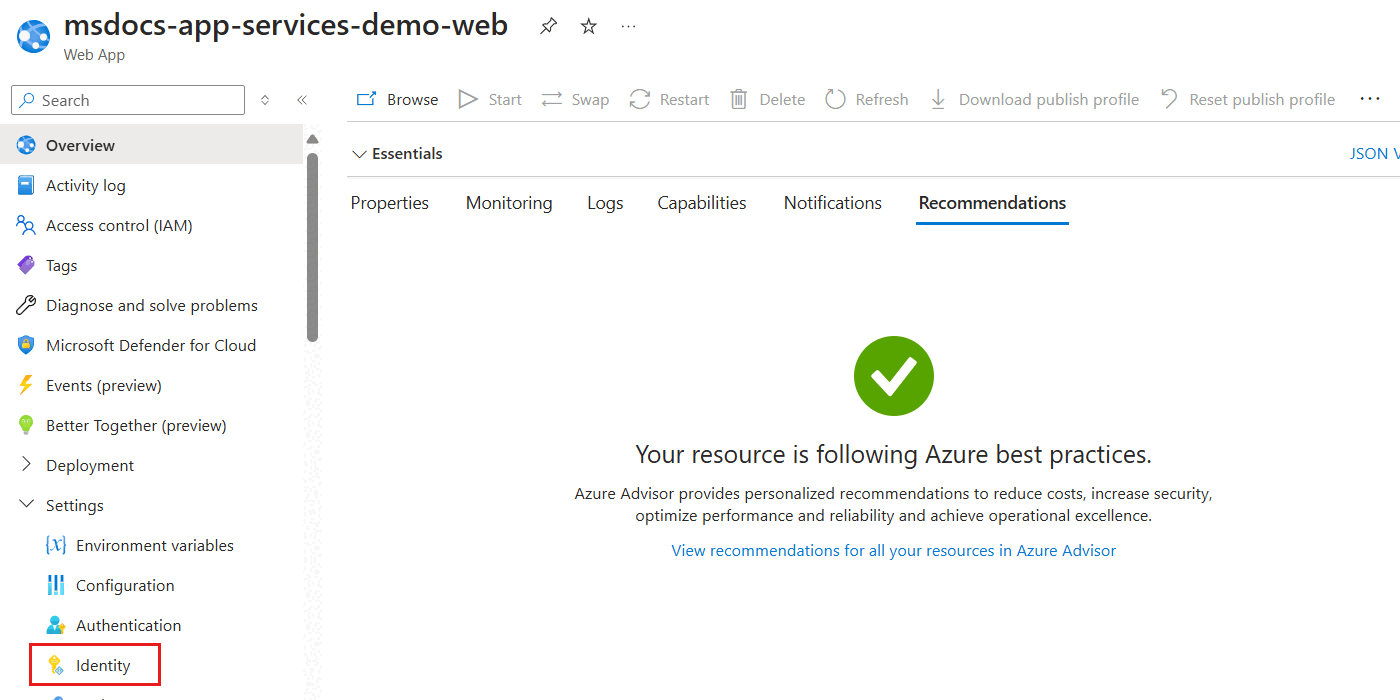
ID 창에서 사용자 할당 옵션을 선택합니다.
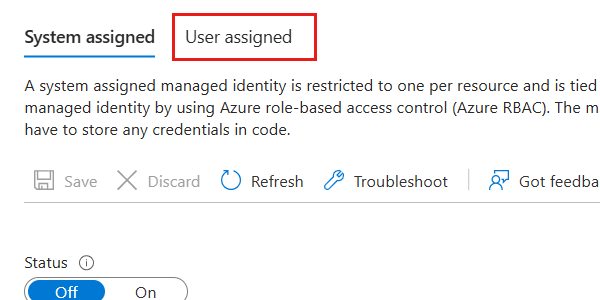
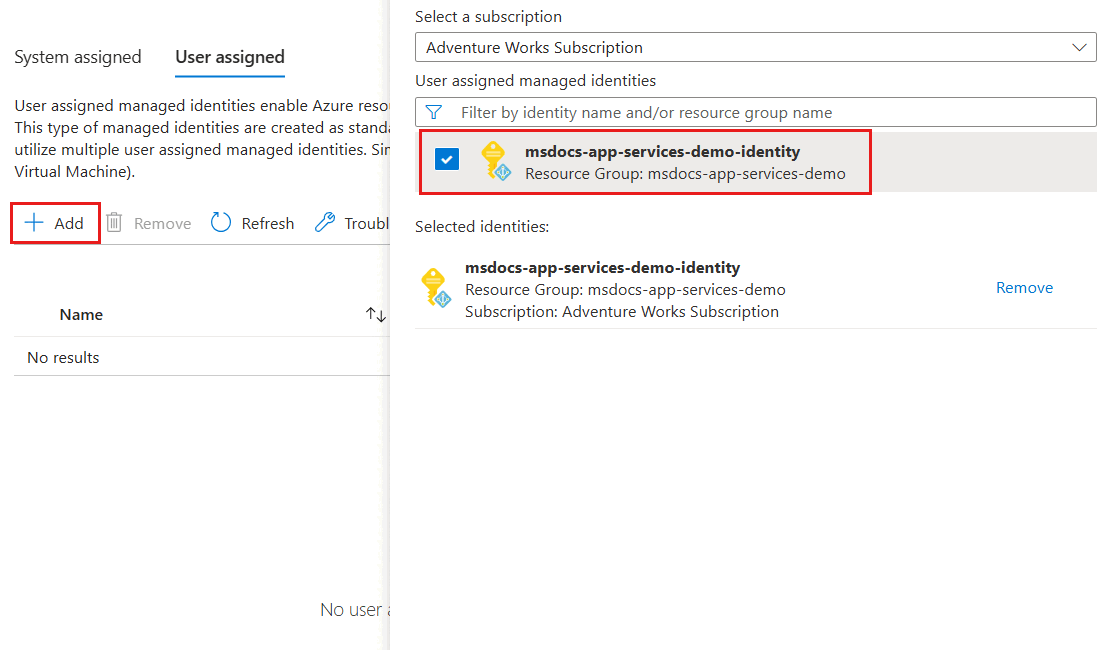
추가를 선택하여 대화 상자를 열어 기존 사용자가 할당한 관리 ID를 할당합니다. 대화 상자에서 기존 사용자가 할당한 관리 ID를 선택한 다음 추가를 선택합니다.
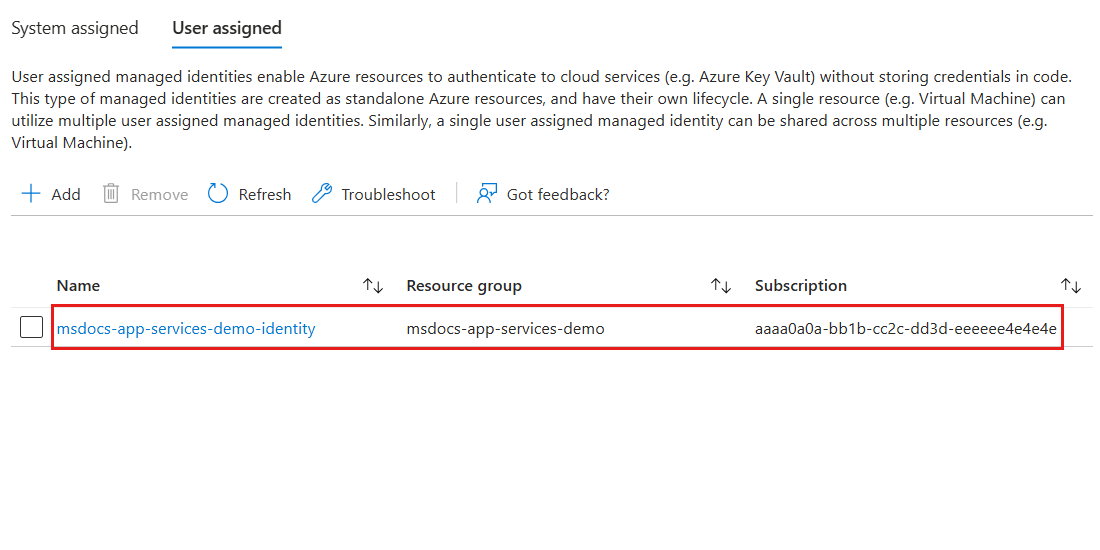
마지막으로 웹앱과 연결된 사용자가 할당한 관리 ID 목록을 검토합니다. ID의 이름, 리소스 그룹 이름 및 구독 식별자를 포함해야 합니다.
New-AzWebApp을(를) 사용하여 Azure App Service 웹앱을 만듭니다.$parameters = @{ ResourceGroupName = "<name-of-existing-resource-group>" Name = "<name-of-new-web-app>" Location = "<azure-region>" } New-AzWebApp @parameters새로 만든 웹앱을 패치하여
identity.type속성을UserAssigned(으)로 설정하고 기존 사용자가 할당한 관리 ID를identity.userAssignedIdentities속성에 추가합니다. 이 작업을 수행하려면 먼저 이 가이드의 앞부분에 기록된id필드를identityId셸 변수의 값으로 제공합니다. 그런 다음 페이로드 개체를 생성하고 JSON으로 변환합니다. 마지막으로Invoke-AzRestMethodHTTP 동사와 함께PATCH을(를) 사용하여 기존 웹앱을 업데이트합니다.$identityId = "<resource-id-recorded-earlier>" $payload = @{ identity = @{ type = "UserAssigned" userAssignedIdentities = @{ "$identityId" = @{} } } } | ConvertTo-Json -Depth 3 $parameters = @{ ResourceGroupName = "<name-of-existing-resource-group>" Name = "<name-of-existing-web-app>" ResourceProviderName = 'Microsoft.Web' ResourceType = 'sites' ApiVersion = '2023-12-01' Method = 'PATCH' Payload = $payload } Invoke-AzRestMethod @parametersGet-AzWebApp,Select-Object,ConvertTo-Json을(를) 사용해Identity속성만 선택하여 웹앱에 할당된 모든 ID에 대한 세부 정보를 가져옵니다.$parameters = @{ ResourceGroupName = "<name-of-existing-resource-group>" Name = "<name-of-existing-web-app>" } Get-AzWebApp @parameters | Select-Object Identity | ConvertTo-Json -Depth 3명령의 출력을 검토합니다. ID 및 테넌트에 대한 고유 식별자를 포함해야 합니다.
{
  "Identity": {
    "Type": "UserAssigned",
    "TenantId": null,
    "PrincipalId": null,
    "UserAssignedIdentities": {
      "/subscriptions/aaaa0a0a-bb1b-cc2c-dd3d-eeeeee4e4e4e/resourcegroups/msdocs-identity-example/providers/Microsoft.ManagedIdentity/userAssignedIdentities/msdocs-identity-example-user-assigned": {
        "PrincipalId": "cccccccc-dddd-eeee-3333-444444444444",
        "ClientId": "11112222-bbbb-3333-cccc-4444dddd5555"
      }
    }
  }
}

