Teams 통화 큐 및 자동 전화 교환에 대한 Azure Communication Services UI 라이브러리 JavaScript 번들 호출 시작
Important
Azure Communication Services의 이 기능은 현재 미리 보기 상태입니다.
미리 보기 API 및 SDK는 서비스 수준 계약 없이 제공됩니다. 프로덕션 워크로드에는 사용하지 않는 것이 좋습니다. 일부 기능은 지원되지 않거나 기능이 제한될 수 있습니다.
자세한 내용은 Microsoft Azure 미리 보기에 대한 보충 사용 약관을 검토하세요.
Azure Communication Services UI 라이브러리는 고객 통신에 더 나은 비즈니스를 제공하기 위해 UI 라이브러리 를 사용하기 위한 플랫폼 간 솔루션을 사용해 보기 위한 JavaScript 번들을 제공합니다. 이 자습서는 UI 라이브러리 및 Teams를 사용하여 전화를 받는 가장 빠른 방법입니다.
이 자습서에 따라 다음을 수행합니다.
- 고객을 비즈니스에 연결하는 모든 웹 페이지에 통화 환경을 배치할 수 있습니다.
- React 이외의 플랫폼에서 통화 환경 만들기
필수 조건
전체 환경을 완료하려면 이러한 단계를 완료해야 합니다 . Teams 음성 애플리케이션 또는 Teams 테넌트 페더레이션 설정에 대한 질문이 있는 경우 Teams 관리자에게 문의하세요.
- 지원되는 플랫폼 중 하나인 Visual Studio Code.
- Node.js, 활성 LTS 및 유지 관리 LTS 버전 노드 20 LTS를 사용하는 것이 좋습니다.
node --version명령을 사용하여 버전을 확인합니다. - Azure Communication Services 리소스. 통신 리소스를 만듭니다.
- Azure Communication Services 리소스와의 상호 운용을 위한 Teams 테넌트 설정 완료
- Teams 통화 큐 및 Azure Communication Services를 사용합니다.
- Teams 자동 전화 교환 및 Azure Communication Services를 사용합니다.
노드 및 VS 코드 확인
이 명령을 사용하여 노드가 올바르게 설치되었는지 확인할 수 있습니다.
node -v
출력은 설치한 버전을 알려줍니다. 노드가 설치되어 있고 추가되지 않으면 실패합니다 PATH. Node와 마찬가지로 Visual Studio Code가 이 명령과 함께 설치되어 있는지 확인할 수 있습니다.
code --version
Node와 마찬가지로 컴퓨터에 VS Code를 설치하는 데 문제가 있는 경우 이 명령이 실패합니다.
시작
4단계를 통해 이 프로젝트를 만듭니다.
1. 프로젝트 만들기
시작하려면 프로젝트의 새 폴더를 터미널 또는 명령 프롬프트에서 다음 명령을 실행합니다.
명령 프롬프트를 사용하는 Windows의 경우 다음 명령을 사용합니다.
mkdir ui-library-js-test-application; cd ui-library-js-test-application
터미널을 사용하는 macOS의 경우 다음 명령을 사용합니다.
mkdir ui-library-js-test-application && cd ui-library-js-test-application
이러한 스크립트는 새 폴더를 만들고 폴더로 이동합니다.
다음으로 , 라는 index.html새 파일을 만들려고 합니다. 호출 환경을 연결하는 웹 페이지입니다.
2. 코드 가져오기
먼저 아웃바운드 호출 복합 JavaScript 파일에서 JavaScript 번들을 다운로드합니다. 이 번들을 .와 동일한 디렉터리에 배치합니다 index.html.
다음으로 VS Code에서 열고 index.html 다음 코드 조각을 추가하려고 합니다.
<!DOCTYPE html>

<head>
  <meta charset="utf-8" />
  <title>Embedded call composite basic example</title>
  <style>
    /* These styles are something we provide for the calling experience, please update for your needs */
    /* these apply to the calling experience you will need to style your button how your desire */
    #outbound-call-composite-container-ready {
      height: 22rem;
      width: 32rem;
      position: absolute;
      bottom: 1rem;
      right: 1rem;
      box-shadow: 0 0 0.5rem 0;
      border-radius: 1rem;
      padding: 0.5rem;
      z-index: 5;
    }
  </style>
</head>

<body>
  <div id="outbound-call-composite-container"></div>
  <button id="start-call-button">Your calling button</button>
  <!-- replace with https://github.com/Azure/communication-ui-library/releases/latest/download/outboundCallComposite.js for development and prototyping -->
  <script src="./outboundCallComposite.js"></script>
  <script type="module">
    const createCallingExperience = async () => {
      const userId = { communicationUserId: "<Add your ACS ID here>" };
      const token = "<Enter your ACS token>";
      const displayName = "Enter the DisplayName for your user";

      const callAdapter = await outboundCallComposite.loadCallComposite(
        {
          userId: userId,
          token: token,
          displayName: displayName,
          targetCallees: [
            { teamsAppId: "<Enter your Teams voice application Resource Account ID here>", cloud: "public" },
          ], // Provide the identifier you want to call, can be flat as a string.
        },
        document.getElementById("outbound-call-composite-container"),
        {
          options: {
            callControls: {
              cameraButton: true,
              screenShareButton: false,
              moreButton: true,
              peopleButton: false,
              raiseHandButton: false,
              displayType: "compact",
            },
            localVideoTile: { position: "floating" },
          },
        }
      );

      window.onbeforeunload = () => {
        callAdapter.dispose();
      };
      // Update the container id to trigger the styles we set above
      const container = document.getElementById("outbound-call-composite-container");
      container.setAttribute("id", "outbound-call-composite-container-ready");
    };
    const startCallButton = document.getElementById("start-call-button");
    startCallButton.onclick = createCallingExperience;
  </script>
</body>
[! 중요] 이 파일에서 가져오는 항목을 편집하지 않으려면 이 파일 index.html 과 JavaScript 번들이 outboundCallComposite.js 동일한 폴더에 있어야 합니다.
3. Azure Communication Services 및 Teams 음성 애플리케이션 설정
다음으로 로컬 사용자를 인증하고 통화를 시작하는 데 사용할 수 있도록 로컬 사용자의 ID 를 만들려고 합니다. 사용자 및 token 사용자에 대한 id 값이 있으면 앞에서 만든 파일에서 몇 가지 편집을 index.html 수행할 수 있습니다.
const userId = { communicationUserId: "<Add your ACS ID here>" };
const token = "<Enter your ACS token>";
const displayName = "Enter the DisplayName for your user";
이 정보를 Azure Portal 또는 Azure CLI에서 받은 정보로 userId token 업데이트하려고 합니다. 또한 .을 설정해야 합니다 displayName.
다음으로 Azure Communication Services 리소스를 페더레이션할 때 이전에 가져온 Teams 음성 애플리케이션의 리소스 계정 ID를 설정하도록 편집하려고 합니다. 아직 수행되지 않은 경우 Teams 관리자에게 문의하세요.
const callAdapter = await outboundCallComposite.loadCallComposite(
    {
        userId: userId,
        token: token,
        displayName: displayName,
        targetCallees: [
        { teamsAppId: "<Enter your Teams voice application Resource Account ID here>", cloud: "public" }, // <- update this teamsAppId value.
        ],
    },
    document.getElementById("outbound-call-composite-container")
);
4. 애플리케이션 실행
이제 모든 설정을 완료했으므로 이제 애플리케이션을 실행해야 합니다.
해당 디렉터리에서 터미널 또는 명령 프롬프트 창을 열고 다음 명령을 실행합니다.
npx http-server@latest -p 3000
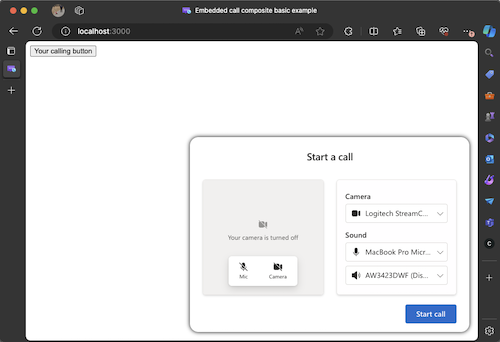
Node를 사용하는 이 스크립트는 HTTP 서버를 시작하고 파일 및 JavaScript 번들을 호스트합니다 index.html . 브라우저에서 열기 http://localhost:3000. 단추가 있는 흰색 페이지가 표시되어야 하며, 단추를 클릭하면 다음 화면이 표시됩니다.
[! 중요] 로컬 호스트를 사용하지 않는 페이지로 이동하려고 하면 보안상의 이유로 통화 환경이 작동하지 않습니다.
start call UI 라이브러리 CallComposite 에 표시된 단추를 클릭하여 Teams 음성 앱에 대한 통화를 시작합니다.
프로덕션 환경에 적용
현재 이 자습서와 JS 번들은 공개 미리 보기로 제공됩니다. Click to Call에 대해 기쁘게 생각하고 현재 제품에 대한 Click to Call 환경을 만드는 방법을 CallComposite 확인하려는 경우 GitHub 리포지토리에 다른 노드 프레임워크에 UI 라이브러리를 통합하는 방법을 보여 주는 토론 게시물이 있습니다. 방금 수행한 자습서의 단계는 이 쇼에 설명된 내용으로 직접 변환하고 React가 아닌 다른 프레임워크에서 UI 라이브러리 복합을 로드하는 방법을 알려줍니다.
다음 단계
Teams 음성 애플리케이션에 대한 자세한 내용은 Teams 자동 전화 교환 및 Teams 통화 큐에 대한 설명서를 확인합니다. 또는 React를 사용하여 보다 완벽한 환경을 빌드하는 자습서를 참조하세요.
빠른 시작: Teams 통화 큐 및 자동 전화 교환에 대한 Azure Communication Services UI 라이브러리 호출 시작
