빠른 시작: 메일 통신 서비스에 여러 보낸 사람 주소를 추가하고 제거하는 방법
이 빠른 시작에서는 Azure Communication Services에서 여러 개의 메일 보낸 사람 주소를 추가하고 제거하는 방법에 대해 알아봅니다.
필수 조건
- 활성 구독이 있는 Azure 계정. 체험 계정을 만듭니다.
- Azure Communication Services 메일 리소스가 만들어지고 도메인을 추가할 준비가 되었습니다. 메일 커뮤니케이션 리소스 만들기 시작을 참조하세요.
- 기본 전송 제한보다 높은 사용자 지정 도메인이 프로비전되고 준비되었습니다. 빠른 시작: 사용자 지정 확인된 메일 도메인을 추가하는 방법을 참조하세요.
여러 보낸 사람 사용자 이름 만들기
메일을 보내도록 프로비전된 메일 도메인에는 donotreply@xxxxxxxx-xxxx-xxxx-xxxx-xxxxxxxxxxxx.azurecomm.net 형식의 기본 MailFrom 주소가 있습니다. 사용자 지정 도메인(예: notification.azuremails.net)을 구성하는 경우 기본 MailFrom 주소에 donotreply@notification.azurecommtest.net이 추가됩니다. 읽기 쉬운 값을 사용하기 위해 MailFrom 주소와 FROM 표시 이름을 구성하고 추가할 수 있습니다.
참고 항목
보내는 제한 또는 기본 전송 제한이 있는 사용자 지정 도메인에 관계없이 Azure Managed Domains에 대해 보낸 사람 사용자 이름을 사용할 수 없습니다. 자세한 내용은 Azure Communication Services에 대한 서비스 제한을 참조하세요.
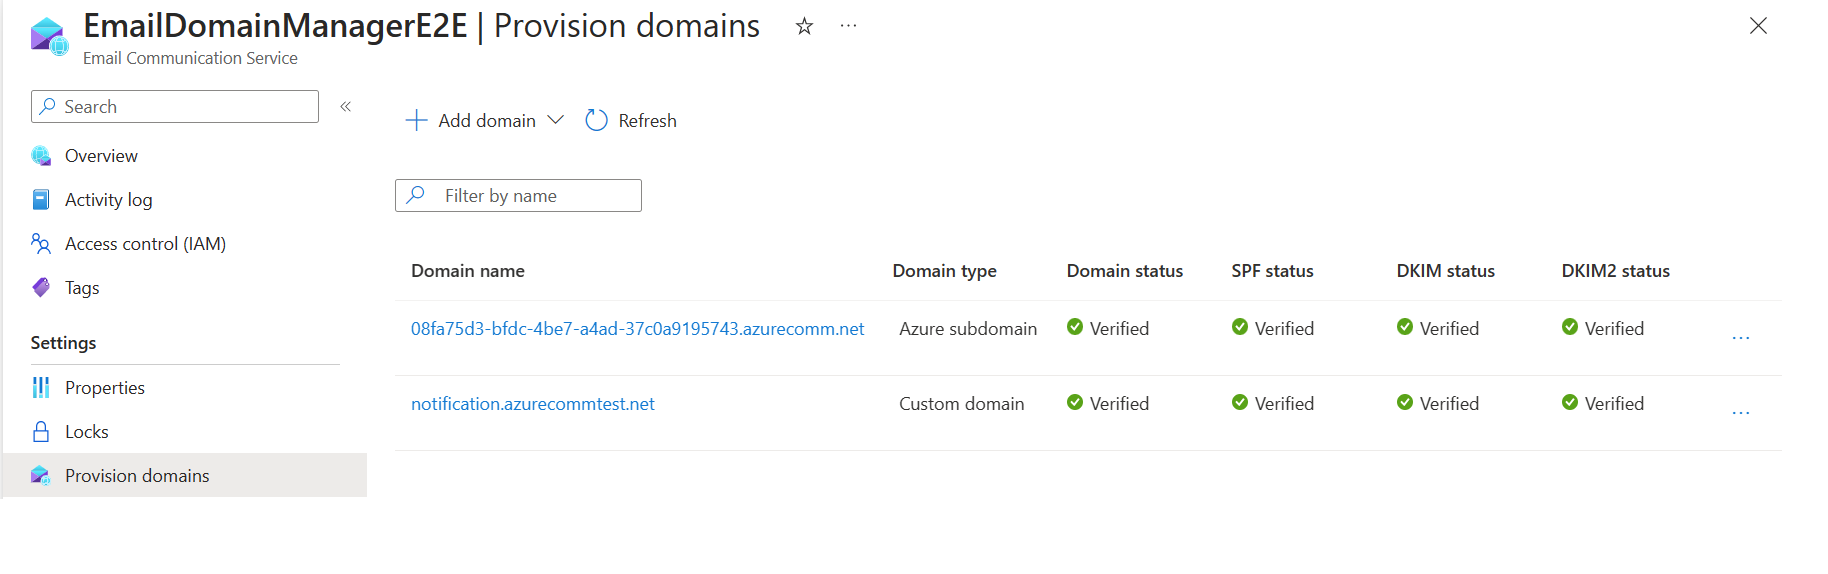
메일 통신 리소스 만들기 시작에서 만든 메일 Communication Service 리소스의 개요 페이지를 엽니다.
프로비전된 도메일의 목록을 보려면 왼쪽 탐색 패널에서 도메인 프로비전을 클릭합니다.
도메인 개요 페이지를 열려면 프로비전된 도메인 중 하나를 클릭합니다.
왼쪽 탐색 창에서 MailFrom 주소 링크를 클릭하여 MailFrom 주소 목록에서 기본값
donotreply를 확인합니다.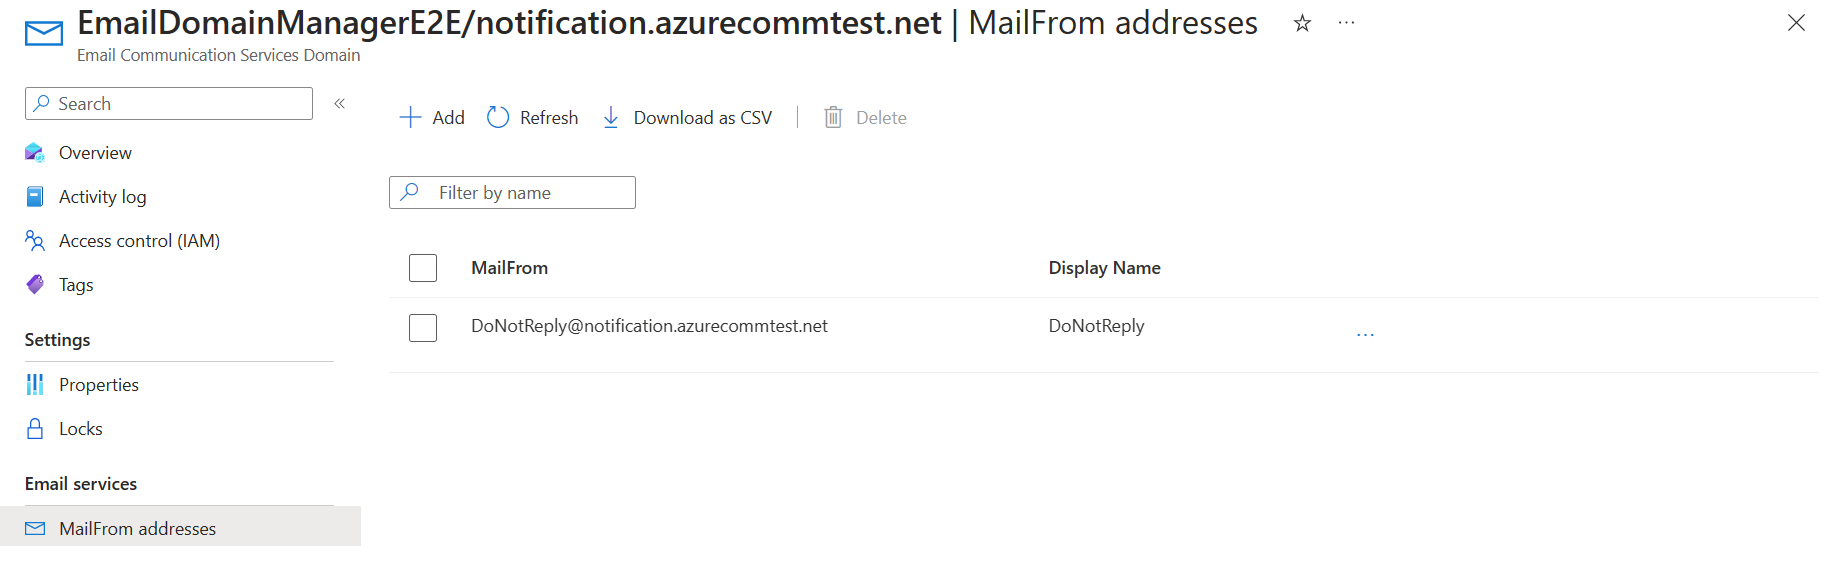
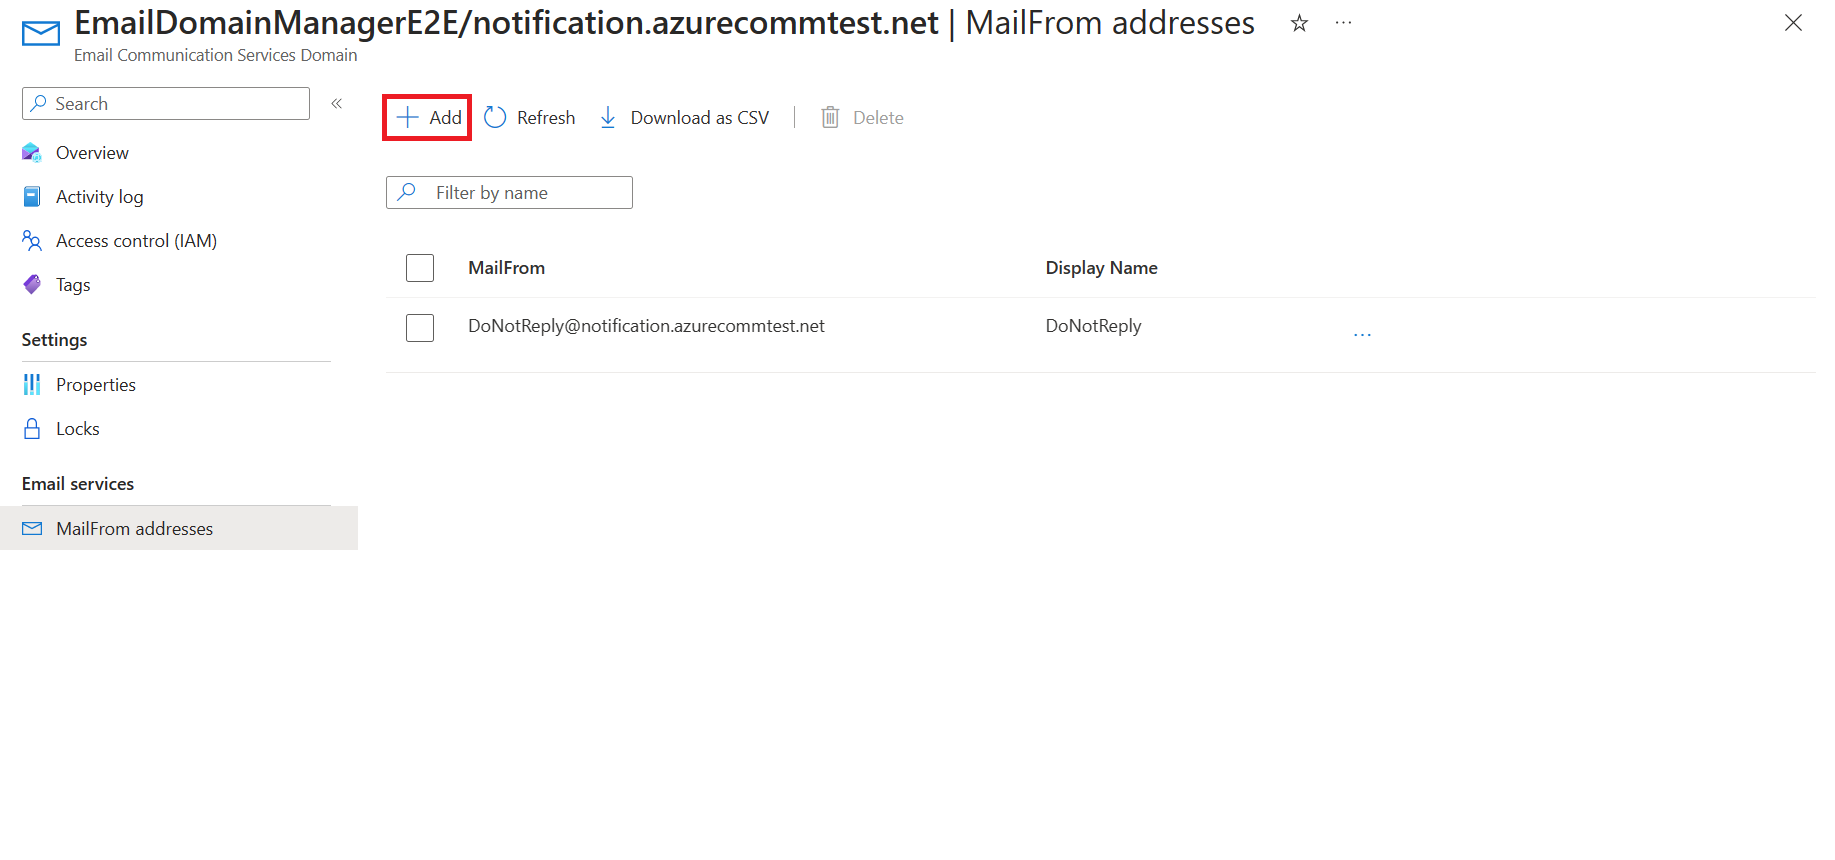
추가를 클릭합니다.
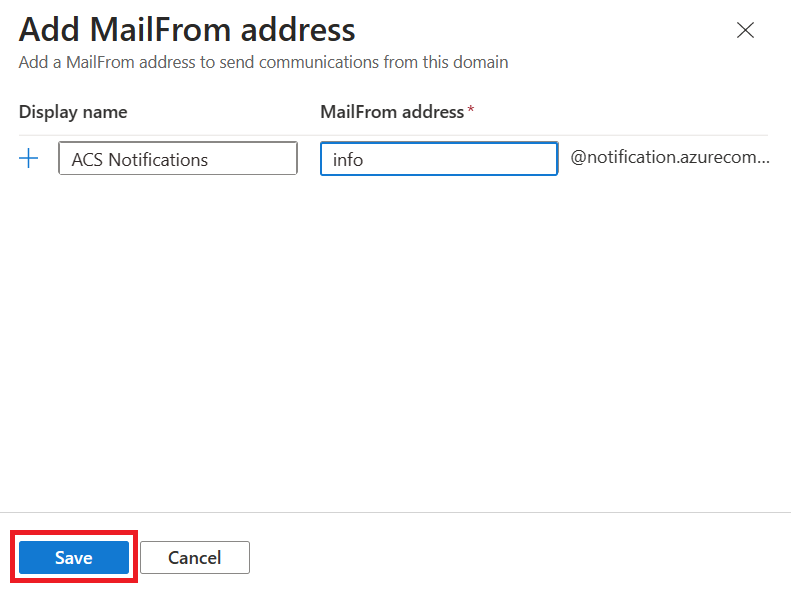
표시 이름 및 MailFrom 주소를 입력합니다. 저장을 클릭합니다.
개요 페이지에 새로 추가된 MailFrom 주소로 업데이트된 목록을 보려면 저장을 클릭하세요.
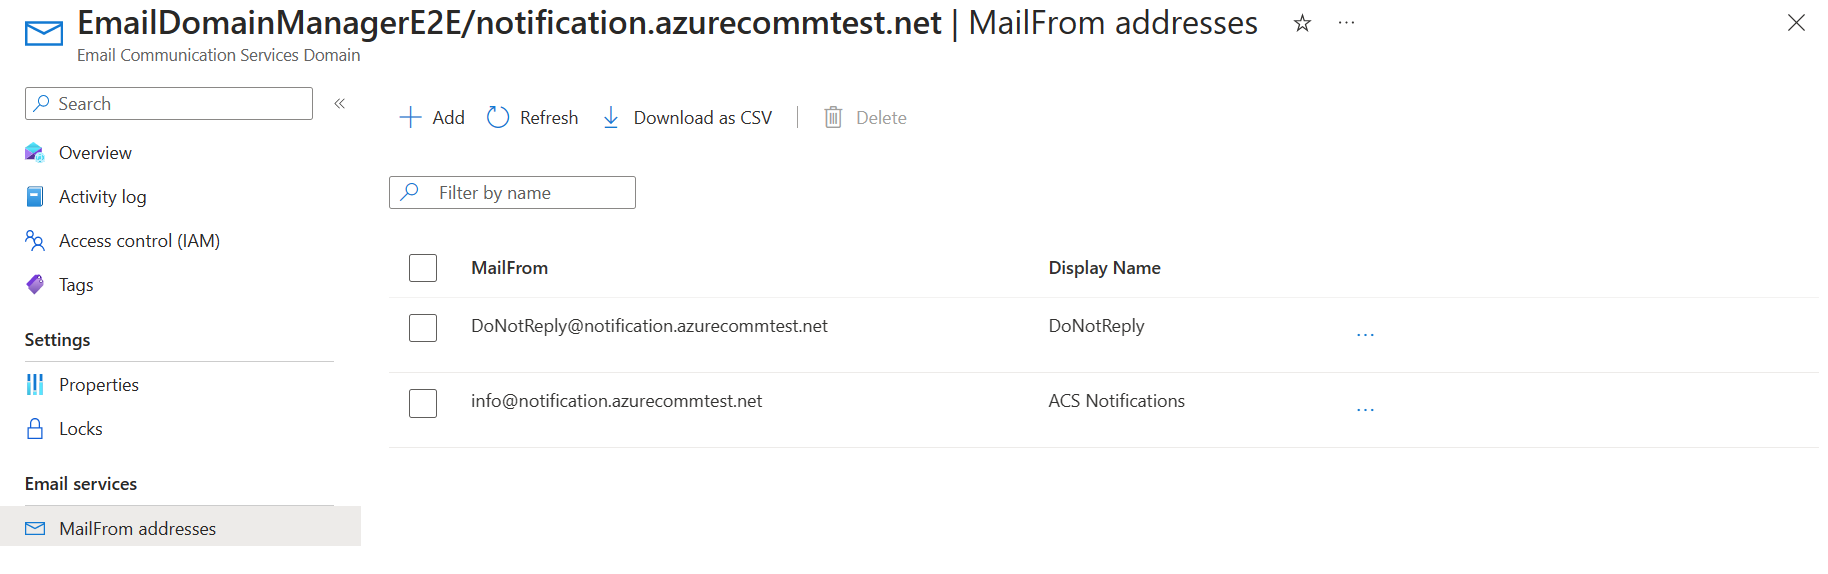


이제 메일 도메인은 MailFrom 주소가 추가된 메일을 보낼 준비가 되었습니다.
여러 보낸 사람 사용자 이름 제거
도메인 개요 페이지를 엽니다.
왼쪽 탐색 창에서 MailFrom 주소 링크를 클릭하여 MailFrom 주소 목록을 확인합니다.
제거해야 하는 MailFrom 주소를 선택하고 삭제를 클릭합니다.
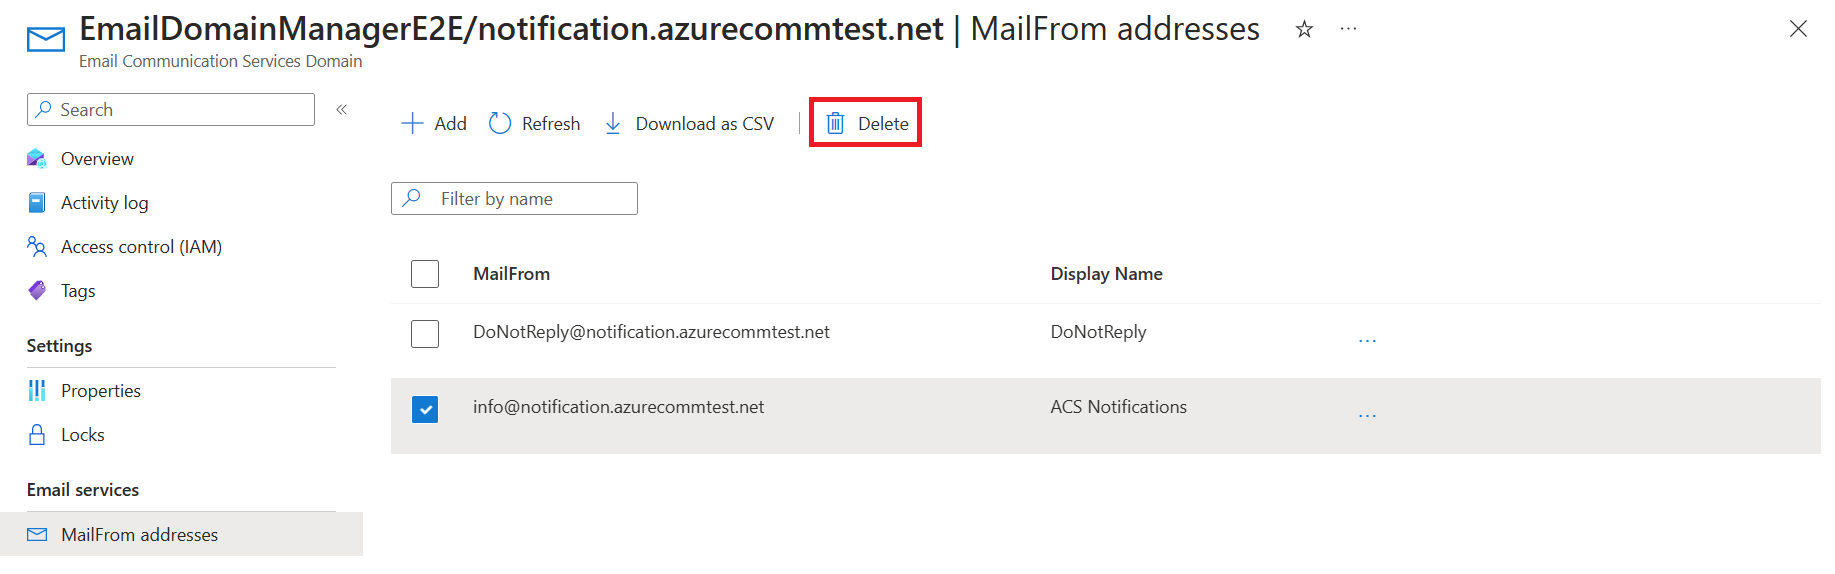
개요 페이지에서 업데이트된 MailFrom 주소 목록을 검토합니다.

필수 조건
- 활성 구독이 있는 Azure 계정. 체험 계정을 만듭니다.
- Azure CLI
- Azure Communication Services 메일 리소스가 만들어지고 도메인을 추가할 준비가 되었습니다. 메일 커뮤니케이션 리소스 만들기 시작을 참조하세요.
- 기본 전송 제한보다 높은 사용자 지정 도메인이 프로비전되고 준비되었습니다. 빠른 시작: 사용자 지정 확인된 메일 도메인을 추가하는 방법을 참조하세요.
보낸 사람 사용자 이름 리소스 만들기
보낸 사람 사용자 이름 리소스를 만들려면 Azure CLI에 로그인합니다. 터미널에서 az login 명령을 실행하고 자격 증명을 제공하여 로그인할 수 있습니다. 리소스를 만들려면 다음 명령을 실행합니다.
az communication email domain sender-username create --email-service-name "<EmailServiceName>" --resource-group "<resourceGroup>" --domain-name "contoso.com" --sender-username "contosoNewsAlerts" --username "contosoNewsAlerts"
특정 구독을 선택하려는 경우 --subscription 플래그를 지정하고 구독 ID를 제공할 수도 있습니다.
az communication email domain sender-username create --email-service-name "<EmailServiceName>" --resource-group "<resourceGroup>" --domain-name "contoso.com" --sender-username "contosoNewsAlerts" --username "contosoNewsAlerts" --subscription "<subscriptionId>"
다음 옵션을 사용하여 도메인 리소스를 구성할 수 있습니다.
- 리소스 그룹
- Email Communication Services 리소스의 이름입니다.
- 리소스가 연결되는 지리적 위치입니다.
- 도메인 리소스의 이름입니다.
- 보낸 사람 사용자 이름의 이름입니다.
- 사용자 이름의 이름입니다.
참고 항목
보낸 사람 사용자 이름과 사용자 이름은 동일해야 합니다.
보낸 사람 사용자 이름 리소스 관리
보낸 사람 사용자 이름 리소스에 표시 이름을 추가하거나 업데이트하려면 다음 명령을 실행합니다. 특정 구독을 대상으로 지정할 수도 있습니다.
az communication email domain sender-username update --email-service-name "<EmailServiceName>" --resource-group "<resourceGroup>" --domain-name "contoso.com" --sender-username "contosoNewsAlerts" --display-name "Contoso News Alerts"

az communication email domain sender-username update --email-service-name "<EmailServiceName>" --resource-group "<resourceGroup>" --domain-name "contoso.com" --sender-username "contosoNewsAlerts" --display-name "Contoso News Alerts" --subscription "<subscriptionId>"
특정 도메인의 모든 보낸 사람 사용자 이름 리소스를 나열하려면 다음 명령을 사용합니다.
az communication email domain sender-username list --email-service-name "<EmailServiceName>" --resource-group "<resourceGroup>" --domain-name "contoso.com"
지정된 리소스에 대한 모든 정보를 표시하려면 다음 명령을 사용합니다.
az communication email domain sender-username show --email-service-name "<EmailServiceName>" --resource-group "<resourceGroup>" --domain-name "contoso.com" --sender-username "contosoNewsAlerts"
보낸 사람 사용자 이름 리소스 정리
보낸 사람 사용자 이름 리소스를 정리하고 제거하려면 다음 명령을 실행하여 보낸 사람 사용자 이름 리소스를 삭제할 수 있습니다.
az communication email domain sender-username delete --email-service-name "<EmailServiceName>" --resource-group "<resourceGroup>" --domain-name "contoso.com" --sender-username "contosoNewsAlerts"
참고 항목
리소스 삭제는 영구적이며 리소스를 삭제하는 경우 이벤트 그리드 필터, 전화번호 또는 리소스에 연결된 기타 데이터를 포함한 데이터를 복구할 수 없습니다.
다른 명령에 대한 자세한 내용은 보낸 사람 사용자 이름 CLI를 참조하세요.
필수 조건
- 활성 구독이 있는 Azure 계정. 체험 계정을 만듭니다.
- 운영 체제에 대한 최신 버전의 .NET Core SDK.
- .NET ID SDK의 최신 버전을 가져옵니다.
- .NET 관리 SDK의 최신 버전을 가져옵니다.
SDK 설치
먼저 C# 프로젝트에 Communication Services 관리 SDK를 포함합니다.
using Azure.ResourceManager.Communication;
구독 ID
Azure 구독의 ID를 알아야 합니다. 이는 포털에서 가져올 수 있습니다.
- Azure 계정에 로그인
- 왼쪽 사이드바에서 구독 선택
- 필요한 구독 선택
- 개요 클릭
- 구독 ID 선택
이 빠른 시작에서는 AZURE_SUBSCRIPTION_ID라는 환경 변수에 구독 ID를 저장했다고 가정합니다.
인증
도메인 리소스와 통신하려면 먼저 Azure에 자신을 인증해야 합니다.
클라이언트 인증
인증된 클라이언트를 만드는 기본 옵션은 DefaultAzureCredential을 사용하는 것입니다. 모든 관리 API는 동일한 엔드포인트를 통과하므로 리소스와 상호 작용하려면 최상위 ArmClient를 하나만 만들면 됩니다.
Azure에 인증하고 ArmClient를 만들려면 다음 코드를 수행합니다.
using System;
using System.Threading.Tasks;
using Azure;
using Azure.Core;
using Azure.Identity;
using Azure.ResourceManager;
using Azure.ResourceManager.Communication;
using Azure.ResourceManager.Resources;
...
// get your azure access token, for more details of how Azure SDK get your access token, please refer to https://learn.microsoft.com/dotnet/azure/sdk/authentication?tabs=command-line
TokenCredential cred = new DefaultAzureCredential();
// authenticate your client
ArmClient client = new ArmClient(cred);
Azure 리소스와 상호 작용
이제 인증이 완료되었습니다.
다음 각 예에서는 보낸 사람 사용자 이름 리소스를 기존 도메인 리소스에 할당합니다.
이메일 통신 서비스를 만들어야 하는 경우 Azure Portal을 사용하여 만들 수 있으며, 도메인 리소스를 만들려면 Azure Portal을 사용하여 만들 수 있습니다.
보낸 사람 사용자 이름 리소스 만들기
보낸 사람 사용자 이름 리소스를 만들 때 리소스 그룹 이름, 이메일 통신 서비스 이름, 도메인 이름 및 리소스 이름을 지정해야 합니다.
// this example assumes you already have this CommunicationDomainResource created on azure
// for more information of creating CommunicationDomainResource, please refer to the document of CommunicationDomainResource
string subscriptionId = "aaaa0a0a-bb1b-cc2c-dd3d-eeeeee4e4e4e";
string resourceGroupName = "contosoResourceGroup";
string emailServiceName = "contosoEmailService";
string domainName = "contoso.com";
ResourceIdentifier communicationDomainResourceId = CommunicationDomainResource.CreateResourceIdentifier(subscriptionId, resourceGroupName, emailServiceName, domainName);
CommunicationDomainResource communicationDomainResource = client.GetCommunicationDomainResource(communicationDomainResourceId);

// get the collection of this SenderUsernameResource
SenderUsernameResourceCollection collection = communicationDomainResource.GetSenderUsernameResources();

// invoke the operation
string senderUsername = "contosoNewsAlerts";
SenderUsernameResourceData data = new SenderUsernameResourceData()
{
    Username = "contosoNewsAlerts",
    DisplayName = "Contoso News Alerts",
};
ArmOperation<SenderUsernameResource> lro = await collection.CreateOrUpdateAsync(WaitUntil.Completed, senderUsername, data);
SenderUsernameResource result = lro.Value;

// the variable result is a resource, you could call other operations on this instance as well
// but just for demo, we get its data from this resource instance
SenderUsernameResourceData resourceData = result.Data;
// for demo we just print out the id
Console.WriteLine($"Succeeded on id: {resourceData.Id}");
보낸 사람 사용자 이름 리소스 관리
도메인 리소스별로 나열
// this example assumes you already have this CommunicationDomainResource created on azure
// for more information of creating CommunicationDomainResource, please refer to the document of CommunicationDomainResource
string subscriptionId = "aaaa0a0a-bb1b-cc2c-dd3d-eeeeee4e4e4e";
string resourceGroupName = "contosoResourceGroup";
string emailServiceName = "contosoEmailService";
string domainName = "contoso.com";
ResourceIdentifier communicationDomainResourceId = CommunicationDomainResource.CreateResourceIdentifier(subscriptionId, resourceGroupName, emailServiceName, domainName);
CommunicationDomainResource communicationDomainResource = client.GetCommunicationDomainResource(communicationDomainResourceId);

// get the collection of this SenderUsernameResource
SenderUsernameResourceCollection collection = communicationDomainResource.GetSenderUsernameResources();

// invoke the operation and iterate over the result
await foreach (SenderUsernameResource item in collection.GetAllAsync())
{
    // the variable item is a resource, you could call other operations on this instance as well
    // but just for demo, we get its data from this resource instance
    SenderUsernameResourceData resourceData = item.Data;
    // for demo we just print out the id
    Console.WriteLine($"Succeeded on id: {resourceData.Id}");
}

Console.WriteLine($"Succeeded");
보낸 사람 사용자 이름 가져오기
// this example assumes you already have this CommunicationDomainResource created on azure
// for more information of creating CommunicationDomainResource, please refer to the document of CommunicationDomainResource
string subscriptionId = "aaaa0a0a-bb1b-cc2c-dd3d-eeeeee4e4e4e";
string resourceGroupName = "contosoResourceGroup";
string emailServiceName = "contosoEmailService";
string domainName = "contoso.com";
ResourceIdentifier communicationDomainResourceId = CommunicationDomainResource.CreateResourceIdentifier(subscriptionId, resourceGroupName, emailServiceName, domainName);
CommunicationDomainResource communicationDomainResource = client.GetCommunicationDomainResource(communicationDomainResourceId);

// get the collection of this SenderUsernameResource
SenderUsernameResourceCollection collection = communicationDomainResource.GetSenderUsernameResources();

// invoke the operation
string senderUsername = "contosoNewsAlerts";
bool result = await collection.ExistsAsync(senderUsername);

Console.WriteLine($"Succeeded: {result}");
보낸 사람 사용자 이름 리소스 정리
// this example assumes you already have this SenderUsernameResource created on azure
// for more information of creating SenderUsernameResource, please refer to the document of SenderUsernameResource
string subscriptionId = "aaaa0a0a-bb1b-cc2c-dd3d-eeeeee4e4e4e";
string resourceGroupName = "MyResourceGroup";
string emailServiceName = "MyEmailServiceResource";
string domainName = "contoso.com";
string senderUsername = "contosoNewsAlerts";
ResourceIdentifier senderUsernameResourceId = SenderUsernameResource.CreateResourceIdentifier(subscriptionId, resourceGroupName, emailServiceName, domainName, senderUsername);
SenderUsernameResource senderUsernameResource = client.GetSenderUsernameResource(senderUsernameResourceId);

// invoke the operation
await senderUsernameResource.DeleteAsync(WaitUntil.Completed);

Console.WriteLine($"Succeeded");
참고 항목
리소스 삭제는 영구적이며 리소스를 삭제하는 경우 이벤트 그리드 필터, 전화번호 또는 리소스에 연결된 기타 데이터를 포함한 데이터를 복구할 수 없습니다.
필수 조건
- 활성 구독이 있는 Azure 계정. 체험 계정을 만듭니다.
- Azure Az PowerShell 모듈 설치
- Azure Communication Services 메일 리소스가 만들어지고 도메인을 추가할 준비가 되었습니다. 메일 커뮤니케이션 리소스 만들기 시작을 참조하세요.
- 기본 전송 제한보다 높은 사용자 지정 도메인이 프로비전되고 준비되었습니다. 빠른 시작: 사용자 지정 확인된 메일 도메인을 추가하는 방법을 참조하세요.
보낸 사람 사용자 이름 리소스 만들기
보낸 사람 사용자 이름 리소스를 만들려면 다음 명령을 사용하여 Connect-AzAccount를 사용하여 Azure 계정에 로그인하고 자격 증명을 제공합니다.
PS C:\> Connect-AzAccount
먼저 다음 명령을 사용하여 Azure Communication Services 모듈 Az.Communication을 설치해야 합니다.
PS C:\> Install-Module Az.Communication
사용자 지정 도메인에 대한 보낸 사람 사용자 이름을 만들려면 다음 명령을 실행합니다.
PS C:\> New-AzEmailServiceSenderUsername -ResourceGroupName ContosoResourceProvider1 -EmailServiceName ContosoEmailServiceResource1 -DomainName contoso.com -SenderUsername test -Username test
특정 구독을 선택하려면 --subscription 플래그를 지정하고 구독 ID를 제공할 수도 있습니다.
PS C:\> New-AzEmailServiceSenderUsername -ResourceGroupName ContosoResourceProvider1 -EmailServiceName ContosoEmailServiceResource1 -DomainName contoso.com -SenderUsername test -Username test -SubscriptionId SubscriptionID
다음 옵션을 사용하여 도메인 리소스를 구성할 수 있습니다.
- 리소스 그룹
- Email Communication Services 리소스의 이름입니다.
- 도메인 리소스의 이름입니다.
- 보낸 사람 사용자 이름의 이름입니다.
- 사용자 이름의 이름입니다.
참고 항목
보낸 사람 사용자 이름과 사용자 이름은 동일해야 합니다.
보낸 사람 사용자 이름 리소스 관리
보낸 사람 사용자 이름 리소스에 표시 이름을 추가하거나 업데이트하려면 다음 명령을 실행합니다. 특정 구독을 대상으로 지정할 수도 있습니다.
PS C:\> Update-AzEmailServiceSenderUsername -ResourceGroupName ContosoResourceProvider1 -EmailServiceName ContosoEmailServiceResource1 -DomainName contoso.com -SenderUsername test -Username test -DisplayName testdisplayname

PS C:\> Update-AzEmailServiceSenderUsername -ResourceGroupName ContosoResourceProvider1 -EmailServiceName ContosoEmailServiceResource1 -DomainName contoso.com -SenderUsername test -Username test -DisplayName testdisplayname -SubscriptionId SubscriptionID
특정 도메인의 모든 보낸 사람 사용자 이름 리소스를 나열하려면 다음 명령을 사용합니다.
PS C:\> Get-AzEmailServiceSenderUsername -ResourceGroupName ContosoResourceProvider1 -EmailServiceName ContosoEmailServiceResource1 -DomainName contoso.com
지정된 리소스에 대한 모든 정보를 나열하려면 다음 명령을 사용합니다.
PS C:\> Get-AzEmailServiceSenderUsername -ResourceGroupName ContosoResourceProvider1 -EmailServiceName ContosoEmailServiceResource1 -DomainName contoso.com -SenderUsername test
보낸 사람 사용자 이름 리소스 정리
보낸 사람 사용자 이름 리소스를 정리하고 제거하려면 다음 명령을 실행하여 보낸 사람 사용자 이름 리소스를 삭제할 수 있습니다.
PS C:\> Remove-AzEmailServiceSenderUsername -ResourceGroupName ContosoResourceProvider1 -EmailServiceName ContosoEmailServiceResource1 -DomainName contoso.com -SenderUsername test
참고 항목
리소스 삭제는 영구적이며 리소스를 삭제하는 경우 이벤트 그리드 필터, 전화번호 또는 리소스에 연결된 기타 데이터를 포함한 데이터를 복구할 수 없습니다.
다음 단계
관련된 문서
- 이메일 클라이언트 라이브러리 숙지
- 빠른 시작: 사용자 지정 확인 메일 도메인을 추가하는 방법에서 사용자 지정 확인 도메인으로 메일을 보내는 방법을 알아봅니다.