자습서: Azure Functions 및 Azure Web PubSub 서비스를 사용하여 서버리스 알림 앱 만들기
이 문서의 내용
Azure Web PubSub 서비스를 사용하면 WebSocket을 사용하여 실시간 메시징 웹 애플리케이션을 쉽게 빌드할 수 있습니다. Azure Functions는 인프라를 관리하지 않고 코드를 실행할 수 있는 서버리스 플랫폼입니다. 이 자습서에서는 Azure Web PubSub 서비스 및 Azure Functions를 사용하여 알림 시나리오의 실시간 메시징과 함께 서버리스 애플리케이션을 빌드하는 방법을 알아봅니다.
이 자습서에서는 다음을 하는 방법을 알아볼 수 있습니다.
서버리스 알림 앱 빌드
Web PubSub 함수 입력 및 출력 바인딩 작업
로컬로 샘플 함수 실행
Azure Function 앱에 함수 배포
Important
원시 연결 문자열 데모용으로만 이 문서에 표시됩니다.
연결 문자열에는 애플리케이션이 Azure Web PubSub 서비스에 액세스하는 데 필요한 권한 부여 정보가 포함됩니다. 연결 문자열 내의 액세스 키는 서비스의 루트 암호와 비슷합니다. 프로덕션 환경에서는 항상 액세스 키를 보호합니다. Azure Key Vault를 사용하여 키를 안전하게 관리 및 회전하고 연결을 WebPubSubServiceClient 보호합니다.
액세스 키를 다른 사용자에게 배포하거나 하드 코딩하거나 다른 사용자가 액세스할 수 있는 일반 텍스트로 저장하지 않도록 합니다. 키가 손상되었다고 생각되면 키를 교체하세요.
필수 조건
Azure를 구독 하고 있지 않다면 시작하기 전에 Azure 체험 계정 을 만듭니다.
Azure에 로그인
Azure 계정을 사용하여 https://portal.azure.com/ 에서 Azure Portal에 로그인합니다.
Azure Web PubSub 서비스 인스턴스 만들기
애플리케이션이 Azure의 Web PubSub 서비스 인스턴스에 연결됩니다.
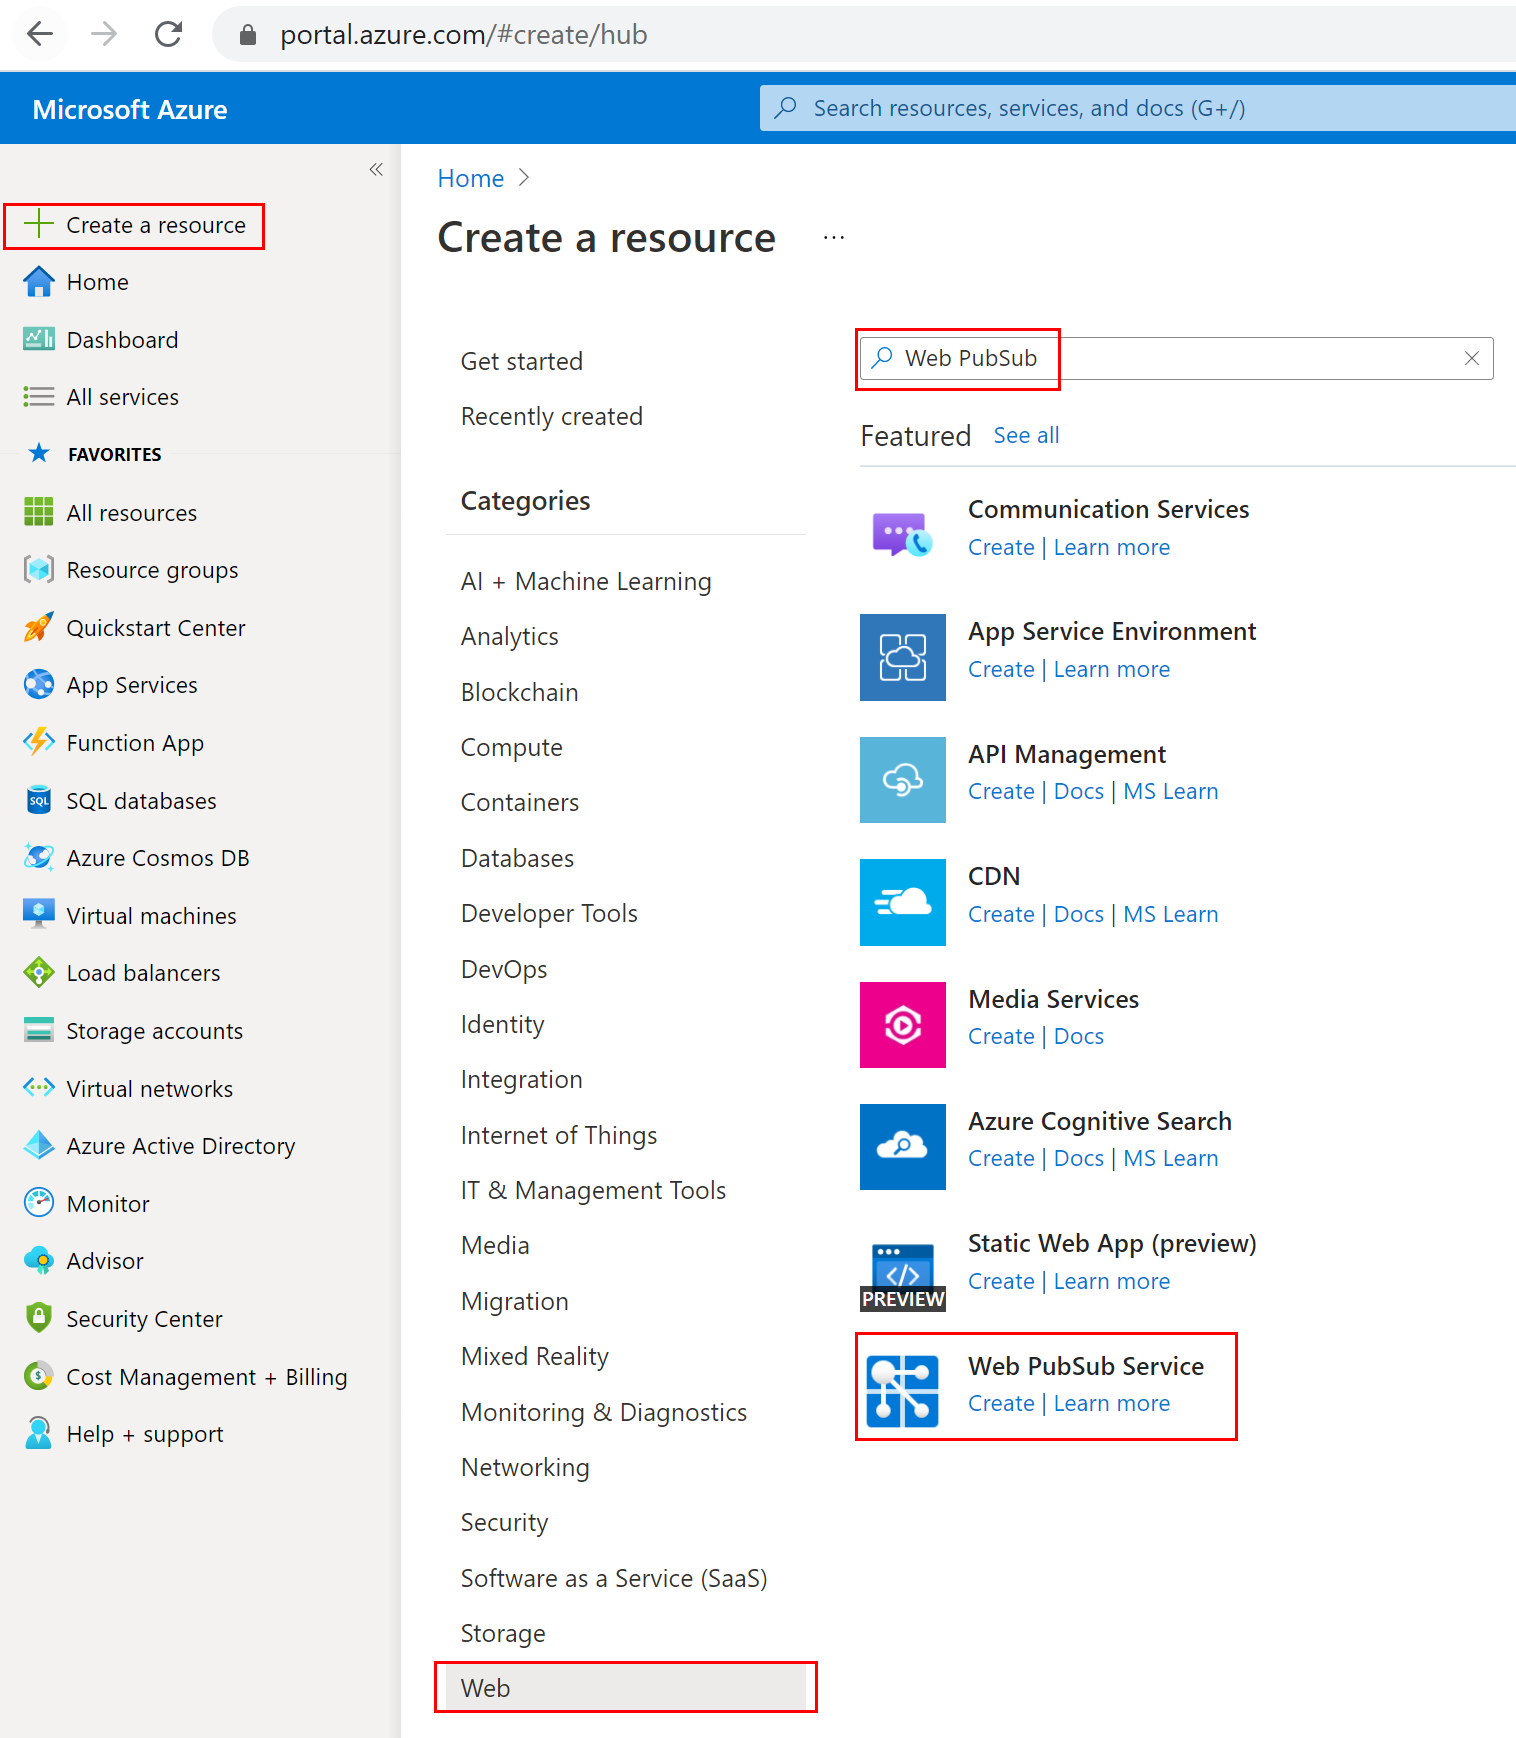
Azure Portal의 왼쪽 위에 있는 새로 만들기 단추를 선택합니다. 새 화면의 검색 상자에서 Web PubSub 를 입력하고 Enter를 누릅니다. (Web 범주에서 Azure Web PubSub를 검색할 수도 있습니다.)
검색 결과에서 Web PubSub 를 선택한 다음, 만들기 를 선택합니다.
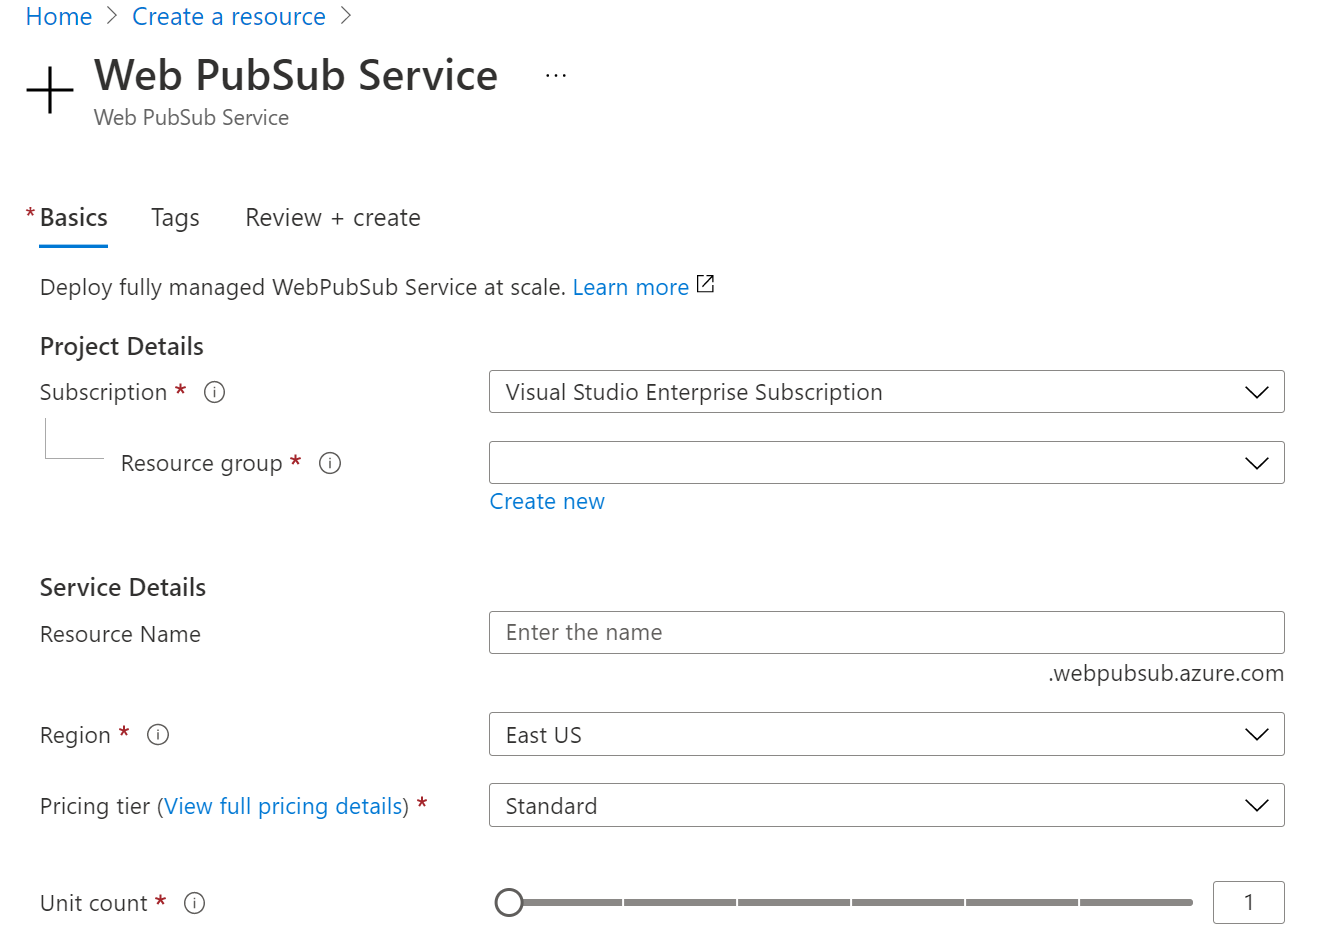
다음 설정을 입력합니다.
설정
제안 값
설명
리소스 이름
전역적으로 고유한 이름
새 Web PubSub 서비스 인스턴스를 식별하는 전역적으로 고유한 이름입니다. 유효한 문자는 a-z, A-Z, 0-9 및 -입니다.
구독
구독
이 새 Web PubSub 서비스 인스턴스가 생성되는 Azure 구독입니다.
리소스 그룹
myResourceGroup
Web PubSub 서비스 인스턴스를 만들 새 리소스 그룹의 이름입니다.
위치
미국 서부
가까운 지역 을 선택합니다.
가격 책정 계층
Free
먼저 Azure Web PubSub 서비스 평가판을 사용할 수 있습니다.
Azure Web PubSub 서비스 가격 책정 계층 에 대해 자세히 알아보세요.
단위 수
-
단위 수는 Web PubSub 서비스 인스턴스가 허용할 수 있는 연결 수를 지정합니다. 각 단위는 최대 1,000개의 동시 연결을 지원합니다. 표준 계층에서만 구성할 수 있습니다.
만들기 를 선택하여 Web PubSub 서비스 인스턴스 배포를 시작하세요.
로컬로 함수 만들기 및 실행
Azure Functions Core Tools 가 설치되어 있는지 확인합니다. 이제 프로젝트에 대한 빈 디렉터리를 만듭니다. 이 작업 디렉터리 아래에서 명령을 실행합니다. 아래의 지정된 옵션 중 하나를 사용합니다.
func init --worker-runtime javascript --model V4
func init --worker-runtime javascript --model V3
func init --worker-runtime dotnet
func init --worker-runtime dotnet-isolated
func init --worker-runtime python --model V1
다음 단계에 따라 Microsoft.Azure.WebJobs.Extensions.WebPubSub을 설치합니다.
Web PubSub 지원을 가져오려면 host.json의 extensionBundle을 확인하거나 버전 4.* 이상으로 업데이트합니다.
host.json을 업데이트하려면 편집기에서 파일을 연 다음, 기존 버전 extensionBundle을 버전 4.* 이상으로 바꿉니다.
{
    "extensionBundle": {
        "id": "Microsoft.Azure.Functions.ExtensionBundle",
        "version": "[4.*, 5.0.0)"
    }
}
Web PubSub 지원을 가져오려면 host.json의 extensionBundle을 확인하거나 버전 3.3.0 이상으로 업데이트합니다.
host.json을 업데이트하려면 편집기에서 파일을 연 다음, 기존 버전 extensionBundle을 버전 3.3.0 이상으로 바꿉니다.
{
    "extensionBundle": {
        "id": "Microsoft.Azure.Functions.ExtensionBundle",
        "version": "[3.3.*, 4.0.0)"
    }
}
dotnet add package Microsoft.Azure.WebJobs.Extensions.WebPubSub
dotnet add package Microsoft.Azure.Functions.Worker.Extensions.WebPubSub --prerelease
Web PubSub 지원을 가져오려면 host.json의 extensionBundle을 버전 3.3.0 이상으로 업데이트합니다.
host.json을 업데이트하려면 편집기에서 파일을 연 다음, 기존 버전 extensionBundle을 버전 3.3.0 이상으로 바꿉니다.
{
    "extensionBundle": {
        "id": "Microsoft.Azure.Functions.ExtensionBundle",
        "version": "[3.3.*, 4.0.0)"
    }
}
클라이언트에 대한 정적 웹 페이지를 읽고 호스팅하는 index 함수를 만듭니다.
func new -n index -t HttpTrigger
src/functions/index.js를 업데이트하고 다음 코드를 복사합니다.
const { app } = require('@azure/functions');
const { readFile } = require('fs/promises');

app.http('index', {
    methods: ['GET', 'POST'],
    authLevel: 'anonymous',
    handler: async (context) => {
        const content = await readFile('index.html', 'utf8', (err, data) => {
            if (err) {
                context.err(err)
                return
            }
        });

        return {
            status: 200,
            headers: {
                'Content-Type': 'text/html'
            },
            body: content,
        };
    }
});
index/function.json을 업데이트하고 다음 json 코드를 복사합니다.
{
  "bindings": [
    {
      "authLevel": "anonymous",
      "type": "httpTrigger",
      "direction": "in",
      "name": "req",
      "methods": [
        "get",
        "post"
      ]
    },
    {
      "type": "http",
      "direction": "out",
      "name": "res"
    }
  ]
}
index/index.js를 업데이트하고 다음 코드를 복사합니다.
var fs = require('fs');
var path = require('path');

module.exports = function (context, req) {
    var index = context.executionContext.functionDirectory + '/../index.html';
    context.log("index.html path: " + index);
    fs.readFile(index, 'utf8', function (err, data) {
        if (err) {
            console.log(err);
            context.done(err);
        }
        context.res = {
            status: 200,
            headers: {
                'Content-Type': 'text/html'
            },
            body: data
        };
        context.done();
    });
}
index.cs를 업데이트하고 Run 함수를 다음 코드로 바꿉니다.
[FunctionName("index")]
public static IActionResult Run([HttpTrigger(AuthorizationLevel.Anonymous)] HttpRequest req, ExecutionContext context, ILogger log)
{
    var indexFile = Path.Combine(context.FunctionAppDirectory, "index.html");
    log.LogInformation($"index.html path: {indexFile}.");
    return new ContentResult
    {
        Content = File.ReadAllText(indexFile),
        ContentType = "text/html",
    };
}
index.cs를 업데이트하고 Run 함수를 다음 코드로 바꿉니다.
[Function("index")]
public HttpResponseData Run([HttpTrigger(AuthorizationLevel.Anonymous, "get", "post")] HttpRequestData req, FunctionContext context)
{
    var path = Path.Combine(context.FunctionDefinition.PathToAssembly, "../index.html");
    _logger.LogInformation($"index.html path: {path}.");

    var response = req.CreateResponse();
    response.WriteString(File.ReadAllText(path));
    response.Headers.Add("Content-Type", "text/html");
    return response;
}
index/function.json을 업데이트하고 다음 json 코드를 복사합니다.
{
  "scriptFile": "__init__.py",
  "bindings": [
    {
      "authLevel": "anonymous",
      "type": "httpTrigger",
      "direction": "in",
      "name": "req",
      "methods": [
        "get",
        "post"
      ]
    },
    {
      "type": "http",
      "direction": "out",
      "name": "$return"
    }
  ]
}
index/__init__.py를 업데이트하고 다음 코드를 복사합니다.
import os

import azure.functions as func

def main(req: func.HttpRequest) -> func.HttpResponse:
    f = open(os.path.dirname(os.path.realpath(__file__)) + '/../index.html')
    return func.HttpResponse(f.read(), mimetype='text/html')
클라이언트가 액세스 토큰과 함께 서비스 연결 URL을 얻을 수 있도록 negotiate 함수를 만듭니다.
func new -n negotiate -t HttpTrigger
src/functions/negotiate.js를 업데이트하고 다음 코드를 복사합니다.
const { app, input } = require('@azure/functions');

const connection = input.generic({
    type: 'webPubSubConnection',
    name: 'connection',
    hub: 'notification'
});

app.http('negotiate', {
    methods: ['GET', 'POST'],
    authLevel: 'anonymous',
    extraInputs: [connection],
    handler: async (request, context) => {
        return { body: JSON.stringify(context.extraInputs.get('connection')) };
    },
});
negotiate/function.json을 업데이트하고 다음 json 코드를 복사합니다.
{
  "bindings": [
    {
      "authLevel": "anonymous",
      "type": "httpTrigger",
      "direction": "in",
      "name": "req"
    },
    {
      "type": "http",
      "direction": "out",
      "name": "res"
    },
    {
      "type": "webPubSubConnection",
      "name": "connection",
      "hub": "notification",
      "direction": "in"
    }
  ]
}
폴더 협상 및 업데이트 negotiate/index.js를 만들고 다음 코드를 복사합니다.
module.exports = function (context, req, connection) {
    context.res = { body: connection };
    context.done();
};
negotiate.cs를 업데이트하고 Run 함수를 다음 코드로 바꿉니다.
[FunctionName("negotiate")]
public static WebPubSubConnection Run(
    [HttpTrigger(AuthorizationLevel.Anonymous, "get", "post", Route = null)] HttpRequest req,
    [WebPubSubConnection(Hub = "notification")] WebPubSubConnection connection,
    ILogger log)
{
    log.LogInformation("Connecting...");

    return connection;
}
필요한 종속성을 해결하려면 헤더에 using 문을 추가합니다.
using Microsoft.Azure.WebJobs.Extensions.WebPubSub;
negotiate.cs를 업데이트하고 Run 함수를 다음 코드로 바꿉니다.
[Function("negotiate")]
public HttpResponseData Run([HttpTrigger(AuthorizationLevel.Anonymous, "get", "post")] HttpRequestData req,
    [WebPubSubConnectionInput(Hub = "notification")] WebPubSubConnection connectionInfo)
{
    var response = req.CreateResponse(HttpStatusCode.OK);
    response.WriteAsJsonAsync(connectionInfo);
    return response;
}
폴더 협상 및 업데이트 negotiate/function.json를 만들고 다음 json 코드를 복사합니다.
{
  "scriptFile": "__init__.py",
  "bindings": [
    {
      "authLevel": "anonymous",
      "type": "httpTrigger",
      "direction": "in",
      "name": "req"
    },
    {
      "type": "http",
      "direction": "out",
      "name": "$return"
    },
    {
      "type": "webPubSubConnection",
      "name": "connection",
      "hub": "notification",
      "direction": "in"
    }
  ]
}
negotiate/__init__.py를 업데이트하고 다음 코드를 복사합니다.
import logging

import azure.functions as func


def main(req: func.HttpRequest, connection) -> func.HttpResponse:
    return func.HttpResponse(connection)
TimerTrigger를 사용하여 알림을 생성하도록 notification 함수를 만듭니다.
func new -n notification -t TimerTrigger
src/functions/notification.js를 업데이트하고 다음 코드를 복사합니다.
const { app, output } = require('@azure/functions');

const wpsAction = output.generic({
    type: 'webPubSub',
    name: 'action',
    hub: 'notification'
});

app.timer('notification', {
    schedule: "*/10 * * * * *",
    extraOutputs: [wpsAction],
    handler: (myTimer, context) => {
        context.extraOutputs.set(wpsAction, {
            actionName: 'sendToAll',
            data: `[DateTime: ${new Date()}] Temperature: ${getValue(22, 1)}\xB0C, Humidity: ${getValue(40, 2)}%`,
            dataType: 'text',
        });
    },
});

function getValue(baseNum, floatNum) {
    return (baseNum + 2 * floatNum * (Math.random() - 0.5)).toFixed(3);
}
notification/function.json을 업데이트하고 다음 json 코드를 복사합니다.
{
  "bindings": [
    {
      "name": "myTimer",
      "type": "timerTrigger",
      "direction": "in",
      "schedule": "*/10 * * * * *"
    },
    {
      "type": "webPubSub",
      "name": "actions",
      "hub": "notification",
      "direction": "out"
    }
  ]
}
notification/index.js를 업데이트하고 다음 코드를 복사합니다.
module.exports = function (context, myTimer) {
    context.bindings.actions = {
        "actionName": "sendToAll",
        "data": `[DateTime: ${new Date()}] Temperature: ${getValue(22, 1)}\xB0C, Humidity: ${getValue(40, 2)}%`,
        "dataType": "text"
    }
    context.done();
};

function getValue(baseNum, floatNum) {
    return (baseNum + 2 * floatNum * (Math.random() - 0.5)).toFixed(3);
}
notification.cs를 업데이트하고 Run 함수를 다음 코드로 바꿉니다.
[FunctionName("notification")]
public static async Task Run([TimerTrigger("*/10 * * * * *")]TimerInfo myTimer, ILogger log,
    [WebPubSub(Hub = "notification")] IAsyncCollector<WebPubSubAction> actions)
{
    await actions.AddAsync(new SendToAllAction
    {
        Data = BinaryData.FromString($"[DateTime: {DateTime.Now}] Temperature: {GetValue(23, 1)}{'\xB0'}C, Humidity: {GetValue(40, 2)}%"),
        DataType = WebPubSubDataType.Text
    });
}

private static string GetValue(double baseNum, double floatNum)
{
    var rng = new Random();
    var value = baseNum + floatNum * 2 * (rng.NextDouble() - 0.5);
    return value.ToString("0.000");
}
필요한 종속성을 해결하려면 헤더에 using 문을 추가합니다.
using System.Threading.Tasks;
using Microsoft.Azure.WebJobs.Extensions.WebPubSub;
using Microsoft.Azure.WebPubSub.Common;
notification.cs를 업데이트하고 Run 함수를 다음 코드로 바꿉니다.
[Function("notification")]
[WebPubSubOutput(Hub = "notification")]
public SendToAllAction Run([TimerTrigger("*/10 * * * * *")] MyInfo myTimer)
{
    return new SendToAllAction
    {
        Data = BinaryData.FromString($"[DateTime: {DateTime.Now}] Temperature: {GetValue(23, 1)}{'\xB0'}C, Humidity: {GetValue(40, 2)}%"),
        DataType = WebPubSubDataType.Text
    };
}

private static string GetValue(double baseNum, double floatNum)
{
    var rng = new Random();
    var value = baseNum + floatNum * 2 * (rng.NextDouble() - 0.5);
    return value.ToString("0.000");
}
폴더 알림 및 업데이트 notification/function.json를 만들고 다음 json 코드를 복사합니다.
{
  "scriptFile": "__init__.py",
  "bindings": [
    {
      "name": "myTimer",
      "type": "timerTrigger",
      "direction": "in",
      "schedule": "*/10 * * * * *"
    },
    {
      "type": "webPubSub",
      "name": "actions",
      "hub": "notification",
      "direction": "out"
    }
  ]
}
notification/__init__.py를 업데이트하고 다음 코드를 복사합니다.
import datetime
import random
import json

import azure.functions as func

def main(myTimer: func.TimerRequest, actions: func.Out[str]) -> None:
    time = datetime.datetime.now().strftime("%A %d-%b-%Y %H:%M:%S")
    actions.set(json.dumps({
        'actionName': 'sendToAll',
        'data': '\x5B DateTime: {0} \x5D Temperature: {1:.3f} \xB0C, Humidity: {2:.3f} \x25'.format(time, 22 + 2 * (random.random() - 0.5), 44 + 4 * (random.random() - 0.5)),
        'dataType': 'text'
    }))
프로젝트 루트 폴더에서 클라이언트 단일 페이지(index.html)를 추가하고 콘텐츠를 복사합니다.
<html>
    <body>
    <h1>Azure Web PubSub Notification</h1>
    <div id="messages"></div>
    <script>
        (async function () {
            let messages = document.querySelector('#messages');
            let res = await fetch(`${window.location.origin}/api/negotiate`);
            let url = await res.json();
            let ws = new WebSocket(url.url);
            ws.onopen = () => console.log('connected');

            ws.onmessage = event => {
                let m = document.createElement('p');
                m.innerText = event.data;
                messages.appendChild(m);
            };
        })();
    </script>
    </body>
</html>
C# 프로젝트는 파일을 다른 출력 폴더로 컴파일하므로 콘텐츠 페이지가 포함되도록 *.csproj를 업데이트해야 합니다.
<ItemGroup>
    <None Update="index.html">
        <CopyToOutputDirectory>PreserveNewest</CopyToOutputDirectory>
    </None>
</ItemGroup>
C# 프로젝트는 파일을 다른 출력 폴더로 컴파일하므로 콘텐츠 페이지가 포함되도록 *.csproj를 업데이트해야 합니다.
<ItemGroup>
    <None Update="index.html">
        <CopyToOutputDirectory>PreserveNewest</CopyToOutputDirectory>
    </None>
</ItemGroup>
Azure 함수 앱을 구성하고 실행합니다.
원시 연결 문자열 데모용으로만 이 문서에 표시됩니다. 프로덕션 환경에서는 항상 액세스 키를 보호합니다. Azure Key Vault를 사용하여 키를 안전하게 관리 및 회전하고 연결을 WebPubSubServiceClient 보호합니다.
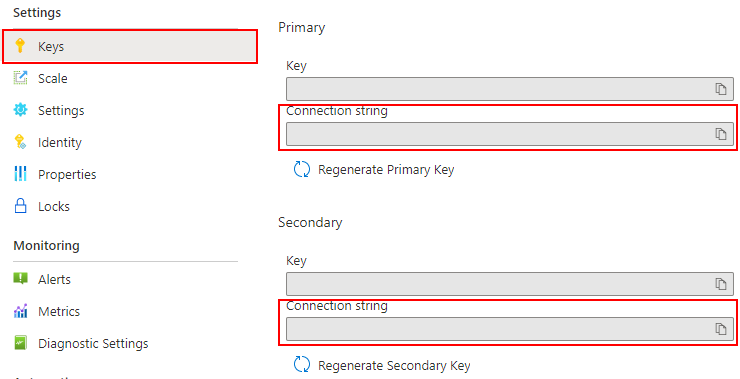
브라우저에서 Azure Portal 을 열고 이전에 배포한 Web PubSub 서비스 인스턴스가 성공적으로 만들어졌는지 확인합니다. 인스턴스로 이동합니다.
키 를 선택하고 연결 문자열을 복사합니다.
함수 폴더의 명령을 실행하여 서비스 연결 문자열을 설정합니다. 필요에 따라 <connection-string>을 해당 값으로 바꿉니다.
func settings add WebPubSubConnectionString "<connection-string>"
참고 항목
샘플에 사용된 TimerTrigger에 Azure Storage에 대한 종속성이 있지만 함수가 로컬로 실행될 때 로컬 스토리지 에뮬레이터를 사용할 수 있습니다.
There was an error performing a read operation on the Blob Storage Secret Repository. Please ensure the 'AzureWebJobsStorage' connection string is valid.와 같은 오류가 표시되면 스토리지 에뮬레이터 를 다운로드하고 사용하도록 설정해야 합니다.
이제 명령으로 로컬 함수를 실행할 수 있습니다.
func start --port 7071
실행 중인 로그를 확인하고 http://localhost:7071/api/index를 방문하여 로컬 호스트 정적 페이지를 방문할 수 있습니다.
참고 항목
일부 브라우저는 자동으로 잘못된 URL로 https 리디렉션됩니다.
Edge 사용을 제안하고 렌더링이 성공하지 못한 경우 URL을 다시 확인합니다.
Azure에 함수 앱 배포
함수 코드를 Azure에 배포하기 전에 다음 세 가지 리소스를 만들어야 합니다.
리소스 그룹 - 관련 리소스에 대한 논리 컨테이너입니다.
스토리지 계정 - 함수에 대한 상태 및 기타 정보를 유지 관리합니다.
함수 앱 - 함수 코드를 실행할 수 있는 환경을 제공합니다. 함수 앱은 로컬 함수 프로젝트에 매핑되며, 함수를 논리적 단위로 그룹화하여 리소스를 더 쉽게 관리, 배포 및 공유할 수 있습니다.
다음 명령을 사용하여 이러한 항목을 만듭니다.
Azure에 로그인:
az login
리소스 그룹을 만들거나, Azure Web PubSub 서비스 중 하나를 다시 사용하여 건너뛸 수 있습니다.
az group create -n WebPubSubFunction -l <REGION>
범용 스토리지 계정을 리소스 그룹 및 지역에 만듭니다.
az storage account create -n <STORAGE_NAME> -l <REGION> -g WebPubSubFunction
Azure에서 함수 앱을 만듭니다.
az functionapp create --resource-group WebPubSubFunction --consumption-plan-location <REGION> --runtime node --runtime-version 18 --functions-version 4 --name <FUNCIONAPP_NAME> --storage-account <STORAGE_NAME>
az functionapp create --resource-group WebPubSubFunction --consumption-plan-location <REGION> --runtime node --runtime-version 18 --functions-version 4 --name <FUNCIONAPP_NAME> --storage-account <STORAGE_NAME>
az functionapp create --resource-group WebPubSubFunction --consumption-plan-location <REGION> --runtime dotnet --functions-version 4 --name <FUNCIONAPP_NAME> --storage-account <STORAGE_NAME>
az functionapp create --resource-group WebPubSubFunction --consumption-plan-location <REGION> --runtime dotnet-isolated --functions-version 4 --name <FUNCIONAPP_NAME> --storage-account <STORAGE_NAME>
az functionapp create --resource-group WebPubSubFunction --consumption-plan-location <REGION> --runtime python --runtime-version 3.9 --functions-version 4 --name <FUNCIONAPP_NAME> --os-type linux --storage-account <STORAGE_NAME>
함수 프로젝트를 Azure에 배포합니다.
Azure에서 함수 앱을 성공적으로 만들었으면 이제 func azure functionapp publish 명령을 사용하여 로컬 함수 프로젝트를 배포할 준비가 되었습니다.
func azure functionapp publish <FUNCIONAPP_NAME> --publish-local-settings
참고 항목
여기서는 로컬 설정(local.settings.json)을 명령 매개 변수(--publish-local-settings)와 함께 배포합니다. Microsoft Azure Storage 에뮬레이터를 사용하는 경우 프롬프트 메시지(App setting AzureWebJobsStorage is different between azure and local.settings.json, Would you like to overwrite value in azure? [yes/no/show])에 따라 Azure에서 이 값의 덮어쓰기를 건너뛰려면 no를 입력할 수 있습니다. 또한 Azure Portal ->설정 ->구성 에서 함수 앱 설정을 업데이트할 수 있습니다.
이제 https://<FUNCIONAPP_NAME>.azurewebsites.net/api/index URL로 이동하여 Azure Function App에서 사이트를 확인할 수 있습니다.
리소스 정리
이 앱을 계속 사용하지 않으려면 다음 단계에 따라 이 문서에서 만든 리소스를 모두 삭제하세요. 요금은 발생되지 않습니다.
Azure Portal에서 맨 왼쪽에 있는 리소스 그룹 을 선택한 다음, 만든 리소스 그룹을 선택합니다. 대신 검색 상자를 사용하여 이름으로 리소스 그룹을 찾을 수 있습니다.
열린 창에서 리소스 그룹을 선택한 다음, 리소스 그룹 삭제 를 선택합니다.
새 창에서 삭제할 리소스 그룹의 이름을 입력한 다음, 삭제 를 선택합니다.
다음 단계
이 빠른 시작에서는 서버리스 채팅 애플리케이션을 실행하는 방법을 알아보았습니다. 이제 자체 애플리케이션을 빌드할 수 있습니다.