Python에서 릴레이 하이브리드 연결 WebSocket 요청 시작
이 빠른 시작에서는 WebSocket 프로토콜을 사용하여 메시지를 보내고 받는 Python 보낸 사람 및 수신자 애플리케이션을 만듭니다. 애플리케이션은 Azure Relay 하이브리드 연결 기능을 사용합니다. Azure Relay에 대한 일반적인 내용은 Azure Relay를 참조하세요.
이 빠른 시작에서 수행하는 단계는 다음과 같습니다.
- Azure Portal을 사용하여 Relay 네임스페이스를 만듭니다.
- Azure Portal을 사용하여 해당 네임스페이스에 하이브리드 연결을 만듭니다.
- 연결 세부 정보를 저장하기 위한 config.json 속성 파일 생성
- 도우미 함수(SAS 토큰, URL)를 위한 Relaylib.py 개발
- 메시지를 수신 대기하기 위한 서버(수신기) 스크립트를 작성합니다.
- 메시지를 보내는 클라이언트(보낸 사람) 스크립트를 작성합니다.
- 서버(수신기) 스크립트를 실행하고 선택적으로 클라이언트(송신자) 스크립트를 실행합니다.
필수 조건
Azure Portal을 사용하여 네임스페이스 만들기
Azure Portal에 로그인합니다.
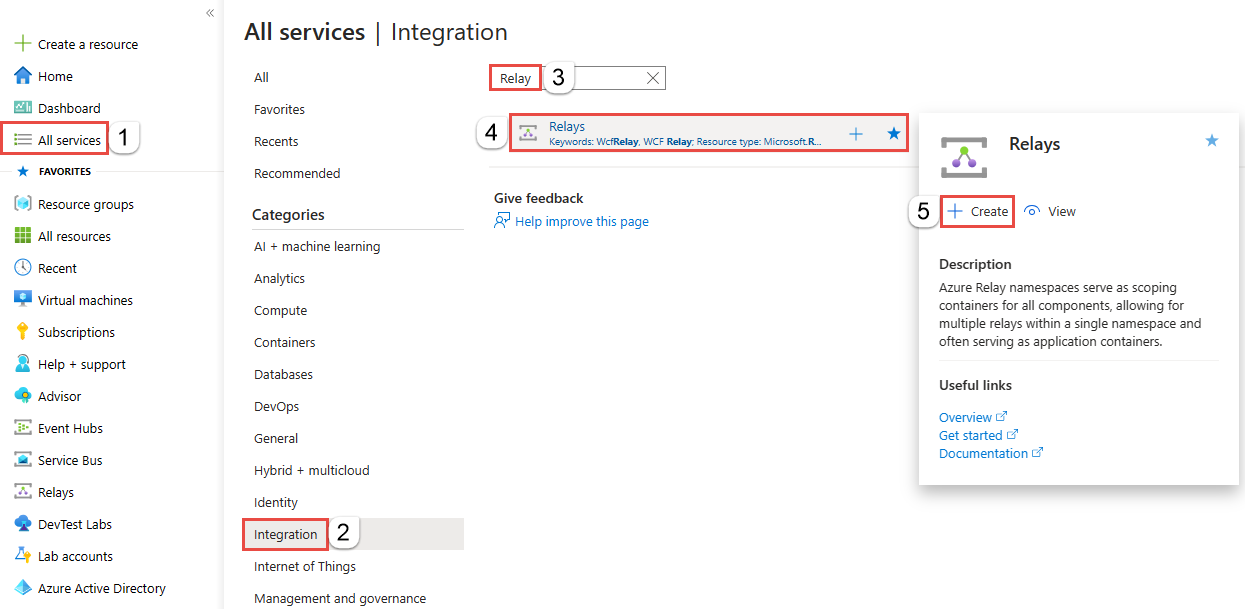
왼쪽 메뉴에서 모든 서비스를 선택합니다. 통합을 선택하고 릴레이를 검색한 다음, 릴레이 위로 마우스 커서를 이동하여 만들기를 선택합니다.
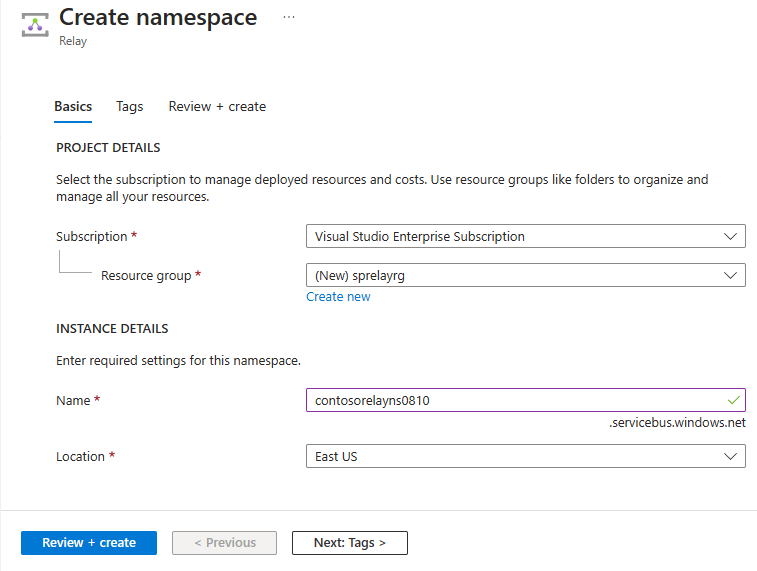
네임스페이스 만들기 페이지에서 다음 단계를 수행합니다.
네임스페이스를 만들 Azure 구독을 선택합니다.
리소스 그룹의 경우 네임스페이스를 배치할 기존 리소스 그룹을 선택하거나 새 리소스 그룹을 만듭니다.
릴레이 네임스페이스의 이름을 입력합니다.
네임스페이스를 호스팅해야 하는 지역을 선택합니다.
페이지 아래쪽에서 검토 + 만들기를 선택합니다.
리뷰 + 생성 페이지에서 생성를 선택합니다.
몇 분 후에 네임스페이스에 대한 릴레이 페이지가 표시됩니다.

관리 자격 증명 가져오기
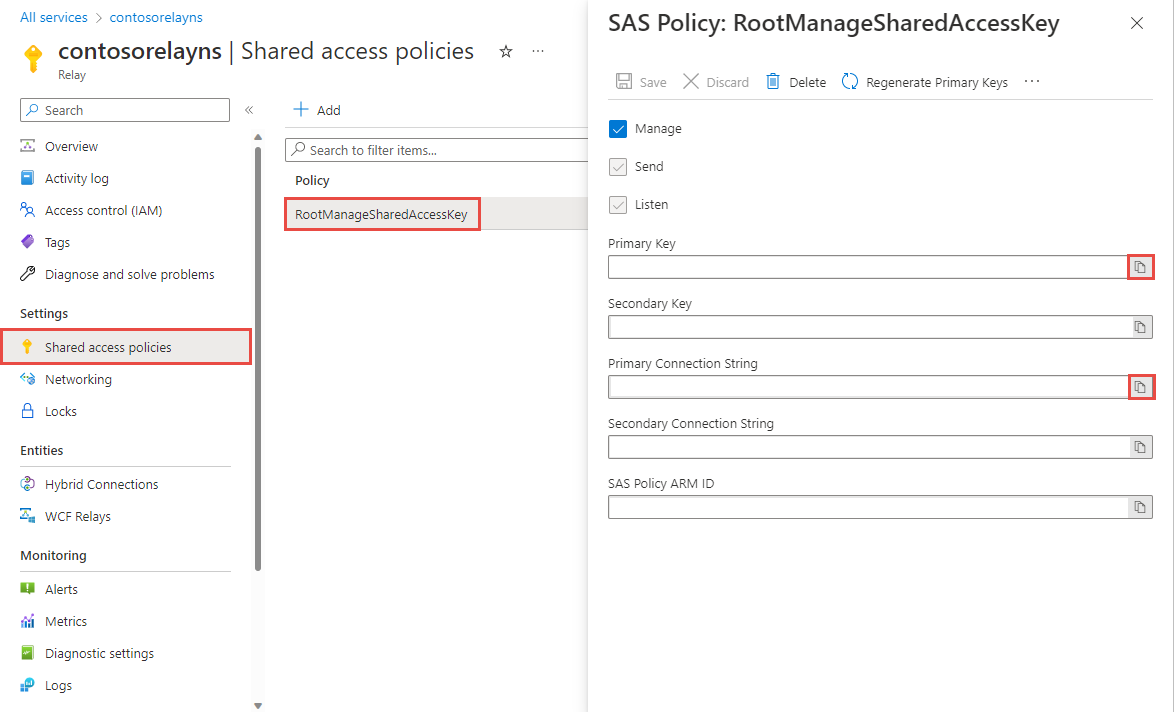
릴레이 페이지의 왼쪽 메뉴에서 공유 액세스 정책을 선택합니다.
공유 액세스 정책 페이지에서 RootManageSharedAccessKey를 선택합니다.
정책: RootManageSharedAccessKey 아래에서 기본 연결 문자열 옆에 있는 복사 단추를 선택합니다. 이 작업은 나중에 사용할 연결 문자열을 클립보드에 복사합니다. 메모장이나 기타 다른 위치에 임시로 이 값을 붙여 넣습니다.
앞의 단계를 반복하여 나중에 사용할 기본 키의 값을 복사하여 임시 위치에 붙여넣습니다.
Azure Portal을 사용하여 하이브리드 연결 만들기
네임스페이스의 릴레이 페이지에서 다음 단계에 따라 하이브리드 연결을 만듭니다.
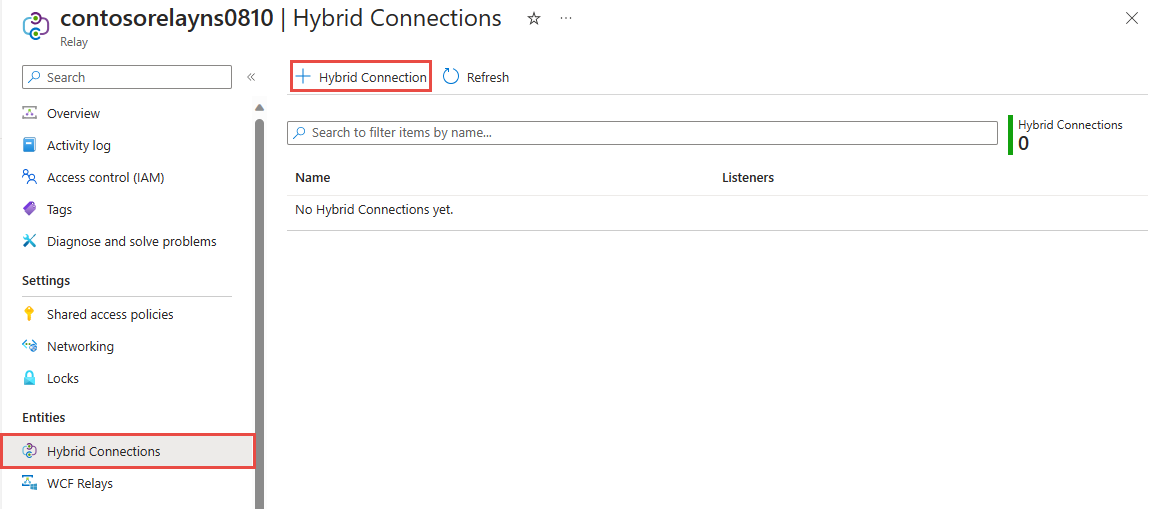
왼쪽 메뉴의 엔터티에서 하이브리드 연결을 선택한 다음, + 하이브리드 연결을 선택합니다.
하이브리드 연결 만들기 페이지에서 하이브리드 연결 이름을 입력하고 만들기를 선택합니다.
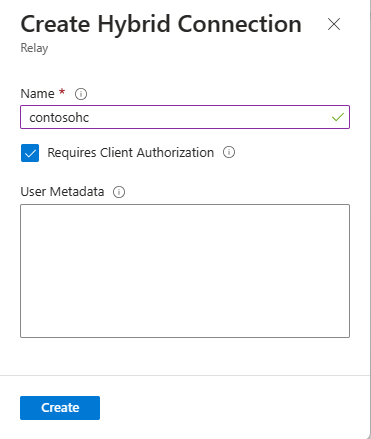
서버 애플리케이션(수신기) 만들기
Relay에서 메시지를 수신 대기하고 받으려면 Python WebSocket 서버 스크립트를 작성합니다.
Python 스크립트 만들기
릴레이를 만들 때 [클라이언트 인증 필요] 옵션을 사용하지 않도록 설정한 경우 임의 브라우저로 요청을 하이브리드 연결 URL에 보낼 수 있습니다. 보호된 엔드포인트에 액세스하려면 여기에 표시된 SAS 토큰을 만들고 전달해야 합니다.
다음은 WebSocket을 활용하는 SAS 토큰을 사용하여 하이브리드 연결 URL로 요청을 보내는 방법을 보여 주는 간단한 Python 스크립트입니다.
종속성
서버 애플리케이션을 실행하기 전에 pip를 사용하여 다음 Python 라이브러리를 설치합니다.
asyncio,json,loggingwebsockets이러한 라이브러리는 다음 명령을 사용하여 설치할 수 있습니다.
pip install <package name>연결 세부 정보를 저장할
config.json파일을 생성합니다.{ "namespace": "HYBRID_CONNECTION_NAMESPACE", "path": "HYBRID_CONNECTION_ENTITY_NAME", "keyrule": "SHARED_ACCESS_KEY_NAME", "key": "SHARED_ACCESS_PRIMARY_KEY" }대괄호 안의 자리 표시자를 하이브리드 연결을 만들 때 얻은 값으로 바꿉니다.
-
namespace- 릴레이 네임스페이스 정규화된 네임스페이스 이름을 사용해야 합니다. 예:{namespace}.servicebus.windows.net -
path- 하이브리드 연결의 이름 -
keyrule- 공유 액세스 정책 키의 이름(기본적으로RootManageSharedAccessKey)입니다. -
key- 이전에 저장한 네임스페이스의 기본 키입니다.
-
도우미 함수에 대한 도우미 함수 파일 생성
다음 파일은
relaylib.py로 사용되며 WebSocket URL 생성 및 SAS 토큰을 위한 도우미 함수를 가지고 있습니다.Python 스크립트 만들기
이 스크립트는 Azure Relay 하이브리드 연결을 활용하는 애플리케이션에 대한 도우미 함수를 제공합니다. 이러한 함수는 SAS 토큰 생성 및 보안 통신을 위한 WebSocket 연결 설정과 같은 작업을 지원합니다.
종속성
도우미 함수 스크립트를 생성하기 전에 pip를 사용하여 다음 Python 라이브러리를 설치합니다.
base64,hashlib,hmac,math,time,urllib이러한 라이브러리는 다음 명령을 사용하여 설치할 수 있습니다.
pip install <package name>도우미 함수 스크립트 작성
relaylib.py파일은 다음과 같습니다.import base64 import hashlib import hmac import math import time import urllib # Function which generates the HMAC-SHA256 of a given message def hmac_sha256(key, msg): hash_obj = hmac.new(key=key, msg=msg, digestmod=hashlib._hashlib.openssl_sha256) return hash_obj.digest() # Function to create a WebSocket URL for listening for a server application def createListenUrl(serviceNamespace, entityPath, token = None): url = 'wss://' + serviceNamespace + '/$hc/' + entityPath + '?sb-hc-action=listen&sb-hc-id=123456' if token is not None: url = url + '&sb-hc-token=' + urllib.parse.quote(token) return url # Function which creates the url for the client application def createSendUrl(serviceNamespace, entityPath, token = None): url = 'wss://' + serviceNamespace + '/$hc/' + entityPath + '?sb-hc-action=connect&sb-hc-id=123456' if token is not None: url = url + '&sb-hc-token=' + urllib.parse.quote(token) return url # Function which creates the Service Bus SAS token. def createSasToken(serviceNamespace, entityPath, sasKeyName, sasKey): uri = "http://" + serviceNamespace + "/" + entityPath encodedResourceUri = urllib.parse.quote(uri, safe = '') # Define the token validity period in seconds (48 hours in this case) tokenValidTimeInSeconds = 60 * 60 * 48 unixSeconds = math.floor(time.time()) expiryInSeconds = unixSeconds + tokenValidTimeInSeconds # Create the plain signature string by combining the encoded URI and the expiry time plainSignature = encodedResourceUri + "\n" + str(expiryInSeconds) # Encode the SAS key and the plain signature as bytes sasKeyBytes = sasKey.encode("utf-8") plainSignatureBytes = plainSignature.encode("utf-8") hashBytes = hmac_sha256(sasKeyBytes, plainSignatureBytes) base64HashValue = base64.b64encode(hashBytes) # Construct the SAS token string token = "SharedAccessSignature sr=" + encodedResourceUri + "&sig=" + urllib.parse.quote(base64HashValue) + "&se=" + str(expiryInSeconds) + "&skn=" + sasKeyName return token
메시지를 수신하는 코드 작성
경로에서 종속성
config.json및relaylib.py를 사용할 수 있는지 확인합니다.listener.py파일은 다음과 같습니다.import asyncio import json import logging import relaylib import websockets async def run_application(config): serviceNamespace = config["namespace"] entityPath = config["path"] sasKeyName = config["keyrule"] sasKey = config["key"] serviceNamespace += ".servicebus.windows.net" # Configure logging logging.basicConfig(level=logging.INFO) # Enable DEBUG/INFO logging as appropriate try: logging.debug("Generating SAS Token for: %s", serviceNamespace) token = relaylib.createSasToken(serviceNamespace, entityPath, sasKeyName, sasKey) logging.debug("Generating WebSocket URI") wssUri = relaylib.createListenUrl(serviceNamespace, entityPath, token) async with websockets.connect(wssUri) as websocket: logging.info("Listening for messages on Azure Relay WebSocket...") while True: message = await websocket.recv() logging.info("Received message: %s", message) except KeyboardInterrupt: logging.info("Exiting listener.") if __name__ == "__main__": # Load configuration from JSON file with open("config.json") as config_file: config = json.load(config_file) asyncio.run(run_application(config))
클라이언트 애플리케이션(보낸 사람) 만들기
Relay에 메시지를 보내려면 HTTP 또는 WebSocket 클라이언트를 사용할 수 있습니다. 포함된 샘플은 Python 구현입니다.
메시지를 보내는 코드 작성
경로에서 종속성
config.json및relaylib.py를 사용할 수 있는지 확인합니다.sender.py파일은 다음과 같습니다.import asyncio import json import logging import relaylib import websockets async def run_application(message, config): service_namespace = config["namespace"] entity_path = config["path"] sas_key_name = config["keyrule"] sas_key = config["key"] service_namespace += ".servicebus.windows.net" # Configure logging logging.basicConfig(level=logging.DEBUG) # Enable debug logging token = relaylib.createSasToken(service_namespace, entity_path, sas_key_name, sas_key) logging.debug("Token: %s", token) wss_uri = relaylib.createSendUrl(service_namespace, entity_path, token) logging.debug("WssURI: %s", wss_uri) try: async with websockets.connect(wss_uri) as websocket: logging.info("Sending message to Azure Relay WebSocket...") await websocket.send(json.dumps({"message": message})) logging.info("Message sent: %s", message) except Exception as e: logging.error("An error occurred: %s", str(e)) if __name__ == "__main__": # Load configuration from JSON file with open("config.json") as config_file: config = json.load(config_file) asyncio.run(run_application("This is a message to Azure Relay Hybrid Connections!", config))
참고 항목
이 문서의 샘플 코드는 연결 문자열 사용하여 Azure Relay 네임스페이스에 인증하여 자습서를 단순하게 유지합니다. 더 쉽게 손상될 수 있는 연결 문자열 또는 공유 액세스 서명을 사용하는 대신 프로덕션 환경에서 Microsoft Entra ID 인증을 사용하는 것이 좋습니다. Microsoft Entra ID 인증을 사용하는 방법에 대한 자세한 정보 및 샘플 코드는 Azure Relay 엔터티에 액세스하고 Microsoft Entra ID를 사용하여 관리 ID를 인증하여 Azure Relay 리소스에 액세스하기 위해 Microsoft Entra ID로 애플리케이션 인증 및 권한을 부여합니다.
애플리케이션 실행
- 서버 애플리케이션을 실행합니다. 명령 프롬프트에서
python3 listener.py를 입력합니다. - 클라이언트 애플리케이션을 실행합니다. 명령 프롬프트에서
python3 sender.py를 입력합니다.
축하합니다. Python을 사용하여 엔드투엔드 하이브리드 연결 애플리케이션을 만들었습니다.
다음 단계
이 빠른 시작에서는 메시지를 보내고 받는 데 WebSockets를 사용한 Python 클라이언트 및 서버 애플리케이션을 만들었습니다. Azure Relay의 하이브리드 연결 기능은 HTTP를 사용하여 메시지를 보내고 받을 수도 있도록 지원합니다. Azure Relay 하이브리드 연결에 HTTP를 사용하는 방법에 대한 자세한 내용은 HTTP 빠른 시작을 참조하세요.
이 빠른 시작에서는 Python을 사용하여 클라이언트 및 서버 애플리케이션을 만들었습니다. .NET Framework를 사용하여 클라이언트 및 서버 애플리케이션을 작성하는 방법을 알아보려면 .NET HTTP 빠른 시작 또는 .NET HTTP 빠른 시작을 참조하세요.