자습서: ASP.NET 애플리케이션에서 Azure 앱 Configuration의 변형 기능 플래그 사용
이 자습서에서는 변형 기능 플래그를 사용하여 예제 애플리케이션 인 오늘의 견적에서 다양한 사용자 세그먼트에 대한 환경을 관리합니다. 변형 기능 플래그 사용에서 만든 변형 기능 플래그를 활용합니다. 계속하기 전에 App Configuration 저장소에서 Greeting이라는 변형 기능 플래그를 만들어야 합니다.
필수 조건
- 컴퓨터에 .NET CLI가 설치되어 있는지 확인합니다.
- 변형 기능 플래그 사용 자습서에 따라 Greeting이라는 변형 기능 플래그를 만듭니다.
ASP.NET Core 웹앱 만들기
명령 프롬프트에서 다음 코드를 실행합니다. 이 명령은 개별 계정 인증을 사용하여 ASP.NET Core에 새 Razor Pages 애플리케이션을 만들고 QuoteOfTheDay라는 출력 폴더에 배치합니다.
dotnet new razor --auth Individual -o QuoteOfTheDayQuoteOfTheDay 폴더로 이동하여 애플리케이션에 대한 사용자 암호를 만들고 다음 명령을 실행합니다. 이 비밀은 앱 구성에 대한 엔드포인트를 보유합니다.
dotnet user-secrets set Endpoints:AppConfiguration "<App Configuration Endpoint>"필요한 패키지의 최신 버전을 추가합니다.
dotnet add package Azure.Identity
dotnet add package Microsoft.Extensions.Configuration.AzureAppConfiguration
dotnet add package Microsoft.FeatureManagement.AspNetCore
기능 관리를 위해 App Configuration에 연결
Program.cs 다음 using 문을 추가합니다.
using Azure.Identity;
using Microsoft.Extensions.Configuration.AzureAppConfiguration;
using Microsoft.FeatureManagement;
Program.cs 줄
var builder = WebApplication.CreateBuilder(args);아래에 애플리케이션이 시작될 때 Azure 앱 Configuration에서 구성을 끌어오는 App Configuration 공급자를 추가합니다. 기본적으로 메서드는UseFeatureFlags레이블이 없는 모든 기능 플래그를 끌어냅니다.App Configuration 저장소에 인증하는 데 사용합니다
DefaultAzureCredential. 지침에 따라 자격 증명에 App Configuration 데이터 판독기 역할을 할당합니다. 애플리케이션을 실행하기 전에 권한이 전파될 수 있는 충분한 시간을 허용해야 합니다.builder.Configuration .AddAzureAppConfiguration(options => { string endpoint = builder.Configuration.Get("Endpoints:AppConfiguration"); options.Connect(new Uri(endpoint), new DefaultAzureCredential()); options.UseFeatureFlags(); });Azure 앱 구성 및 기능 관리 서비스를 추가하고 기능 관리에 대한 대상 지정을 사용하도록 설정합니다.
// Add Azure App Configuration and feature management services to the container.
builder.Services.AddAzureAppConfiguration()
    .AddFeatureManagement()
    .WithTargeting();
줄
var app = builder.Build();아래에서 동적 구성 새로 고침을 위해 Azure 앱 구성 미들웨어를 추가합니다.// Use Azure App Configuration middleware for dynamic configuration refresh. app.UseAzureAppConfiguration();
변형 기능 플래그 사용
QuoteOfTheDay>페이지>Index.cshtml.cs 열고 콘텐츠를 다음 코드로 바꿉다.
using Microsoft.AspNetCore.Mvc;
using Microsoft.AspNetCore.Mvc.RazorPages;
using Microsoft.FeatureManagement;

namespace QuoteOfTheDay.Pages;

public class Quote
{
    public string Message { get; set; }

    public string Author { get; set; }
}

public class IndexModel(IVariantFeatureManagerSnapshot featureManager) : PageModel
{
    private readonly IVariantFeatureManagerSnapshot _featureManager = featureManager;

    private Quote[] _quotes = [
        new Quote()
        {
            Message = "You cannot change what you are, only what you do.",
            Author = "Philip Pullman"
        }];

    public Quote? Quote { get; set; }

    public string GreetingMessage { get; set; }

    public async void OnGet()
    {
        Quote = _quotes[new Random().Next(_quotes.Length)];

        Variant variant = await _featureManager.GetVariantAsync("Greeting", HttpContext.RequestAborted);

        if (variant != null)
        {
            GreetingMessage = variant.Configuration?.Get<string>() ?? "";
        }
        else
        {
            _logger.LogWarning("No variant given. Either the feature flag named 'Greeting' is not defined or the variants are not defined properly.");
        }
    }
}
현재 사용자의 인사말 기능 플래그 변형을 검색하고 해당 값을 페이지 모델의 속성에
GreetingMessage할당하기 위해 호출GetVariantAsync합니다.QuoteOfTheDay>Pages>Shared>_Layout.cshtml에서 추가되는 위치에
QuoteOfTheDay.styles.css글꼴이 멋진 CSS 라이브러리에 다음 참조를 추가합니다.<link rel="stylesheet" href="https://cdnjs.cloudflare.com/ajax/libs/font-awesome/5.15.3/css/all.min.css">index.cshtml을 열고 해당 콘텐츠를 다음 코드로 바꿉니다.
@page
@model IndexModel
@{
    ViewData["Title"] = "Home page";
    ViewData["Username"] = User.Identity?.Name ?? string.Empty;
}

<style>
    body {
        font-family: Arial, sans-serif;
        background-color: #f4f4f4;
        color: #333;
    }

    .quote-container {
        background-color: #fff;
        margin: 2em auto;
        padding: 2em;
        border-radius: 8px;
        max-width: 750px;
        box-shadow: 0px 4px 8px rgba(0, 0, 0, 0.2);
        display: flex;
        justify-content: space-between;
        align-items: start;
        position: relative;
    }

    .vote-container {
        position: absolute;
        top: 10px;
        right: 10px;
        display: flex;
        gap: 0em;
    }

    .vote-container .btn {
        background-color: #ffffff; /* White background */
        border-color: #ffffff; /* Light blue border */
        color: #333
    }

    .vote-container .btn:focus {
        outline: none;
        box-shadow: none;
    }

    .vote-container .btn:hover {
        background-color: #F0F0F0; /* Light gray background */
    }

    .greeting-content {
        font-family: 'Georgia', serif; /* More artistic font */
    }

    .quote-content p.quote {
        font-size: 2em; /* Bigger font size */
        font-family: 'Georgia', serif; /* More artistic font */
        font-style: italic; /* Italic font */
        color: #4EC2F7; /* Medium-light blue color */
    }
</style>

<div class="quote-container">
    <div class="quote-content">
        <h3 class="greeting-content">@(Model.GreetingMessage)</h3>
        <br />
        <p class="quote">“@(Model.Quote?.Message ?? "< Quote not found >")”</p>
        <p>- <b>@(Model.Quote?.Author ?? "Unknown")</b></p>
    </div>

    <div class="vote-container">
        <button class="btn btn-primary" onclick="heartClicked(this)">
            <i class="far fa-heart"></i> <!-- Heart icon -->
        </button>
    </div>
</div>

<script>
    function heartClicked(button) {
        var icon = button.querySelector('i');
        icon.classList.toggle('far');
        icon.classList.toggle('fas');
    }
</script>
이 코드는 오늘의 견적 애플리케이션의 UI를 표시하고 페이지 모델의 UI를
GreetingMessage표시합니다. JavaScript 처리기는heartClicked하트 단추를 클릭할 때 트리거됩니다.
앱 빌드 및 실행
애플리케이션을 빌드 및 실행합니다.
dotnet build
dotnet run
애플리케이션이 로드되면 오른쪽 위에 있는 등록을 선택하여 새 사용자를 등록합니다.

usera@contoso.com이라는 새 사용자를 등록합니다.
사용자 정보를 입력한 후 이메일의 유효성을 검사하려면 여기를 클릭합니다 링크를 선택합니다.

동일한 단계를 반복하여 두 userb@contoso.com번째 사용자를 등록합니다.
참고 항목
이 자습서에서는 이러한 이름을 정확하게 사용해야 합니다. 기능이 예상대로 구성되었으면 두 사용자에게 서로 다른 변형이 표시되어야 합니다.
오른쪽 위에서 로그인을 선택하여 로그인합니다usera@contoso.com.

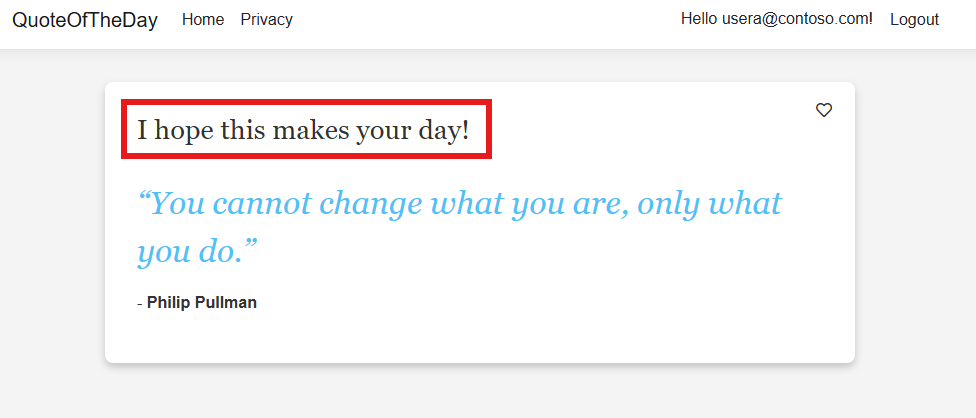
로그인하면 다음을 위한 긴 인사말 메시지가 표시됩니다. usera@contoso.com

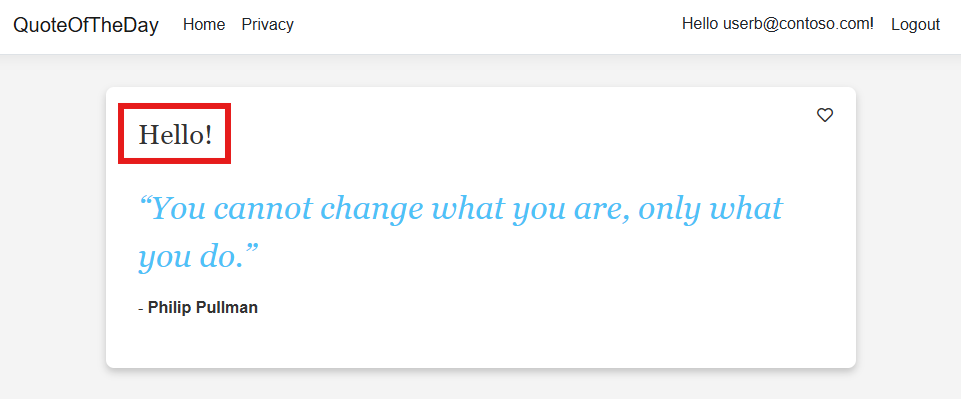
로그아웃을 클릭하고 로그인하면 userb@contoso.com간단한 인사말 메시지가 표시됩니다.

다음 단계
.NET 기능 관리 라이브러리의 전체 기능 개요는 다음 문서를 참조하세요.