Develop applications with Semantic Kernel and Azure AI Foundry
In this article, you learn how to use Semantic Kernel with models deployed from the Azure AI model catalog in Azure AI Foundry portal.
Prerequisites
An Azure AI project as explained at Create a project in Azure AI Foundry portal.
A model supporting the Azure AI model inference API deployed. In this example, we use a
Mistral-Largedeployment, but use any model of your preference. For using embeddings capabilities in LlamaIndex, you need an embedding model likecohere-embed-v3-multilingual.- You can follow the instructions at Deploy models as serverless APIs.
Python 3.10 or later installed, including pip.
Semantic Kernel installed. You can do it with:
pip install semantic-kernelIn this example, we're working with the Azure AI model inference API, so we need to install the relevant Azure dependencies. You can do it with:
pip install semantic-kernel[azure]
Configure the environment
To use LLMs deployed in Azure AI Foundry portal, you need the endpoint and credentials to connect to it. Follow these steps to get the information you need from the model you want to use:
Go to the Azure AI Foundry portal.
Open the project where the model is deployed, if it isn't already open.
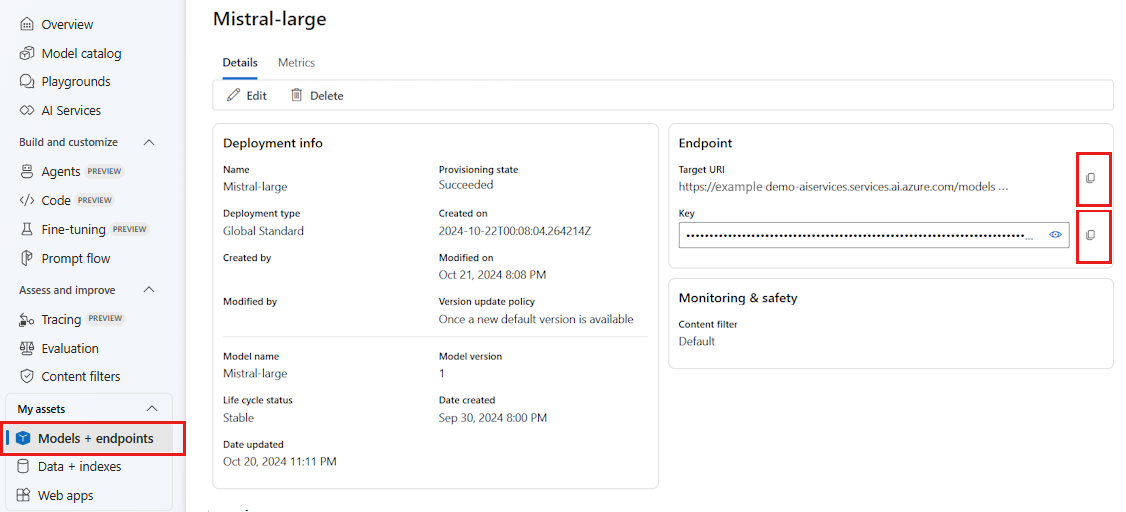
Go to Models + endpoints and select the model you deployed as indicated in the prerequisites.
Copy the endpoint URL and the key.
Tip
If your model was deployed with Microsoft Entra ID support, you don't need a key.

In this scenario, we placed both the endpoint URL and key in the following environment variables:
export AZURE_AI_INFERENCE_ENDPOINT="<your-model-endpoint-goes-here>"
export AZURE_AI_INFERENCE_API_KEY="<your-key-goes-here>"
Once configured, create a client to connect to the endpoint:
from semantic_kernel.connectors.ai.azure_ai_inference import AzureAIInferenceChatCompletion

chat_completion_service = AzureAIInferenceChatCompletion(ai_model_id="<deployment-name>")
Tip
The client automatically reads the environment variables AZURE_AI_INFERENCE_ENDPOINT and AZURE_AI_INFERENCE_API_KEY to connect to the model. However, you can also pass the endpoint and key directly to the client via the endpoint and api_key parameters on the constructor.
Alternatively, if your endpoint support Microsoft Entra ID, you can use the following code to create the client:
export AZURE_AI_INFERENCE_ENDPOINT="<your-model-endpoint-goes-here>"
from semantic_kernel.connectors.ai.azure_ai_inference import AzureAIInferenceChatCompletion

chat_completion_service = AzureAIInferenceChatCompletion(ai_model_id="<deployment-name>")
Note
When using Microsoft Entra ID, make sure that the endpoint was deployed with that authentication method and that you have the required permissions to invoke it.
Azure OpenAI models
If you're using an Azure OpenAI model, you can use the following code to create the client:
from azure.ai.inference.aio import ChatCompletionsClient
from azure.identity.aio import DefaultAzureCredential

from semantic_kernel.connectors.ai.azure_ai_inference import AzureAIInferenceChatCompletion

chat_completion_service = AzureAIInferenceChatCompletion(
    ai_model_id="<deployment-name>",
    client=ChatCompletionsClient(
        endpoint=f"{str(<your-azure-open-ai-endpoint>).strip('/')}/openai/deployments/{<deployment_name>}",
        credential=DefaultAzureCredential(),
        credential_scopes=["https://cognitiveservices.azure.com/.default"],
    ),
)
Inference parameters
You can configure how inference is performed by using the AzureAIInferenceChatPromptExecutionSettings class:
from semantic_kernel.connectors.ai.azure_ai_inference import AzureAIInferenceChatPromptExecutionSettings

execution_settings = AzureAIInferenceChatPromptExecutionSettings(
    max_tokens=100,
    temperature=0.5,
    top_p=0.9,
    # extra_parameters={...},    # model-specific parameters
)
Calling the service
Let's first call the chat completion service with a simple chat history:
Tip
Semantic Kernel is an asynchronous library, so you need to use the asyncio library to run the code.
import asyncio

async def main():
    ...

if __name__ == "__main__":
    asyncio.run(main())
from semantic_kernel.contents.chat_history import ChatHistory

chat_history = ChatHistory()
chat_history.add_user_message("Hello, how are you?")

response = await chat_completion_service.get_chat_message_content(
    chat_history=chat_history,
    settings=execution_settings,
)
print(response)
Alternatively, you can stream the response from the service:
chat_history = ChatHistory()
chat_history.add_user_message("Hello, how are you?")

response = chat_completion_service.get_streaming_chat_message_content(
    chat_history=chat_history,
    settings=execution_settings,
)

chunks = []
async for chunk in response:
    chunks.append(chunk)
    print(chunk, end="")

full_response = sum(chunks[1:], chunks[0])
Create a long-running conversation
You can create a long-running conversation by using a loop:
while True:
    response = await chat_completion_service.get_chat_message_content(
        chat_history=chat_history,
        settings=execution_settings,
    )
    print(response)
    chat_history.add_message(response)
    chat_history.add_user_message(user_input = input("User:> "))
If you're streaming the response, you can use the following code:
while True:
    response = chat_completion_service.get_streaming_chat_message_content(
        chat_history=chat_history,
        settings=execution_settings,
    )

    chunks = []
    async for chunk in response:
        chunks.append(chunk)
        print(chunk, end="")

    full_response = sum(chunks[1:], chunks[0])
    chat_history.add_message(full_response)
    chat_history.add_user_message(user_input = input("User:> "))
Use embeddings models
Configure your environment similarly to the previous steps, but use the AzureAIInferenceEmbeddings class:
from semantic_kernel.connectors.ai.azure_ai_inference import AzureAIInferenceTextEmbedding

embedding_generation_service = AzureAIInferenceTextEmbedding(ai_model_id="<deployment-name>")
The following code shows how to get embeddings from the service:
embeddings = await embedding_generation_service.generate_embeddings(
    texts=["My favorite color is blue.", "I love to eat pizza."],
)

for embedding in embeddings:
    print(embedding)