BizTalk, Work Flow (WF) & Windows Communication Foundation (WCF): Combining functionality

Summary
All versions of BizTalk Server use a publish/subscribe messaging engine architecture. In a publish/subscribe architecture, all messages that flow through BizTalk Server are first published to the MessageBox database and subsequently picked up by Send Ports, Receive Ports, or Orchestrations that are decorated with matching subscription information. One of the primary advantages of a publish/subscribe architecture is that receiving of messages is loosely coupled from sending of messages and messages can be published even if there are no subscribers available to process messages when they are published. Other advantages include the ability to track message properties, messages bodies, and to resubmit messages that initially failed delivery to subscribers.
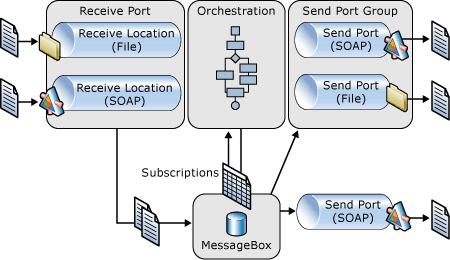
Figure 1 - BizTalk Server Publish Subscribe architecture
One potential drawback of the BizTalk Server Publish/Subscribe architecture is that because all messages flow through the MessageBox database, under high load scenarios the MessageBox database(s) may encounter file I/O contention which can negatively impact performance. While this is not problematic for most BizTalk Server scenarios, this may become an issue for BizTalk Server scenarios where low latency is a desirable attribute of the solution.
This document provides .NET/WorkFlow developers with techniques for utilizing AppFabric and BizTalk Server 2010 together to develop low latency connectivity solutions to LOB systems. Such solutions allow front end applications built on ASP.NET, SharePoint, or Web Services to exchange messages with multiple backend systems and respond to user initiated requests quickly.
Introduction
This whitepaper provides information on using BizTalk Server and WF/WCF together by illustrating to BizTalk and Workflow developers how to combine functionality from both in a Visual Studio 2010 project. The project is a simple workflow that leverages the BizTalk Server Mapper and LOB Adapter functionality.
Because this project does not use the BizTalk Messaging Engine it will provide improved latency over a pure BizTalk Server solution while still utilizing BizTalk Server functionality.
Since Visual Studio 2010 can access the BizTalk Mapping and WCF LOB connectivity APIs, this whitepaper also illustrates how WorkFlow developers can now access BizTalk Mapper functionality to implement document transformations and complete WCF LOB connectivity without having to first configure a BizTalk Server environment.
Who Should Read This Whitepaper?
The following users should read this guide:
- .NET and WF developers that would like to leverage BizTalk Server Mapper and LOB Adapter functionality in their workflows.
- BizTalk Developers that seek alternatives to currently available techniques for developing certain optimal latency solutions.
Software installed for the BizTalk/WF/WCF walkthrough
All software was installed on a single machine using the steps provided at Installing the BizTalk Server 2010 AppFabric Connect feature on a developer computer (http://social.technet.microsoft.com/wiki/contents/articles/installing-the-biztalk-server-2010-appfabric-connect-feature.aspx#InstDev). For purposes of this walkthrough, both the Required and Optional components were installed.
Building a WCF solution that uses the BizTalk WCF SQL Adapter and the BizTalk Mapper to copy records from one database to another
This section provides a walkthrough of using Visual Studio 2010 with BizTalk Server 2010 and the BizTalk Adapter Pack to develop a simple WCF solution which uses the WCF SQL Adapter to retrieve some records from the "Customers" table in the "NorthWind" database, apply a simple map to the selected records, and then update a modified version of the "Customers" table ("Customers2") in a modified version of the "Northwind" database ("Northwind2"). To build and run the solution, follow these steps:
Install all prerequisite software and install the NorthWind database
After installing all software, download the scripts to install the NorthWind database on your SQL Server instance from http://go.microsoft.com/fwlink/?LinkID=62009.
Note Ensure that your user account is member of the serveradmin role on this instance of SQL Server.
After following the instructions to install the NorthWind database on your SQL Server instance, paste the following script into the SQL Query Editor to add a "Customers2" table to the NorthWind database:
USE [Northwind]
GO
/****** Object:  Table  [dbo].[Customers2]******/
SET ANSI_NULLS ON
GO
SET QUOTED_IDENTIFIER ON
GO
CREATE TABLE  [dbo].[Customers2](
 [CompanyName] [nvarchar](100) NOT NULL,
 [Address] [nvarchar](100) NULL)
GO
Create the WCF Solution and a WCF Workflow Service Application in Visual Studio 2010
Click Start and then click Microsoft Visual Studio 2010.
Click the File menu, click New and then click Project to display the New Project dialog box.
In the left-hand pane of the New Project dialog box select Workflow and in the middle pane click to select WCF Workflow Service Application.
Enter a name for the solution and project such as WCF_BTS_APP and then click OK.
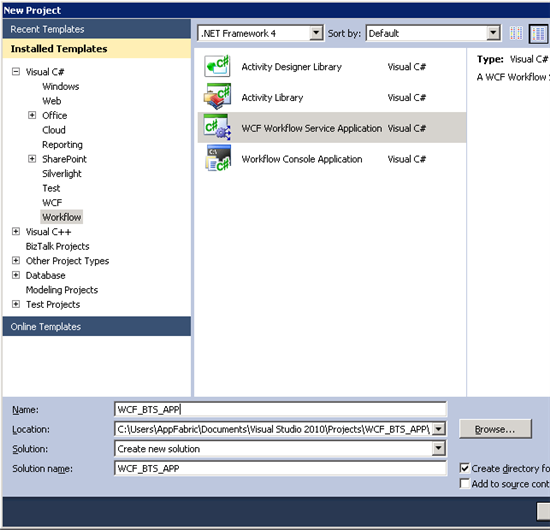
Figure 2 - Visual Studio 2010 New Project Dialog Box
Select the Sequential Service that is displayed in the designer pane and delete it as it will be replaced with a new Sequence shape.
Drag and drop a Sequence shape from the toolbox to the center of Service1.xamlx, the result should look similar to the following:
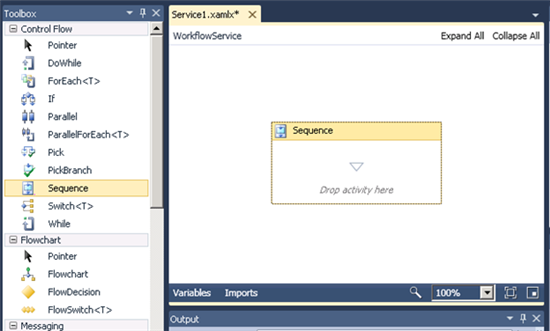
Figure 3 - Visual Studio 2010 Service1.xamlx as viewed in Designer
Drag and drop a Receive shape from the toolbox onto the Sequence shape that is displayed in the designer pane, the Receive shape is available on the Messaging tab of the toolbox.
Right-click the Receive shape and select Properties from the context menu.
In the Properties for the Receive shape set the OperationName to ExtractTransformLoad, the ServiceContractName property to IinitializeSvc, verify that the CanCreateInstance checkbox is selected and verify that the SerializerOption is set to DataContractSerializer.
Click to select the WCF_BTS_APP project in the Solution Explorer, right-click to display the context menu and click to select Add Adapter Service Reference to display the Add Adapter Service Reference dialog box. This is where the code to invoke the WCF SQL Adapter is added to the project. Enter the following values to populate the Add Adapter Service Reference dialog box and click OK.
- For Select a binding: choose sqlBinding
- For Configure a URI: enter mssql://localhost//NorthWind
- Click the Connect button to establish a connection to the NorthWind database
- Under Select contract type verify that Client (Outbound operations) is selected
- In the Select a category: section click to expand Tables and select the [dbo].[Customers] table
- In the Available categories and operations: section, select the Select operation and then click the Add button
- In the Select a category: section select the [dbo].[Customers2] table
- In the Available categories and operations: section, select the Insert category and then click the Add button
Verify that the Add Adapter Service Reference dialog box is populated with the following values and click the OK button.
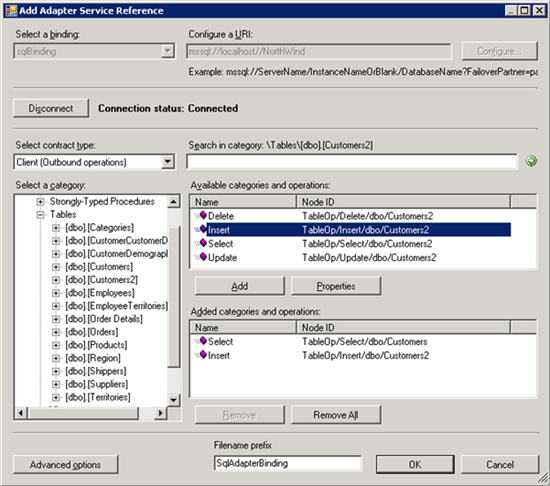
Figure 4 - Visual Studio 2010 Add Adapter Service Reference dialog box
Note If you installed the BizTalk Adapter Pack 2.0 on a 64-bit machine and you received the error message "No valid adapters installed on the machine", then ensure that the 32-bit version of the BizTalk Adapter Pack 2.0 is also installed. Both the 64-bit and 32-bit versions of the BizTalk Adapter Pack 2.0 are available for download at http://go.microsoft.com/fwlink/?LinkId=194572 (http://go.microsoft.com/fwlink/?LinkId=194572).
In the Solution Explorer, right-click the WCF_BTS_APP project and select Build from the context menu. After building this project with the new adapter service references the Visual Studio 2010 toolbox should expose two additional tabs; mssql:TableOp_dbo_Customers and mssql:TableOp_dbo_Customers2. The mssql:TableOp_dbo_Customers tab will expose a SelectActivity and the mssql:TableOp_dbo_Customers2 tab will expose an InsertActivity:
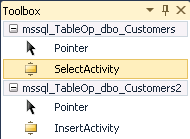
Figure 5 - Visual Studio 2010 Toolbox Tabs added after adding SQL Adapter service references
Click and drag the SelectActivity and the InsertActivity from the toolbox onto the Sequence shape that is displayed in the designer pane:
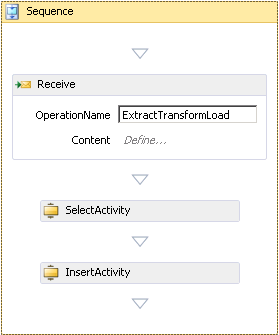
Figure 6 - Sequence shape with Receive shape, SelectActivity shape and InsertActivity shape as viewed in the Designer
These activities are visual representations of the logic that will be used to select records from the Customers table in the NorthWind database and after performing a BizTalk mapping operation on the selected records, insert the result set into the Customers2 table in the NorthWind database. Before we can apply any operations to the selected data or insert the result set we must first define a query for the select activity, and define variables to contain both the selected data as input into a BizTalk map as well as the data that is output from the BizTalk map.
Create variables to contain the SQL query results and BizTalk Map output
- Click Variables in the bottom right-hand corner of the Designer to invoke the Create Variable option in the Designer.
- Click Create Variable to display a row in the Designer that accepts inputs for Name, Variable type, Scope, and Default. Create two variables with the following values:
Name Variable Type Scope Default data1 Click to select Array of <T> and from the Select Types dialog box browse to select the Type Name: of schemas.microsoft.com.Sql._2008._05.Types.Tables.dbo.Customers Leave at default value Leave at default value data2 Click to select Array of <T> and from the Select Types dialog box browse to select the Type Name: of schemas.microsoft.com.Sql._2008._05.Types.Tables.dbo.Customers2 Leave at default value Leave at default value
After creating the variables data1 and data2 the Designer should look as follows:
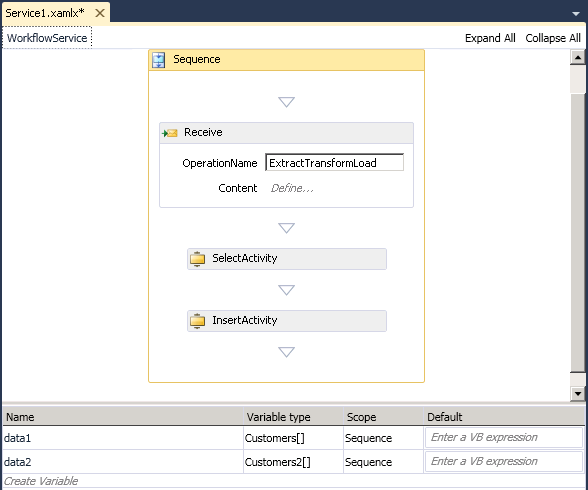
Figure 7 - Variables defined in the Visual Studio 2010 Designer
Apply properties to the SelectActivity and InsertActivity items
After creating variables apply properties to the SelectActivity and InsertActivity items as follows:
Right-click to select the SelectActivity item in the Visual Studio Designer and select Properties from the context menu. Enter the following values for the SelectActivity item properties :
Columns DisplayName EndPointConfigurationName Query SelectResult "*" Leave at default Leave at default Leave at default data1 Right-click to select the InsertActivity item in the Visual Studio Designer and select Properties from the context menu. Leave all values at their default except for Rows, set the value for the Rows property to data2.
Add a BizTalk Map to the WCF_BTS_APP Project
Follow these steps to add a BizTalk Map to the WCF_BTS_APP project:
Locate the Mapper item in the BizTalk category of the Toolbox, click to select it and drag it between the SelectActivity and the InsertActivity.
When you release the left mouse button to drop it onto the Designer surface a Select Types dialog box will be displayed. Specify an InputDataContractType of schemas.microsoft.com.Sql._2008._05.Types.Tables.dbo.Customers[] and specify an OutputDataContractType of schemas.microsoft.com.Sql._2008._05.Types.Tables.dbo.Customers2[], then click OK.
Click the Edit option that is displayed for the Mapper item to display the Select a Map dialog box.
Verify that the Create a new Map radio button is selected, enter a name of TestMap, verify that Launch the Map is checked and click OK to launch the BizTalk Mapper. A new map surface should be displayed that contains the input and output schemas:
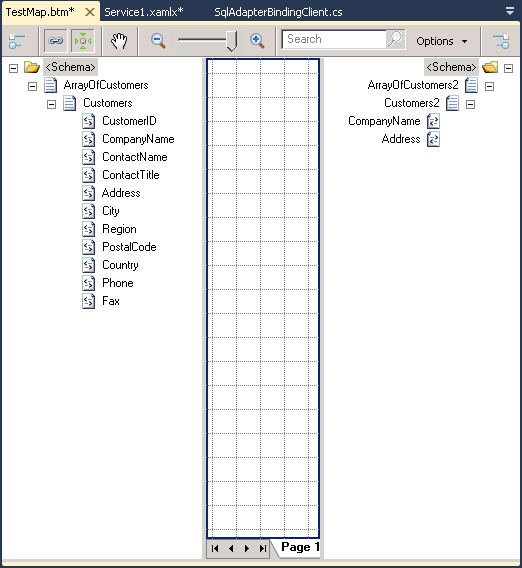
Figure 8 - New map surface displayed in Visual Studio
Drag and drop two String Concatenate functoids onto the surface of the Map and click to fully expand the Input1.xsd and Output1.xsd schemas.
Drag and drop the following nodes from the Input1.xsd schema onto the first String Concatenate functoid:
- CompanyName
- ContactName
- ContactTitle
Drag and drop the output of the first String Concatenate functoid to the CompanyName node of the Output1.xsd schema.
Drag and drop the following nodes from the Input1.xsd schema onto the second String Concatenate functoid:
- Address
- City
- Region
Drag and drop the output of the second String Concatenate functoid to the Address node of the Output1.xsd schema.
The BizTalk mapper should look similar to the following now:
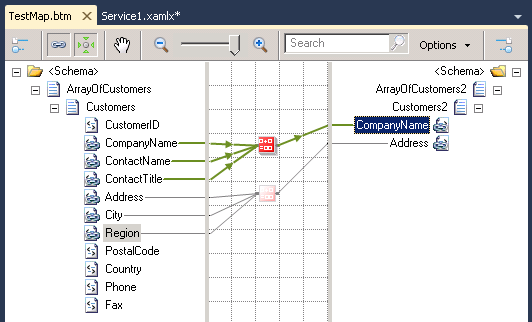
Figure 9 - Map connecting input schema to output schema
Double-click Service1.xamlx in the Solution Explorer to display the Designer surface, right-click the Mapper item and select Properties from the context menu to display the Visual Studio properties for the Mapper item.
Enter an Input value of data1 in the Visual Studio properties for the Mapper item.
Enter an Output value of data2 in the Visual Studio properties for the Mapper item.
Click the Visual Studio 2010 File menu and select Save All to save the solution and project.
In Solution Explorer, right-click the WCF_BTS_APP project and click Build.
Publish the WCF Solution to IIS
Complete the following steps to publish the WCF_BTS_APP project to IIS:
In the Solution Explorer, right-click the WCF_BTS_APP project and select Properties from the context menu to display the properties page for the project.
On the Web tab of the project properties page select Use Local IIS Web server.
In the Solution Explorer, right-click the WCF_BTS_APP project and select Publish from the context menu to display the Publish Web dialog box.
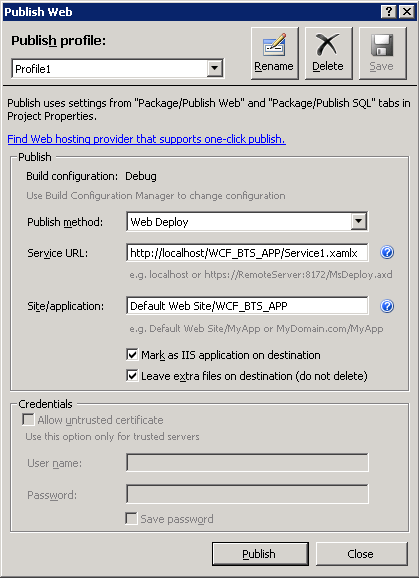
Enter the following values into the Publish Web dialog box (assuming that IIS 7.0 is running locally) and then click the Publish button:
Figure 9 - Publish Web dialog box displayed in Visual Studio
Open a browser and navigate to http://localhost/WCF_BTS_APP/Service1.xamlx to verify that the service has been created.
Click on the link http://localhost/WCF_BTS_APP/Service1.xamlx?wsdl to verify that the WSDL is displayed correctly.
Since this WCF application will use the WCF SQL Adapter to connect to the NorthWind database, either configure the DefaultAppPool Identity with an account that has permissions to read from and write to the NorthWind database or else configure the WCF_BTS_APP application in IIS to run in a different Application Pool that is using an identity with an account that has permissions to read from and write to the NorthWind database.
Create and launch a console application to test the published WCF Service and verify that the WCF SQL Adapter is updating the NorthWind database as expected.
To create a console application to test the published WCF Service and verify that the WCF SQL Adapter is updating the NorthWind database as expected, follow these steps:
Select the WCF_BTS_APP solution in Solution Explorer, then click the File menu, click Add, and then click New Project to display the Add New Project dialog box.
In the Add New Project dialog box, under Installed Templates, click to expand Visual C#, select Windows, and select Console Application.
Type ConsoleAppTest for the Name of the project and click OK.
In Solution Explorer, right-click the ConsoleAppTest project and click Set as StartUp Project.
In Solution Explorer, right-click the ConsoleAppTest project again and click Add Service Reference to display the Add Service Reference dialog box.
Enter http://localhost/WCF_BTS_APP/Service1.xamlx into the Address: and click Go.
Under Services: click to expand Service1, select IinitializeSvc and then click OK.
Replace the code that currently exists in Program.cs with the following code:
using System;
using System.Collections.Generic;
using System.Linq;
using System.Text;
using ConsoleAppTest.ServiceReference1;

namespace ConsoleAppTest
{
 class Program
 {
 static void  Main(string[] args)
 {
 Console.WriteLine("Invoking WCF Service to transform selected rows from Customers table and insert result set into Customers2 table");
 IinitializeSvcClient client = new  IinitializeSvcClient();
 client.ExtractTransformLoad();
 Console.WriteLine("Done");
 Console.WriteLine("Please press <Enter> to close program.");
 Console.ReadLine();
 }
 }
}
Press F5 to execute the console application.
Open Microsoft SQL Server Management Studio to verify that rows have been added to the Customers2 table in the Northwind database.
Return to Top
See Also
Read suggested related topics:
- Work with BizTalk AppFabric Connect
- Install the BizTalk Server 2010 AppFabric Connect Feature
- BizTalk Server 2010 AppFabric Connect Feature Frequently Asked Questions
Another important place to find a huge amount of BizTalk related articles is the TechNet Wiki itself. The best entry point is BizTalk Server Resources on the TechNet Wiki
