Create a Procurement Cost Manager Power App using Receipt Processor

- Introduction
- Scenario
- Implementation
- Extract Receipt Information
- Save the data
- Test the App
- Summary
Introduction
AI Builder is a Power Platform capability that provides you the AI models to take leverage of artificial intelligence to optimize your business as well as automate process. We can either use the already existing prebuilt models that suits our needs to use the Power of AI in Power Apps or Power Automate or create our own custom AI models to suit some specific business needs. You can read more about AI Models in the Official documentation here. The out of the box prebuilt available models in AI Builder are:
- Business card reader
- Category classification
- Entity extraction
- ID reader
- Invoice Processing
- Key phrase extraction
- Language detection
- Receipt processing
- Sentiment analysis
- Text recognition
- Text translation
In earlier days if we wanted to use any of these models, we had to call Power Automate and add the AI Builder actions to leverage the Cognitive abilities. However, more and more AI Builder capabilities are coming natively to Power App so that we can add them as controls to the App and directly interact with the AI Models based on our needs.
In this article we will see how we can make use of the Receipt Processor within Power App without the use of Power Automate to read receipt information.
Scenario
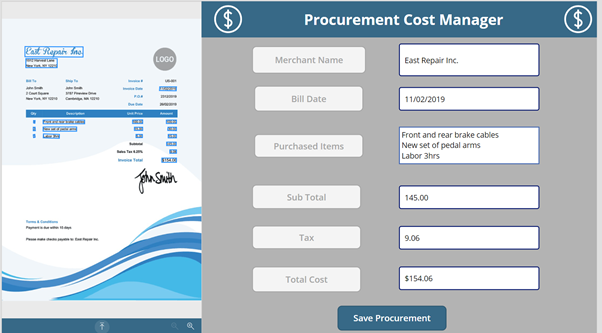
We have a requirement where we want to manage the reading of multiple receipts and digitalize the procurement done by various teams in an organization. Manually entering the data could be a cumbersome process. To make the importing of data from receipts to a repository which can be used for creating Power BI cost related reports, we will use the Recipient processor within the Power App , that can easily scan the receipts and extract the information and save it to the SharePoint List.
Implementation
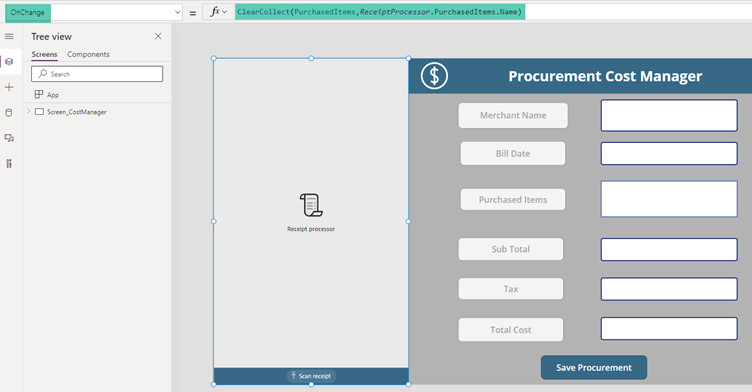
As part of implementing the Receipt processor, lets add the control from AI Builder to the Screen.
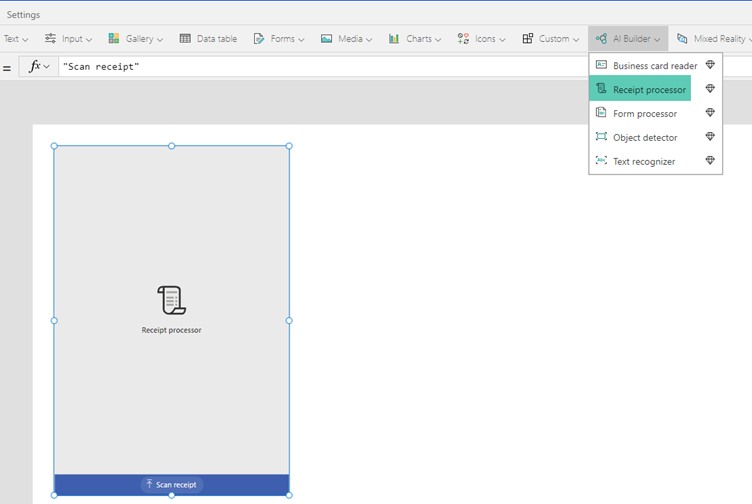
In addition to that we will also add Text Input controls that can be used to host the extracted information from the Receipt Processor.
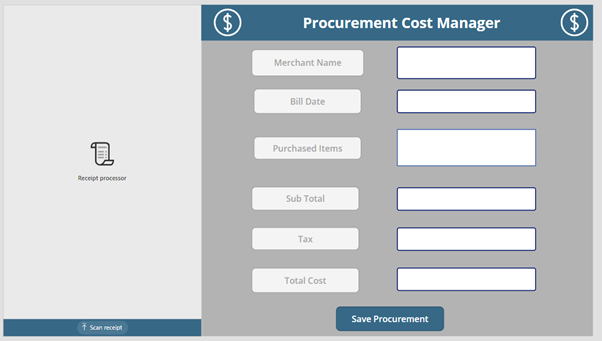
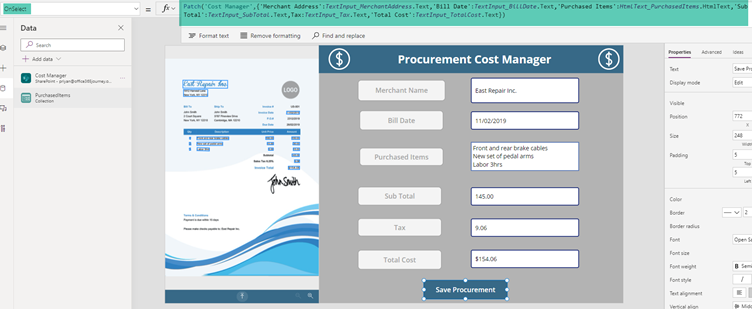
In the above screen, all the fields except Purchased items are Text Input Controls.
For Purchased items, since it will be returning as a table, we will use an HTML Text control to better host the extracted data as multi line values.
Extract Receipt Information
The Receipt processor uses its inbuilt model to extract the predefined receipt fields which we will show in the fields we have added in the form using the expression: ReceiptProcessor.<ReceiptField>
The Receipt Processing models has the capability to output the below information:
Property |
Definition |
|---|---|
MerchantName |
Merchant name |
MerchantAddress |
Merchant address |
MerchantPhone |
Merchant phone number |
TransactionDate |
Transaction date |
TransactionTime |
Transaction time |
PurchasedItems |
The list of purchased items
|
Subtotal |
Subtotal |
Tax |
Tax |
Tip |
Tip |
Total |
Total |
DetectedText |
The list of all recognized lines of text on the receipt |
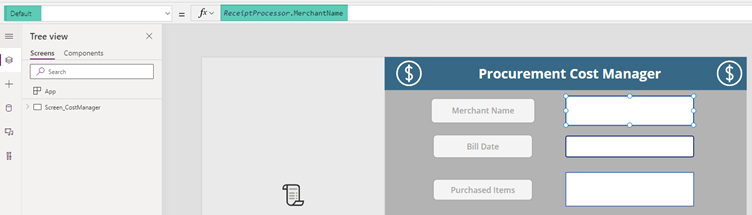
We will assign the extracted value to the Default property of the control. In case of Merchant Name, we set the value with the expression
ReceiptProcessor.MerchantName
We will use the below expression for populating the remaining controls
Control |
Expression |
Merchant Name |
ReceiptProcessor.MerchantName |
Bill Date |
ReceiptProcessor.TransactionDate |
Purchased Items |
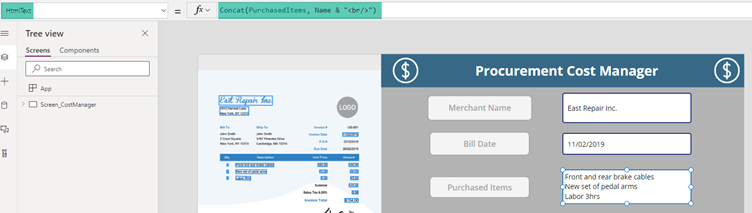
Concat(PurchasedItems, Name & "<br/>") |
Sub Total |
ReceiptProcessor.Subtotal |
Tax |
ReceiptProcessor.Tax |
Total Cost |
ReceiptProcessor.Total |
Apart from Purchased Items, the rest of the expressions, directly pick the data from the Form Processor output. Purchases Items return a table of procured items as a collection of multiple records. To show it as a multi-line text, we will initially capture the Purchased Items into a collection by using the below expression in the On Change of the Receipt Processor.
ClearCollect(PurchasedItems,ReceiptProcessor.PurchasedItems.Name)
This will save the Name of the Purchased Items into the Collection.
During run time, we can check the collection and see that it has been populated with the purchased items name as:
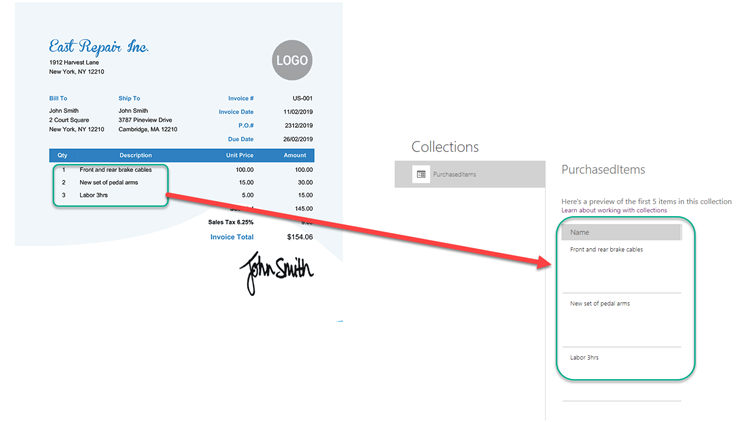
The Purchased Items is shown using an HTML Text Control. To combine the Purchased Items collection, we will use the Concat function and use the <br/> tag to create a multiline display.
Save the data
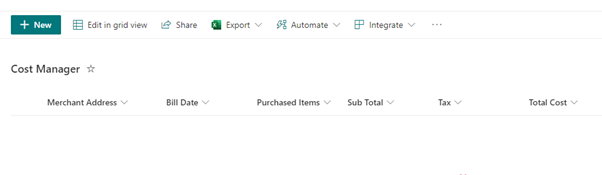
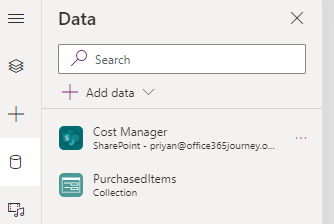
To Save the data to the back end, we will create a SharePoint List with the below columns
We will also create a connection to this list from Power App
With the connection added to the app, we can now use the Patch function to save the extracted information to the List using the expression:
Test the App
Let’s test the app by previewing it, we can upload a receipt and the receipt processing model will extract the information from the receipt and populate the form. Clicking on Save will eventually save the data back to the list.

Summary
Thus, we saw how we can use the Receipt processor directly within Power App to extract the information in the receipt and save it back to the SharePoint List